Installing Off-Grid Solar & Electrical in our Renovated Airstream: Part 2
For us, one of the perks of renovating our vintage Airstream was that we got to design not only the interior and layout, but also the entire power system from the ground up. The first part of this series provides a high level overview on all that, so you may want to go read it first.
Back? Ok, good.
In this article we’ll look at the actual installation - from wires to connectors to switches to relays and fuses and everything in between. Hint - there are sooo many things in-between!
We’ve been using this setup for over 4 years living mostly off the grid (boondocking), but also in campgrounds, friends’ driveways, and even at farms and wineries. We get around.
And now we’ve setup shop permanently on our off-grid desert homestead using the same system day in and day out.

Keep in mind we’re a family of 6 living, working, and homeschooling with this power setup full time. And I can count on one hand the number of times we’ve had to pull out the generator to top the batteries off - all of which involved lots of trees blocking our panels.
This setup has been solid as a rock, and one of the main reasons we’ve waited so long to write this is that we really wanted to make sure that we could wholeheartedly recommend the setup after real world usage.
Shout Out to Samlex America
As you'll see below, writing, photographing, and illustrating all this information was a herculean task. We'd like to thank Samlex America for sponsoring this post, and giving us the time to really dig deep and get into the nitty gritty details.
We've been using various versions of their PST Inverters from the start, and they've been fantastic. They also have a new Evolution (EVO) series that combines your inverter, charger, transfer switcher and more into a single unit. Let's just say I could have massively simplified my setup with one of these. Or as I'll probably repeat multiple times throughout this article - "Should have gotten an EVO!"
Anyway, thanks Samlex!
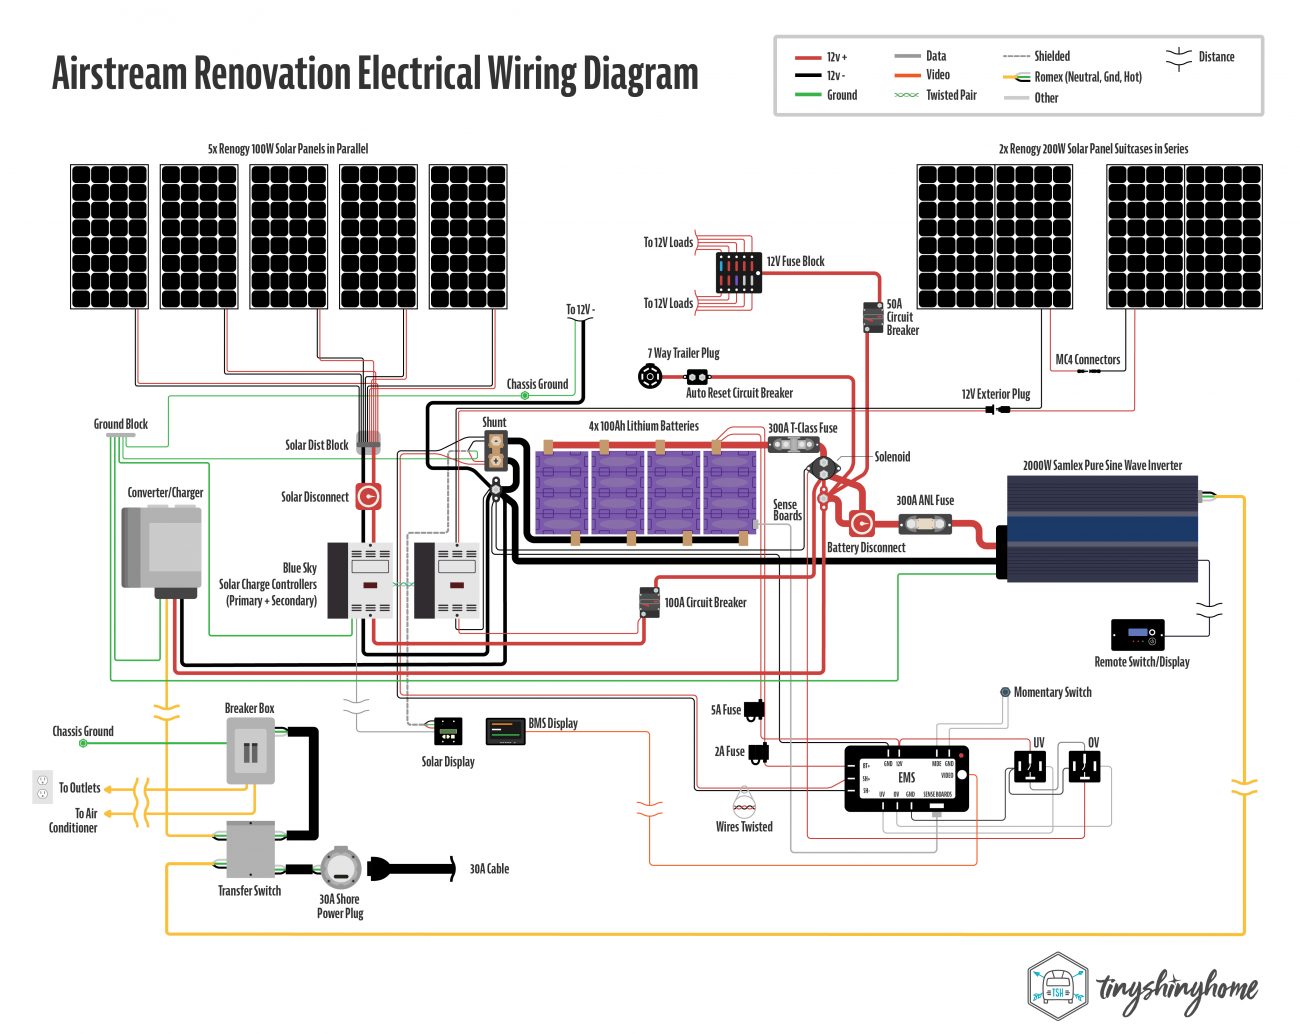
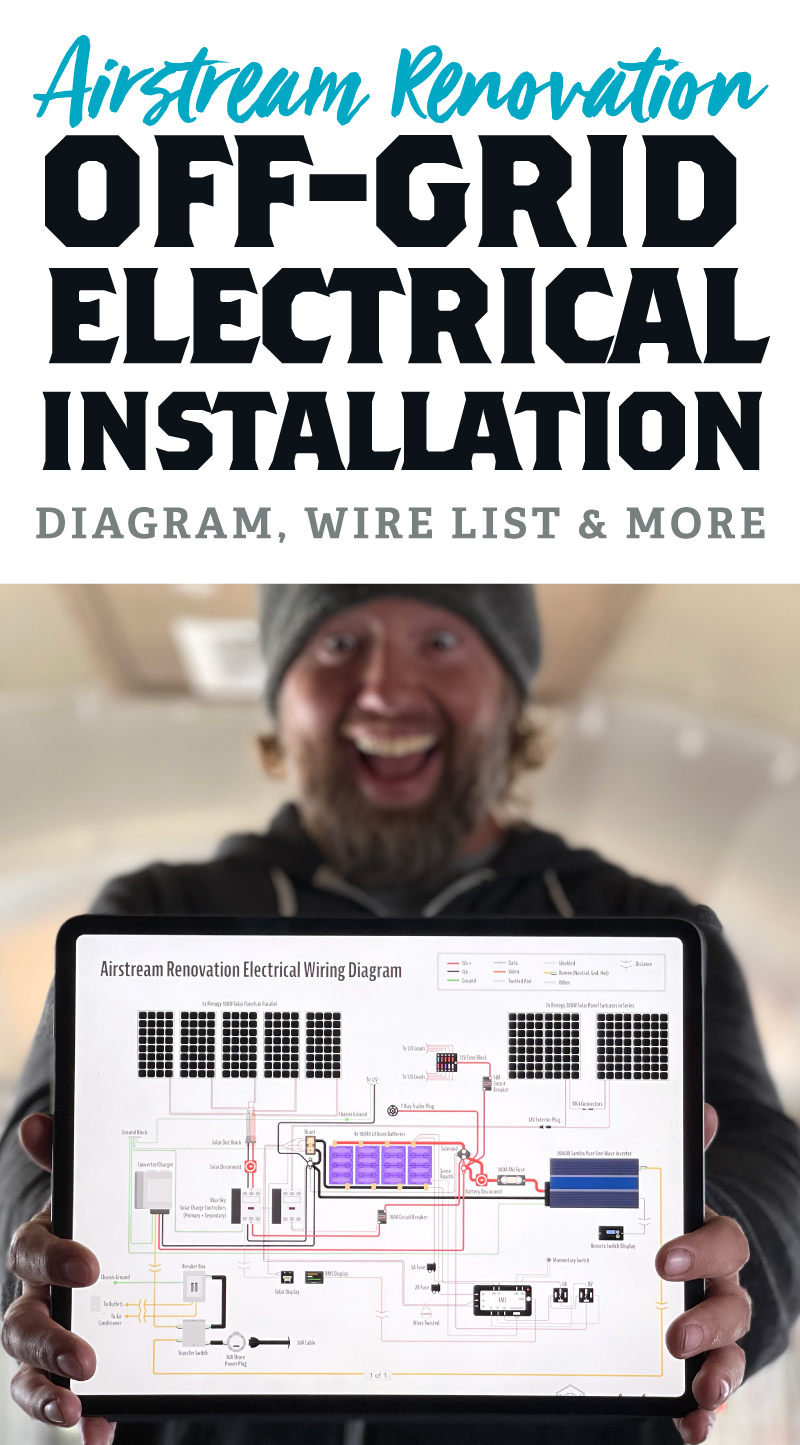
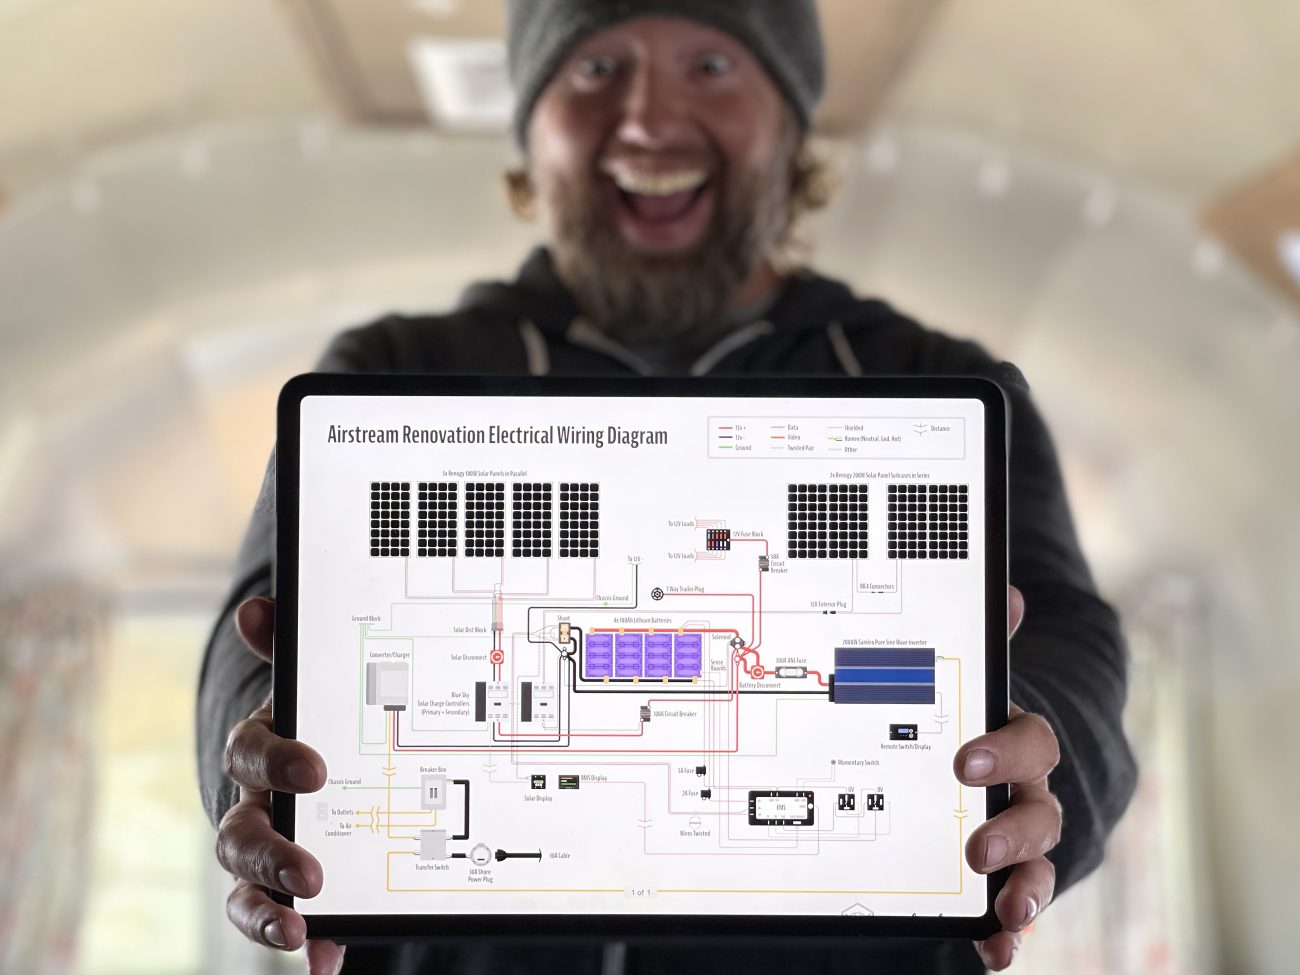
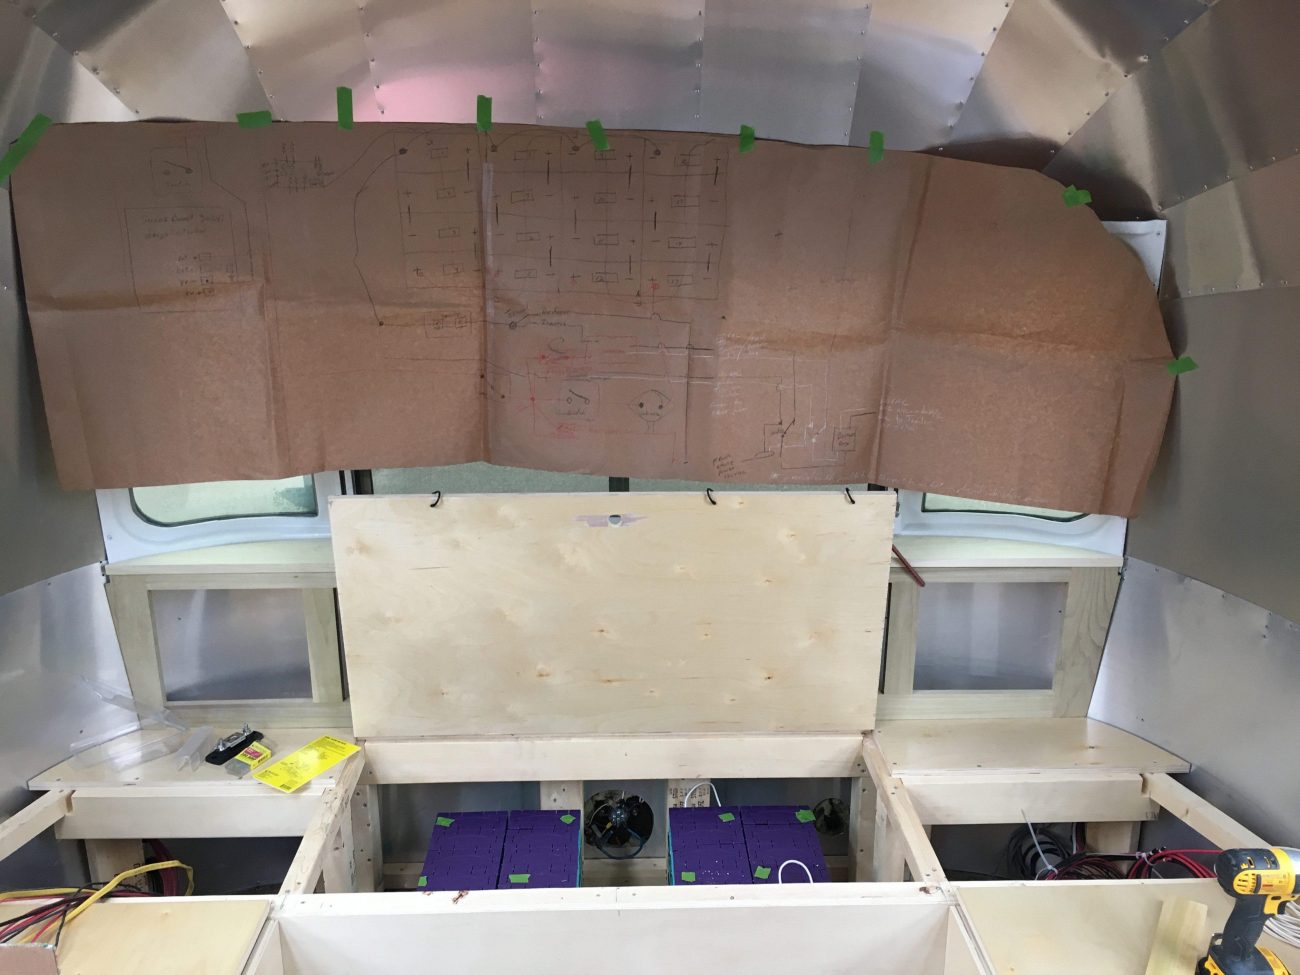
Airstream Renovation Electrical Wiring Diagram
Ever wondered what all the major connections look like on a 12V system like ours? As part of this deep dive, we created a very detailed replica of our wiring setup.
I know I'm a visual person, and sometimes I just need to see it all laid out no matter how many words there are to explain it.
This is as big as I can make it here on the site - if you'd like to download a vector PDF that you can zoom in on, grab a copy here:
Download our Electrical Diagram
Get up close and personal with this super detailed, impeccably illustrated hi-res PDF of our full off-grid power setup. Get a visual schematic representation of how an entire 12V and 120V system connect together.
Article Overview
- Planning Your Power
- Gauging & Running Your 12V Wiring
- Creating a Wiring Guide
- 12v Fuses and Grouping
- Running 120V Wiring
- All other wiring (radio, tanks, displays, thermostats, cable, internet, remotes
- Organizing Connections with DIN Rail Terminal Blocks
- Mounting Solar Panels
- Wiring Solar Panels & Charge Controller
- Locating & Connecting Lithium Batteries
- Converter
- Inverter
- Transfer Switch
- Wiring Tips
- What Would We Have Done Differently?
- Shopping List
Planning Your Power
The hard thing about electrical - especially in a trailer - is that it’s such a circular process. You could start with 120V wiring or 12V wiring or solar panels. You could start with your batteries. Eventually they all need each other to work, but just because I’m listing things in a certain order doesn’t necessarily mean you HAVE to do them that way.
That being said, you do need a detailed plan. Why? Well, a bunch of your wires are going to be installed in the ceiling behind your interior panels. Some of them will run the length of the trailer behind cabinets. The location of your appliances, outlets, and switches all need to be known beforehand. Then there’s all the other wires you may not have thought for things like the radio, tank sensors, remote displays, thermostats, cable, internet, etc… We'll get to that in a minute.
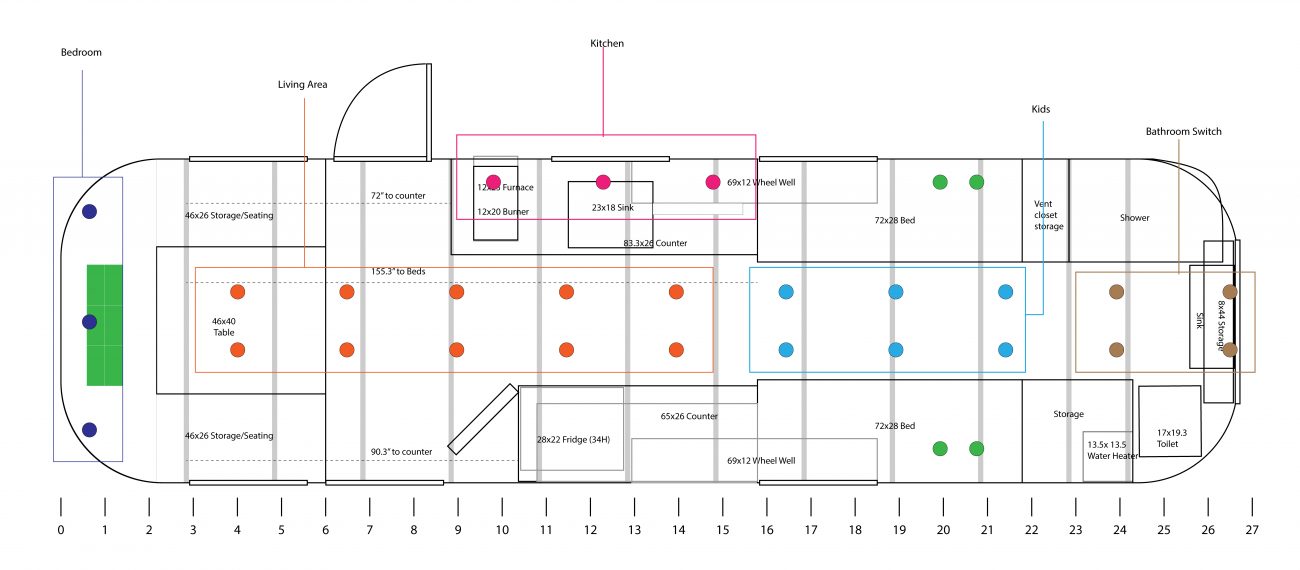
There are a number of ways you can draw this out - from online programs like Sketchup to simple gridded paper. The key is to know what major appliances go where, and how much power they’re going to draw. Then you can start planning the best way to run each wire, and what gauge it needs to be.
Here you can see an early floorpan design where we grouped all our lighting, and began to visualize where major appliances would live.
Gauging & Running Your 12V Wiring
The biggest downside to 12V wiring is how much length and amps affect the thickness you need to safely run what you have hooked up to it. If you were to put in an under-gauged wire, the increased power draw can cause overheating, appliance failure, and even fire.
Use this simple chart to calculate what thickness wire you need.
Length |
Amps |
5A |
10A |
15A |
20A |
25A |
30A |
40A |
50A |
60A |
70A |
|
|---|---|---|---|---|---|---|---|---|---|---|---|---|
15ft |
16 |
12 |
10 |
10 |
8 |
8 |
6 |
6 |
4 |
4 |
||
20ft |
14 |
12 |
10 |
8 |
8 |
6 |
6 |
4 |
4 |
4 |
||
25ft |
14 |
10 |
8 |
8 |
6 |
6 |
4 |
4 |
2 |
2 |
||
30ft |
12 |
10 |
8 |
6 |
6 |
4 |
4 |
2 |
2 |
2 |
||
40ft |
12 |
8 |
6 |
6 |
4 |
4 |
2 |
2 |
1 |
1/0 |
||
50ft |
10 |
8 |
6 |
4 |
4 |
2 |
2 |
1 |
1/0 |
1/0 |
||
60ft |
10 |
6 |
6 |
4 |
2 |
2 |
1 |
1/0 |
2/0 |
2/0 |
||
70ft |
10 |
6 |
4 |
2 |
2 |
2 |
1/0 |
2/0 |
2/0 |
3/0 |
||
80ft |
8 |
6 |
4 |
2 |
2 |
1 |
1/0 |
2/0 |
3/0 |
3/0 |
||
90ft |
8 |
4 |
4 |
2 |
1 |
1/0 |
2/0 |
3/0 |
3/0 |
4/0 |
* Numbers in AWG unless otherwise noted.
* Note! Wire size based on a 3% or (0.36 V) voltage drop for 12V. Always oversize wires if voltage drop is critical.
For instance, let’s say you’ve got a furnace that draws 5 amps when running. Here’s the catch though - all your power gear is up front, and the furnace is on the other side of your front door which means any wire that goes to it will have to go up into the ceiling and come back down near the batteries. So what would have just been 6 feet long is now 30 feet. Based on the chart you’d need at least a 12 AWG wire to safely run the furnace.
That’s also right on the limit of what that appliance draws - what if it fluctuates higher? What if you group that fuse circuit with a few other low power draws like lights or 12V chargers?
To give yourself maximum flexibly, we recommend a 25% buffer here. Size up a gauge or two just in case. It’s a little more expensive, but I can tell you from experience that having headroom is a huge help down the line when you find yourself switching out an appliance for something more powerful or adding a second phone charger.
Trunk Wires
You should also keep in mind your "trunk" connections - short, thick wires that will connect your batteries together and run to your inverter, converter, and charge controller. These are often in the "aught" territory - for instance our 2000w inverter should have at least 2/0 cabling - and a 3000w would need 4/0. That's huge!
Because there's such a big conversion happening from 12V all the way up to 120V, a large 120V appliance can cause dangerous voltage sags if it can't pull enough power through the wires.
The shorter you can keep these connections, the better. Make sure to check your manual to see what wire size they recommend.
Creating a Wiring Guide
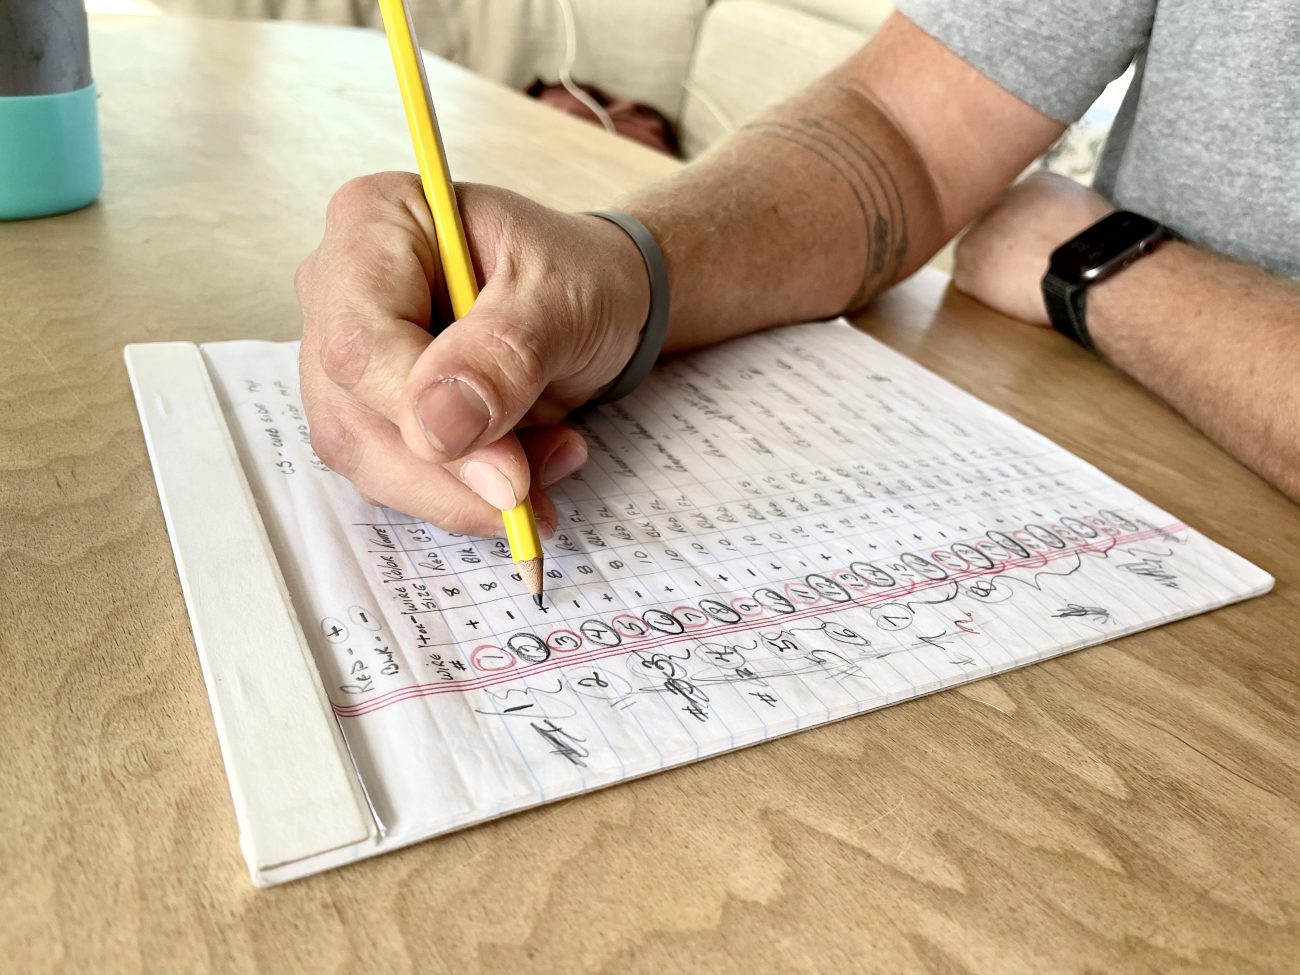
As you run your wires it’s super important to label everything. We used these wire marker labels, and it was such a huge help. Also a huge help - buying color coded wiring! On a 12V system, red for +, black for -, and green for ground. Then use smaller 18 AWG white for other things like switches, thermostats, etc…
We wrote much of this down in a notebook, but recently converted it to an excel spreadsheet using these columns:
- Group/Fuse
- Wire #
- Polarity
- AWG
- Color
- Routing Location
- Description
Create Your Own Wire List Guide!
Quickly plan and assemble your very own digital wire list guide with this handy template. Use our exact wiring as a guide, and organize your installation by wire number, color, gauge, polarity, and more.
Having a digital version of this wire list guide is such a huge time saver. For starters, you can make changes and not have to re-write the whole thing. You can pull it up on your phone, tablet, or computer without digging through your cabinets for the original. You can search the text, sort the columns, and find what you need instantly. We think it's pretty handy.
Run each wire you need for every appliance, switch, light, display, and more. Keep reading, we're going to cover additional wiring you might need besides power below.
12V Fuses and Grouping
For safety reasons, you don’t want to just jam all your individual 12V lines together in one big wire nut.
You should already have a good idea of how much electricity each wire will be using based on how you gauged them above. So then it’s just a matter of deciding which circuit things should be on. An easy solution is to put each major appliance on its own fuse.
For smaller draws like LED lights or USB chargers, you can combine or group them into a single fused circuit. The fuse size will depend on how much you expect everything to draw at its max capacity.
The fuses make sure that if an appliance or USB plug were to go bad, have a surge, or start using too much power, the fuse would pop and stop supplying electricity to everything on that line.
It doesn’t happen often, but we’ve definitely had fuses burn out for various reasons. Having that extra layer of fused protection is really important.
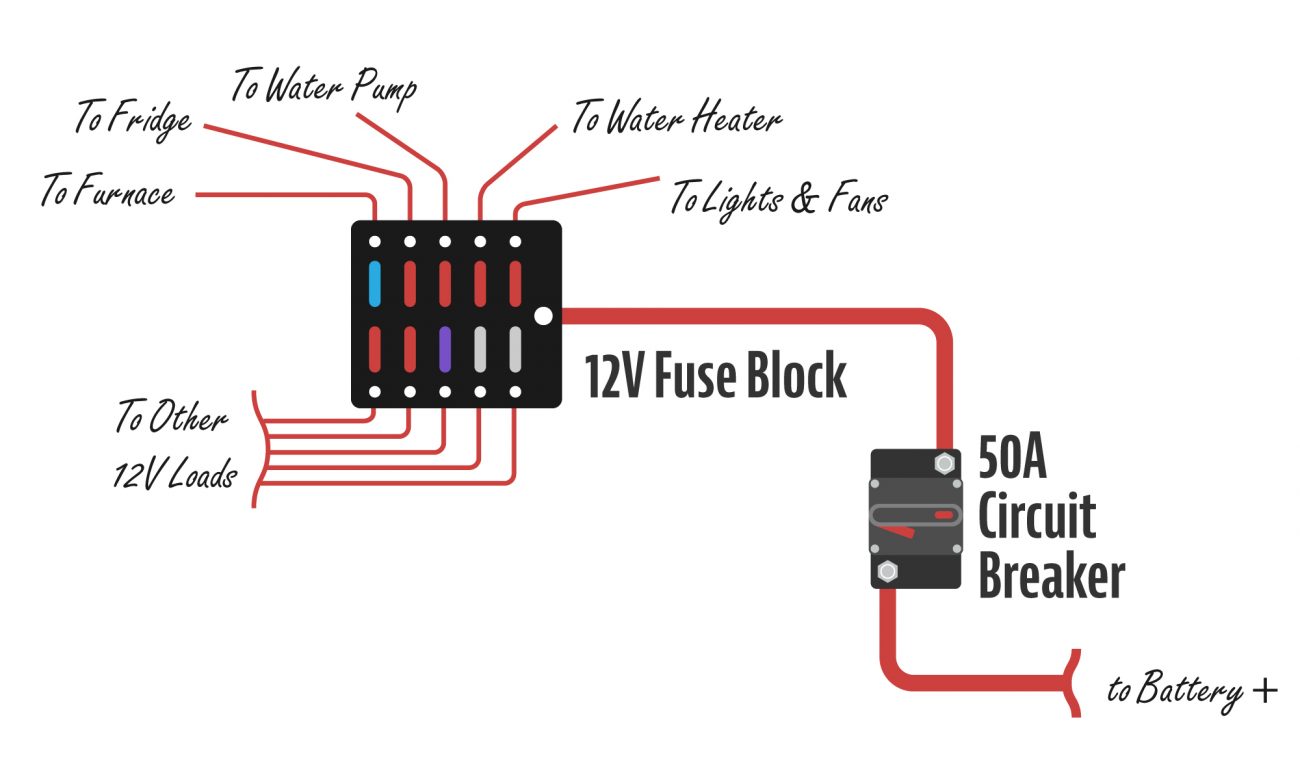
To wire this up, you’d run a positive line off your battery through a 50A breaker switch and onto a fuse block. Then you’d connect the load lines from each group to a spot on the block and fuse them appropriately.
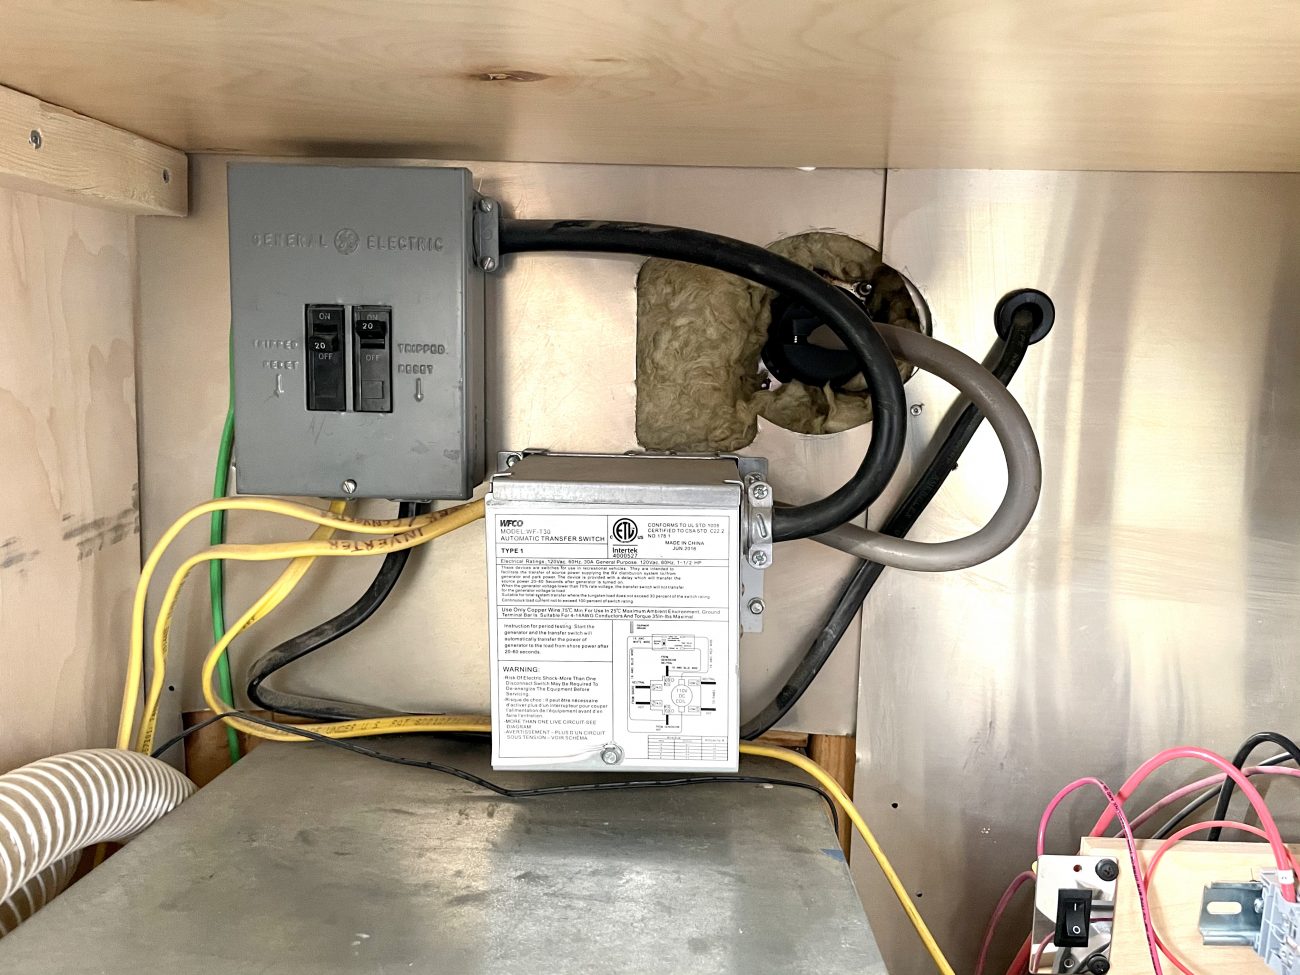
Running 120V Wiring (Romex™)
Not everything will be 12V in your renovation! You’ll likely have appliances like an air conditioner, hot water heater, or microwave that run on regular 120V power. Not to mention household receptacles for plugging up computers, blenders, coffee makers, and more.
Most Airstreams already have shallow receptacles in the wall, but you may need to install even more Romex behind the skins if you plan to add more. Otherwise just do some planning and use cabinets to hide the lines.
Because these wires carries high voltage, you don’t have to worry as much about gauging your wire as the amperage drops very slowly over long distances. Standard Romex should work just fine for your tiny trailer.
Like your house, make sure to use breakers for each major line (likely a max of 15A each). We kept things simple, and used the original breaker box from our Airstream which only had two breakers. One for the air conditioner and one for the receptacles. If you have additional appliances that will run on 120V then add as many breakers as you need.
The breakers are a more robust version of the blade fuses you used on your 12V wiring. Should that line or appliance pull more than 15 amps, it trips the breaker to avoid causing damage.
One more thing to note - because of the high voltage, any junctions need to be self contained in a junction box, and clamped in place, just like they would be in a house. You don’t want to accidentally touch a live wire at 120 volts, trust me.
All Other Wiring
Oh, did you think you were finished running wires? Hah! No my friend, there are many other “things” in your trailer that will likely need their own proprietary cables run.
Again, by planning ahead you won’t get stuck in a situation like we almost did - where an important display related to our solar charge controller required a cable run through the roof we weren’t planning on. Thankfully we hadn’t put the interior skins back and and were able to connect it, but we could have been out of luck.
Here are some of those “things” you don’t want to forget about.
Audio Deck
Before Spotify and Apple Music there was thing thing called the radio. You may even still use it in your car! Our 1972 Airstream Sovereign Land Yacht came with an 8 track and AM radio installed. So we decided to keep the speakers in their original spot (upgraded, of course) - and install a digital audio deck. This lets us jam out to the radio or connect any of our phones or tablets to stream whatever we like.
Audio Deck Cables include:
- Positive Wire
- Negative Wire
- Speaker Wires
- Antenna Cable

TV Antenna
Speaking of antennas - we don’t have a television, but made a conscious decision to install a TV antenna for a few reasons.
The first is that we use the raise, lower, and turn functions in conjunction with our directional cellular internet antenna so we can point directly at a cell tower and get the fastest speeds.
The second is that TV antennas also boost radio frequency bands. So our audio deck antenna cable is actually plugged right into our TV antenna with this special adapter.
Turn the antenna booster on, and you’ll see a huge difference in the radio signals you can pick up.
Just in case, we also ran an extension antenna cable over to my office area should we ever install a TV there and want to get HD signal over the air. Just a bit of future proofing.
TV Antenna Cables Include:
- Positive Wire
- Negative Wire
- Motorola to F Connector
- Antenna Cable
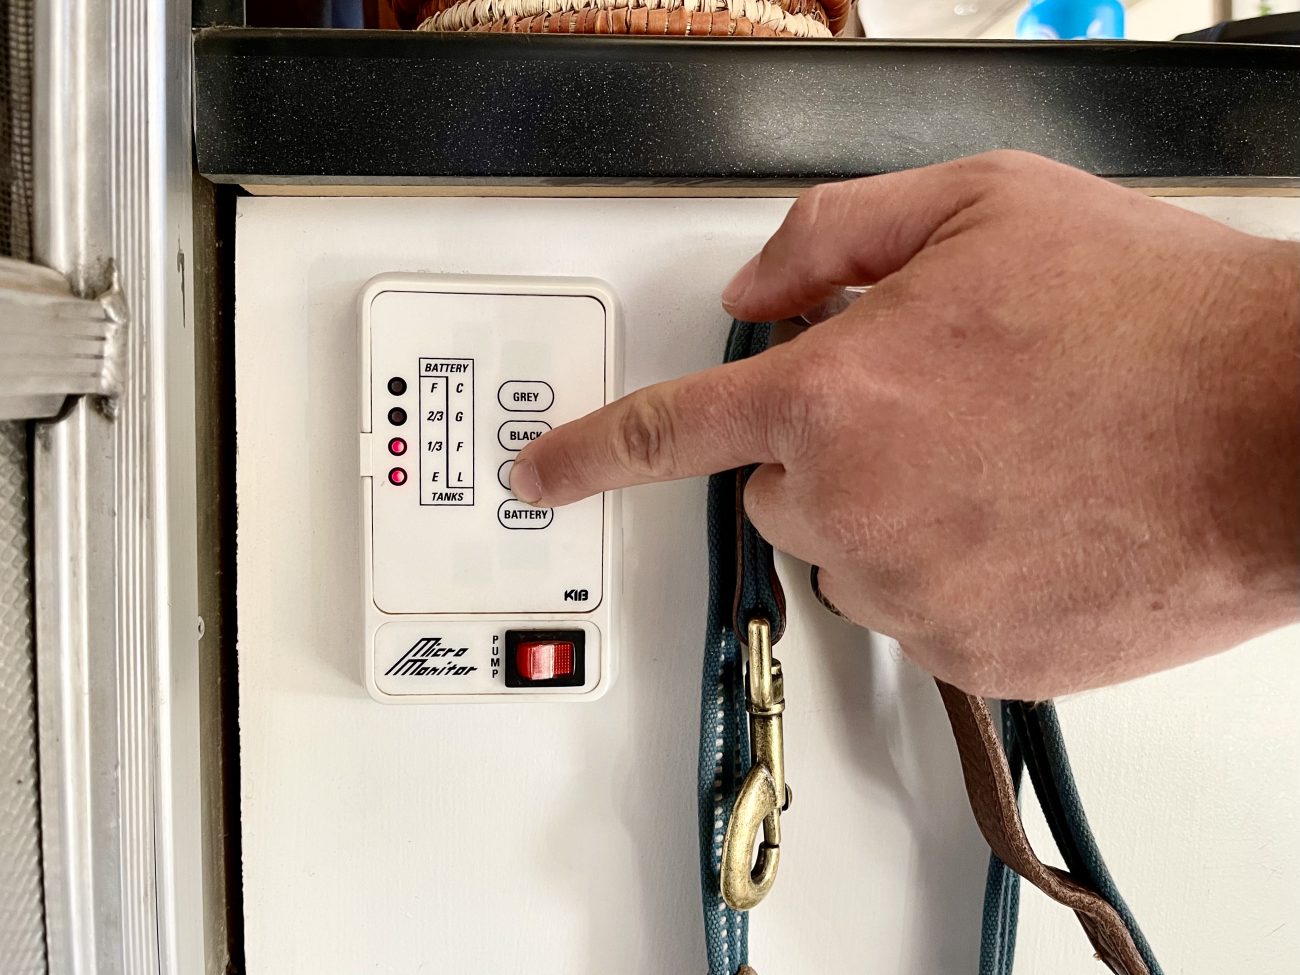
Tank Sensors
Want to know how full your fresh, gray and black water tanks are? Tank sensors are a great way to get a quick check. Are they super accurate? Not necessarily. Once you’ve been in your trailer long enough you’ll become intimately connected to how much water you’re using and where it’s going. So while we learned to rely on these less and less - it’s a good idea to run those wires to a monitor panel.
Tank Sensor Wires Include:
- Tank Sensor Wire Harnesses Connected to Probes Installed in Tank
- Ground Wire.
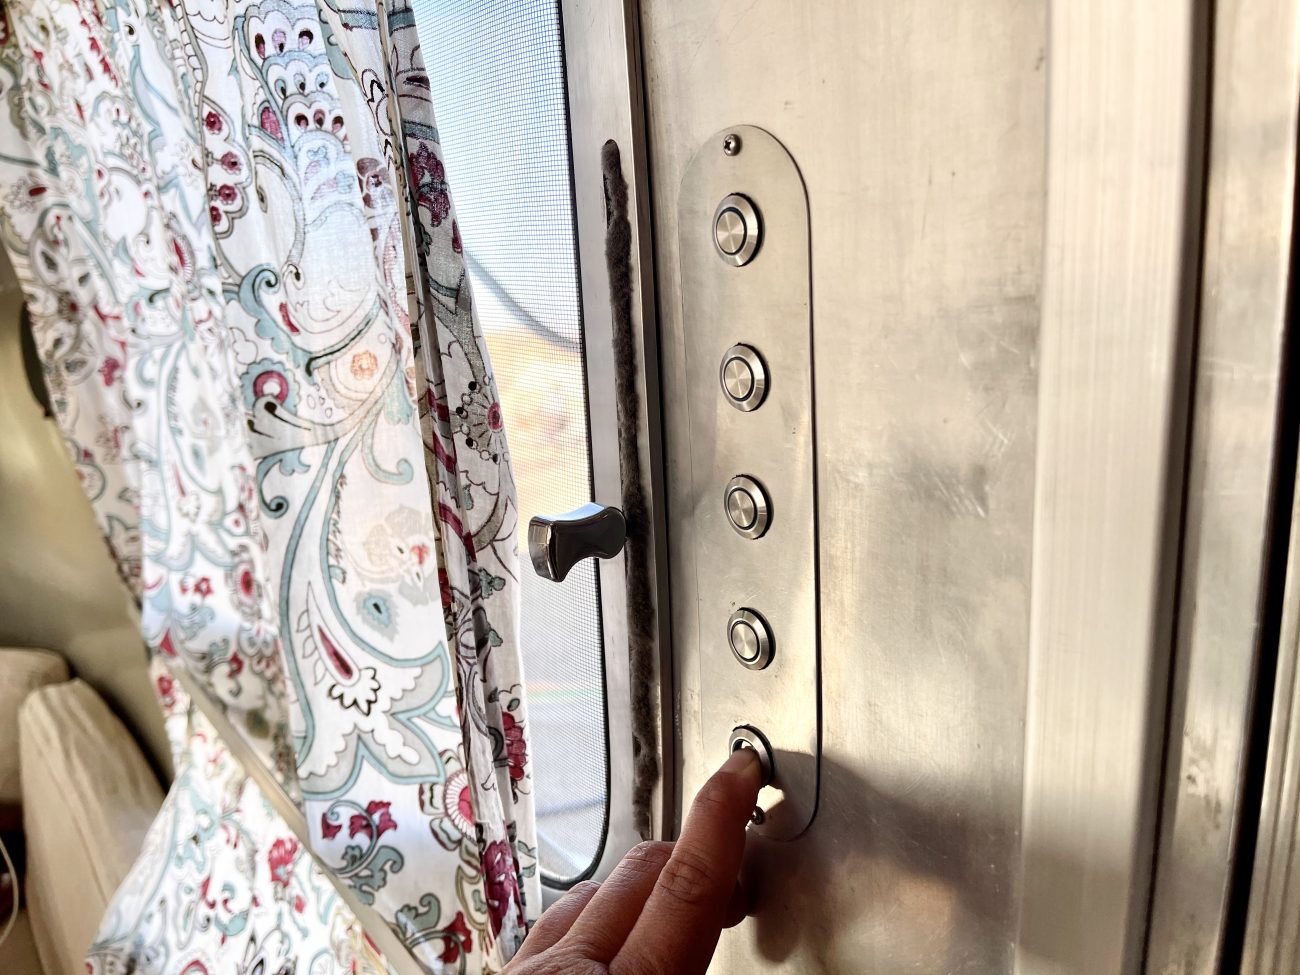
Switches
Want to remotely control things like lights, appliances, and more without pulling fuses? Switches are your friends! But they can bring additional complexity so use wisely.
Obviously, light switches would be the most obvious example. You probably want several groupings of lights you can control. So as you’re planning your wiring, make sure you have the necessary cables run from the lights down to the switch, and back to the power center.
Other ways we use switches: To turn our entire internet setup off and on to save power at night and preserve the batteries in our cellular hotspots (they don’t like being plugged in all the time). Also we use a switch to turn our hot water heat off and on. It didn’t come with a built-in switch, and sometimes it needs to be reset.
Switch Wires Include: - each switch will have it’s own requirements, but generally you’re just breaking the positive power line to the appliance so you’ll have one wire coming from the appliance and one back to the power center.
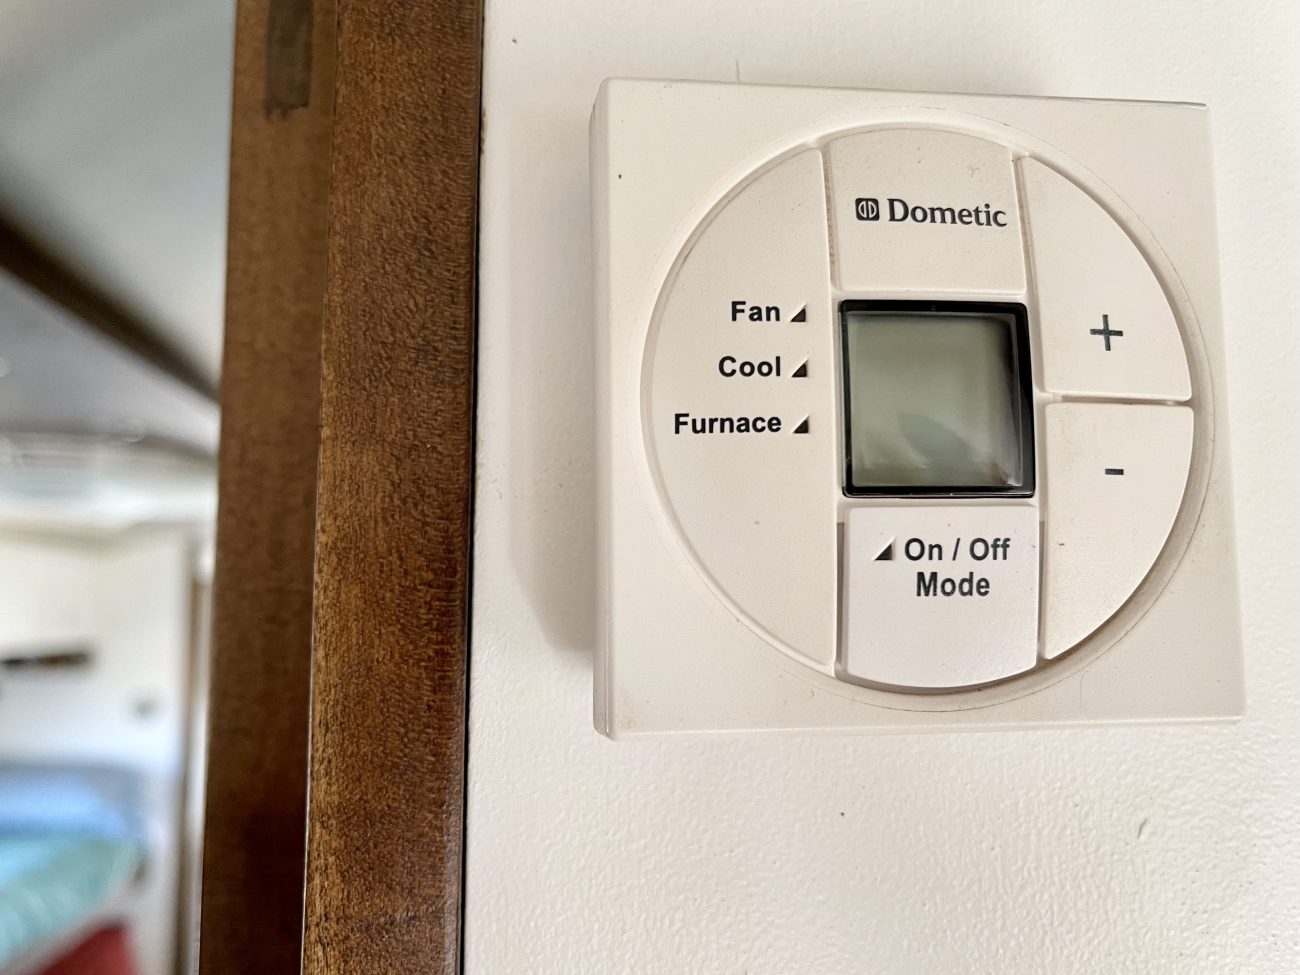
Thermostat
If you want to control the temperature in your RV by way of air conditioner or furnace, you’ll need a thermostat. Usually you can use a single thermostat, but that means it’ll have several wires connected to it from multiple sources.
Thermostat Wires Include: Thermostats are all very different, so make sure to read your manual to see what wires you’ll need to plan for.

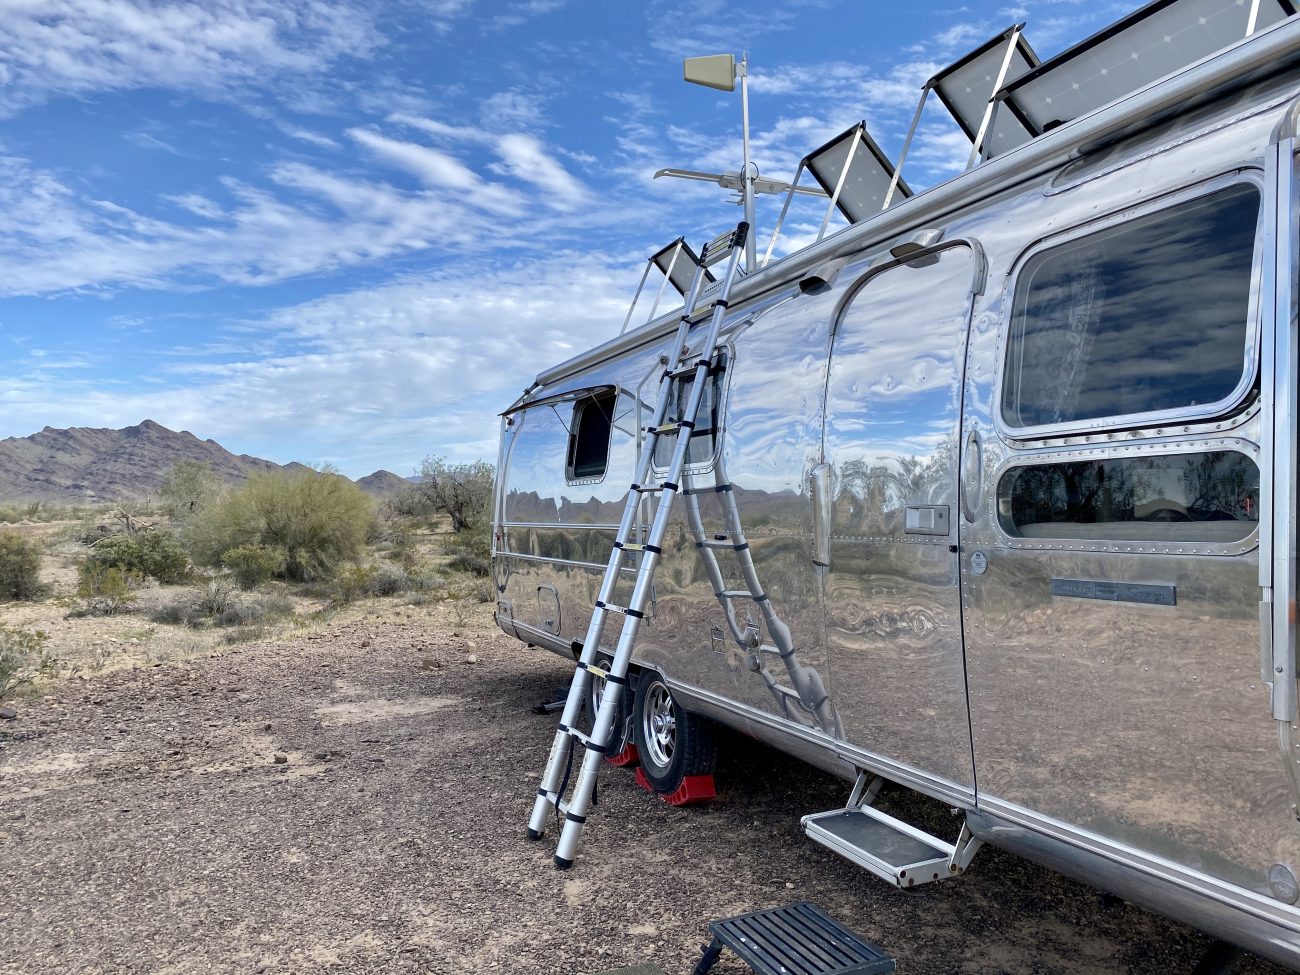
Mobile Internet
Need a reliable, robust internet setup? We’ve got you covered - you can read all about it here or grab a copy of the guide here. Since we’re talking about running wires let’s take a look at what cables you’ll want to plan for if you’re installing an internet setup.
- Directional Antenna - this is attached to our TV antenna and uses a CA240 antenna cable run through our refrigerator vent to our cell signal booster.
- Omnidirectional Antenna - this is mounted to our roof and uses a CA240 antenna cable run through our refrigerator vent to our cell signal booster.
- Omnidirectional Wifi Antenna - this is mounted to our roof and uses a reverse polarity CA240 cable run through our refrigerator vent to our our router to provide Wifi outside the Airstream.
- In addition, you’ll need 12v positive and negative power to the cell signal booster and router - plus a way to run the internal cell booster antenna close to your phone or hotspots.
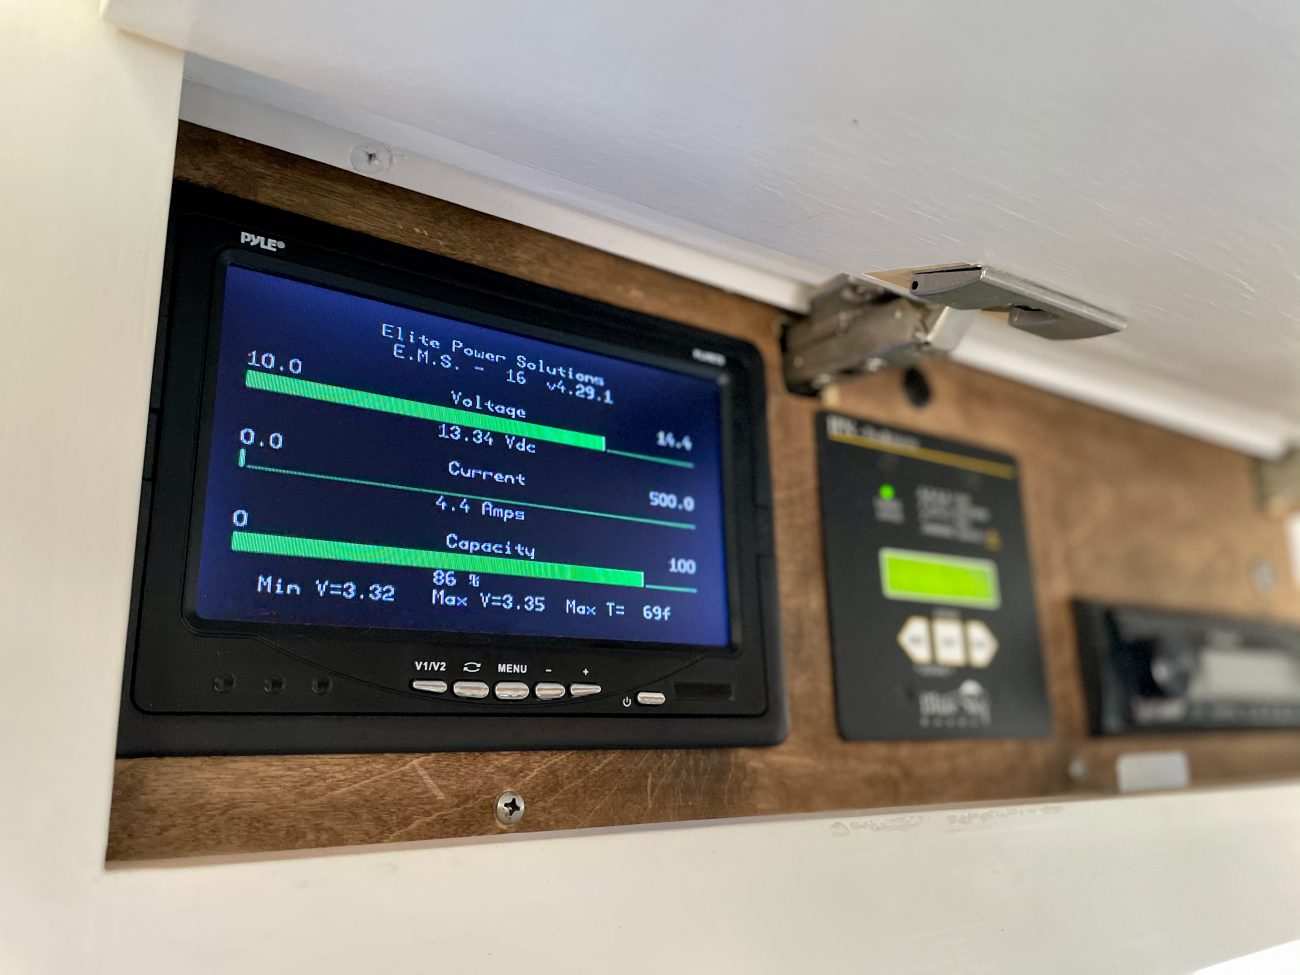
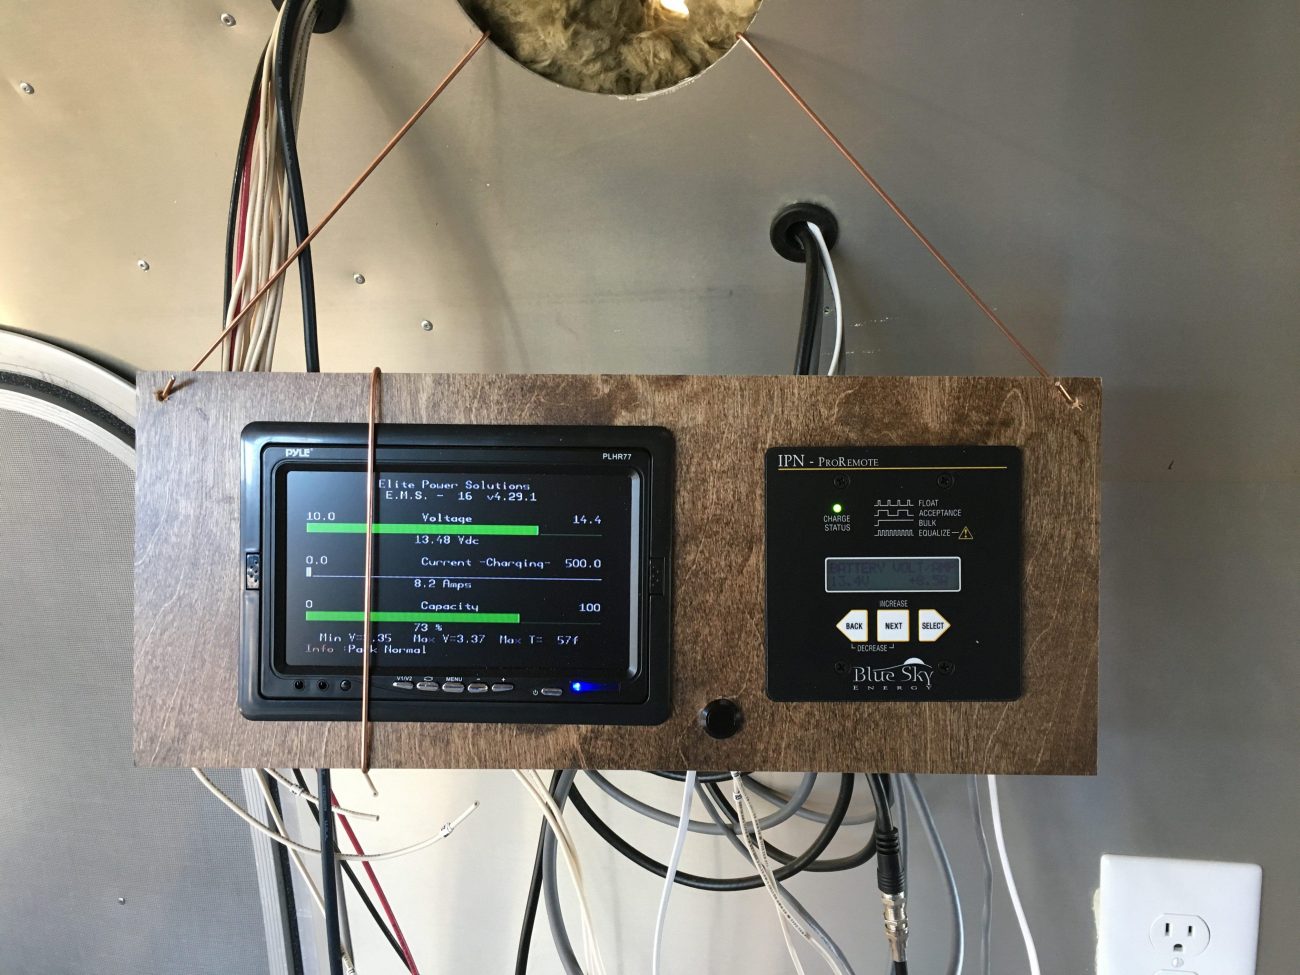
BMS Display
Your BMS or Battery Management System will likely have a way to connect a display so you can see your battery capacity and usage. Ours uses a simple video cable and momentary switch wires to page results on the screen. The display is also hooked up to 12V positive and negative power.
Of course, your setup could be totally different. Be sure to check your manual for wires you'll need to run.
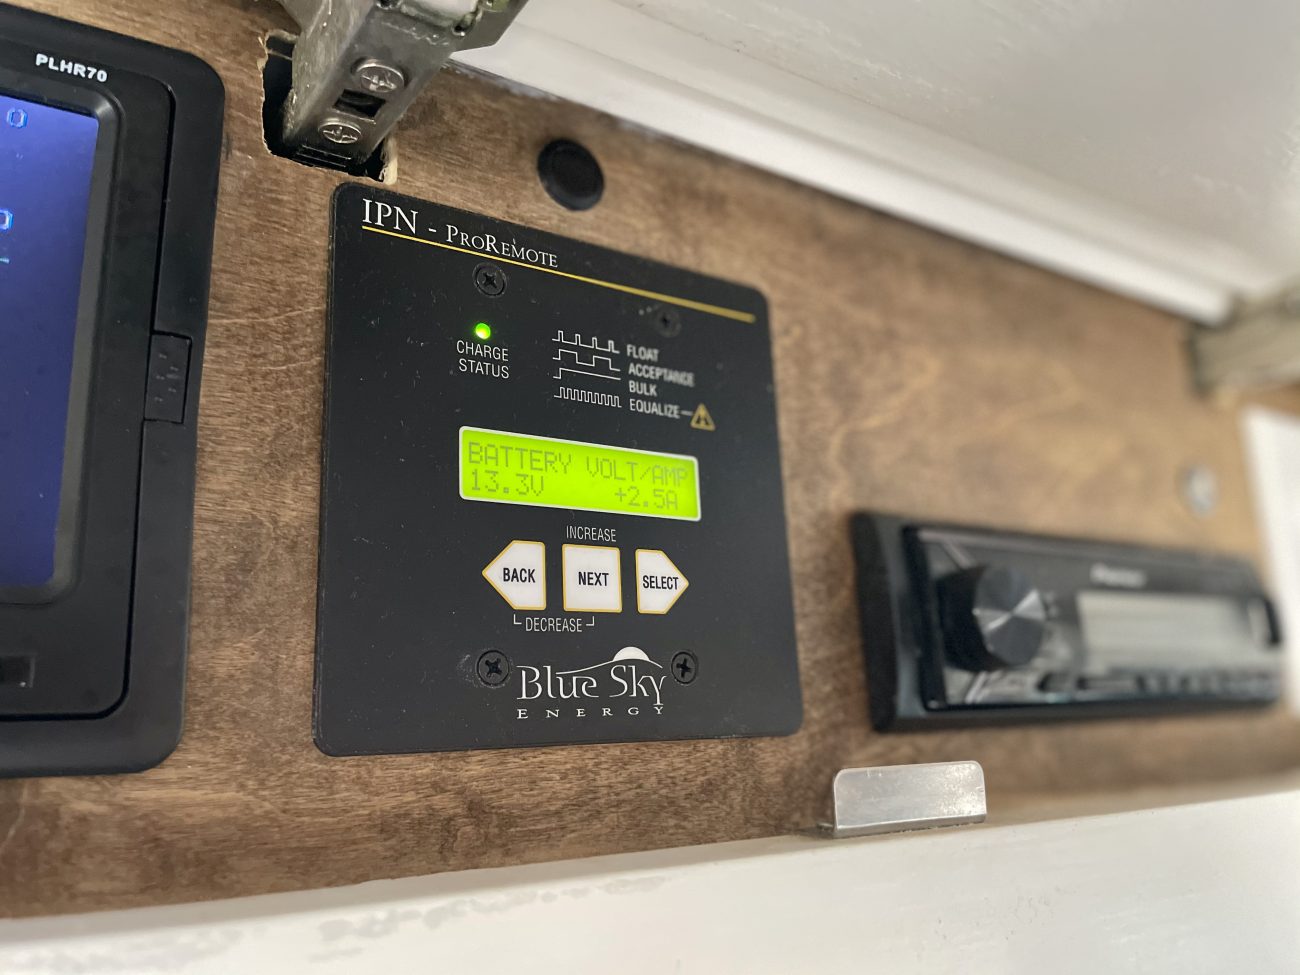
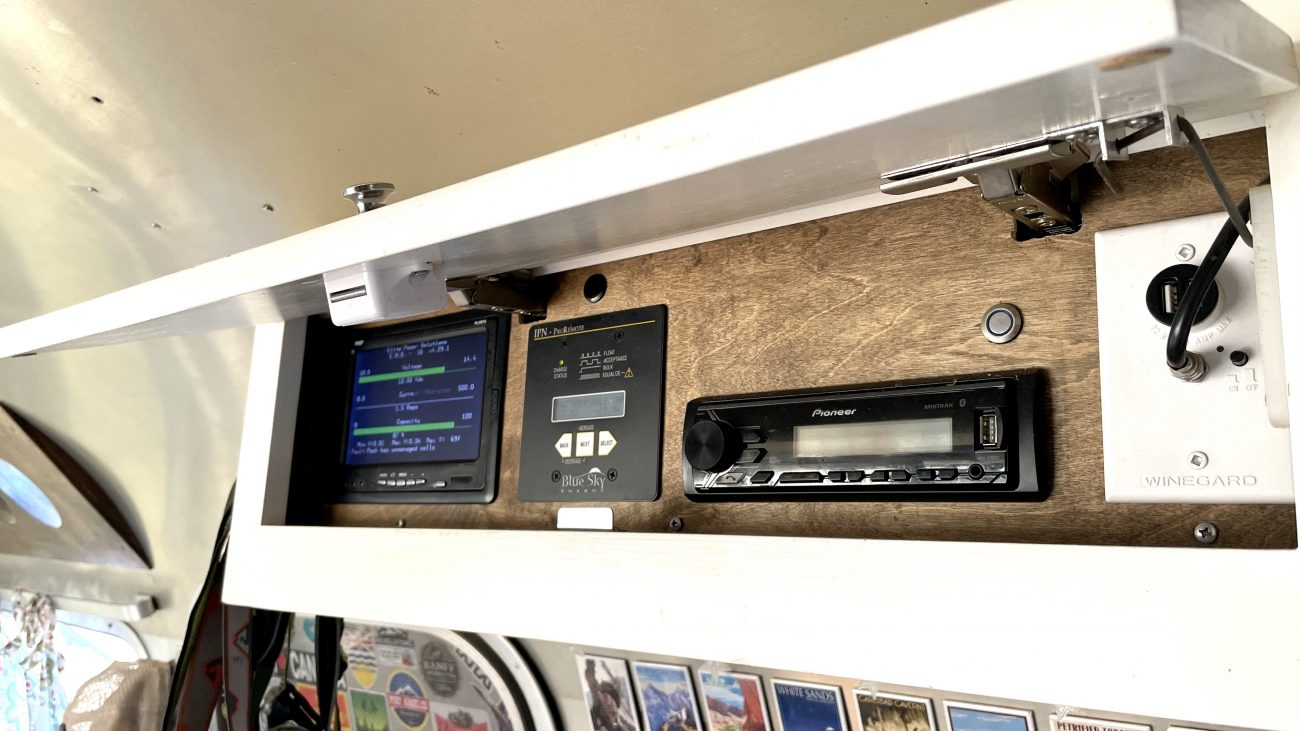
Solar Charge Controller Display
We have a separate IPN ProRemote display for our Blue Sky Solar Charge Controllers. This not only lets us see exactly how much power our solar panels are putting out, but gave us crucial programming abilities to set up the chargers to work properly with our lithium batteries. You’ll need to refer to the specific spec of your batteries to know the best way to program. AM Solar has a great document that should get you started.
Charge Controller Display Cables Include:
- Data Cable (telephone cable) through the roof
- Shielded cable to connect to shunt. Check with your specific manual instructions to see what wires you need to run.
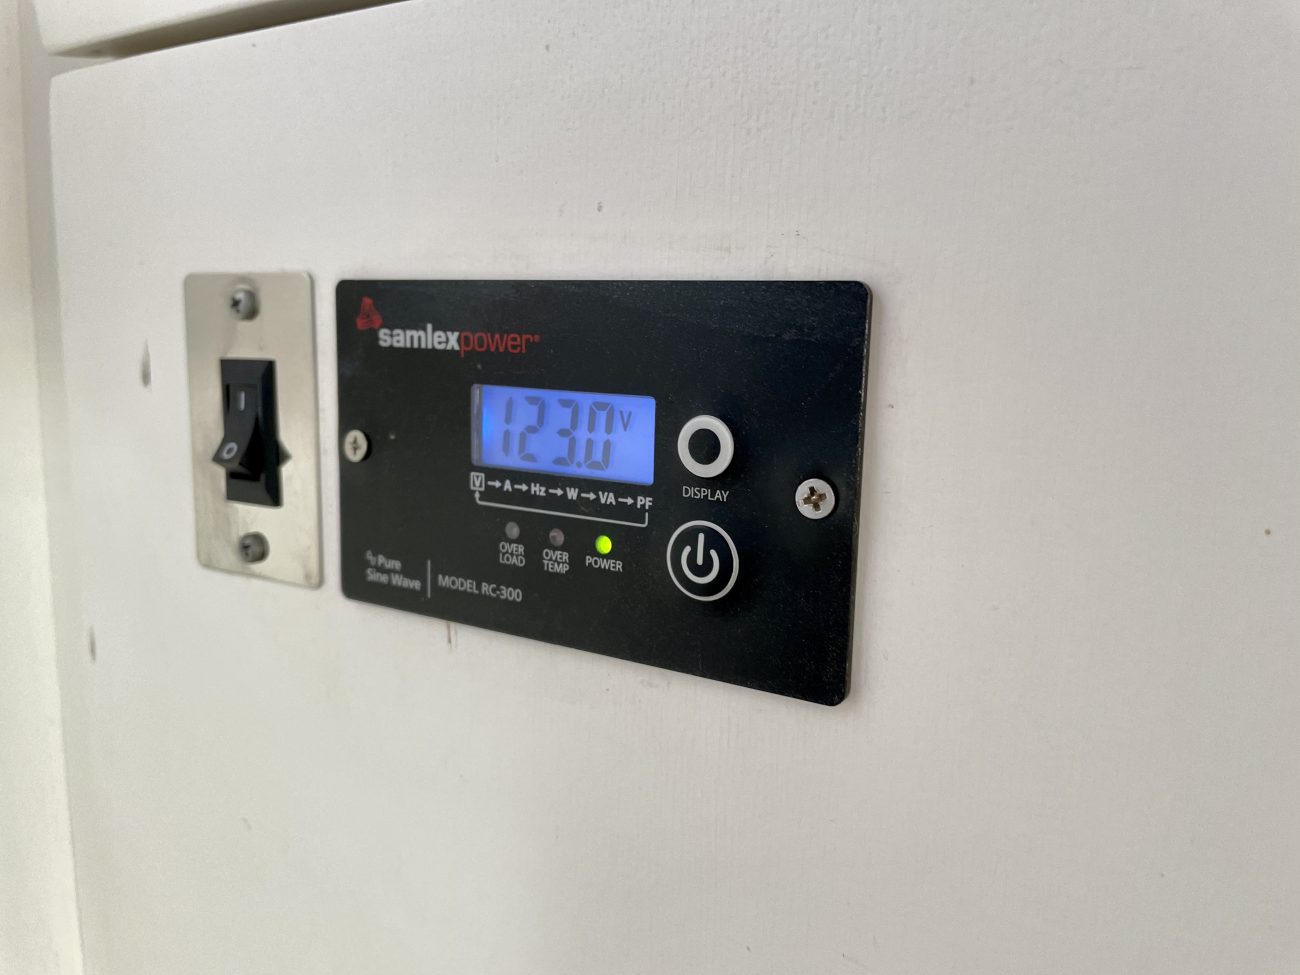
Inverter Display
Getting to and turning off our inverter became a pain in the butt so we added this remote switch display. It also uses a simple data cable and was super easy to install. The hardest part was finding a place for it where we could run the wire since we were finished with the renovation and living in it when we added it.
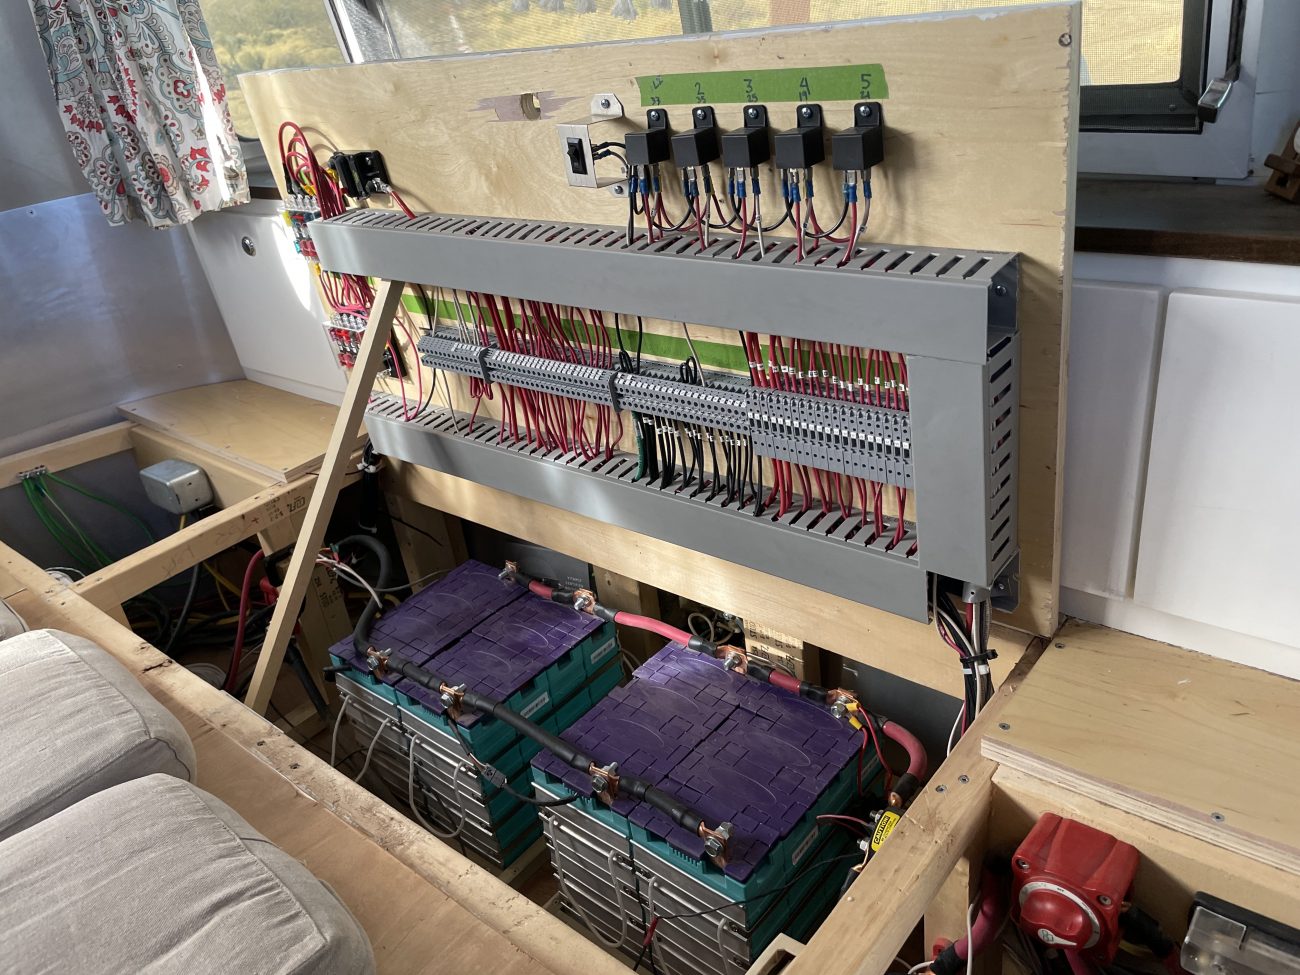
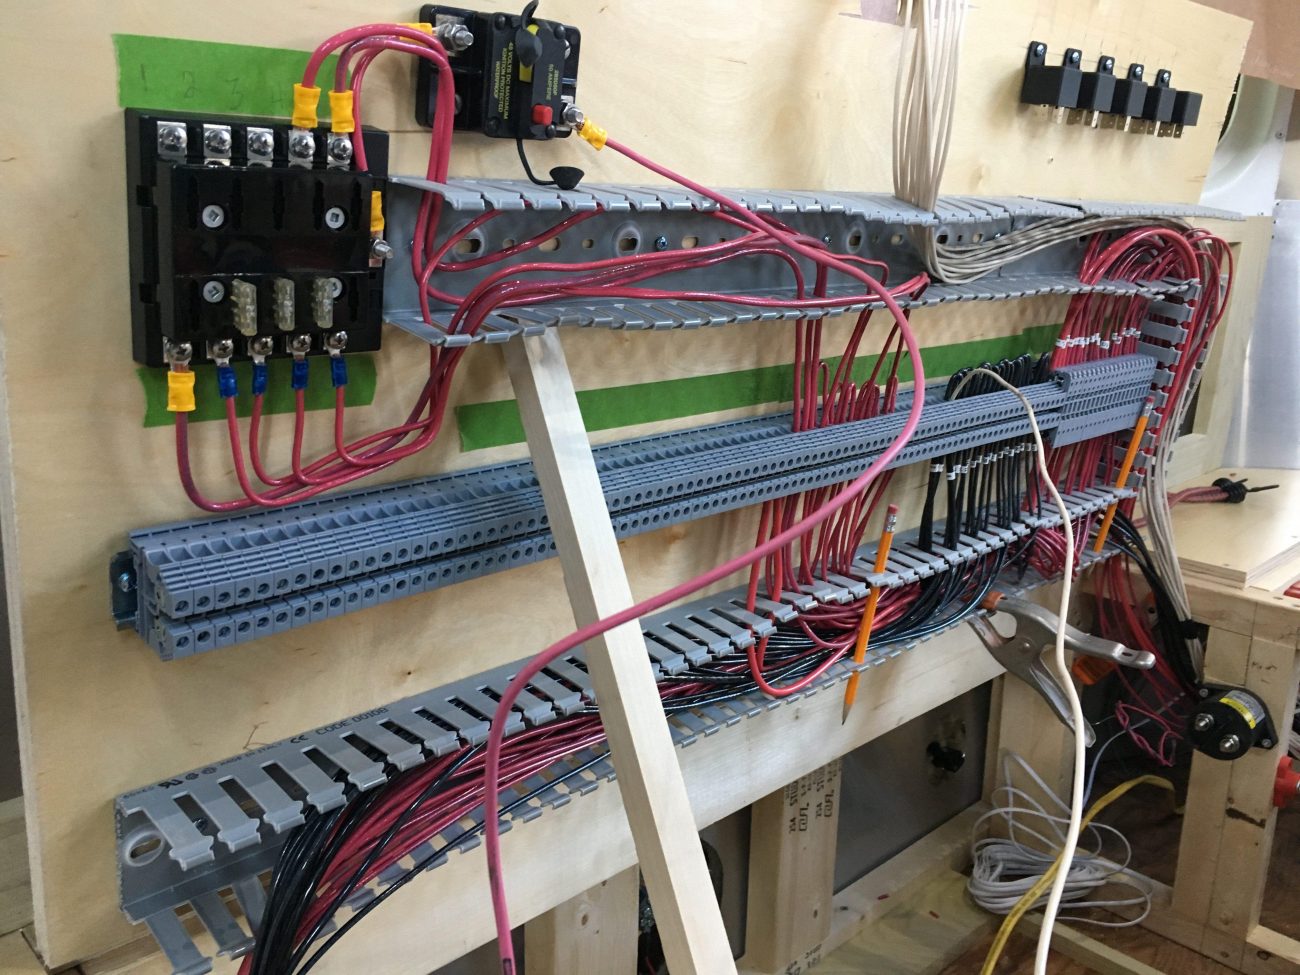
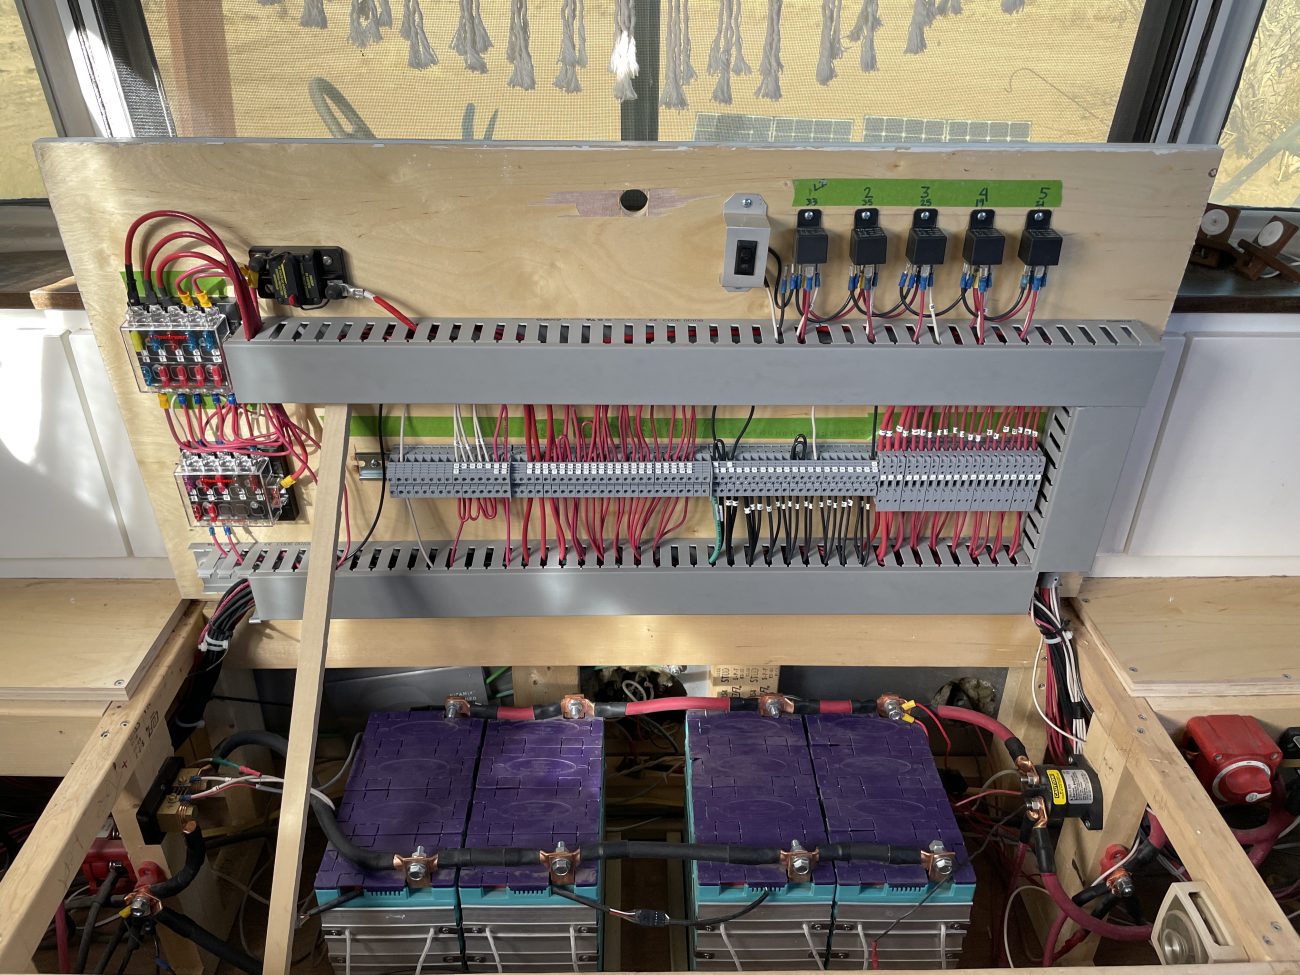
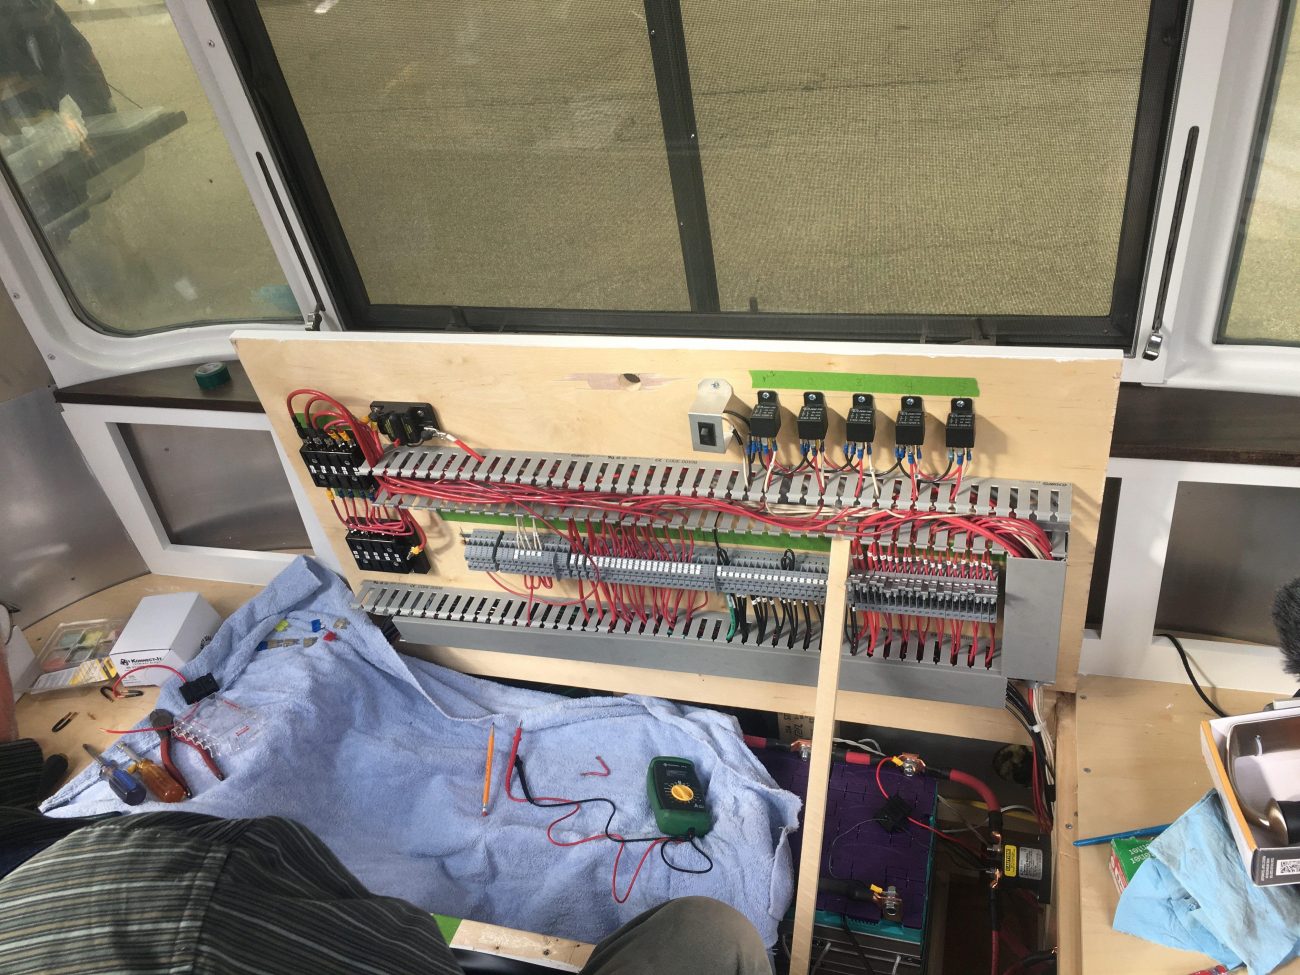
Organizing Connections with Din Rail Terminal Blocks
As you can see from this picture, we may have gone a little overboard on the organization. RV’s rarely get this detailed with connecting loads, but we’re going to make a case for why we think it’s worth it.
When looking for ways to connect our 100+ wires together, it was important that we be able to get to every junction for maintenance. It was also important that everything was clearly labeled, numbered, and safely junctioned.
In other words, we didn’t want wire nuts and electrical tape everywhere.
After lots of research we came across the Konnect-It DIN-Rail Terminal Block System, and fell in love. It’s a modular system that allows you to mount all your screw-down terminals on a DIN-Rail, easily connect and disconnect lines, jumper circuits without extra wires, and even add marking tags for labeling.
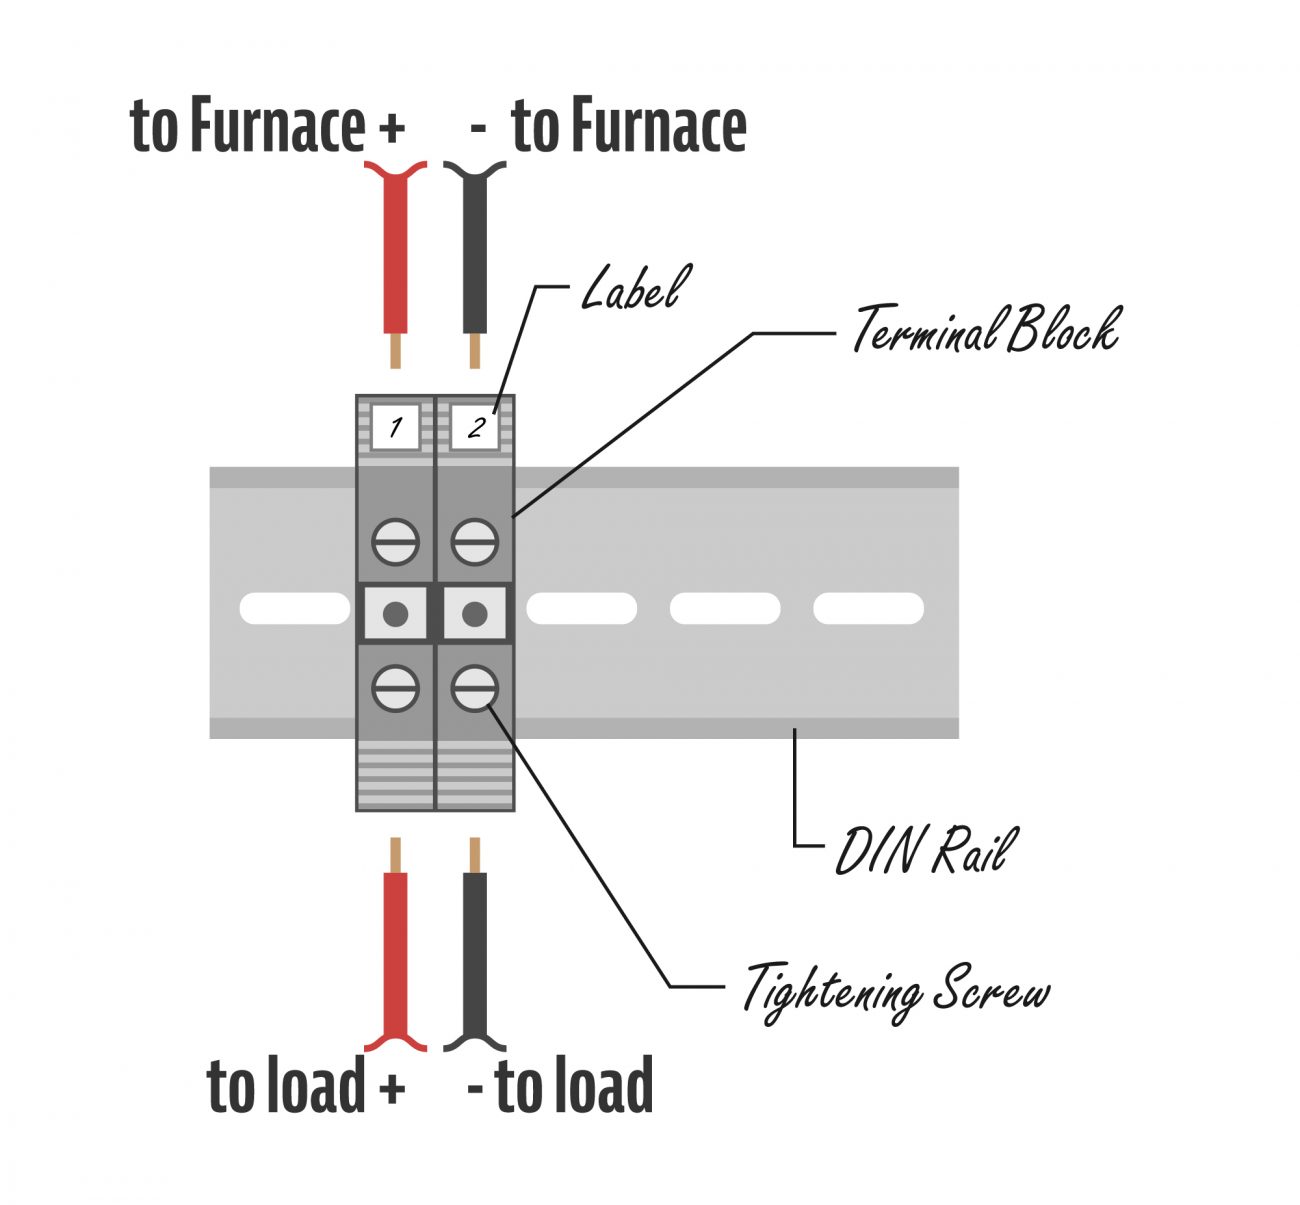
The simplest way to explain how these work is this. Let’s say you have wires #1 & #2. They are the positive and negative wires for your furnace. The furnace wires have to run through the ceiling down to your power center and get fused and connected to the battery for power.
Instead of running one end of the wire directly into your fuse block and the other to the load line of the furnace, use terminal blocks instead. Strip the end of the wire and run it into one side of the block. Screw it down to make contact. Then run a new line out the other side to your appliance or load that’s been screwed down as well. When both are inserted and screwed, it completes the connection.
You’re probably saying at this point - "well, what’s the point? Seems like you’re just adding a few extra steps and additional expense into the mix." But here’s where it gets fun.
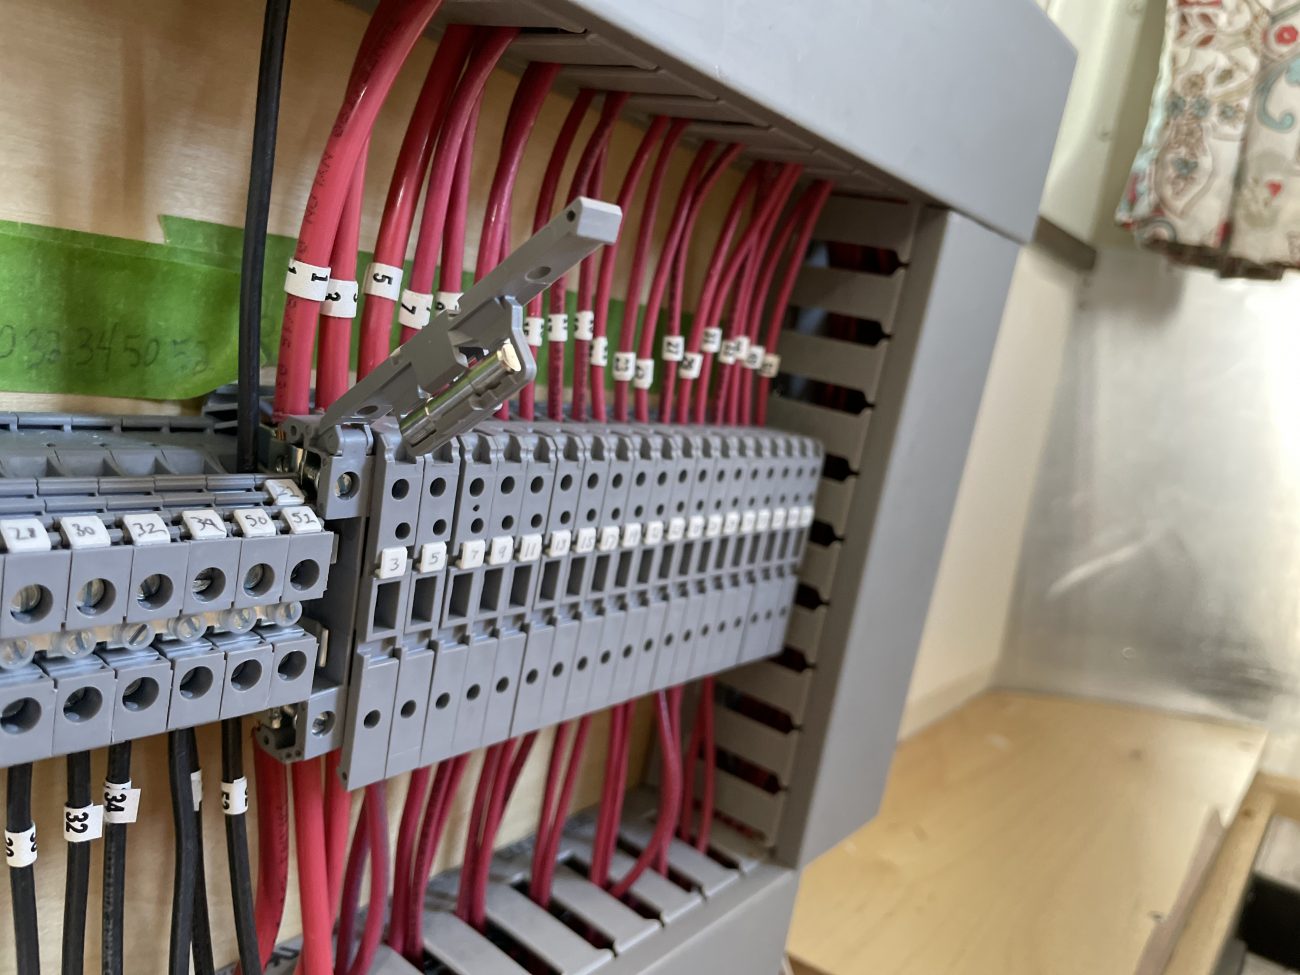
There’s a disconnect version of the terminals with a flip up section that breaks the connection on the wires. Need to troubleshoot an appliance and don’t want to take your whole system out? Look up what number wire it is and cut its power. Of course you could also do this by pulling its blade fuse - but if you have more than one thing grouped on that circuit it could be hard to troubleshoot.
There’s also the terminal block jumper. This is a copper bar with insulated screws that connect to the middle of the terminal block so you can join multiple lines together. Not only does this give you a nice visual of how you may have grouped lines, but by jumpering two blocks together all of a sudden you have four inputs instead of two. This is a great way to take a single wire and power multiple smaller loads without tape and wire nuts.
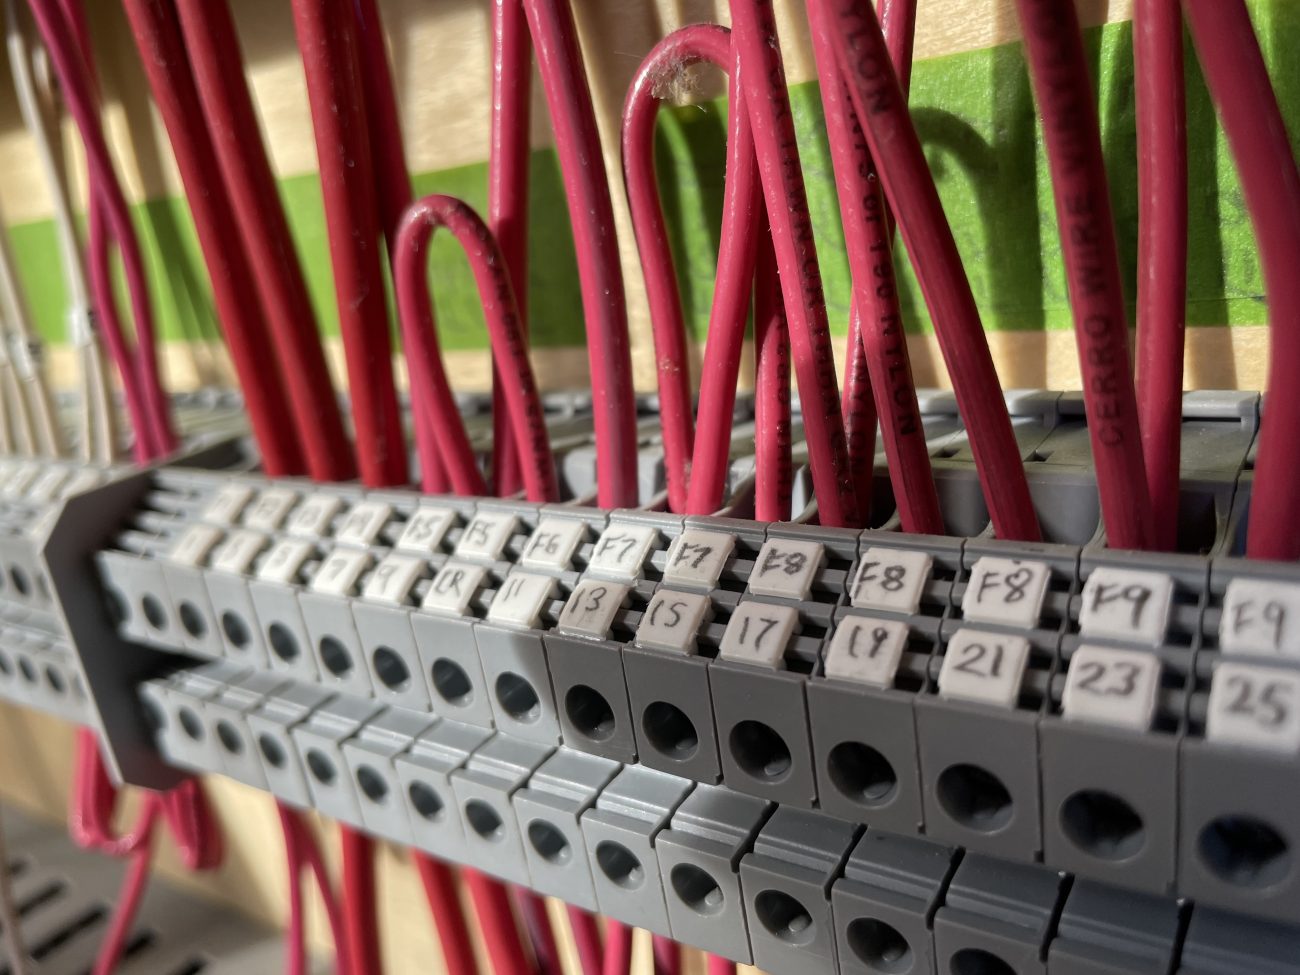
Finally, there’s a wonderful labeling system. Small blank plastic tabs snap in, and even allow for two on top of each other in case what’s coming in one side is different than the other. For example, we used the terminal blocks to group our fuse load lines. So the individual wires come in the bottom, and we jumper them together at the terminal before running a single line out to the fuse block. That means the bottom label is the wire # and the top label is the fuse #.
The beauty of this system is that its so clean and easy to maintain - if you need to use it for some of your “other” type wires, it works great for those, too. Having the actual connections contained inside the plastic housing keeps things safe, but also stacked super tight to save space.
We even put in small DIN-Rail terminal blocks at each major area where wires came out of the ceiling or under cabinets. Making changes or fixing problems is so much easier when you can unscrew, add more blocks, and rearrange on the fly.
We’re huge fans.
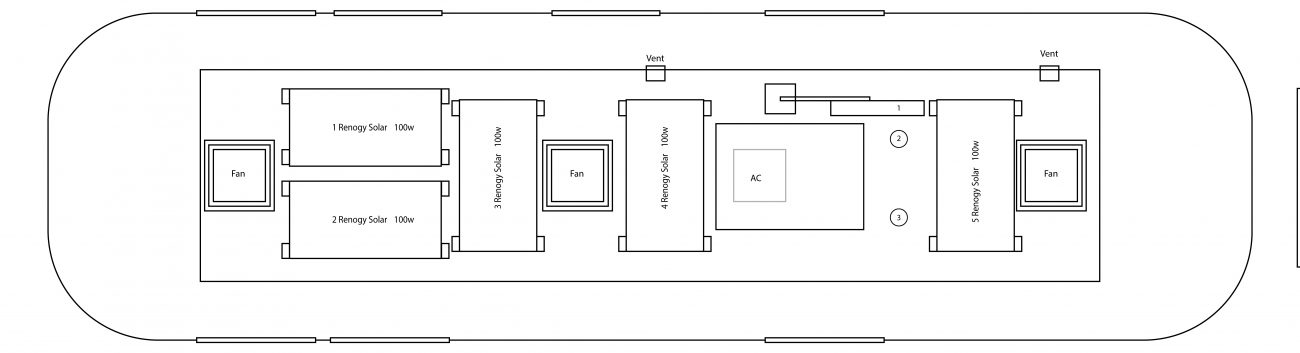
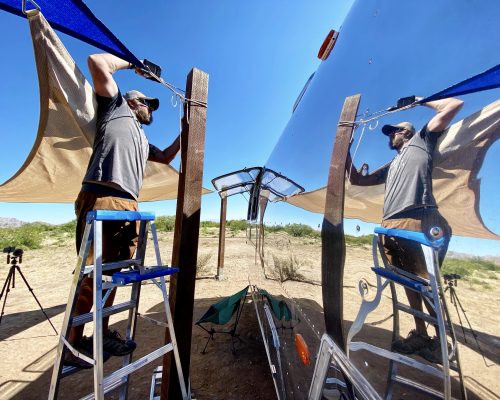
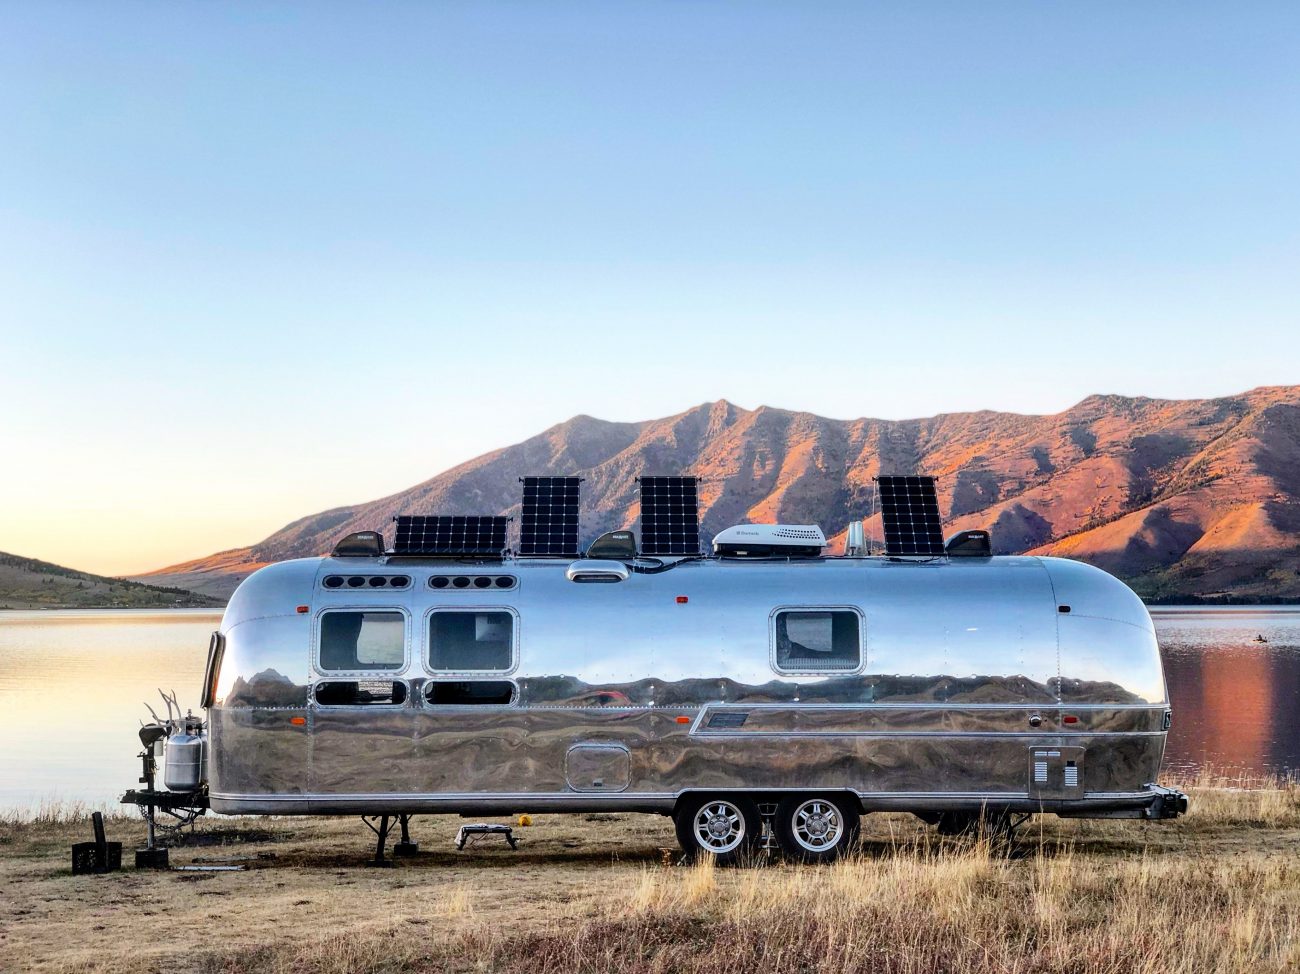
Mounting Solar Panels
As you may have read in the first part of this installment, we went with five 100 watt Renogy Eclipse Monocrystalline solar panels. We had many things to consider - size, weight, power output - and these turned out to be the best fit for us. As you can see by the diagram, it was quite the puzzle to fit that much solar in-between 3 vents, an air conditioner and a very rounded top. Those older Airstreams don’t have near the roof space the newer ones do.
We also wanted to be able to tilt the panels to a 45 degree angle to help on those winter days when the sun traveled at a lower angle and spent less time in the sky. As much as we loved the Renogy solar panels, their bracket mounting system left a lot to be desired, especially for a rounded roof!
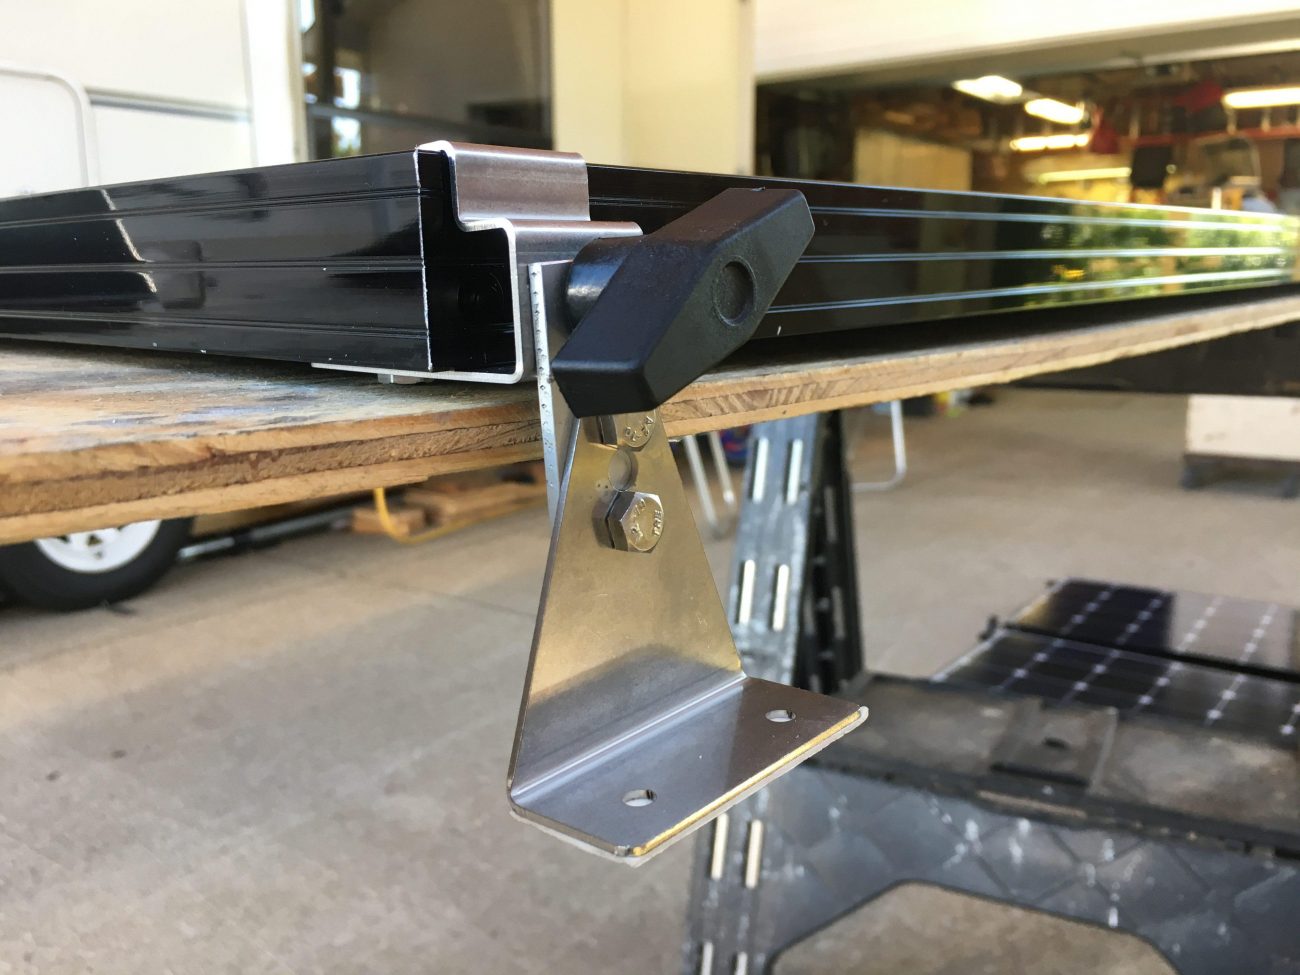
Turning to AM Solar, we found a much better (though seriously expensive) mounting bracket and foot. But the extra tall ones gave us room to mount on the curve and still keep the panel high enough to run the wires underneath. They also sold tilting bars, but were so outrageously expensive that we just bought their knobs and went to the hardware store and cut our own bars of aluminum and tapped them ourselves.
It’s not convenient or easy to tilt the panels, but with a collapsible ladder I can get them put up in maybe 10-15 minutes total. One of the big goals of the renovation was to stay away from unnecessarily complicated products so we weren’t interested in any sort of “automatic” tilting motor.
That’s just one more thing to maintain and eventually break. Our cheap aluminum bars work just fine and keep us more in tune and aware of how we’re using the Airstream. i.e. It’s much less likely that we’d drive off with the panels up since I have to climb up and put them down myself.
Once all the hardware was attached, we primed the aluminum surface with 3M tape primer and used VHB tape to stick the mounts directly to the aluminum skin of the Airstream. VHB stands for “very high bond,” and so far it has lived up to its name. Everything is still nice and sturdy, no screws required!
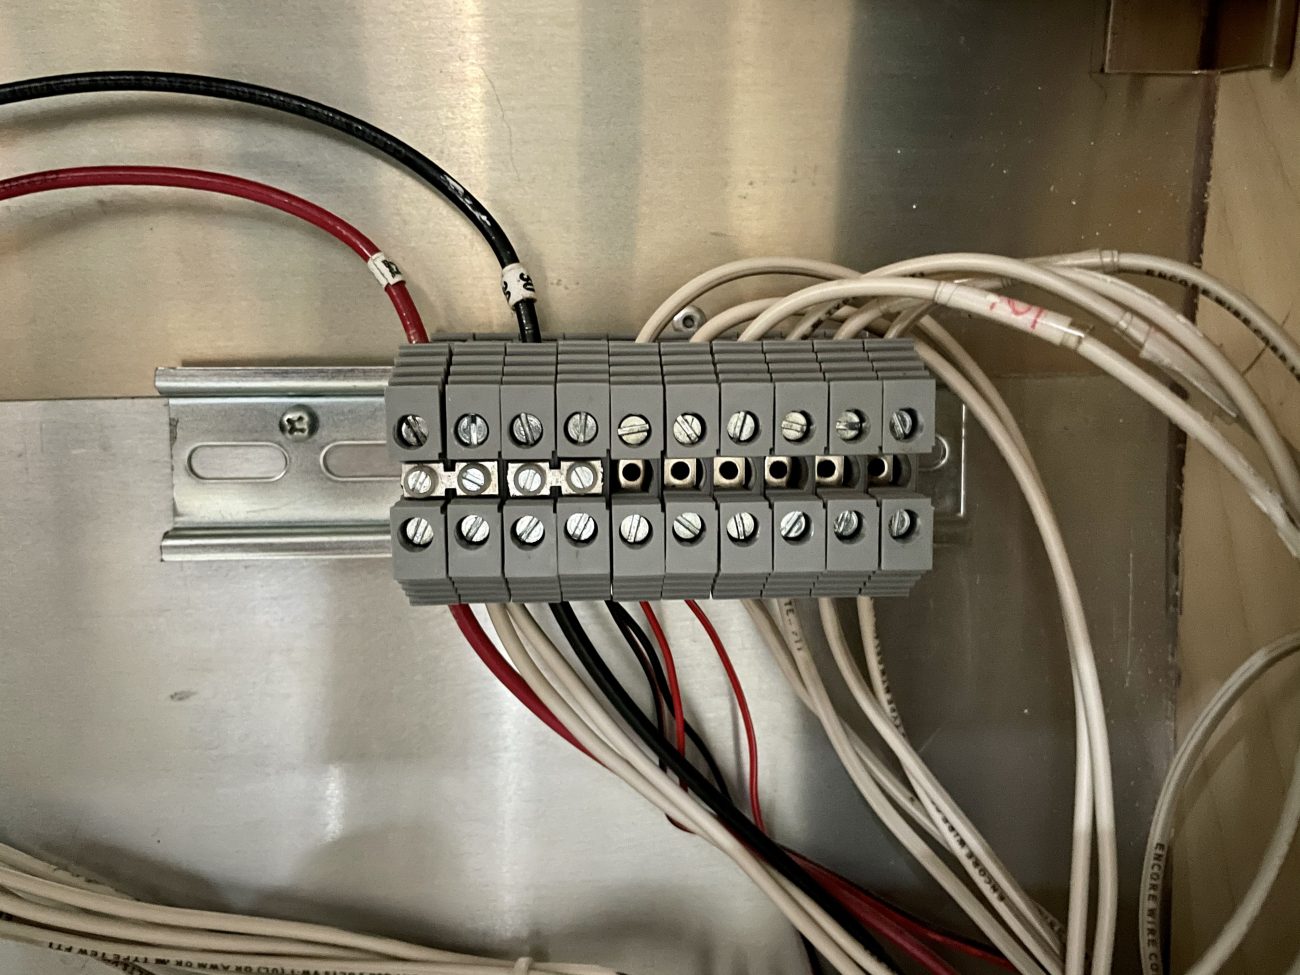
Wiring Solar Panels & Charge Controllers
As mentioned in the planning article, we ran our roof panels in parallel so each positive and negative wire coming from the panel go directly to a distribution block. All the negatives go together and all the positives go together. Then we run two heavy gauge wires to our Bluesky 3024DiL solar charge controller.

The Airstream has a lovely refrigerator vent that we were able to run the cables down through without cutting holes in the roof. We made sure they routed down the side a bit and then back up to the vent so that water couldn’t run down the cables inside. Then we added a plastic bracket to make sure the wires wouldn’t rub through their insulation on the aluminum corner and a custom wood bracket to keep the wires nice and tidy as they run down the wall.
We may be a little OCD.
Anyhow, the 10 wires (5 positive, 5 negative) converge in that distribution block inside, and then run to a heavy duty switch in case we want to cut all solar energy coming into the batteries. Then the wires run into our Blue Sky Solar Charge Controller.
From there, the positive wire runs through a 100A circuit breaker and to the solenoid attached to our BMS. The negative wire runs to our negative battery post.
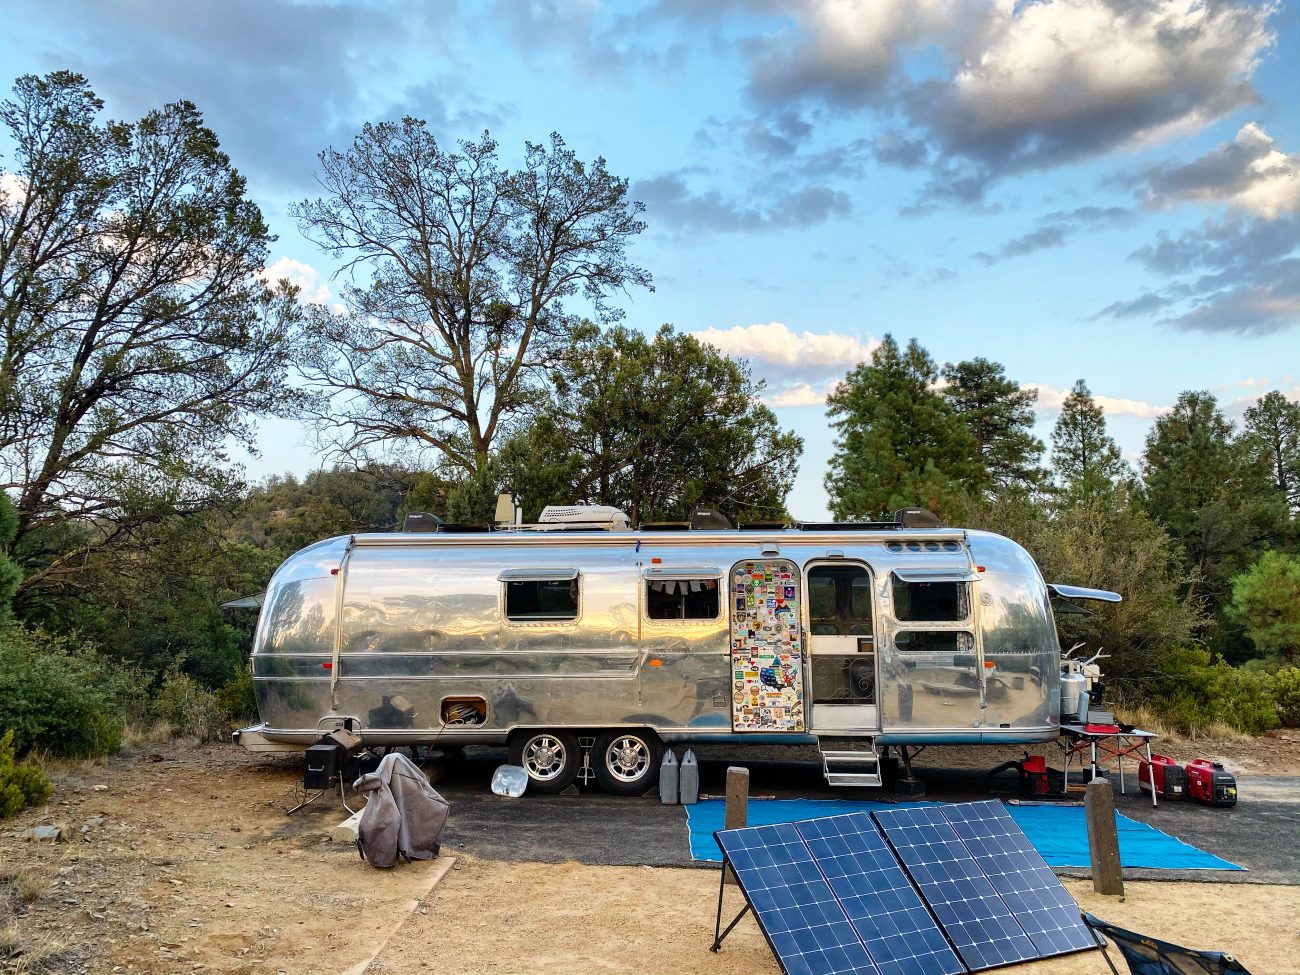
A couple of years later we added two 200 watt Renogy Solar Suitcases. They’re basically the same panels on the roof, but joined to gather with hinges, legs and latches. This gets us 400 more watts (for a total of 900 watts), and allows us better sunlight gathering, especially in the winter months. These ground deploys fold up and store in handy cases when not in use.
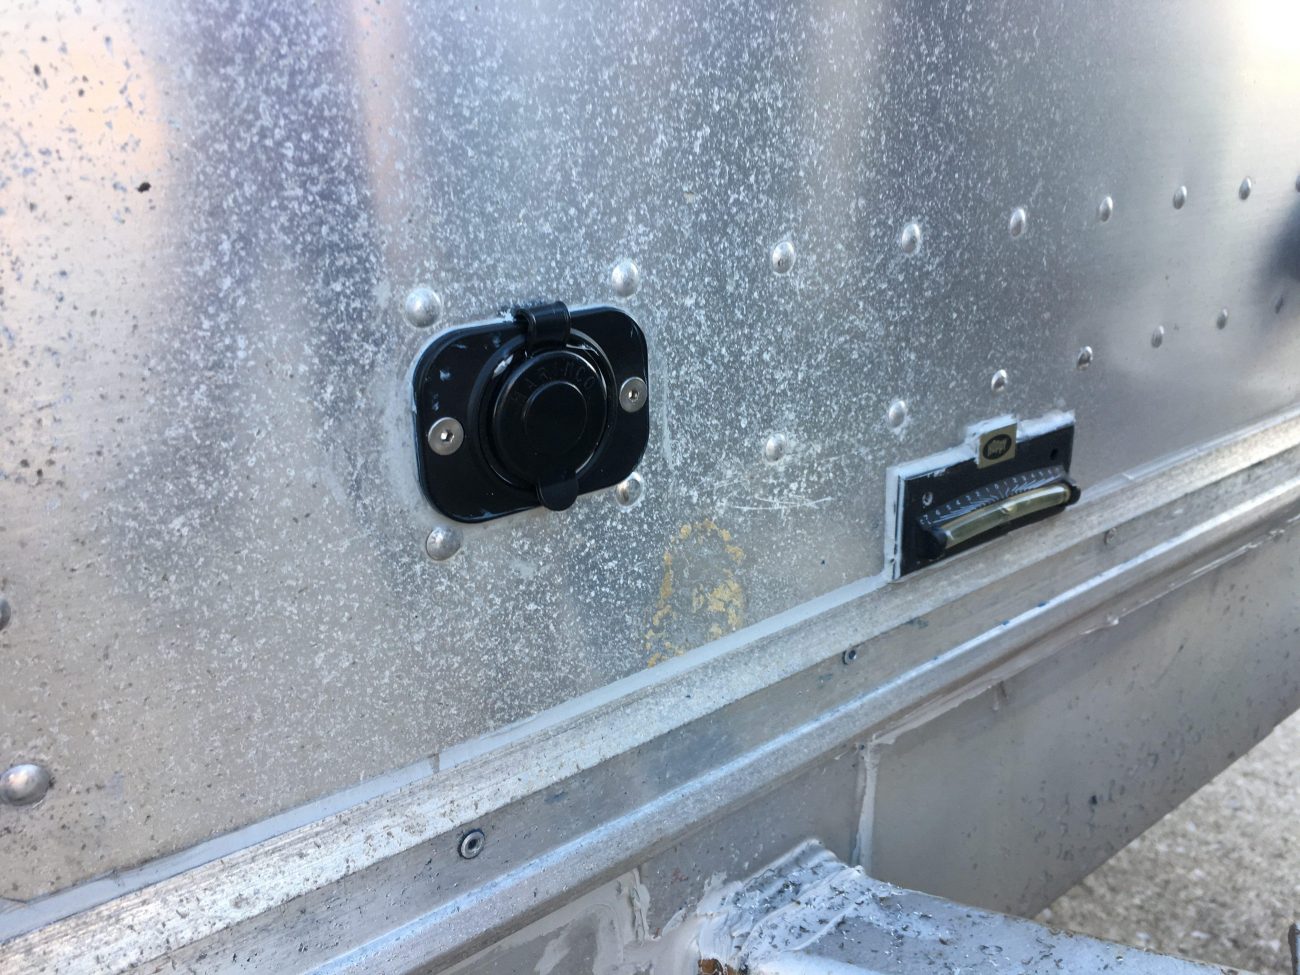
To easily connect and disconnect these panels, we used a weatherproof 12V Plug & Receptacle and installed it in the Airstream during the renovation. In order to use the single plug for both panels, we connected them in series, and made sure to match up the positive and negative wires on both pieces. There’s a 3rd connection, but we don’t need it for this application.
Unfortunately our original solar charge controller could only handle 40A max, so we had to get a second unit and run the wires the same way. Since we can unplug the panels from the outside we did’t add a disconnect switch.
The cool thing about the Blue Sky charge controllers is that you can daisy chain them together. The first one that is connected to the IPN ProRemote (with additional programming) is the primary controller, and the secondary controller inherits the same settings. Because they are MPPT controllers, the ground deploys send through higher voltage in series, but it is converted to a higher amperage for charging.
The remote display shows the combined total of both charge controllers as if they were a single unit. High five!
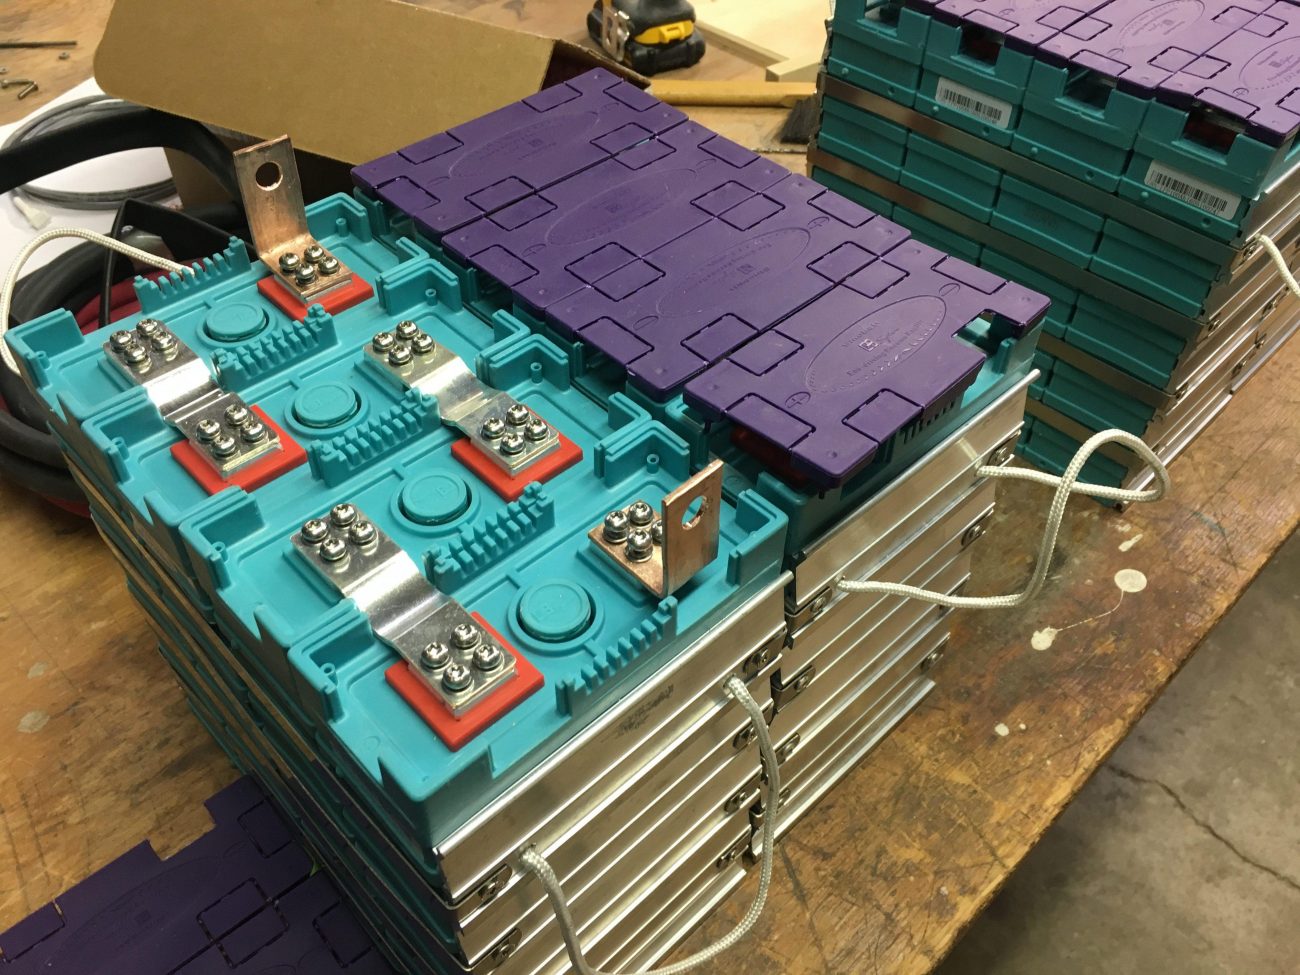
Locating & Connecting Lithium Batteries
We’ve already sung the praises of lithium batteries vs. lead acid batteries in our first article. Besides huge space, weight, and usability savings, they also don’t have to be vented to the outside. This opens up a lot more possibilities for storage and where you can put them in your renovation.
Being able to store them inside under cabinets also keeps them more temperature regulated, which is good because lithiums can be damaged if charged in below freezing conditions.
We ended up going with 4x 100 amp hour lithium batteries from Elite Power Solutions. At the time, they sold direct to consumers via their website, but now they only sell via authorized dealers.
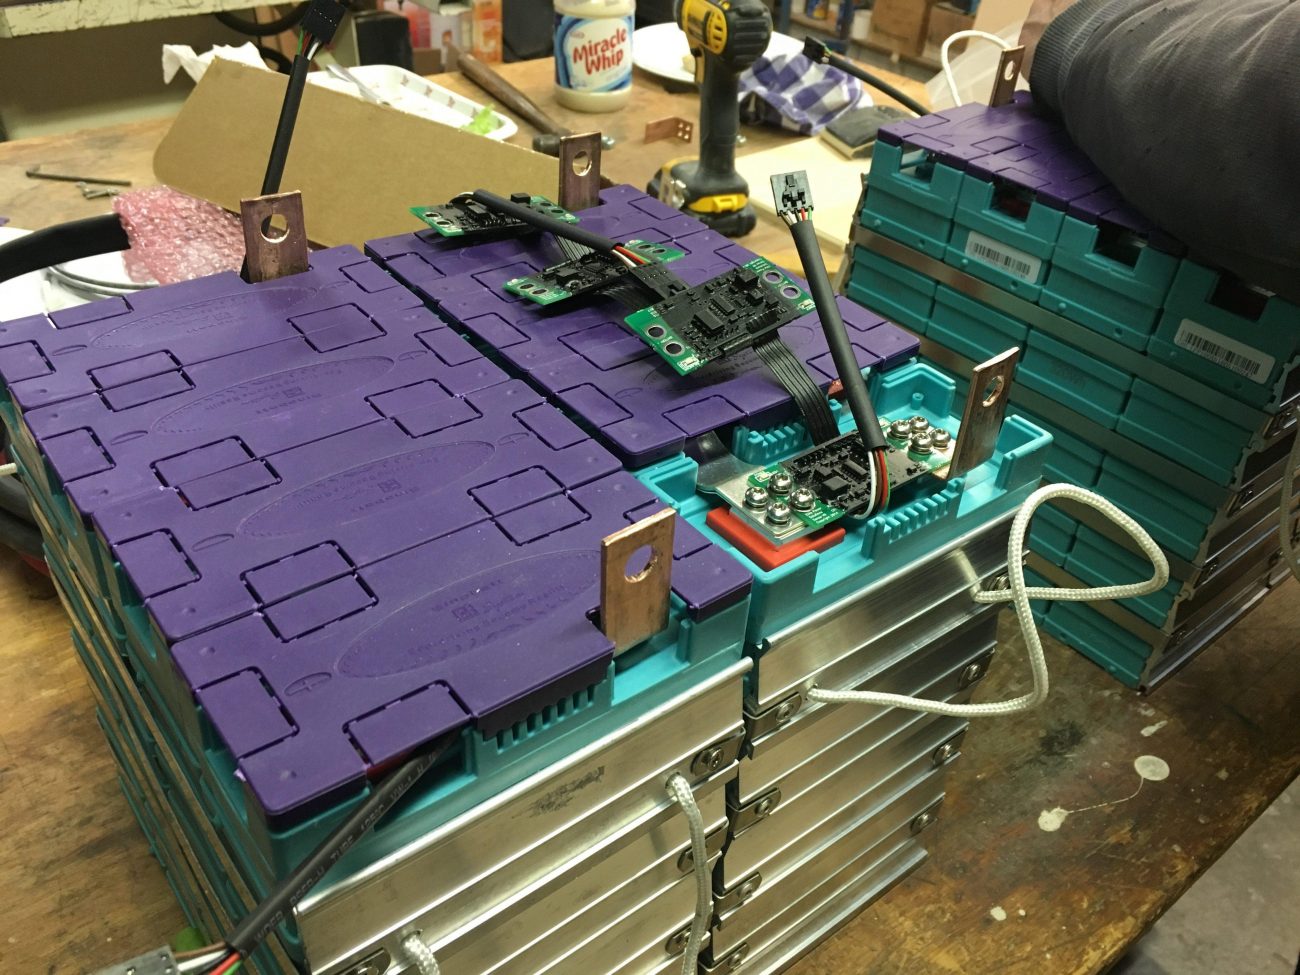
The first step was to install the sense boards on each battery and connect them together. In our case, each battery pack totaled 3.4V so wiring them in series produces a 13.6V system. The sense boards send important info back to the BMS like temperature and voltage for each cell.
The BMS (Battery Management System or EMS - Energy Management System) provides several important protections for your batteries.
- Checks each battery cell for under voltage or over voltage situations - if one is triggered it cuts power
- Checks each battery cell for temperature extremes - if too cold to charge, for example it won’t allow it
- Equalizes battery cells - if it sees a cell with higher voltage it will temporarily shut it off and allow the others to catch up - this elongates the life of the batteries by keeping them in sync.
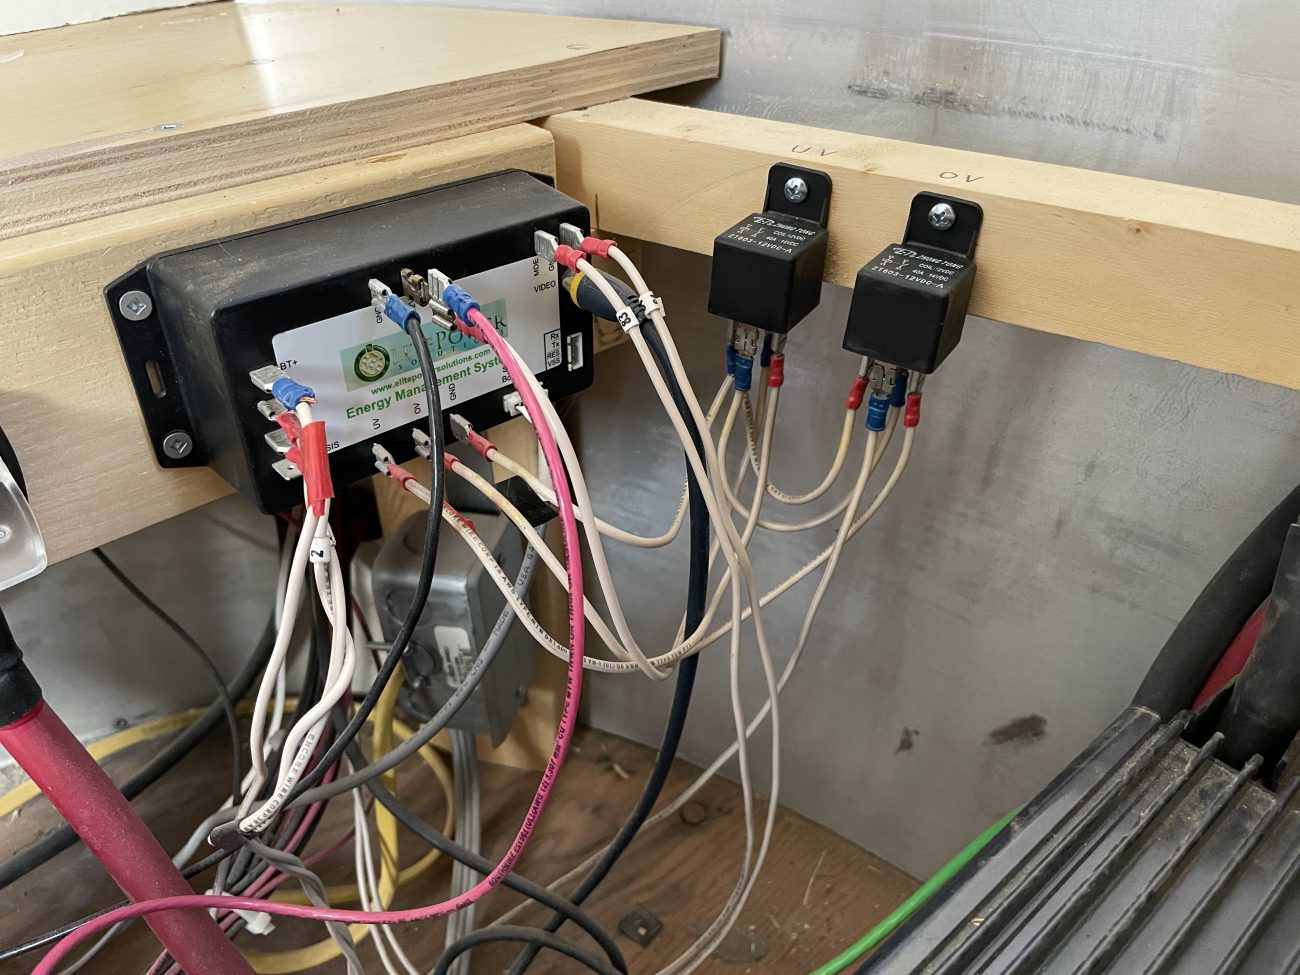
In our particular setup, the BMS uses separate OV and UV relays and a solenoid to stop power going into the battery during those situations. I can see the benefit of being able to easily replace a relay or solenoid, but as you can see from the wiring diagram the Elite BMS is mind-bendingly complicated to set up.
I’m not going to go into great detail for wiring this particular BMS because it’s old, overly complicated, and based on a few conversations with Larry from Starlight Solar - probably not connected the *best* way 😂. It works for us, though. And if you go down this path you’ll be studying your own EMS wiring guide anyway.
We’ll cover more of the “what we would do differently” down below, but just know there are other options out there like BattleBorn that have much of protections built right into the battery and aren’t as complicated to install.

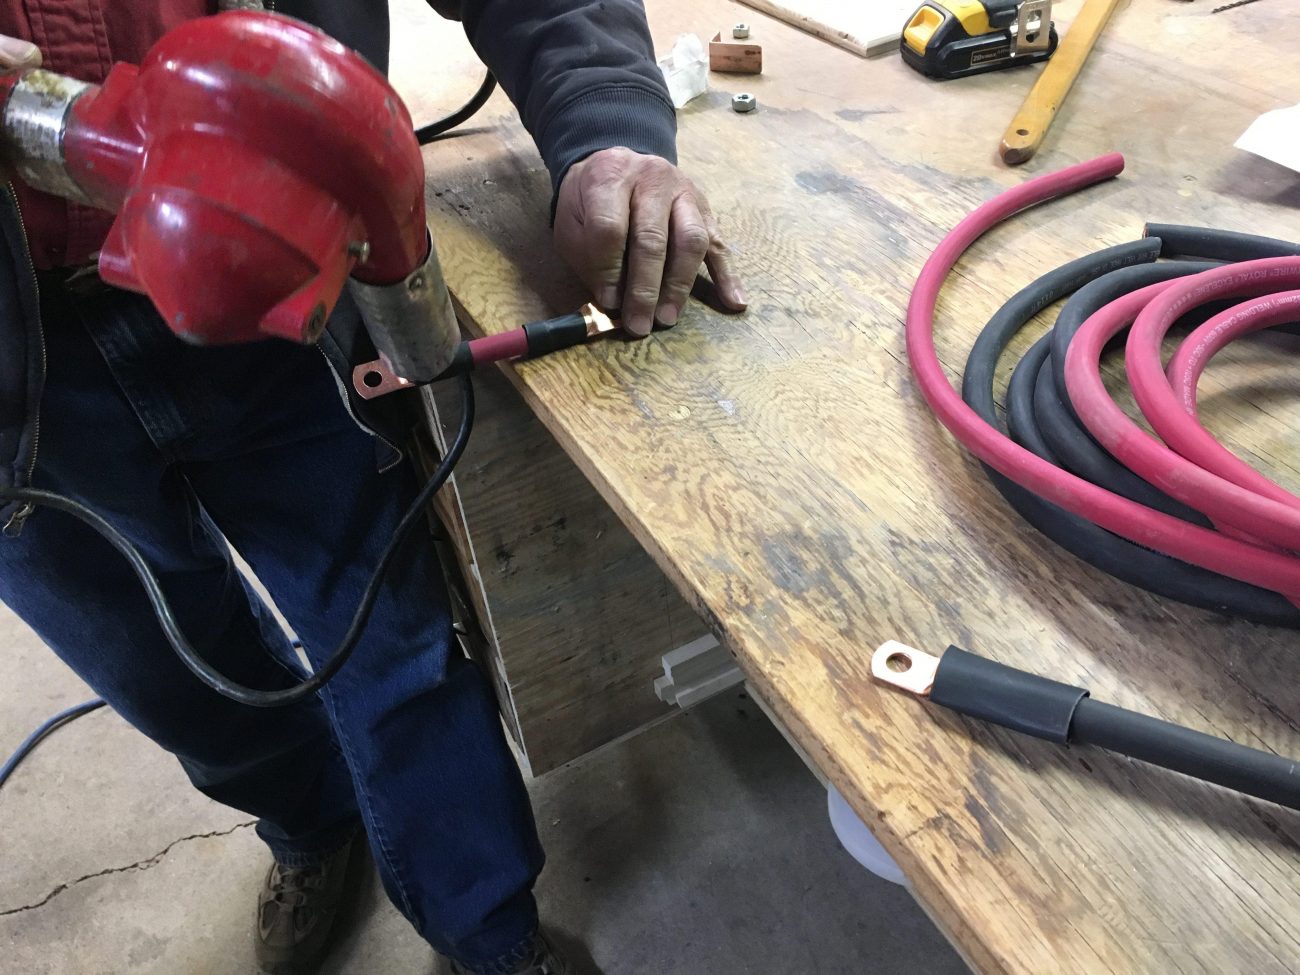
The next step is to build your own "trunk" wires to connect the batteries together. We used copper bars bent at a 90 degree angle and bolts to connect the positives and negatives together.
Time for an honest review. After 4 years of using these things full-time, they are rock solid. The only issue we’ve had was the failure of two sense boards, and I’m pretty sure we caused it trying to run a 1HP shallow well pump off our inverter. Because we bought directly from Elite, they did some troubleshooting over the phone, and all we needed to do was buy new sense boards. I should also give a shoutout to Larry from Starlight Solar Power Systems who helped me diagnose a few things as well.
For us they’ve been (mostly) pretty great. However, I’ve spoken to a few folks who are using a newer version of their BMS and had some stability issues. And as I'm writing this, we've just had one of our new sense boards fail again after 6 months of use. Not to mention the first replacement they sent me was also faulty. So there may be some quality control issues there.
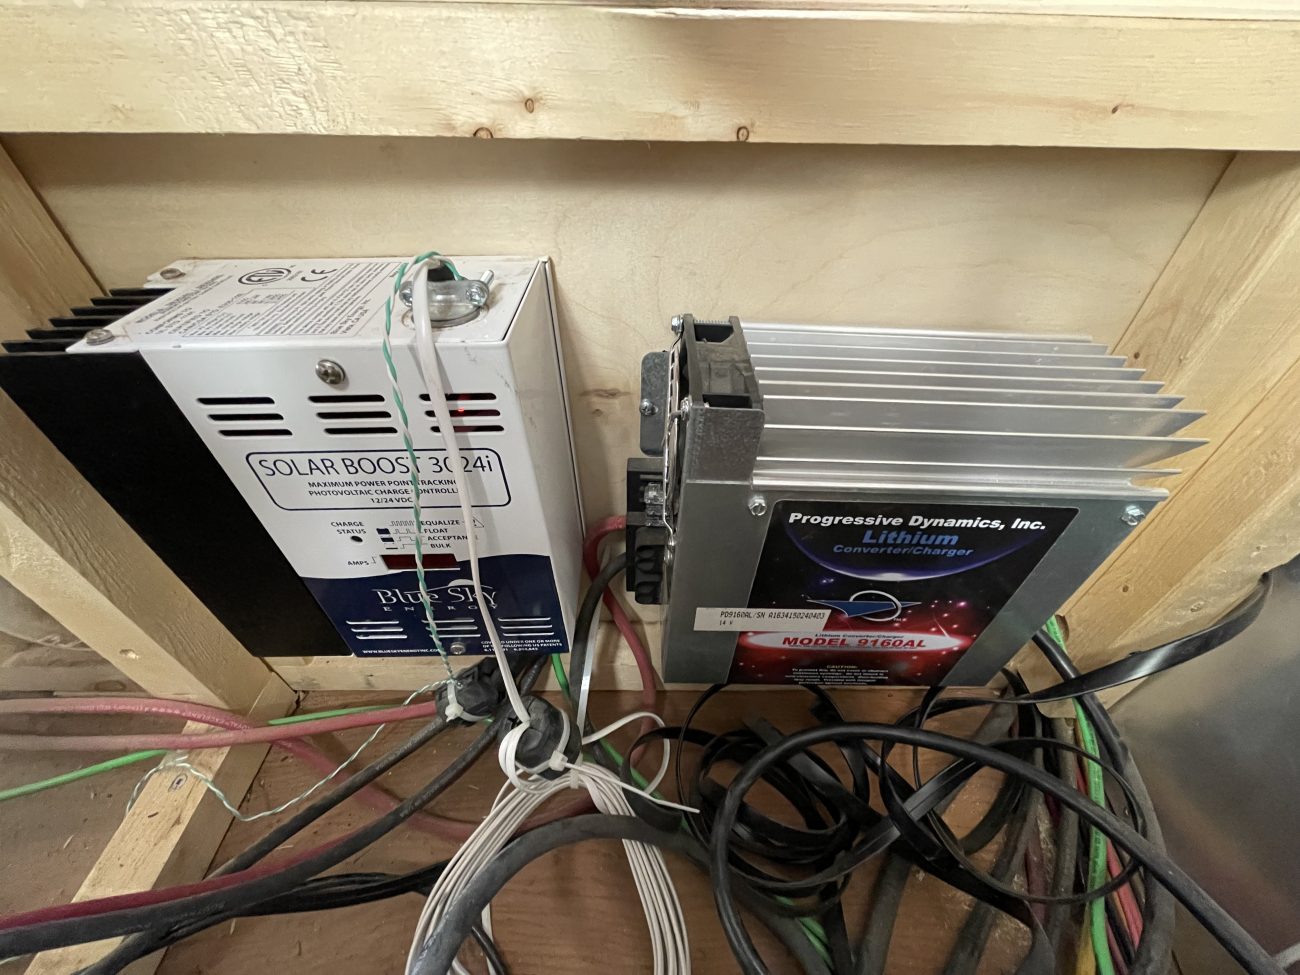
Converter
Your converter or charger (not to be confused with solar charge controller) takes the 120V power from your shore power connection (or generator) and converts it to 12V power while also charging your battery. This means your 12V appliances will work when connected to shore power and not get blown out by high voltage.
Getting the right converter is really important because lithium, lead acid, or AGM batteries all need to be charged and floated differently. We ended up having a lot of trouble with our converter. We started with a variable one that made horrible noises and smelled like it was burning. Returned it and ended up with a Progressive Dynamics 60A Lithium, but it still had to be sent back to the factory and have the voltage adjusted because the Elite Power Solutions batteries run a bit lower than most lithiums (14.4V vs 14.6V). Out of the box the Progressive Dynamics charger would pump too much power in, and the OV protection on the BMS would shut everything off.
I’m sure now there are more programmable converters out there, but it’s always fun to share a little behind the scenes weirdness.
For wiring, a converter is fairly easy to connect. It will likely have a normal 120V plug on it to provide power (though you’ll want to consider a transfer switch for this - see below). Then the positive and negative wiring go to your battery posts. Because it’s a 120V appliance, they also recommend a ground wire run to the chassis.
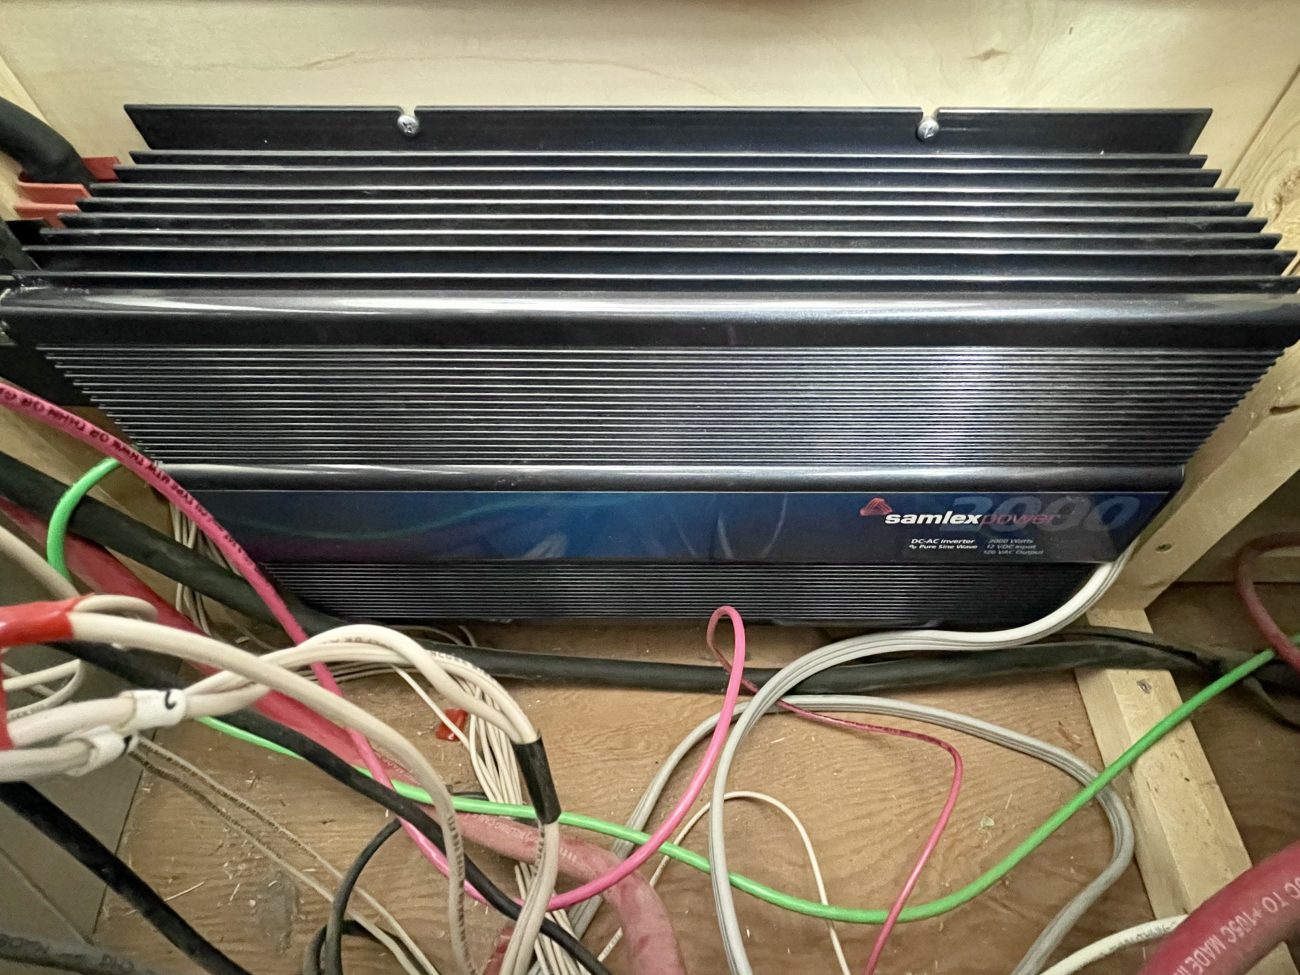
Inverter
The inverter does the opposite of a converter - it allows you to run household or 120V appliances from your 12V batteries. Making sure you have a high quality, clean power inverter is important if you’re using any expensive electronics like computers, televisions, blenders, etc…
We started out with a Samlex PST 1000W Inverter and upgraded to a 2000W a few years later so we could run our new Vitamix. They have always provided rock solid power, and protected us when we did stupid stuff like try to run appliances that were too powerful or kept tripping when we wired a new 120V plug backwards.
Our only complaint was that it was hard to get to the switch to turn it off at night when we weren’t using it. But we fixed that with their remote display a few years later. Now it’s easy to shut off each night.
Wiring the inverter is also pretty straightforward. The positive and negative lines from the battery provide power, though you’ll want a large ANL fuse on the positive line for protection. A ground wire is also recommended.
Then the Romex or 120V wire then needs to connect to your other 120V wire (also with a transfer switch - see below).
Shore Power, Transfer Switch, & Breaker Box
Ok, you’re probably wondering about this transfer switch. What’s the deal?
Think of it this way - when you’re plugged in to shore power, your 120V system is automatically powered, and your converter needs to take that power and convert it to 12V and charge the batteries. You won’t need your inverter, and quite frankly if your inverting and converting at the same time you’d have a serious power loop going on.
Same with not being plugged in - you don’t need the converter at all because your 12V power is coming from your batteries and powering your inverter.
So a transfer switch will turn off one or the other depending on your situation. You can see from the illustration that you shore power wires go into the transfer switch. Then out of the switch you have three additional lines. One to your breaker box, one to the inverter, and one to the converter.
Connecting this all together in a tiny metal box is tricky, but the result is a system that takes the guesswork out and turns on the right appliances depending on your power situation.
Wiring Tips
You'll be making a TON of custom connections while you wire up your own trailer. Here's a few tips and tricks we learned along the way.
- Double check your AWG size, and give yourself 25% headroom.
- Always run your wires extra long just in case.
- Get an automatic wire stripper. Your hands will thank you later.
- Invest in a well built crimp tool, and buy yourself a boatload of butt, spade, ring, and quick disconnect crimp terminals to have on hand.
- Use the Konnect-It DIN-Rail Terminal Block System for wire junctions.
- For larger wires, get some copper lugs, and hammer crimper, and marine grade heat shrink to make beautiful custom cables.
You'll be a pro in no time, we promise!
What Would We Do Differently?
Four years in, that’s a great question! Not only are there some core changes we’d make, but there are so many new and better products on the market. Let’s talk about each one.
Bigger Battery Bank
Always, right? 400 Ah is what we could afford, but 600 or 800 would have been amazing. It was plenty when we started traveling, but as our family and power needs have grown, we could definitely use more.
Simpler Battery Setup
Have you seen that EMS diagram? Holy smokes. It’s so complicated, man. Battleborn Batteries simplify this process a lot (the BMS is built directly into each battery), and there are even smaller and less expensive lithium batteries on the market now. There’s even a whole movement repurposing electric car batteries into 48V systems.
I’m not 100% sure which way we’d go if we had to do it again - but we’d definitely look for a way to simplify things.
Lightning Supressor Device
Now that we’ve moved to the wide open spaces of Arizona, we’ve started to hear more about indirect lightning strikes affecting gear though solar panels. Many electricians recommend adding a lightning suppressor device or SPD that will absorb any massive energy surges and protect all your electronic gear. We're doing more research, and will update if we add one.
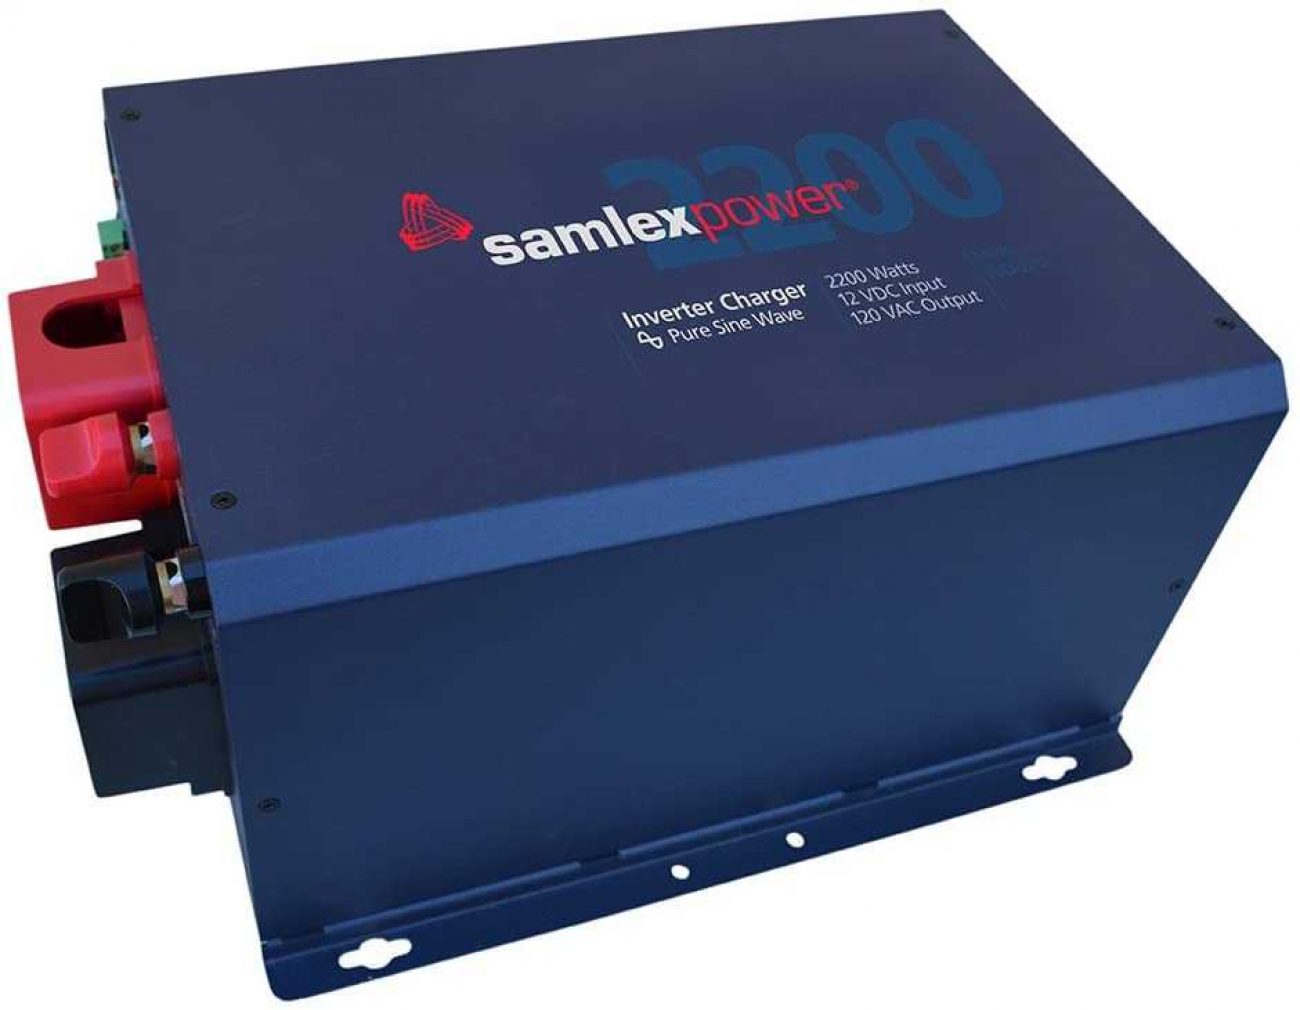
Should have gotten an EVO
So here’s the thing. Samlex (the makers of our inverter) graciously agreed to sponsor this deep dive post. And during our talks with them they mentioned a new product called the EVO (or Evolution) that combines most of the large disparate appliances into one single product:
- Two separate AC inputs for shore power & generator
- Adaptive battery converter/charger
- Synchronized transfer switch at zero crossing
- High surge inverter with active power boost
- Input for solar charge controller
I know they’re the sponsor, but look at that! How much could my setup have been simplified with one of their EVO units?
FYI, these units have a max of around 50A for solar input, so you may not be able to use them to their full functionality if you have a large solar array like we do.
How much will your Airstream renovation cost?
Get a better understanding of what your project will cost with our renovation calculator!
Besides the intelligent spreadsheet, it includes includes links to everything we bought for our renovation + over 20 short videos where we share behind the scenes thoughts, details, & tips!
Shopping List
Because our setup is a bit older, I thought it would be good to include not just what we specifically have, but some other newer options that might work better for you.
Wondering how much all this is going to cost you? Head over to our Airstream Renovation Cost Breakdown article in the solar & electrical section to see what we spent.
- 12V Wire - red, black, green, white (note - you may need heavier AWG for some appliances - use the table above to calculate the correct size. Your length for each color will depend on your trailer and appliance locations)
- 12V Fuses - Assortment pack
- Fuse Block - 10 Circuit Blade Fuse Block with Cover (x2)
- 12V Sockets - Blue Sea socket for inserting USB Car Chargers (x8
- Romex - Standard 12/2 Indoor (your length needed will vary depending on your requirements)
- Breakers - Standard 15A Single Pole (x2)
- Breaker Box - We used something like this 2 panel model. If you need more circuits grab a bigger box
- Antenna Cable - Standard coaxial coupler - you may need a longer version depending on your setup
- TV Antenna to Radio Adapter - Motorola to F Connector.
- Tank Sensors - The actual sensor wires usually come with your monitor
- Switches - On/Off Switch (x2), LED Latching Switch (x15)
- Internet Antenna wires - CA240 Antenna cables - read this article for more details.
- BMS Video Display - Simple small video screen
- BMS Video Cable - Standard video cable
- Shielded Cable - Use this shielded wire to connect the solar charge display to shunt
- DIN Rail - 35mm Slotted, get as much as you'll need
- Terminal Bocks - Screw down, modular terminal blocks (x125)
- Marking Tags/Labels - Labels that attach to terminal blocks (x500)
- Disconnect Terminals - Screw down modular blocks with quick disconnect feature (x20)
- Terminal Block Jumper - Screw down jumper, available in different sizes (x2 10 Pole Package of 5)
- Open Slot Wire Duct - Wire duct with cover - attaches to DIN Rail, groups cables with multiple entry/exit points (13ft)
- Roof Mount Solar Panels - 100 watt Renogy Eclipse Monocrystalline solar panels (x5)
- Solar Panel Mounts - Mounting bracket set with knobs (x4)
- Solar Wires - 10 AWG UV Resistant Cable
- MC4 Connectors - Male/Female Waterproof Connectors (x5)
- Renogy MC4 Tool - Tool that makes it easy to connect or disconnect MC4 junctions
- Solar Charge Controller - Bluesky 3024DiL solar charge controller handles up to 40A
- Solar Charge Controller Display - The IPN ProRemote display allows for programming and daisy chaining multiple units together
- Solar Distribution Block - We needed 5 in, one out for both positive and negative - this block is little overkill, but all we could find
- Heavy Duty Switch - 300A Blue Seay Battery Switch (x2)
- 100A Circuit Breaker - 12V 100A Manual Reset Circuit Breaker
- 50A Circuit Breaker - 12v 50A Manual Reset Circuit Breaker
- Solenoid - Blue Sea 12V Solenoid Switch
- Battery Posts - Insulated Junction Post Block Set
- Solar Suitcase - 200W Renogy Solar Suitcase (x2)
- Solar Plug & Receptacle - 3 Wire 6AWG Plug and Receptacle
- Second Solar Charge Controller - Blue Sky Energy Solar Boost SB3024iL solar charge controller (no display)
- Lithium Batteries - Elite Power Solutions 100Ah Batteries (x4)
- Sense Boards, BMS, etc - All sold as part of the Elite bundle
- Relays - 12V 40A 4Pin Relay (x10)
- Converter - Progressive Dynamics 60A Lithium
- Inverter - Samlex PST 1000W Inverter and Samlex PST 2000W Inverter
- Inverter Remote - Samlex America RC-300 Inverter Remote
- ANL Fuse Block - Blue Sea Systems ANL Fuse Block with Insulating Cover
- ANL Fuse - Blue Sea 300A ANL Fuse
- T-Class Fuse - 300A T Fuse with Block
- Ground Bus Bar - Power Distribution Terminal Block for ground wires
- Inline Fuse Holders - Waterproof 12V Inline Fuse Holder
- Auto-reset circuit breaker - 30A Circuit Breaker to protect your vehicle
- Transfer Switch - 30A Transfer Switch
- Heavy Duty Welding Cable - 6AWG, 4AWG, 2/0 - amounts will depend on your setup
- Copper Ring Terminals - 2/0 x 3/8", 4AWG x 3/8" - amounts will depend on your setup
- Hammer Crimper - Manual crimper for large lugs
- Heat Shrink - Marine Grade Heat Shrink
- Wire Stripper - Automatic wire stripper self-adjusting
- Crimping Tool - Hand Ratcheting Wire Crimper for Insulated Connectors
- Insulated Terminals - Assortment of butt, spade, ring, and quick disconnect crimp terminals
Newer Options
- Battleborn Lithium - 100Ah lithium batteries with BMS built in
- Lightning Suppressor -SPD Device to protect from indirect lightning strikes
- Samlex Evolution Series Inverter/Charger - Combines shore power and generator inputs, converter/charger, transfer switch, and inverter all into one. We recommend the 2200W version.
Finishing Up
Whew! If you made it through this article you get a high five and a cookie. We hope that with the detailed explanations and photos, the PDF wiring diagram, and spreadsheet wire guide we've equipped you to start putting your own off-grid electrical system together in your RV.
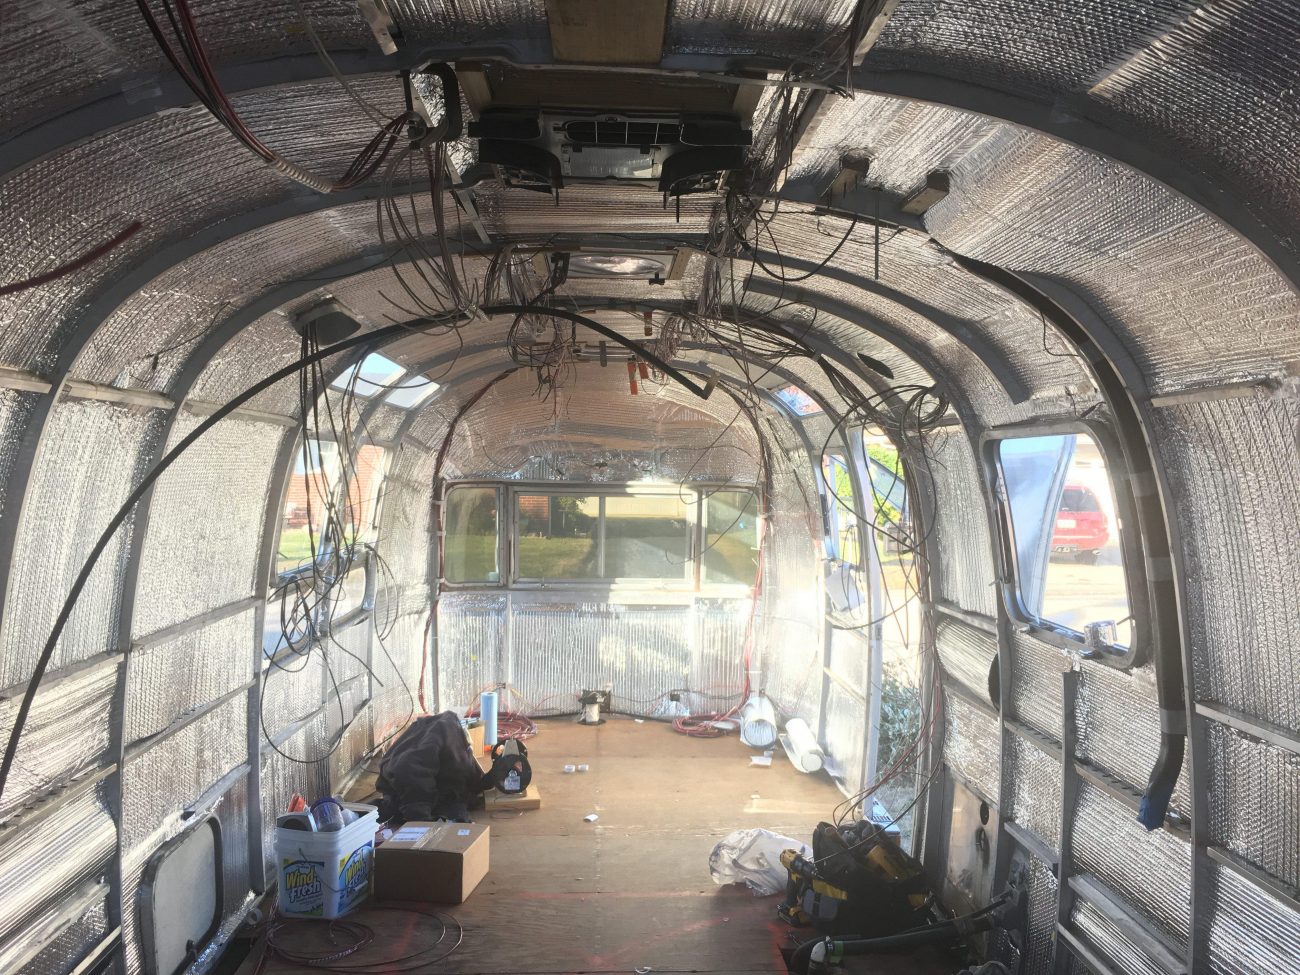
Here's a few more behind-the scenes photos for you!

Have questions? Ask away in the comments.
Want to help support our family?
Over the years we've created hundreds of articles + videos, replied to thousands of comments, and continue to create new content each week. Help us keep it going!
Apparel
Grab a fun, comfy t-shirt & help support our family.


About the Author
Jonathan Longnecker is the strongly opinionated tattooed and bearded half of Tiny Shiny Home. He loves making music, figuring out nerdy solutions, exploring the outdoors, and living off-grid.
comments powered by Disqus