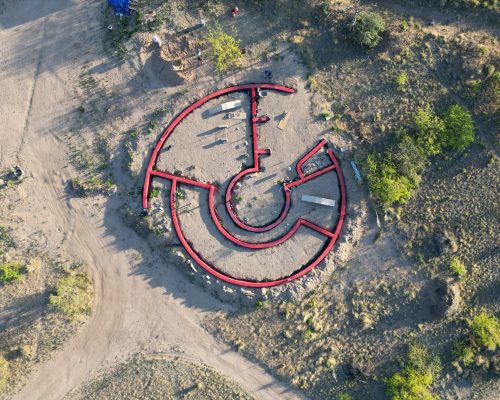
Hyperadobe Roundhouse - Building the Roof
With the hyperadobe earthbag walls finished, we begin the most complicated part of the build yet - the roof. Join us as we create a custom bond beam, build the metal roofing structure, and panel the whole thing.
Watch the video series below:
Step 1: Rebar Cage
The hyperadobe roundhouse build continues with the next big step: the rebar cage for the bond beam.
Step 2: Building Custom Curved Bond Beam Forms
Our hyperadobe earthbag bond beam prep continues with custom forms built in-place on our circular walls.
Step 3: Finishing Building and Sealing Bond Beam Forms
We're racing to get our bond beams forms finished before the pour.
Step 4: Pouring the Bond Beam
The pump truck is here, the concrete's here, the team is back. Let's do this!
Step 5: Removing the Forms
With the bond beam pour finished, now we get to start taking the wooden forms off.
Step 6: Bond Beam Reveal
We continue to remove the forms from the Roundhouse while taking time to appreciate what we have, share an update on Roux, and reveal the bond beam.
Step 7: Securing Hurricane Straps
Finally! We spend days grinding down the edges of the bond beam and securing hurricane straps.
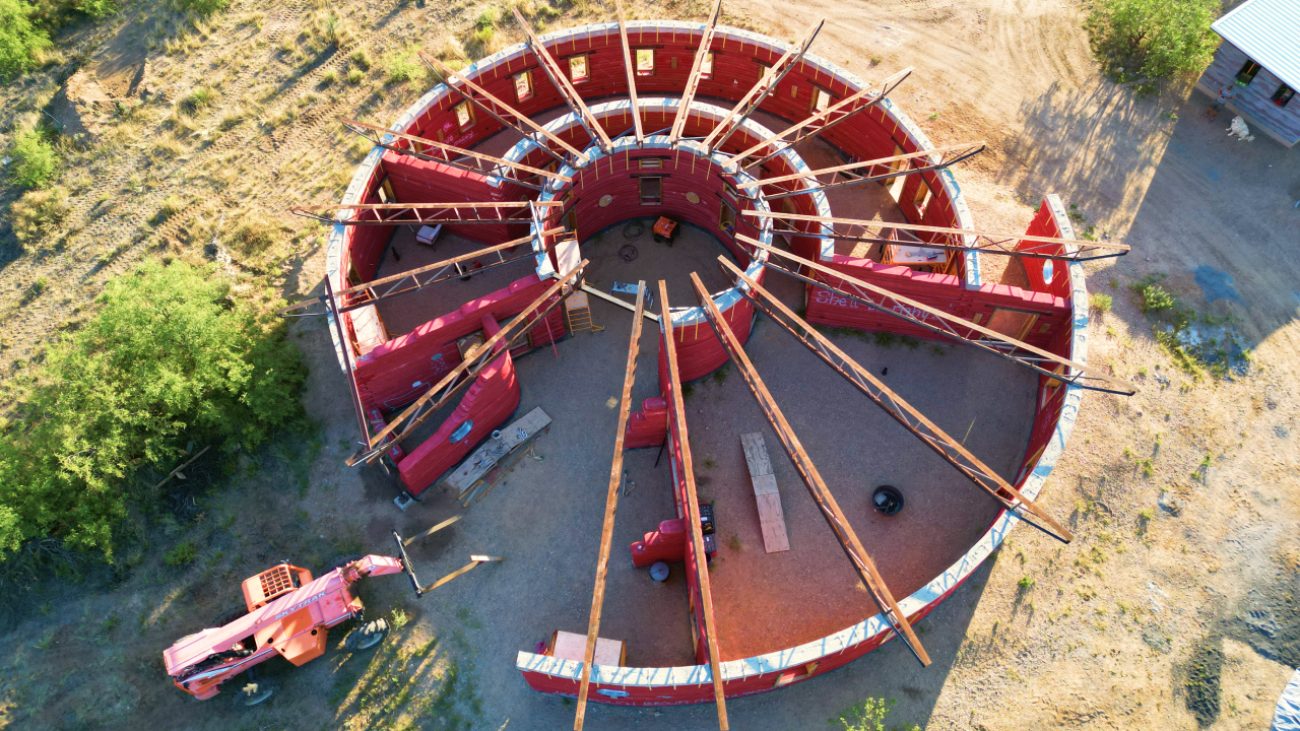
Step 8: Bar Joist Transport
We're transporting the bar joists for the hyperadobe roundhouse to our property, celebrating our 23rd anniversary, and welcoming our first spring Kids to the homestead.
Step 9: Bar Joist Fabrication
Finally, the roof project begins on the Hyperadobe Roundhouse! We welcome Ashley's dad and his twin brother to the homestead as we begin the huge job of modifying and fabricating 50 year old recycled steel bar joists as the base of our roof.
Step 10: Setting Roof Trusses
After painstakingly fabricating the bar joists for our Hyperadobe Roundhouse, it's finally time to set them. We've been both dreading and looking forward to this step for a very long time, and the roundhouse will never look the same!
Step 11: Starting C-Purlins
The Hyperadobe Roundhouse roof structure continues! We lock in the last 2 bar joists and start installing C-Purlins around the outer edge of the perimeter. Then Fred has to leave and we learn to help Dick with the process of finishing the inner and outer C-Purlins before Ashley's family goes back home.
Step 12: Welding C-Purlins on Our Own
It's been a wild couple of weeks fabricating and setting bar joists with Ashley's family, but now we're on our own. Join us as we begin the huge process of cutting and welding in over 250 C-Purlins on the Hyperadobe Roundhouse.
Step 13: Welding C-Purlins in Main Bedroom
We're continuing to weld the 250+ C-Purlins on our Hyperadobe Roundhouse roof, but getting delayed fighting monsoons and hard to reach areas.
Buy Your Own Hyperadobe Earthbags!
Get your own super strong UV protected polyethylene raschel knit tubing. It's made in the U.S.A, and shipped directly to your door. Starting at $419/roll. DIY your dream project today.
Apparel
Grab a fun, comfy t-shirt & help support our family.


About the Author
Jonathan Longnecker is the strongly opinionated tattooed and bearded half of Tiny Shiny Home. He loves making music, figuring out nerdy solutions, exploring the outdoors, and living off-grid.
comments powered by Disqus