DIY Off-Grid Solar Power System for Homestead - Installation & Wiring Guide
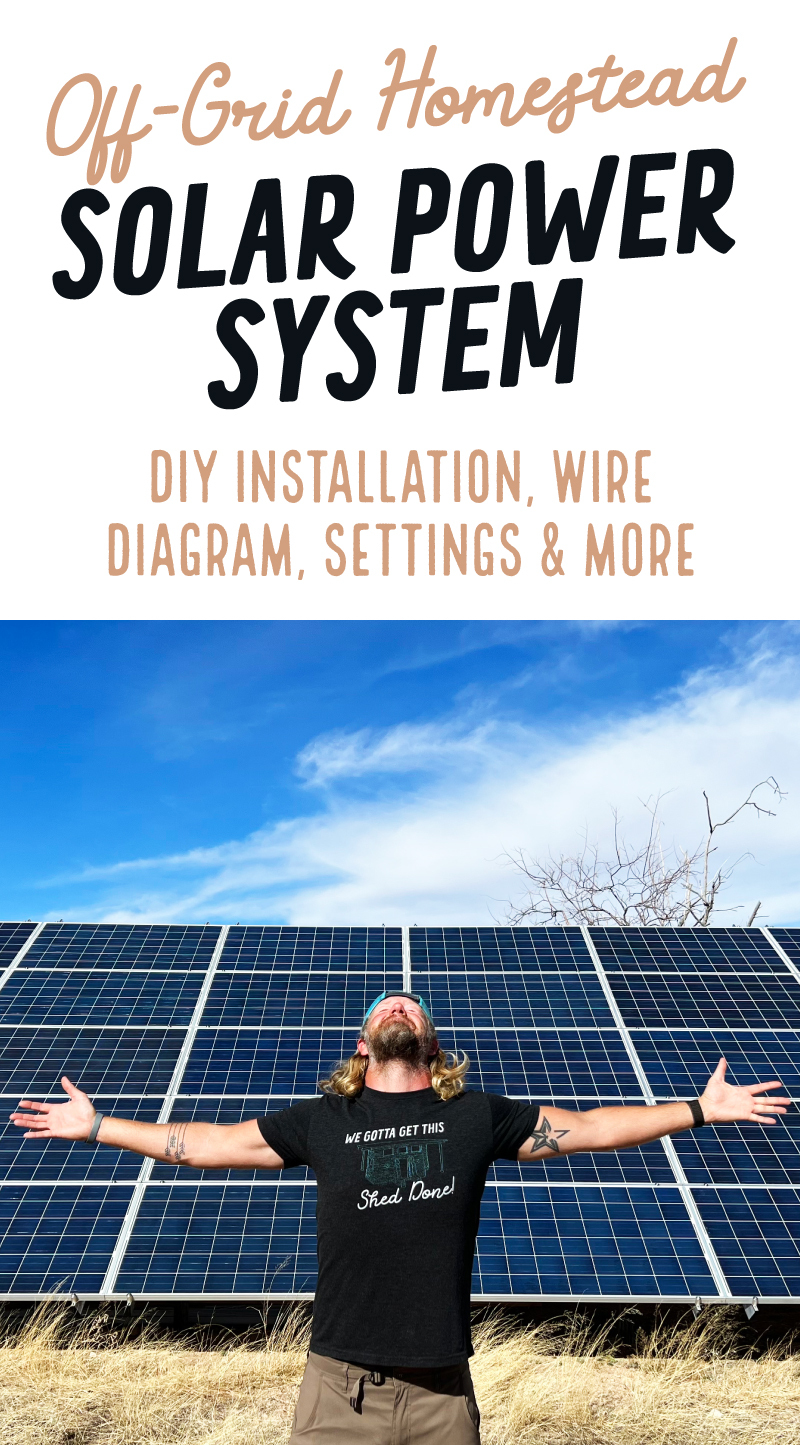
If you’re looking for a safe, reliable way to build your own massive DIY off-grid solar system at a fraction of the cost, you’ve come to the right place.
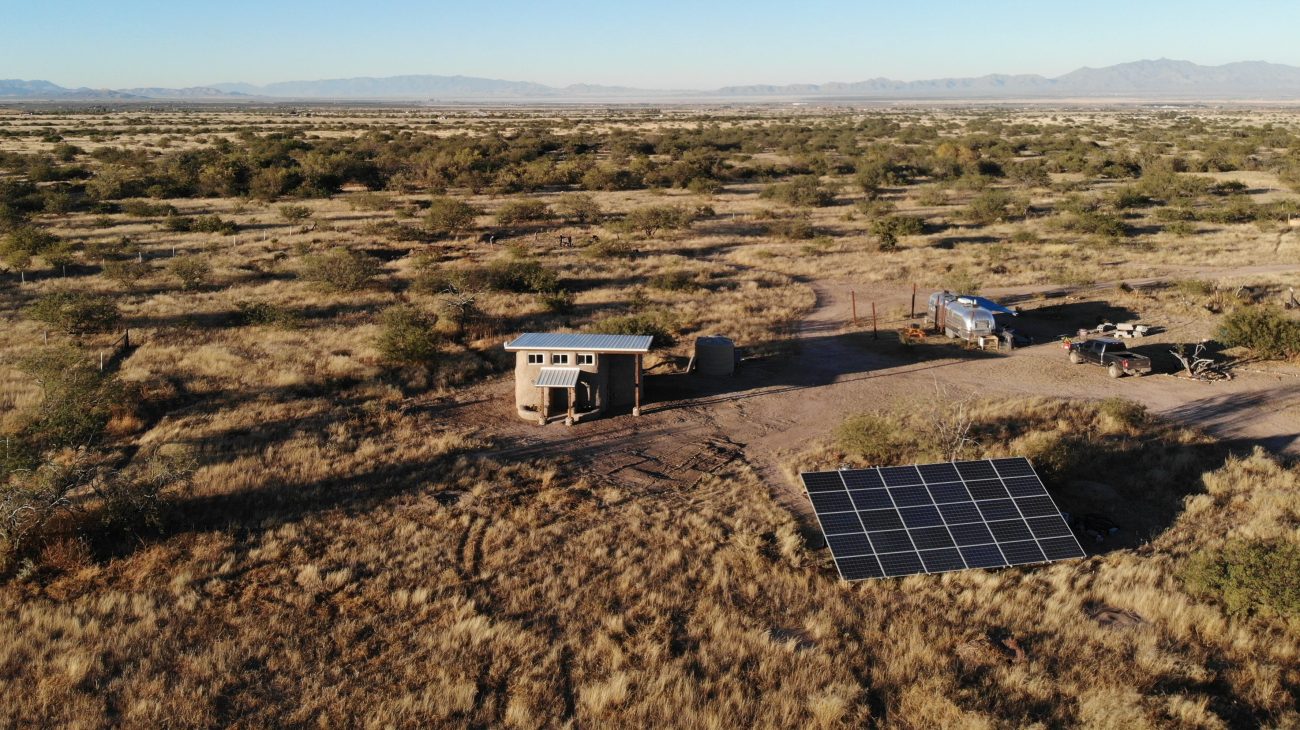
Hi there, we’re Jonathan & Ashley from Tiny Shiny Home. Our family of 6 spent many years traveling full-time in our renovated vintage Airstream before finding some off-grid property in Cochise County, Arizona to settle on.
Our dream here is to build a sustainable off-grid homestead from the ground up using solar power, water catchment, and natural building techniques to create an oasis in the desert.
If you’re looking for a safe, reliable way to build your own massive DIY off-grid solar system at a fraction of the cost, you’ve come to the right place.
We’ll be doing a full cost breakdown in a separate article and video, but today we’re focusing on the planning, building, and installation process we went through to build a fully independent off-grid power system.
Before we go further, let’s give you a high level overview of our off-grid solar power system.
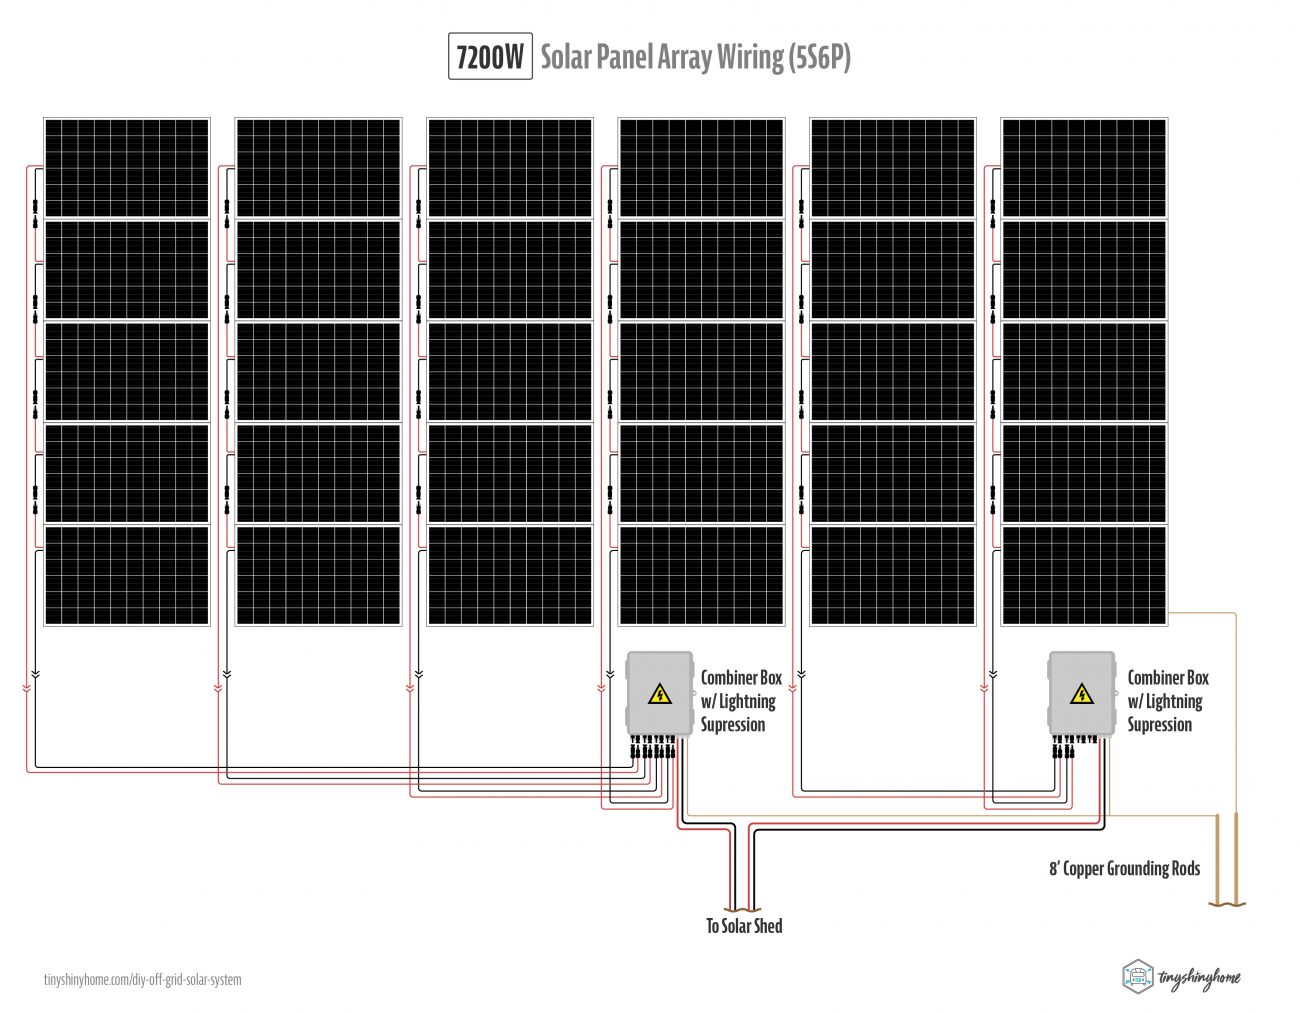
- 7,200 Watts of Solar Panels (5S6P)
- 28kWH of Lithium or LiFePO4 Batteries (2P16S @ 48 Volts)
- 5,000 Watt Inverter (Single Phase @ 120V, Surge to 10,000W)
- This should power our Airstream, Solar Shed, and eventually our House
Disclaimer: I’m not an electrician, nor do I play one on YouTube. All information here is solely for entertainment purposes, and all electrical work should be performed by qualified individuals according to local electrical codes. Cool? Cool.
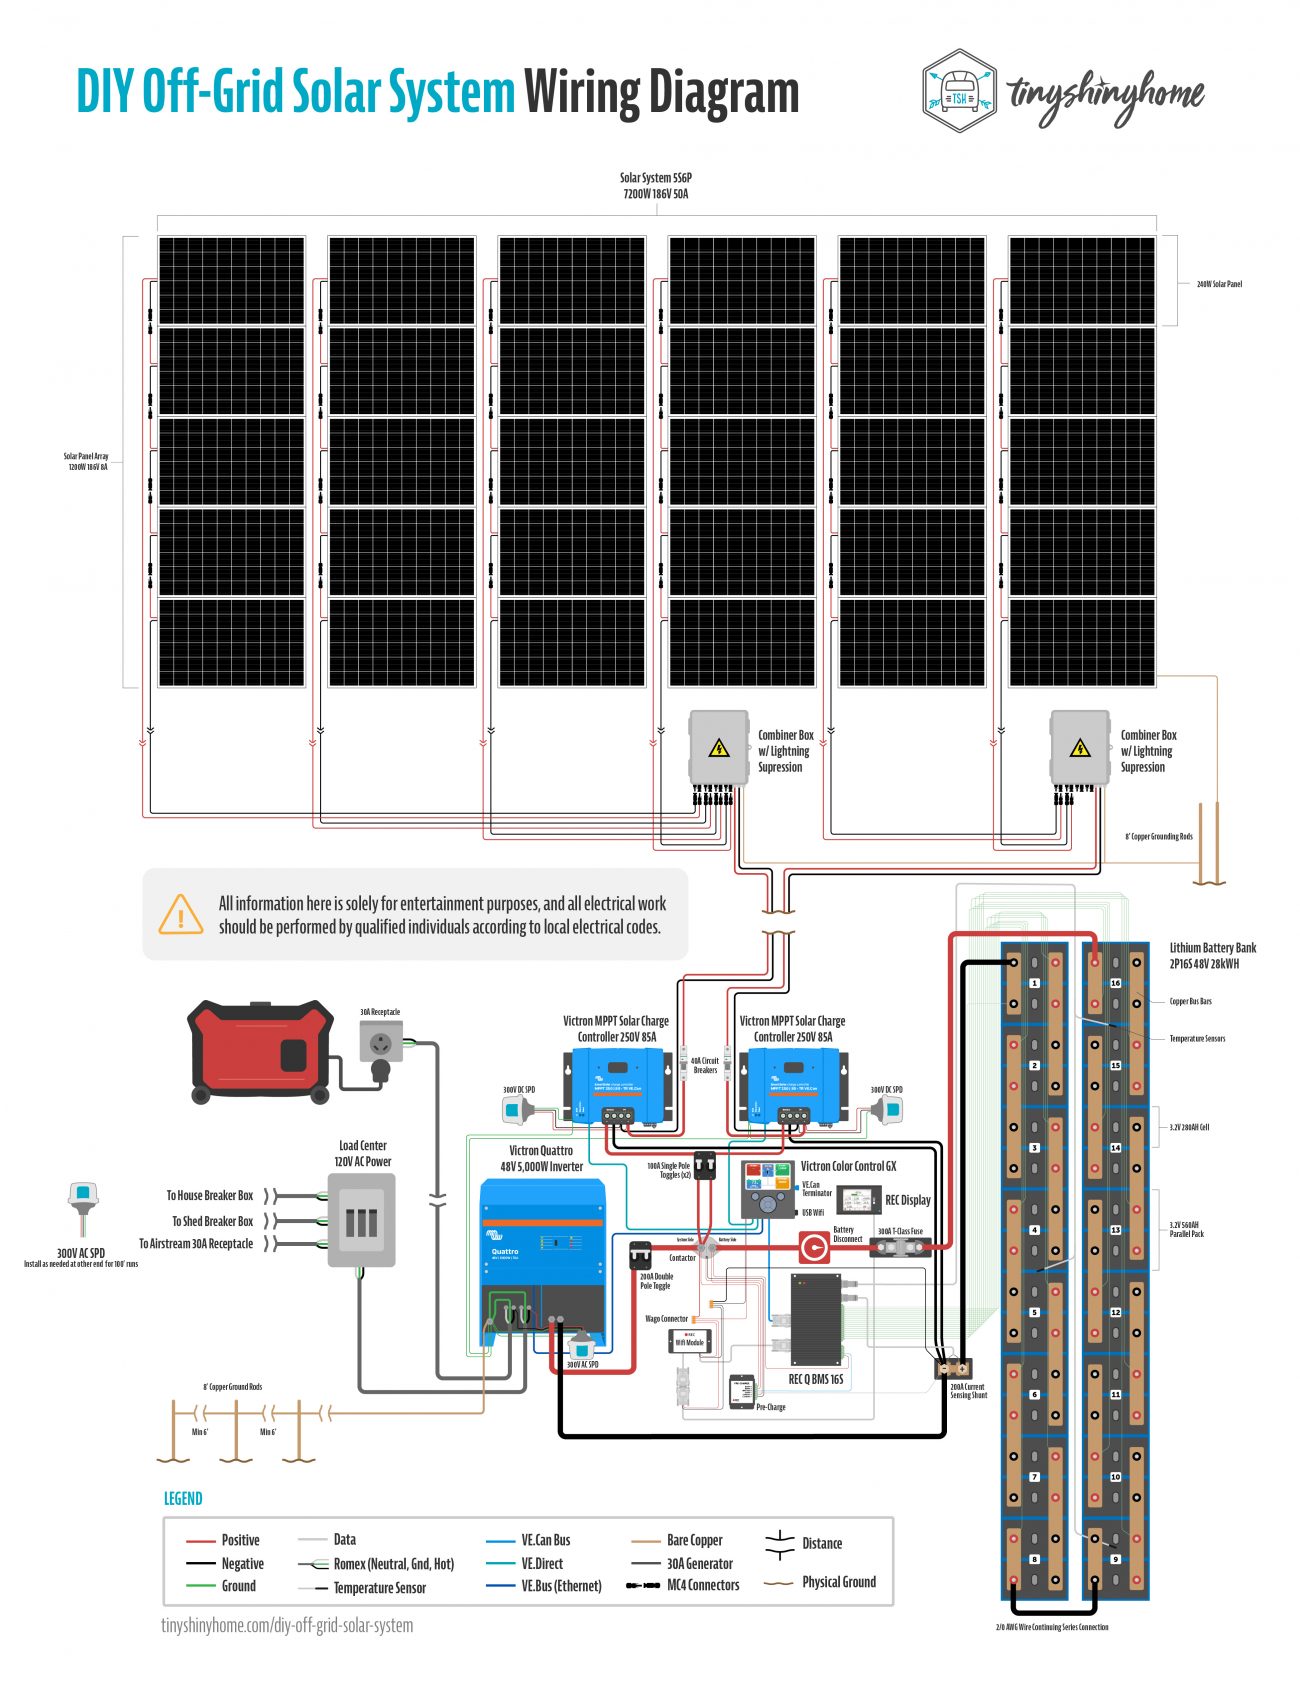
Off-Grid Homestead Solar Wiring Guide
Ever wondered what all the major connections look like on a custom solar system like ours? As part of this deep dive, we created a very detailed replica of our wiring setup.
I know I'm a visual person, and sometimes I just need to see it all laid out no matter how many words there are to explain it.
This is as big as I can make it here on the site - if you'd like to download a vector PDF that you can zoom in on, grab a copy here:
Download Our Solar Wiring Diagram
Get up close and personal with this super detailed, impeccably illustrated hi-res PDF of our full off-grid power setup with a schematic representation of how everything in our 7200W, 28kWH, 120V off-grid battery and solar system connects together. Includes bonus individual component wiring configs, too!
Article Overview
- Housing the System: Earthbag Solar Shed
- Off-Grid Power Goals
- Sizing an Off-Grid Solar Power System
- Finding the Right Solar Panels
- Solar Ground Mount
- Wiring the Solar Panels
- Finding the Best Lithium Battery Deal
- LiFePO4 Shipping Update
- Assembling the LiFePO4 Battery Pack
- Major Fuses, Disconnects, and Breakers
- REC BMS Install
- Victron Color Control GX & VRM Portal
- Victron Quattro 48V 5,000W Inverter
- Victron SmartSolar MPPT Solar Charge Controllers
- Final Tweaks & Adjustments
- Real World Impressions & Power Usage
- What Would We Do Differently?
- Lightning Protection
- Cost Breakdown
- Wrapping Up
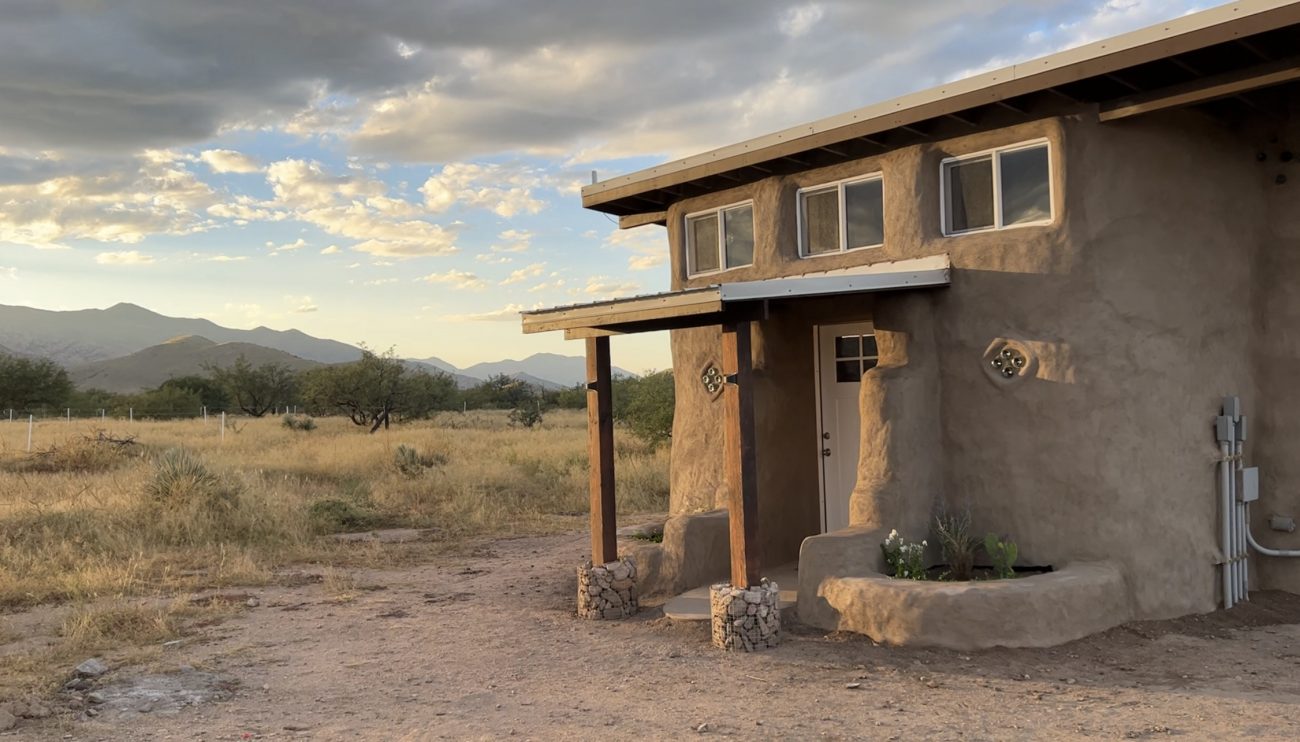
Housing the System: Recap of our Earthbag Solar Shed Project
We have to mention that our solar and electrical install were part of a larger project - our hyperadobe earthbag solar shed office. Besides needing somewhere to store our batteries and power gear, we needed an office, a guest room, and really just some extra breathing room. The Airstream was getting a little cramped.
Plus, it was a chance to explore a bunch of natural building techniques that we’ll use as we design and build other earthbag buildings here on our property. Setting up an independent power system was an important piece of infrastructure, a huge step for our homestead.
We’re excited to share our power setup with you because we believe we’ve found an incredibly cost effective way to build a massive 100% off-the-grid system that is safe, stable, and reliable.

Off-Grid Power Goals
Let’s start by talking quickly about our situation. While our property was completely off-grid, connecting to the the power company wasn’t out of the question. We can see our closest power pole about half a mile up the road, so theoretically it could’ve be possible to run those lines to us.
Like we mentioned, running off grid power wasn’t really part of our dreams or goals - but turns out it’s really expensive to run a power line half a mile. Like $35,000! And then we’d get the pleasure of paying the power company every month for our usage.
So not only did our resolve to stay off-grid send us down the road of building our own system - it turned out we could build the whole thing cheaper than it would’ve cost to run the power to our property anyway.
We knew this off-grid solar system needed to be large enough to power our Airstream, Solar Shed, and eventually our house. And we also knew that a 48V lithium battery bank was the way to go. Inverting from 48V to 120V is so much more efficient than 12V or 24V, but still low voltage enough to work with safely.
This setup needed to power some large appliances - air conditioners, power tools, transfer pumps, and kitchen gadgets like a blender and instant pot.
But we also wanted to be smart about our usage, especially in the cold months. For heating and cooking we would supplement as much as we could with propane, gas, or wood. And by building with earthbags we took advantage of thermal mass transfer and passive solar heating.
This meant we could setup our power system at 120V power instead of 220V. Our stove would be gas or wood, and a we really don’t need a clothes dryer out here with our endless sun and low humidity. Should we get in a situation where we need 220V power, we can always switch out the inverter or add more batteries.
Sizing an Off-Grid Solar Power System
Let’s talk big picture setup before we get super nerdy. Based on our goals out here, and the fact that we’d been living low power in our Airstream for years, we already had a pretty good idea of how much power we’d need. But we reached out to Juan from Beginning From This Morning to help us work through the transition from a 12V system to a 48V system. After a few conversations we decided on a few specs:
7,200 Watts of Solar Power
By connecting 240w panels in series of 5, we could create high voltage arrays that charged well even in cloudy conditions. This also helped keep our wire size down as we had a fairly long run from the ground mount to the charge controllers (over 100’). We ended up with 30 panels total for this project.
28kWH Lithium Battery Bank
Battery bank size is always tricky - trying to find the right balance between having enough storage and not spending too much money. Fortunately we found some great deals on 280AH cells shipped directly from China, and were able to create a large bank for an incredible price. We knew the BMS would only have 16 cell inputs so we opted for 32 total batteries, grouping them in packs of 2. We’ll get into this more later.
5,000 Watt 120V Power Inverter
Finally, the inverter. Again, lots of options here for massive wattage, but we settled on a 5,000 Watt Quattro Inverter Charger from Victron. It surges to 10,000 watts which should be more than enough for us. And if we ever need more power we can daisy chain these units together. The decision to go with Victron also tied into our charge controllers, BMS, the ability to monitor the system remotely, and manage all power systems on the property from one app. Also more on this later.
Finding the Right Solar Panels
As you can imagine, there are a plethora of options out there for residential and commercial solar panels. When renovating our Airstream, the size and weight of the panels on the roof were a huge consideration. But here on our 11+ acres of property we could install as many panels as we wanted. The sky was the limit! Well, really our budget was the limit.
And we wanted to get the most bang for our buck. So we did a ton of research and ran across SanTan Solar. They're a (semi) local solar panel dealer that specializes in both new and refurbished used panels of all kinds.
Here's a secret - solar panels get replaced often - usually way before they need to be. So SanTan buys them, tests them extensively, and resells them to folks like you and me at a fraction of the cost of new ones.
They still have plenty of life left in them, and the cost savings can be so significant that even if they need to be replaced a few years earlier you're still getting a great deal.
During their yearly Sidewalk Sale, we snagged all 30 of our 240W solar panels for only $25 each. That's a crazy deal. 7200W of solar for less than $800. Whoah!
As you'll see below, we still had to build a massive ground mount to attach these to, but we were off to a good start saving some cash.

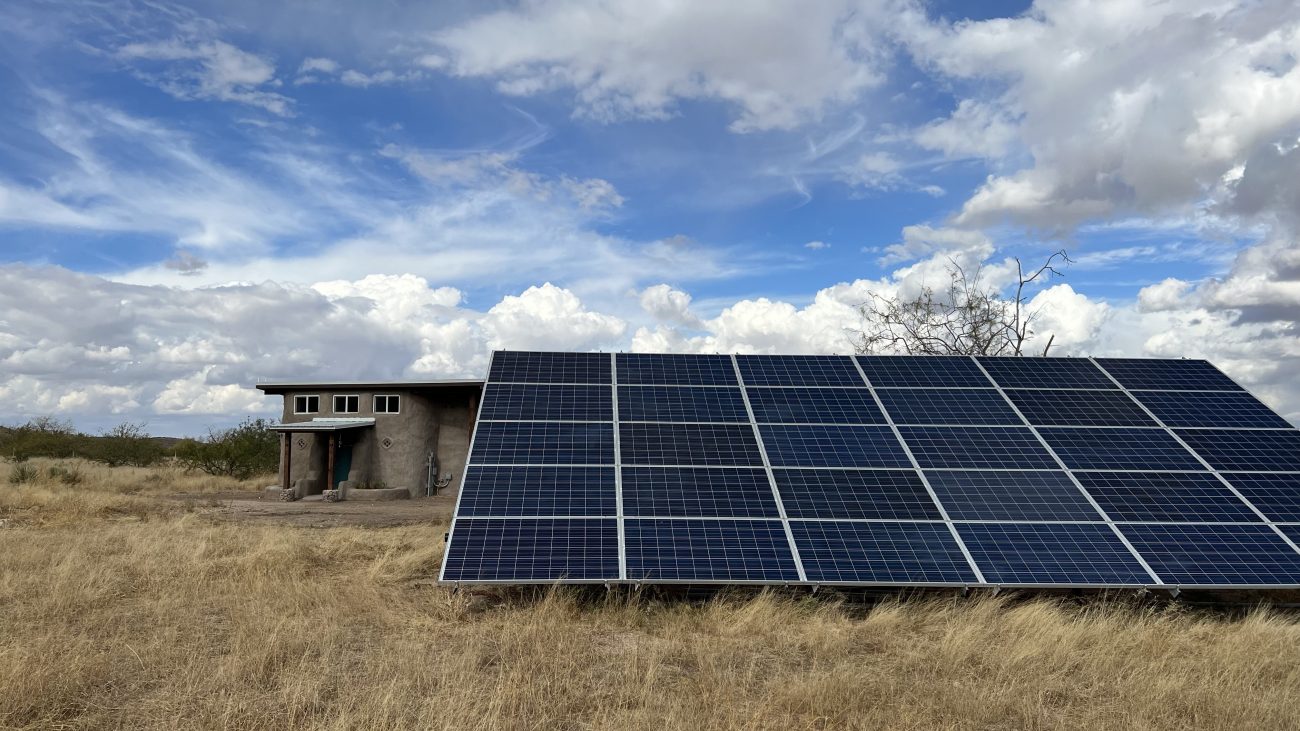
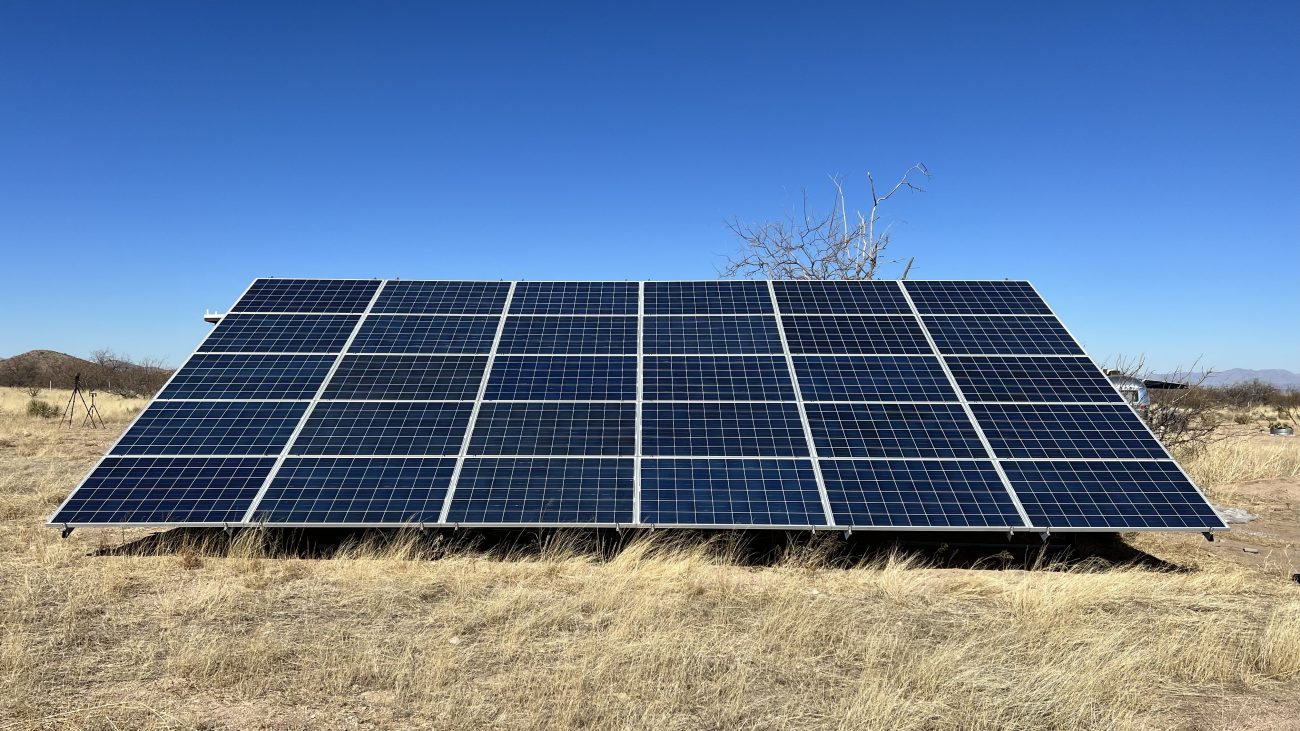
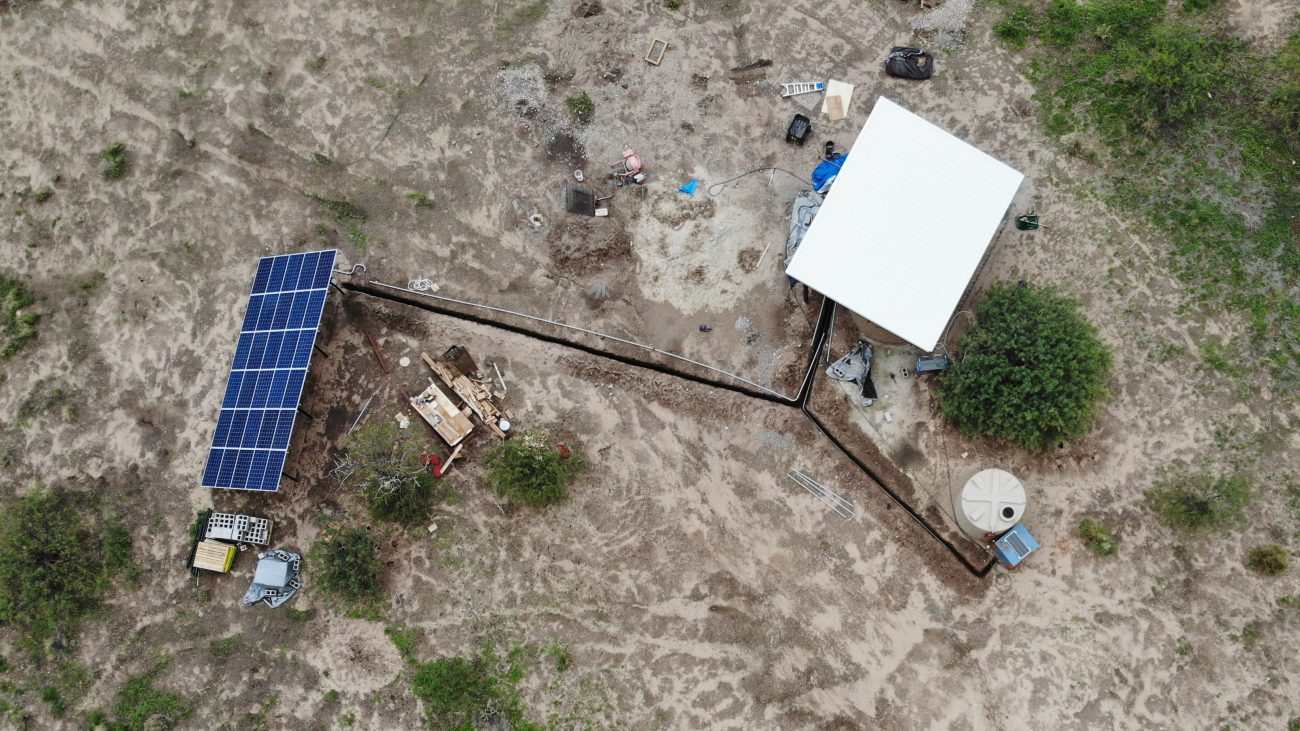
Solar Ground Mount
Now before we could install any of our gear, we needed the solar panels mounted and ready to use. That in itself was a massive project. Since we didn’t have a roof to mount on - and because the solar shed itself was setup for passive solar, and the roof was tilted North - we had to create a solar ground mount array ourselves.
Thanks to some simple online tools we calculated our panels needed to be tilted about 30 degrees and pointed about 10 degrees East of South.
Fun fact - here in the high desert of South East Arizona we have weather events that can create up to 100mph updrafts. And our soil is high in sand content. So engineering what’s effectively a huge windsail of solar panels wasn’t as simple as throwing them on some wooden posts.

Thankfully there are a few companies out there that will help you do this. We used IronRidge’s Design Assistant Tool, to design a heavy duty ground mount, and were impressed with its level of detail. They help you work through:
- Foundation type
- Titling angle
- Snow loads
- Wind events
- Soil type
- Panel configuration
- And more...
They even let you use custom panel dimensions which is perfect because we bought used residential panels from SanTan Solar.
Then they output technical drawings with easy to read dimensions and all sorts of other complicated data like shear and uplift strength, the total amount of pipe and cement you’ll need, and more.
Now of course, IronRidge is selling you something - they make quite a few of the important pieces you’ll need to build your mounting system - the reason they do this is to give you an estimate for what you’ll need to buy from them.
But without this tool we would have spent days trying to calculate all this stuff, and would have had no idea where to start. Let’s start with the basics.
IronRidge Components
Note: none of the IronRidge components here are affiliate purchase links because the cost per piece on Amazon is insane. Build your setup with the Design Assistant Tool, and it will give you a full parts list, and then help connect you with a local distributor to get the best pricing.
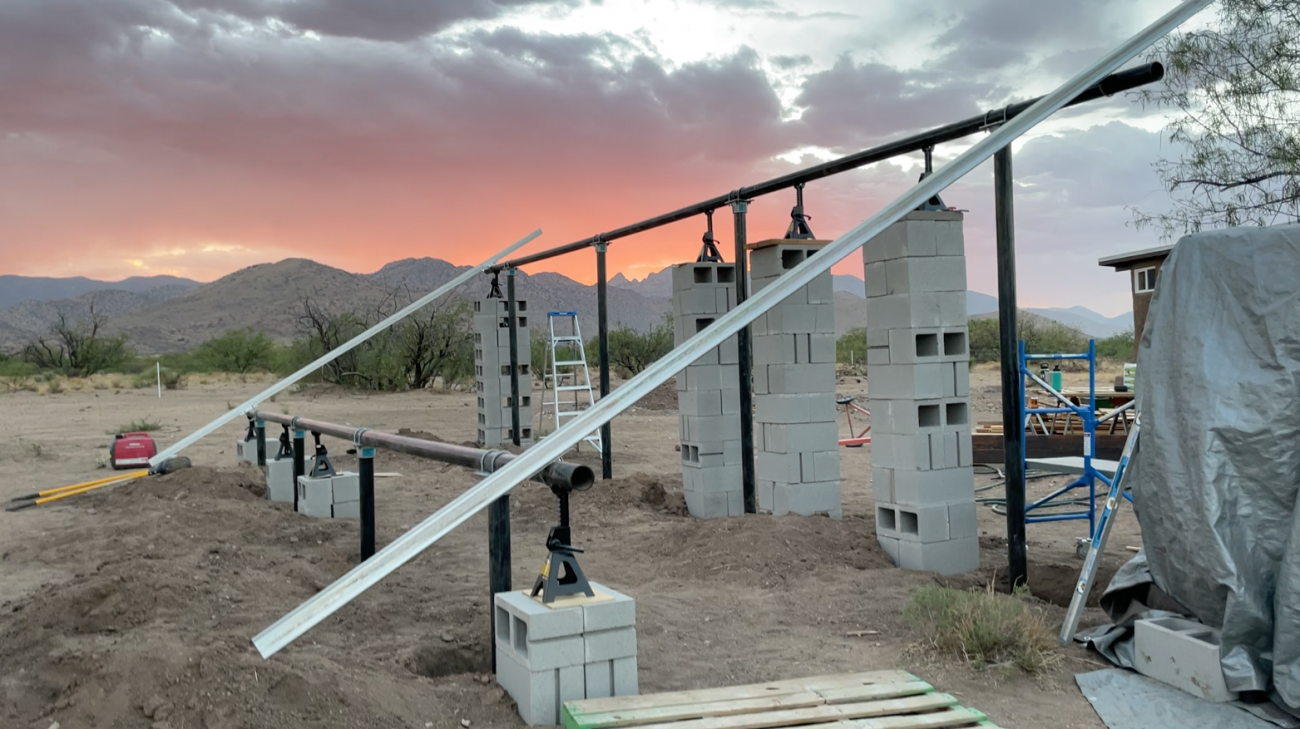
Assembling the Ground Mount Frame
The frame of your solar ground mount will be 2” or 3” Schedule 40 Steel Pipe. We went for the 3” due to the size of our mount. You can either concrete your piers into the ground or use massive ground screws depending on your environmental conditions. In our case, the soil was too sandy so concrete it was. IronRidge doesn’t sell the pipe so we had to source from a local metal yard. This was during COVID so prices were higher than usual.
We also ordered a few pallets of concrete, cinder blocks, and jacks to help us build the frame. More on that in a minute.

Using the diagrams generated by IronRidge, we planned and marked the 8 pier holes needed for the mount. Then our friend came out with his tractor to auger the 12” wide 7’ deep holes they required for installation.
But it turned out that with the extension, his tractor arm couldn’t go high enough to start drilling. So we adjusted the settings for 24” holes instead which got us to about 5.5’. The downside was that this created the need for a lot more cement. It also meant we had to rent a different auger.
But we didn’t want to skimp on the strength of the structure so we called Lowe’s and had a few more pallets of cement delivered, and waited till the next weekend to use the 48” auger.
Then we had to cut the steel pipe. It came in 20’ lengths which meant our 32’ long array had to be built in multiple pieces. Also, we had to cut the piers to certain lengths depending on whether they went in the front or back. There was lots of measuring and re-measuring to make sure we did this right. We only had one shot at cutting. For the long pieces we had to make sure that they were cut to hit right on top of a pier for stability.
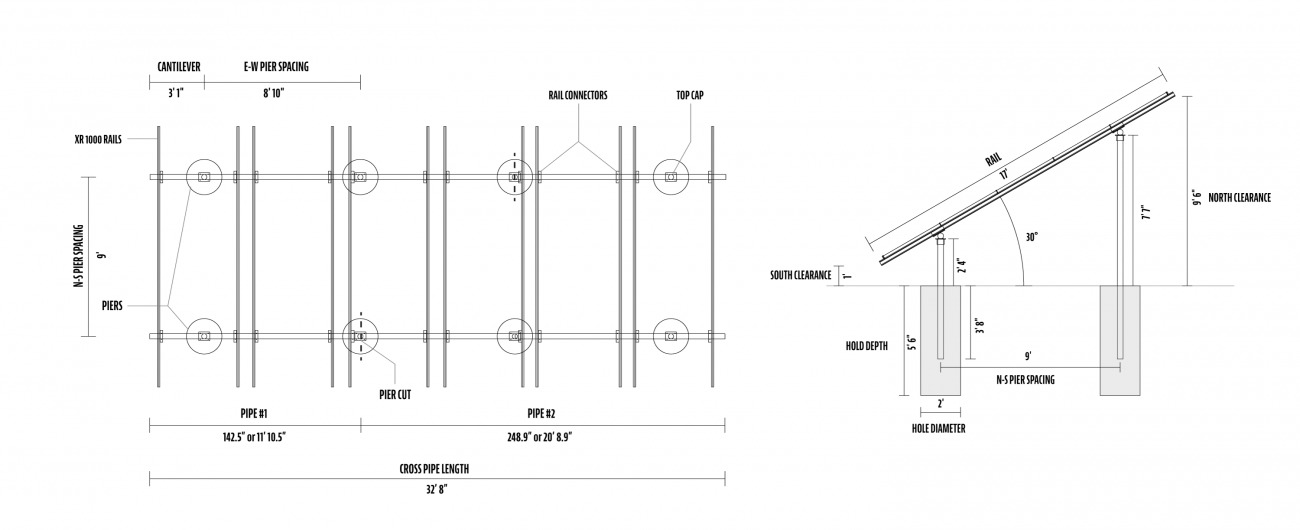
Again, the IronRidge Design Assistant Tool, was super useful in helping us know exactly how long to cut each piece.
Once the holes were dug, it was time to use stacks of cinder blocks and jacks to get the horizontal rails in place both parallel with each other and leveled horizontally. As you can imagine, lining all this up took a while, and we had to re-adjust many times.
But we finally got it! This meant our main horizontal supports were exactly where they needed to be. So it was just a matter of attaching the vertical piers via IronRidge’s Top Caps, letting them hang in the holes, and filling with cement.
I say just - we’re talking over 200 bags of Quickcrete here. It took DAYS to mix by hand and fill in. I never wanted to see a bag of concrete again.
Installing Solar Panels
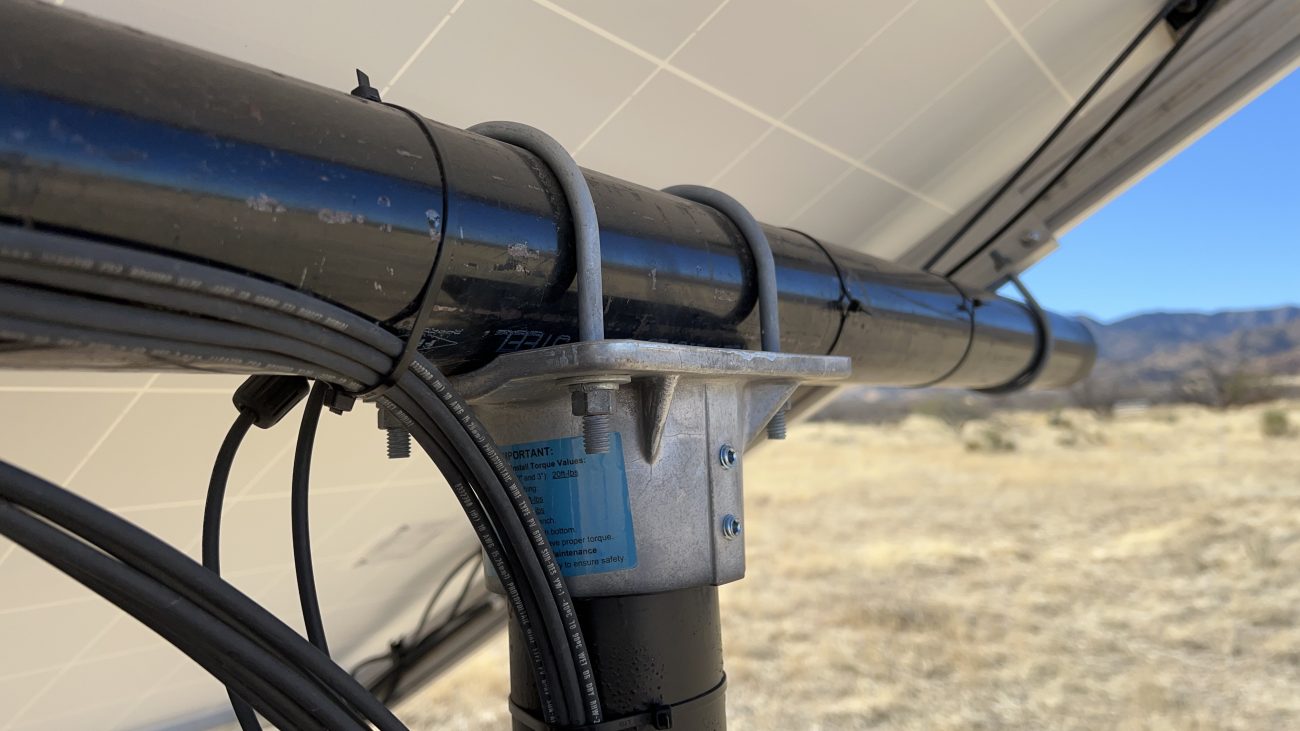
With the frame in place, it was time to install the other IronRidge pieces. Their rails are the centerpiece of the system - we went with the XR1000 which is rated for heavy loads and high winds. Since our panels were 6 across and 5 down, we needed 12 rails (one on each side of each array). Here’s a visual.
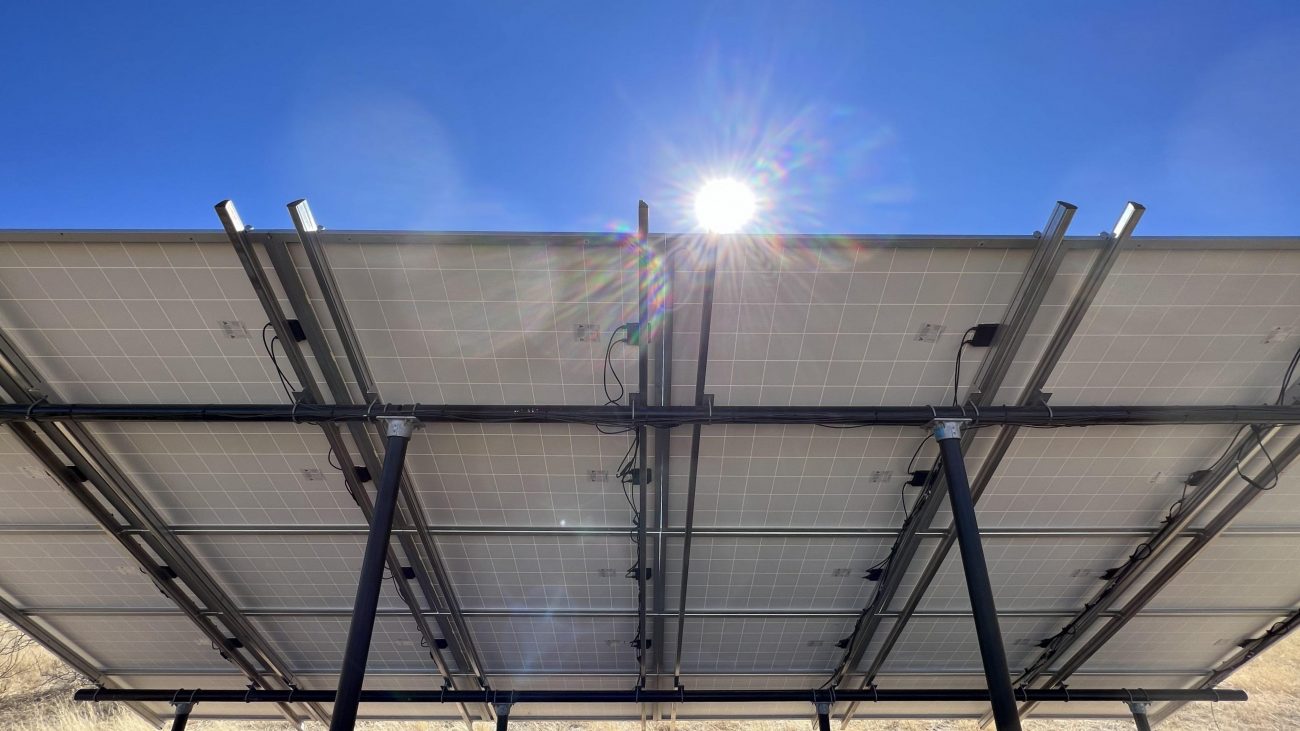
These rails are held on by Rail Connectors - an L shaped piece of steel with U Brackets to attach to your pipe. You have to do some measuring to set them in the right place, but once you get going it’s pretty easy.
And pretty forgiving, too. The more we worked with this system we realized that much of our stressing about everything being perfectly lined up wasn’t necessary. The whole thing is designed with a lot of wiggle room.

Once your first two rails are in you can start installing solar panels! Panels are mounted to the rails using UFO’s or Universal Fit Objects. They have a small foot that slides down the track on top of the rails and then clamps down on top of the panels.
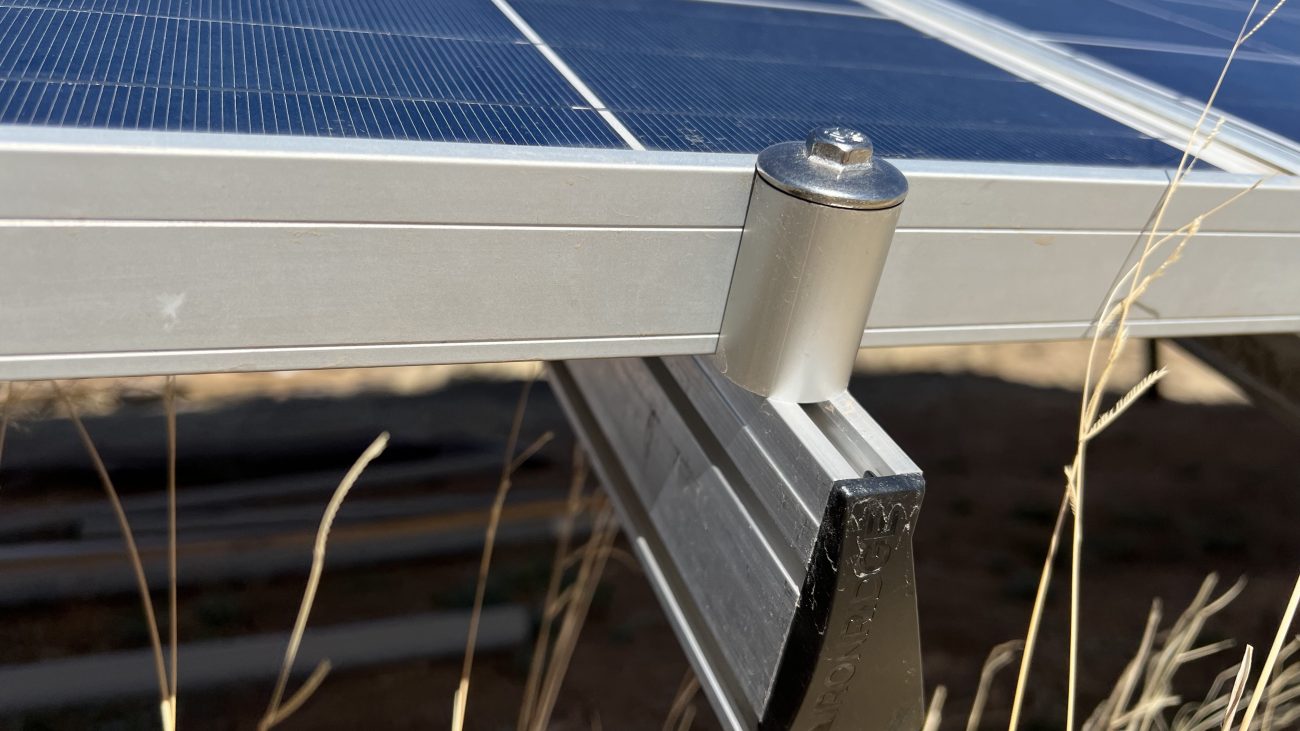
On the first and last panel of the vertical array you have to attach Stopper Sleeves to the UFO’s. This provides a solid, flat surface for the panels to sit against.
Set your first panel on the UFO’s then slide two more in the track so they touch the top of the panel. Slide the next panel down on those UFO’s and repeat.
You also need to tighten down the UFO’s to the correct torque. Too much and you could break the panel. Not enough and it might fly away in a wind storm.
Speaking or torque, there are several parts of this process that require exacting torquing specs. I recommend getting both foot pound and inch pound torque wrench’s as well as a deep socket set.
Wiring the Solar Panels
With the ground mount built, and the panels attached, we turned our attention to wiring. Like we mentioned, our plan was to group 5 panels at a time in series to run at high voltage. This meant the panels would produce more power earlier and later in the day or in cloudy conditions, and that the amps being transferred to the batteries would be lower, allowing us to use smaller wire for the conduit runs. Remember our mount was over 100’ from the solar shed, so cost was an important consideration.
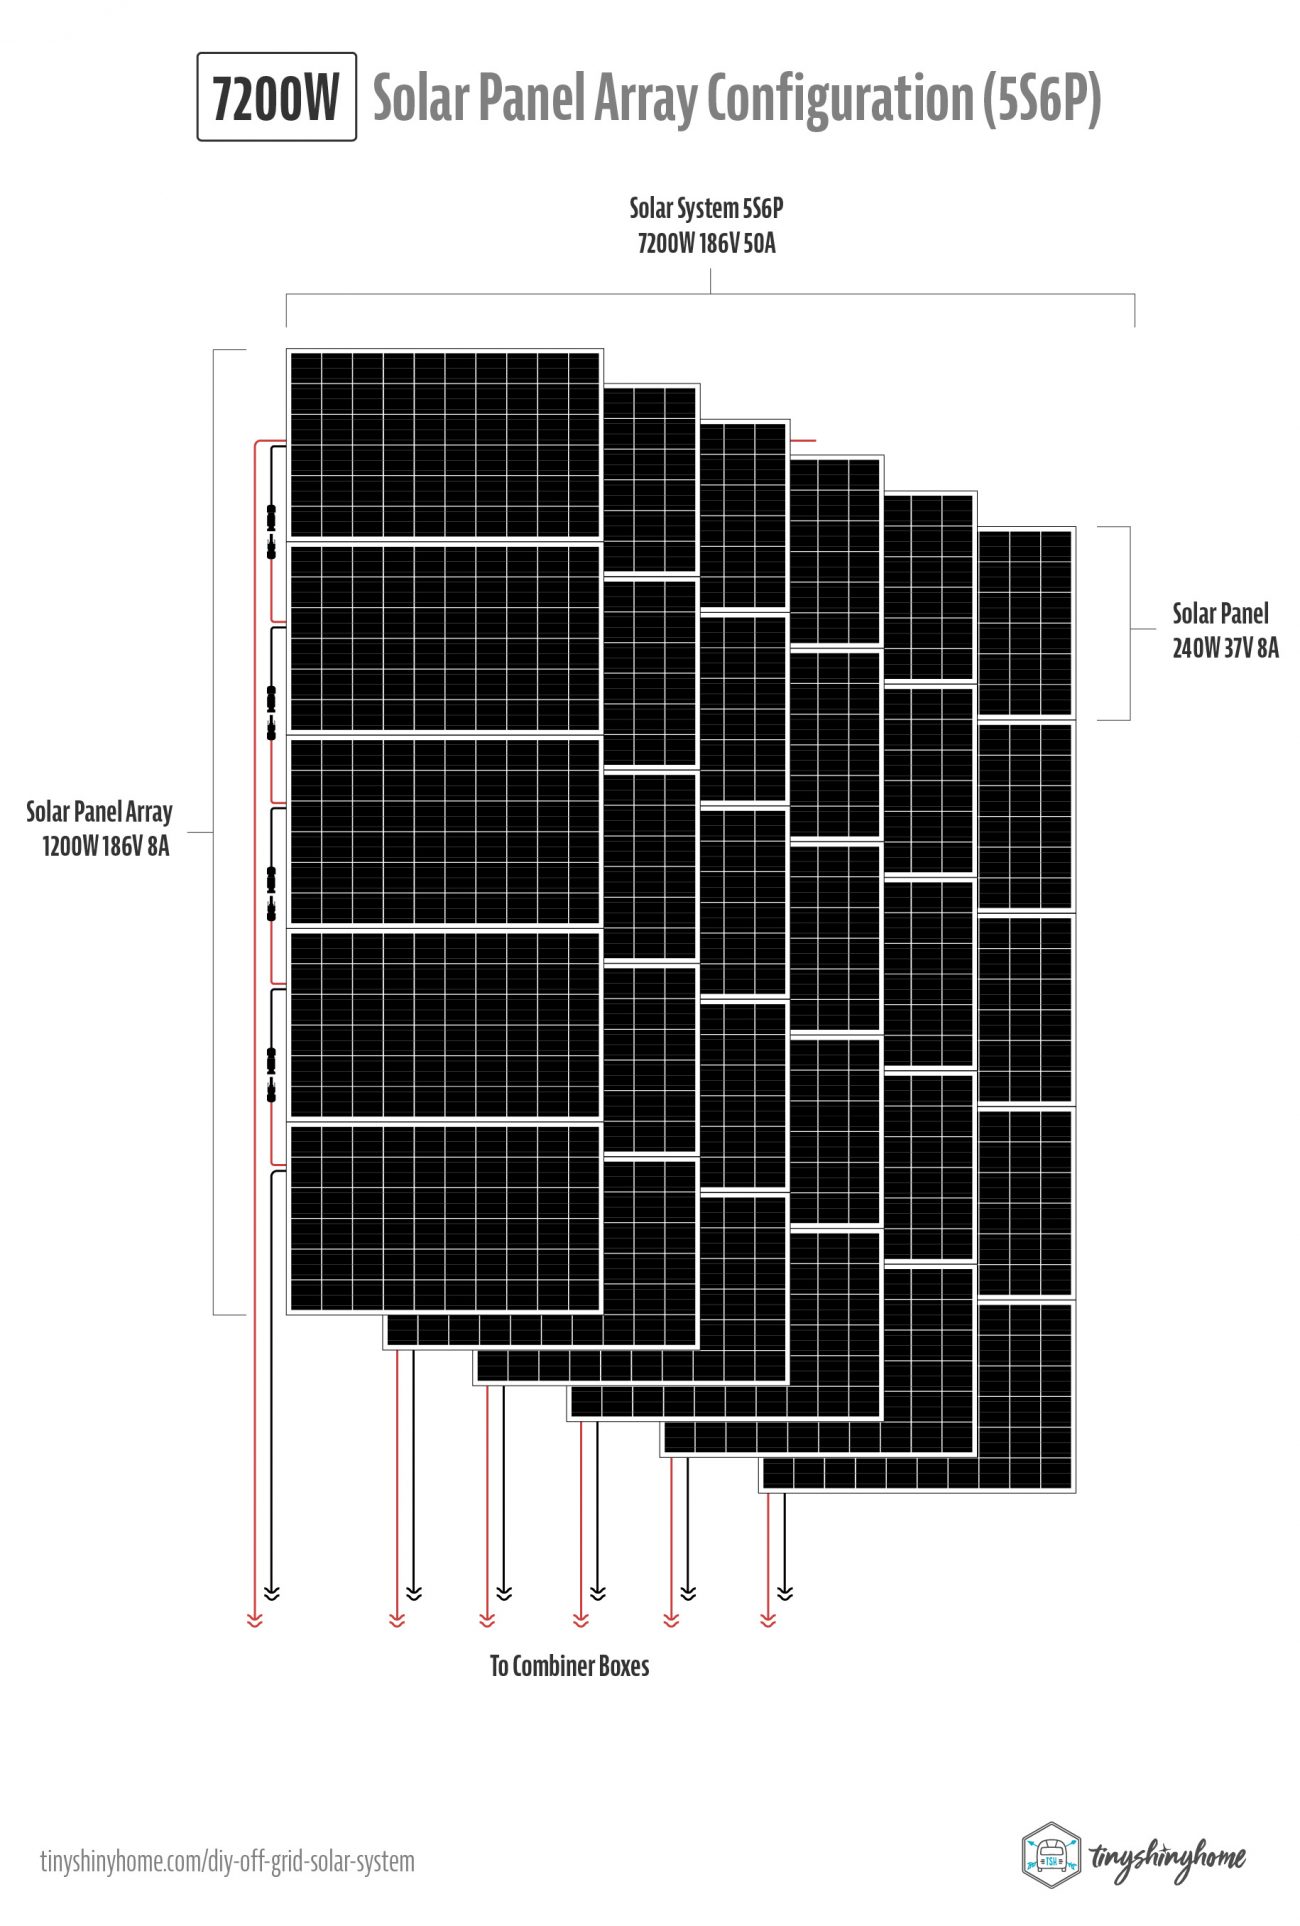
Here's how the math worked out. Each 240W solar panel array connected 5 in series produced 1200 Watts, 186 Volts, & 8 Amps. Then connecting all 6 arrays in parallel created a 7200W, 186V, 50A solar panel system.
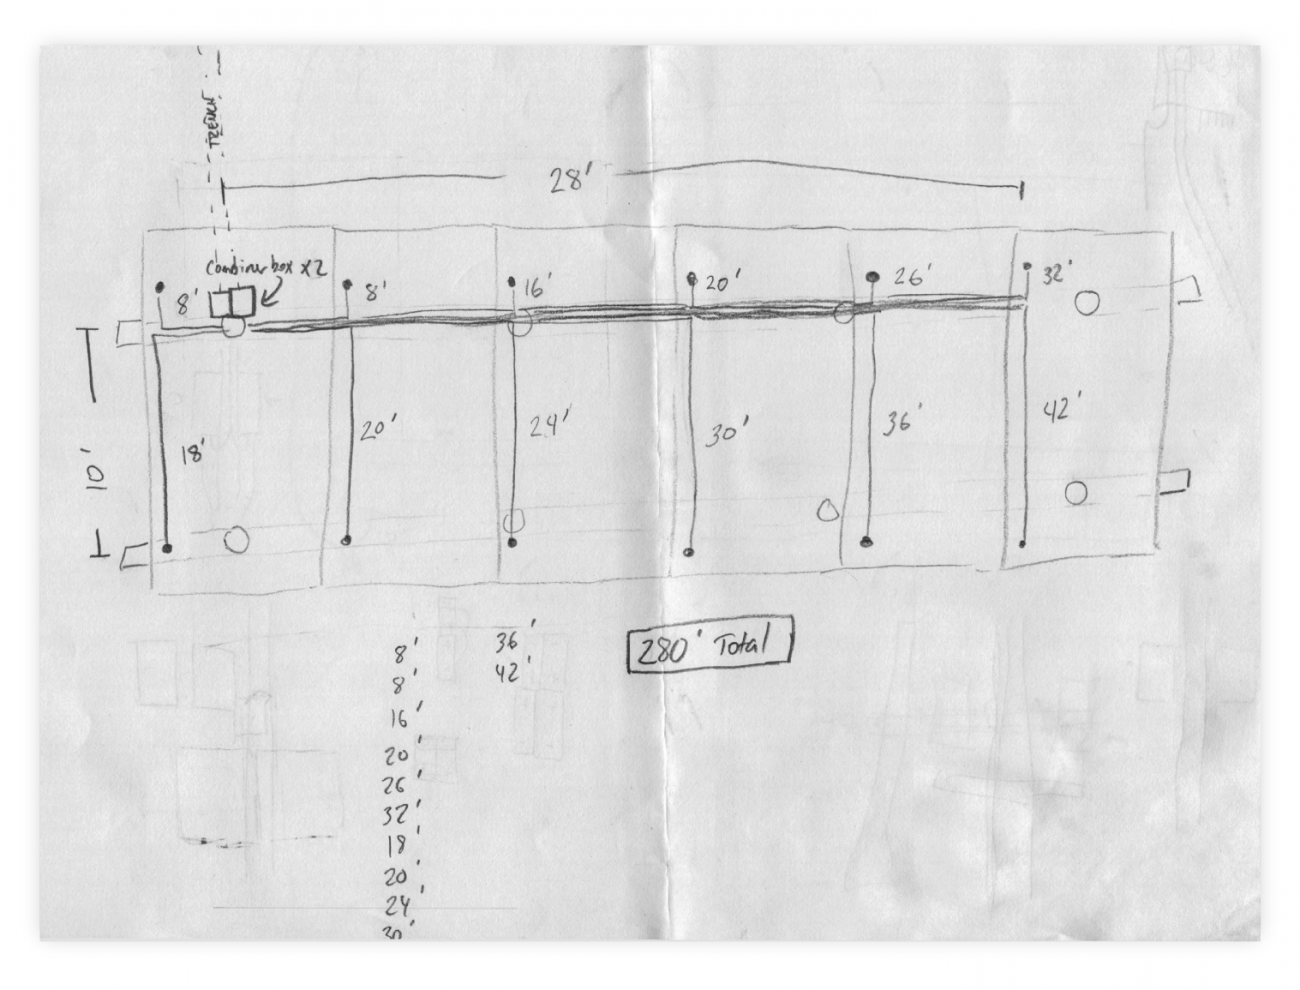
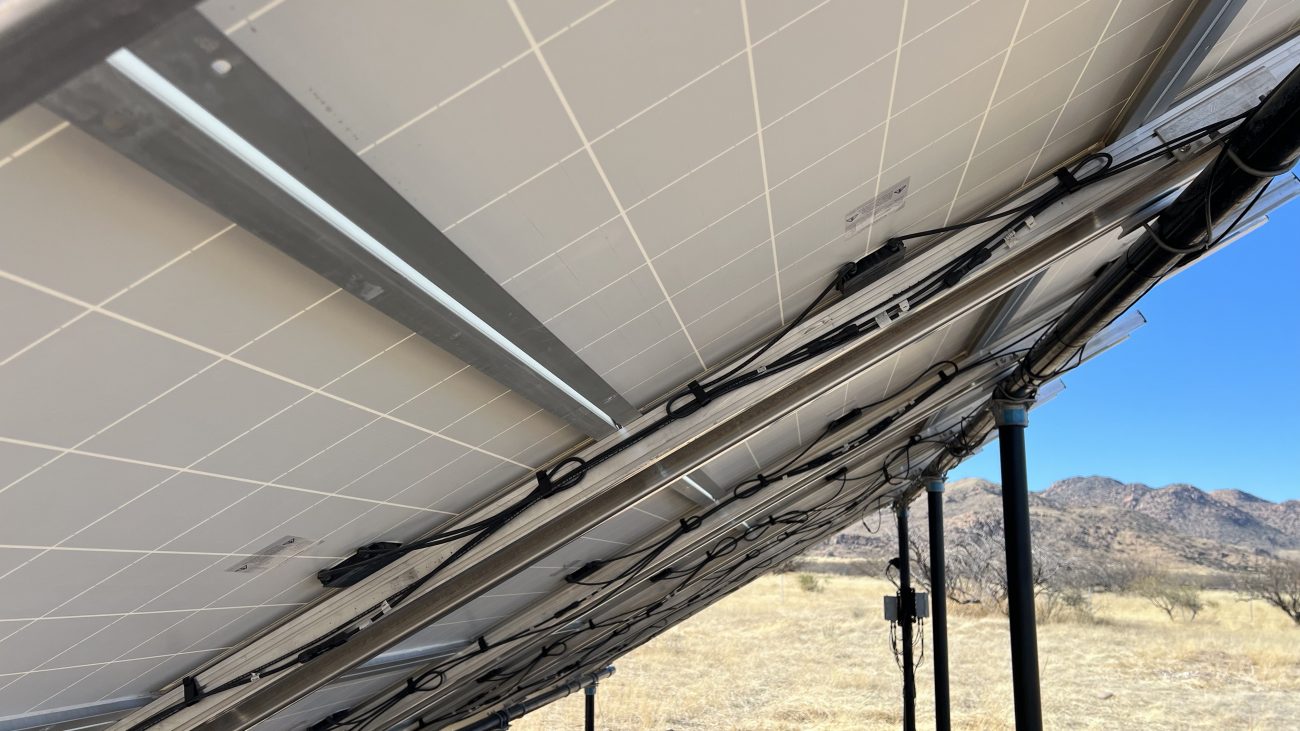
Grouping the panels 5 in series meant we had 6 total arrays (or 5S6P). It also meant that we had to create a bunch of solar wires to complete the series back to the combiner boxes. That meant buying our own MC4 connectors and hundreds of feet of PV solar wiring. And again, lots of measuring. One end of the series was always closer than the other, and each array got farther from the combiner boxes. So for our size panels we needed 300’ of 10 AWG PV Wire and 24 MC4 Connectors.
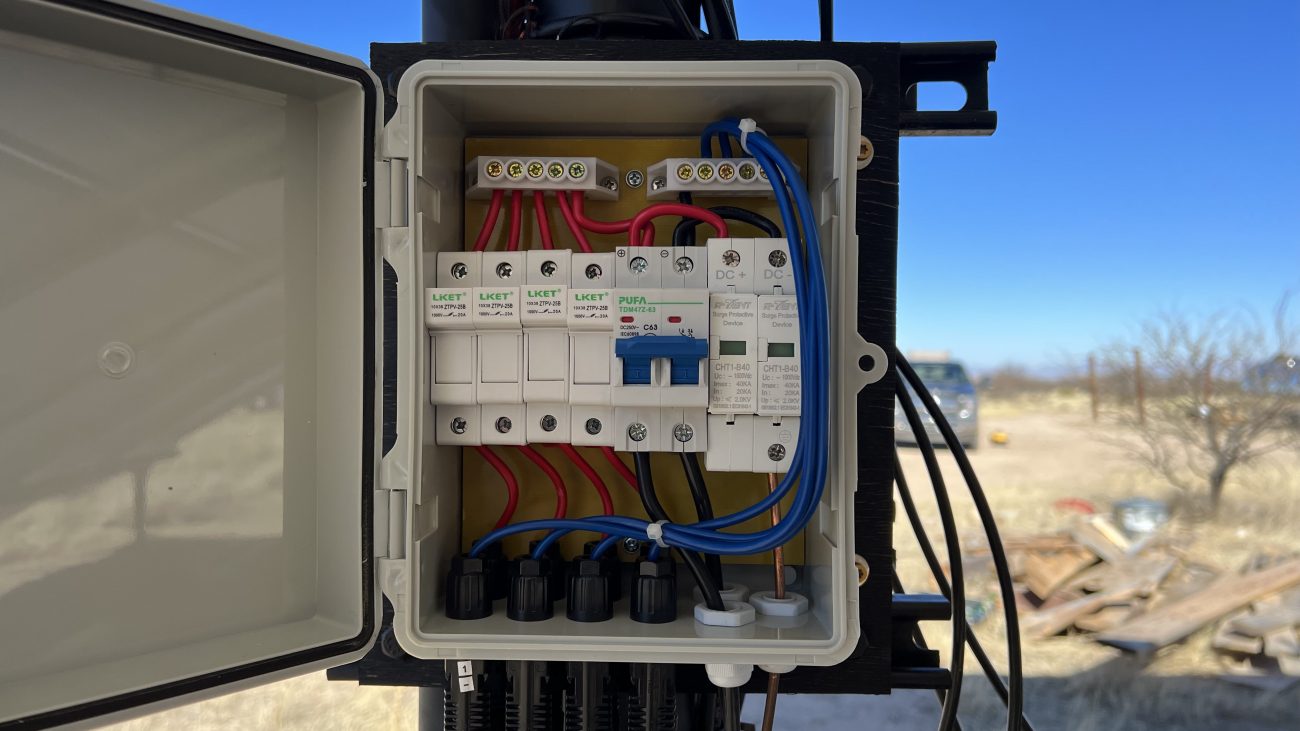
Finding the right combiner box(es) was important. They needed to be the right size in terms of voltage and amperage for each array, and because of our wide open skies a lightning arrestor was necessary to protect the gear inside the solar shed from a lightning event. We ended up with these Eco-Worthy combiner boxes. They’re heavy duty, rain proof, and already have MC4 connectors installed to make connections easy.
Even though they sell a 6 string, we decided to buy two 4 string boxes just in case we ever wanted to expand and add more panels later. So one combiner box has 4 strings and the other has 2.

Honestly, figuring out a way to mount the combiner boxes to the 3” pipe was more complicated than hooking the wires up. But with some pipe clamps, plywood, and Unistrut we figured it out.
Once the panels were connected, we started our trenching conduit runs.
I won’t go into a ton of detail here as your trenching requirements are likely very different than ours. But there are a few important things to keep in mind.
The first is that the length of the run out of the combiner boxes, and the amount of amps running through these wires is important. For us, we decided to go with 6 AWG wire for the 100+ft run because each combiner box had a potential of 32A. It’s cost effective, but also still oversized in case we want to add higher capacity panels later (more on this below).
Note: the link above it to Amazon, but you can likely source this much cheaper at your local hardware or electrical store.
The second is that you’ll want conduit large enough to easily pull your wires through, keeping in mind any twists and turns along the way. We went with 1.5” electrical conduit for our four 6 AWG wires. And we had 6 90 degree bell turns. Fish tape helped a ton with this process. We bundled them together and pulled them all at the same time.
Our local codes call for electrical conduit it to be buried at least 2’ so we dug a trench by hand, glued everything together, and pulled the wires through into the solar shed. One day we’ll get a tractor or ditch witch, because that was way too much work!
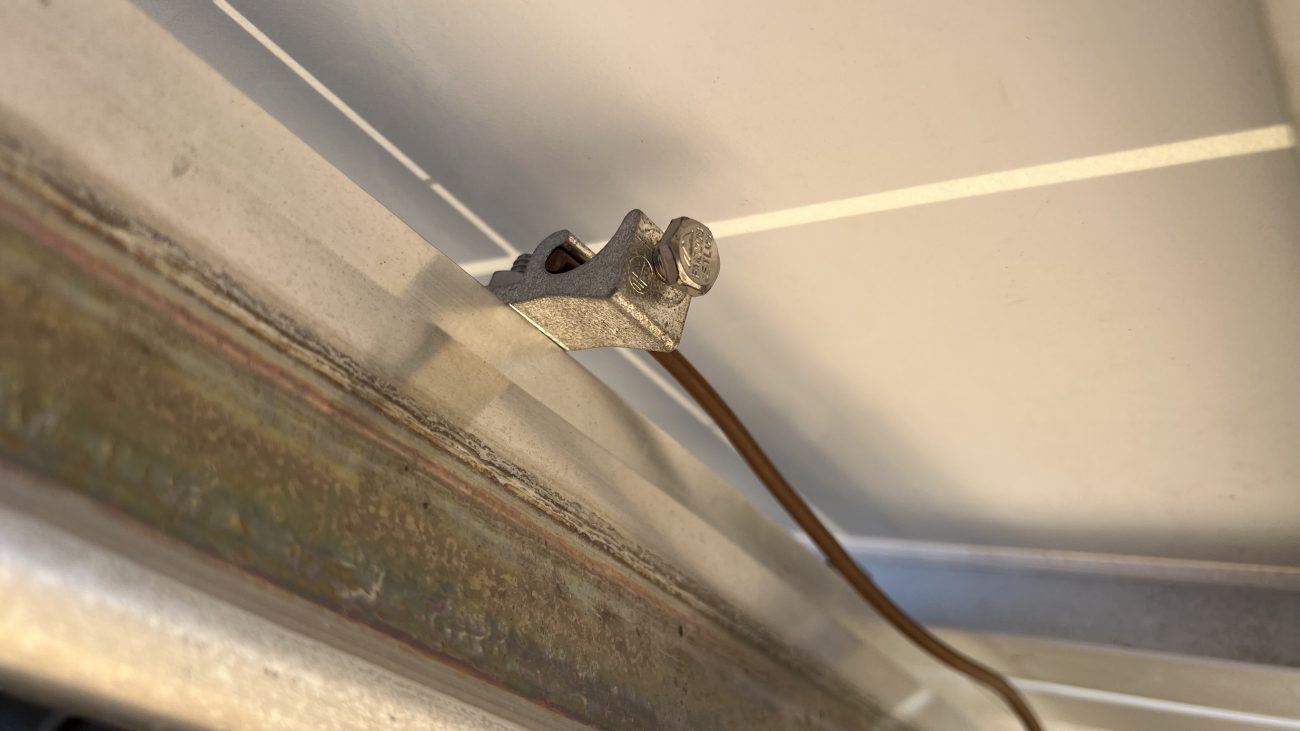
The final piece for the solar mount was grounding. The IronRidge system is designed so that all the metal frames of your panels are connected together, meaning you just have to run a copper line to a copper ground rod off one of the rails. They supply the lug connection for you. In our case, we decided to add a second ground rod to connect to the lightning arresters in the combiner boxes as well. Then we ran another copper wire between the two.
This should allow the lightning arresters to trip if lightning were to ever hit the mount or anywhere near it. Out here indirect lightning strikes are totally a thing, so just trying to be extra careful. When it trips, it cuts all power from the combiner box so no surges can make it into the shed and destroy the charge controllers, inverter, batteries, etc…
Finding the Best Lithium Battery Deal
There are so many ways now to build a large battery bank for off-grid living. But the one constant is that you should definitely be looking at Lithium Ion or LiFePO4 batteries.
Lead acid or AGM batteries are bigger, heavier, wear out quicker, can only use half the capacity, charge slowly, and are affected by large loads.
But Lithium batteries are smaller, lighter, last much longer, use most of their stated capacity, don’t have much voltage sag, and charge quickly.
For reference, the batteries we purchased have a lifespan of 2,000 to 3,000 cycles. Currently we’re using about 10 cycles per month because we have so much solar, and the State of Charge rarely drops below 80% overnight. That means these batteries could easy last anywhere from 15-20+ years if we take care of them. Whoah!
The one downside is that Lithiums are more expensive and need a brain or BMS to manage the cells. But if you are building an off-grid system to use full time, the investment in lithium pays off easily.
These have been the main options on the market so far:
- Tesla sells the Powerwall which includes a battery pack, inverter, and charger all-in-one.
- Used electric car batteries are very popular as well, Chevy Volt and Nissan Leaf being the most widely used.
- Rack Mounted 48V Systems like the LifePower4 EG4
- And of course everyone’s getting into the lithium cell game with companies like Battle Born that have a BMS built into each battery.
There are some issues with these, though:
- Powerwalls are crazy expensive per kWh ($500/kWh).
- Battle Born’s are also ridiculously expensive ($720/kWh), and the built-in BMS doesn’t interface well if you have more than one.
- Rack mounted systems are a little cheaper ($300/kWh).
- Electric car batteries prices are all over the map ($170-$300/kWh), but they’re difficult to source, and then they often come in a hard to open housing with lots of voltage and setup quirks.
What if you could buy small, efficient, easy to connect cells that allow you to build your own bank exactly how you want at a fraction of the price?
Enter Alibaba. Here’s the thing. Other than Tesla, all those lithium cells I mentioned above come from China anyway. In fact, just about every other lithium battery you buy - whether it comes in your phone, laptop or a flashlight - come from China. They know how to make lithium batteries.
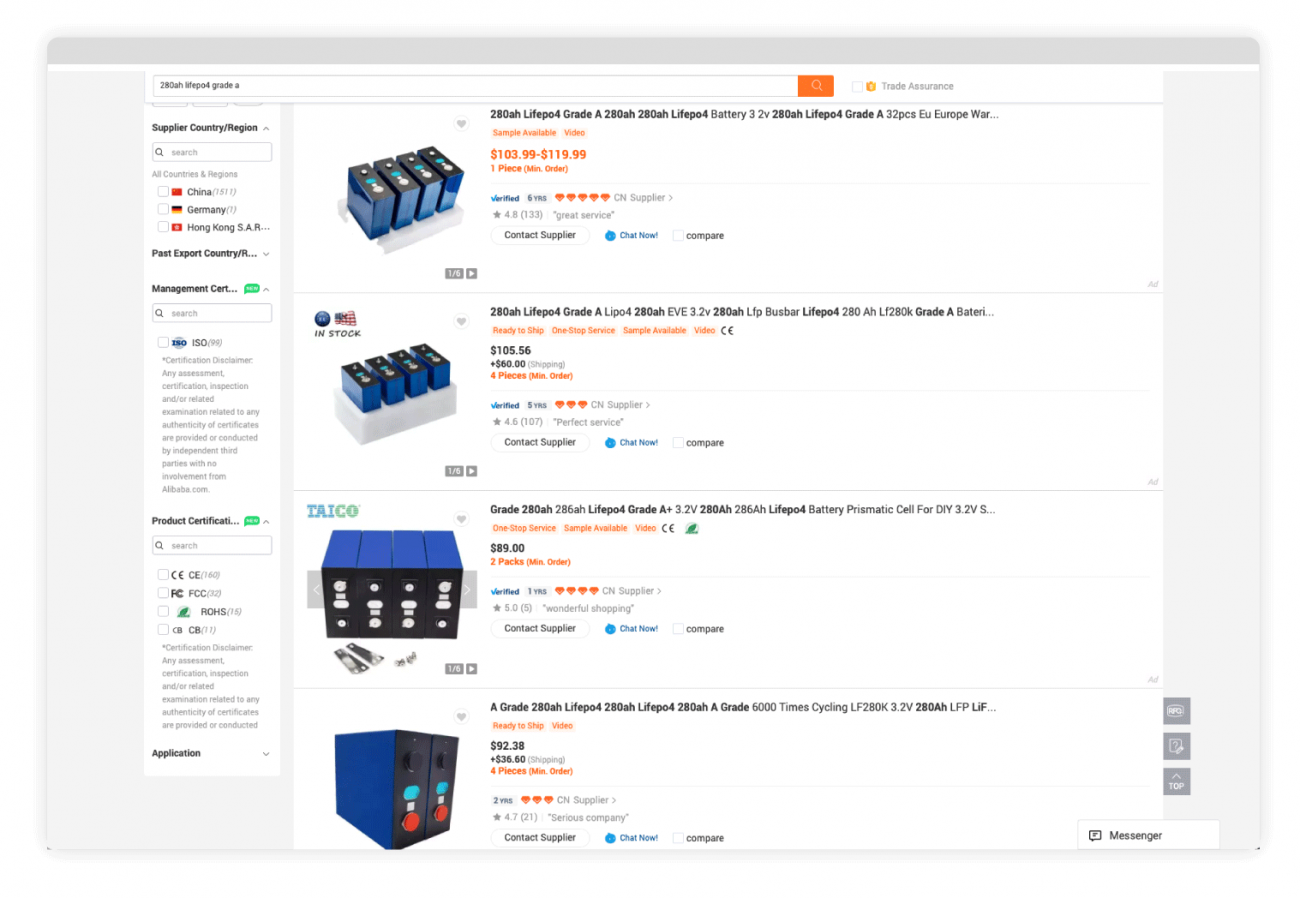
And recently there’s been a surge in competition for these cells. Do a search on their site and you’ll get thousands of results for 3.2V 280Ah lithium Grade A cells.
We paid about $130/kWh in the middle of COVID for our batteries, so there’s a chance they’ll be even cheaper in the future. With these insane prices we got estimates from a few suppliers and bought 28kWh or 32 battery cells directly from China for only $3,700.
The Tesla or Battle born options would have cost 5-7x more for the same amount of storage. The trick is you have to assemble yourself. We’ll get to that in a minute.
Beware the Purchasing Process on Alibaba
Before I get too ecstatic about these cells, we have to talk about the buying experience on Alibaba. In a word: “sketch city.” Things started out ok. The conversations I had with each supplier were super helpful. They all were asking important questions like, “What are you going to do with all these batteries?”, and “How are you connecting, what voltage, what size bank are you looking for?” to make sure my math was correct.
I picked a supplier, and accepted the offer. The trouble started when I went to pay. My Apple Card was immediately declined. Then apparently because I had a credit card declined I was not ever allowed to pay with credit cards again. Western Union was an option. I mean, c’mon - how much more sketchy can we get? I was about to give up, but decided to try Paypal and it actually went through! Sweet!
But wait! The saga isn’t over yet. Literally the day after I paid I got a message from the supplier saying the cells I ordered weren’t available anymore along with a bunch of spec sheets in Chinese for a similar cell that they would send instead “at no extra charge.” We went back and forth over this for several days - the new cells were REPT instead of EVE. This may not mean a lot, but if you do any research on these cells, there’s a lot more real world experience with the EVE cells, and they come highly recommended. I was hesitant to accept this change because there wasn’t much data about REPT yet.
I told them I’d prefer what I paid for, but they said it would be another 6 months before they got them in. With COVID and all sorts of shortages going on I decided to take the risk and settle for REPT. Why? Because they get shipped via freight overseas and it takes months to receive them. And we needed them ASAP.
I kind of feel like this whole process was more of a cultural thing. In the US when you buy something you expect to get exactly what you ordered. But the Chinese supplier really wanted to sort of wheel and deal, and change things up afterwards - this was really foreign to me and made me uncomfortable.
After agreeing to the new cells, it was a matter of waiting. And man, did we wait. The FedEx tracking numbers they gave me never showed any updates. I messaged them several times for some kind of tracking info, and they sent over shipping manifests completely in Chinese.
I was starting to get worried I got ripped off. Finally they said the ship was at port, but because of the pandemic was just sitting out there, and it hadn’t been unloaded. Then a few weeks later it was in customs with no timeframe for release.
And then, 2 1/2 months later the FedEx guy showed up with 8 big heavy boxes of batteries! And that FedEx tracking number still never showed any updates.
Now here’s one thing you should know. The way Alibaba works is that they function as a middle man. So we paid them, and they hold the funds in Escrow until we receive and sign off. Then they release the funds to the supplier. So theoretically we were somewhat protected the entire time, it just felt sketchy.
Also, several other YouTubers have had mixed success actually receiving Grade A cells that aren’t prone to swelling and capacity loss (they likely received Grade B or C cells).
We recommend:
- Going through Alibaba instead of Aliexpress
- Sticking to well known cell names like EVE or REPT
- Getting quotes from multiple suppliers, and avoiding any prices that seem too good to be true. Even with our amazing cost savings here, an even lower price can be a red flag.
- If you're curious, we bought our cells from Dongguan Lightning New Energy Technology Co
- This is the exact listing: 3.2V LiFePO4 REPT 280Ah
That being said, our batteries were all packaged very securely, with no swelling, in perfect condition, and almost perfectly top balanced with each other right out of the gate. So if you do your diligence and don’t mind dealing with a bit of sketchiness, you can assemble yourself a large lithium battery bank at a fraction of the cost of other options.
LiFePO4 Shipping Update
Since writing this article, I got an email from the same supplier I bought my batteries from, and they had a very interesting piece of information. Apparently they’ve seen the long wait pain point and have setup a warehouse here in the US with a stockpile of EVE, REPT, and CATL grade A lithium batteries that are ready to ship without all the overseas customs and wait times.
In fact, they told me it would only take 3-7 days to receive the cells here in the U.S. That’s a huge deal! And after looking at the current battery prices for the cells I bought vs these stateside stockpiled cells there’s barely any difference in cost - just a few bucks per piece.
And these prices are “DDP” or Delivery Duty Paid which means the price they give you includes import duties, customs and any clearance taxes. Even better, their sales rep Hayley told me that if you mention Tiny Shiny Home they’ll give you an extra discount.
Use these non-affiliate links to buy them directly:
Now let’s get into how we built our battery bank.
Assembling the Lithium Battery Bank
While using these types of cells made the process of building our battery easier, that’s not to say it was a simple process. There’s so much to keep in mind.
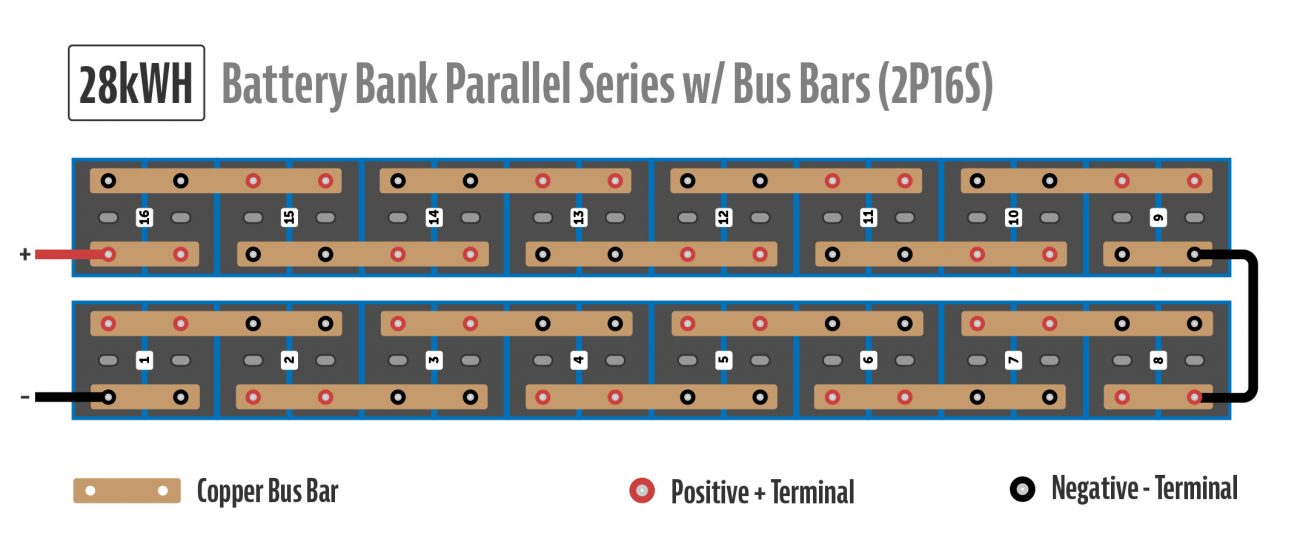
Series vs. Parallel
The first is how do you connect them? Batteries wired in series means their voltages are added together. But batteries wired in parallel will have their amp-hours added together.
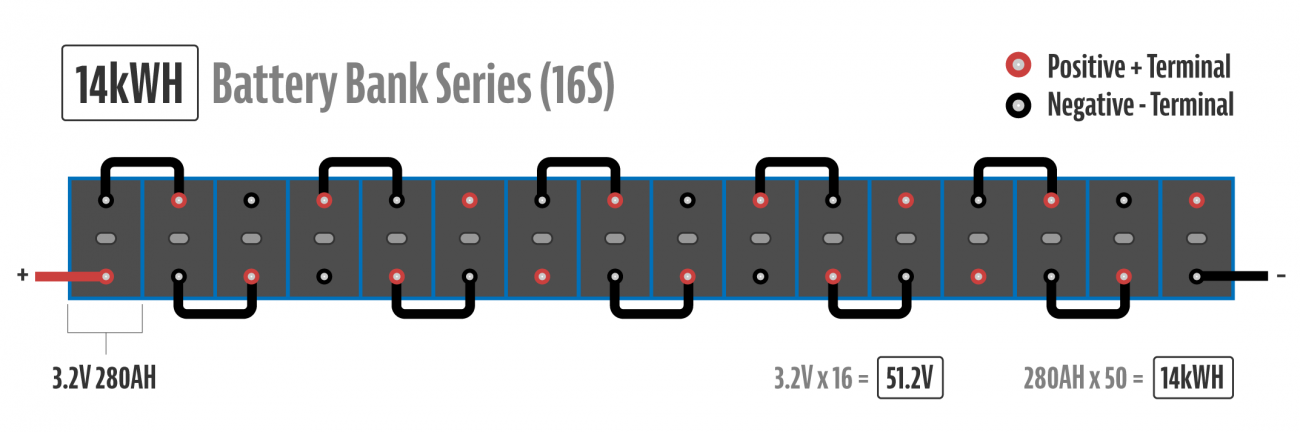
We knew we wanted a 48V system, and we also knew that the REC BMS we were going to use had 16 cell inputs.
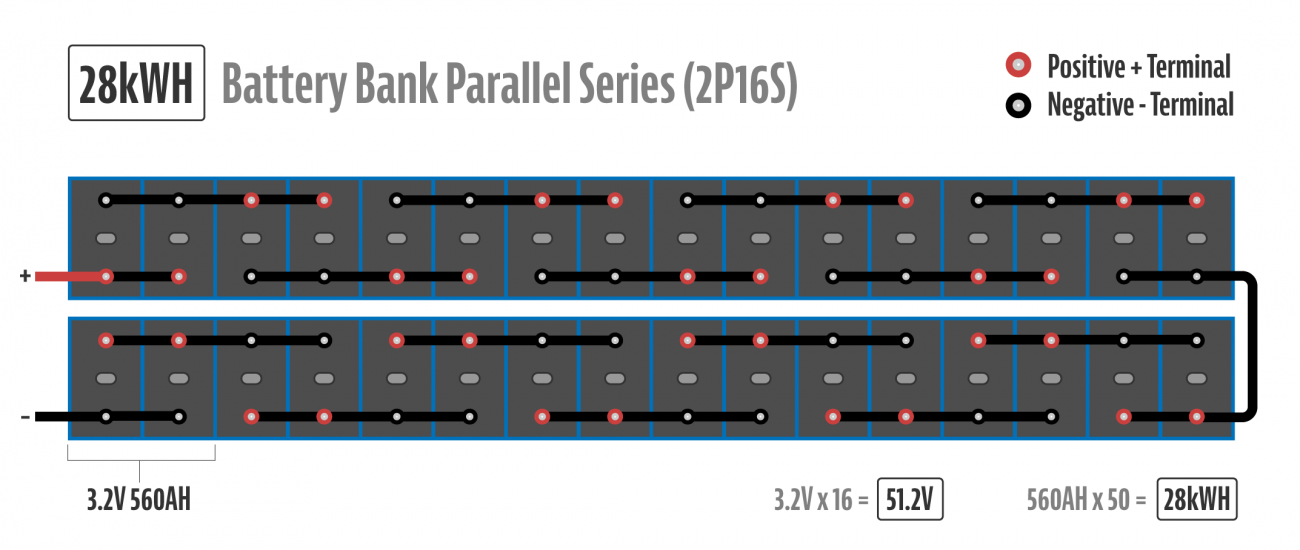
So in our case, it was just a matter of doing the math. We could have bought 16 of the 3.2 V battery cells, connected them all in series, and created a 48V system (3.2v x 16 = 51.2V). But that would have only been about 14kWh of storage (280AH x 50V = 14kWh). Don’t get me wrong, that’s a lot of storage, but we wanted a larger bank for our needs.
The simplest way to add more size to the bank was just to double it. So we bought 32 cells, grouped them in packs of 2 via a parallel connection, and then joined each pack in series. So the first bit of math stayed the same (3.2v x 16 = 51.2V), but the storage capacity doubled (280AH x 2 = 560AH), (560AH x 50V = 28kWh).
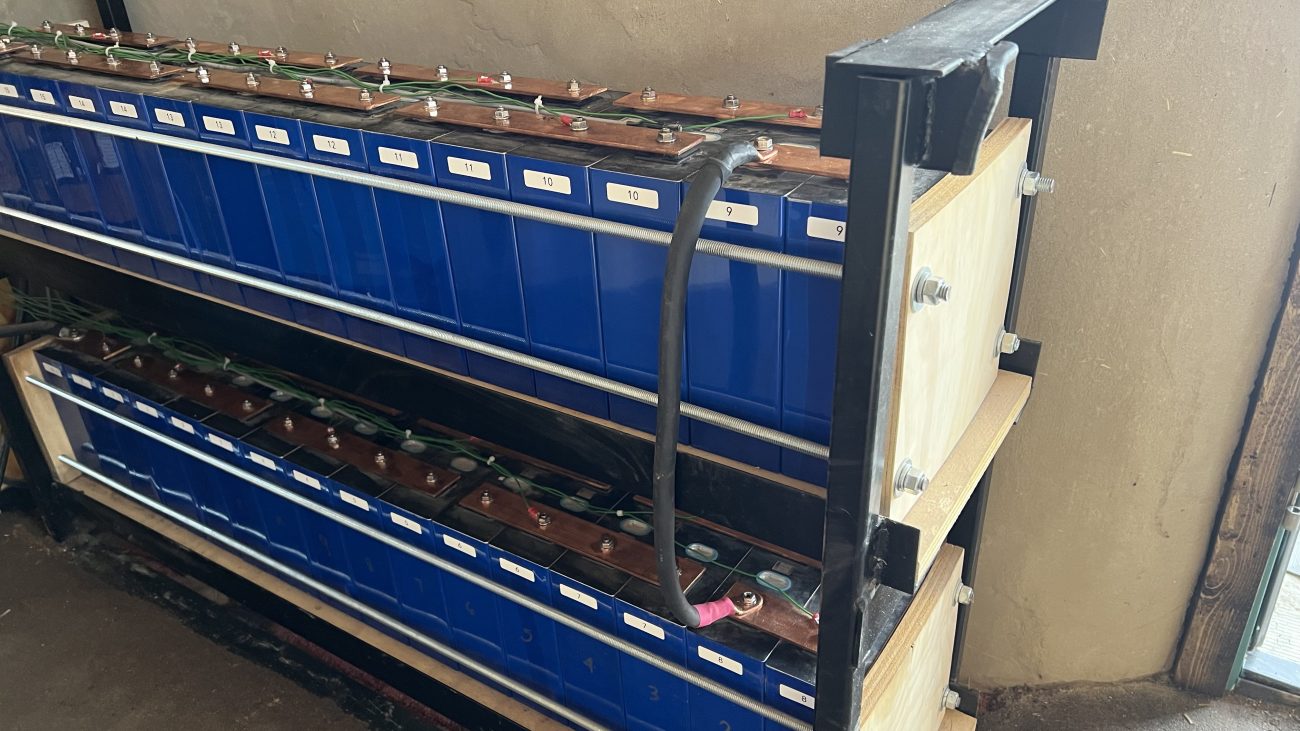
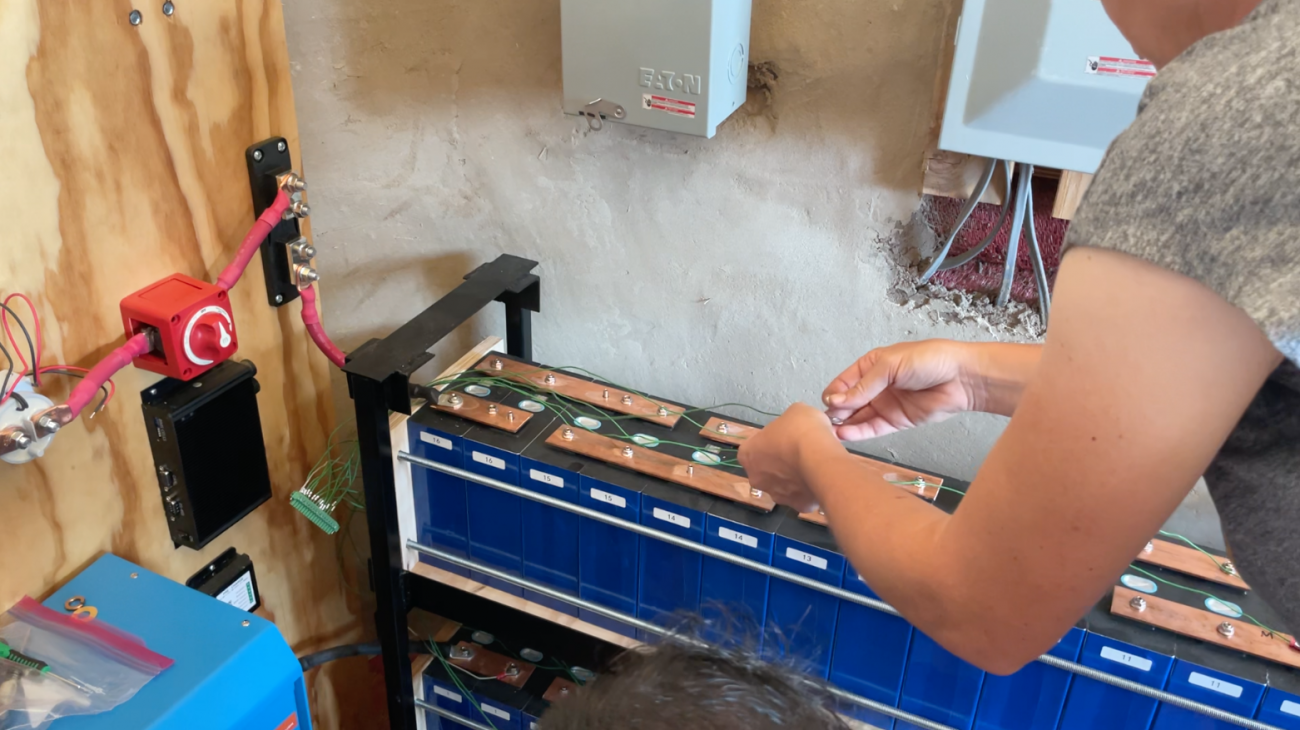
As for the actual connections, the batteries shipped with threaded posts, bus bars and nuts. Some folks don't like threaded posts because you can strip them out easily if not put in correctly - we didn't have any issues, though. Also, the bus bars they came with were thin, and honestly there just weren’t enough of them. So we decided to buy 16' of 1/8” x 1.5” copper bar stock, and cut it, drill it, and make our own.
Before we could connect, though, we had to build a battery box. The first step was to decide how they would be organized. The best way would be all 32 end to end, flipping each pack of 2 for the series connection, but we didn’t have room in our tiny solar shed for that. So we planned on two rows of 16, stacked on top of each other.
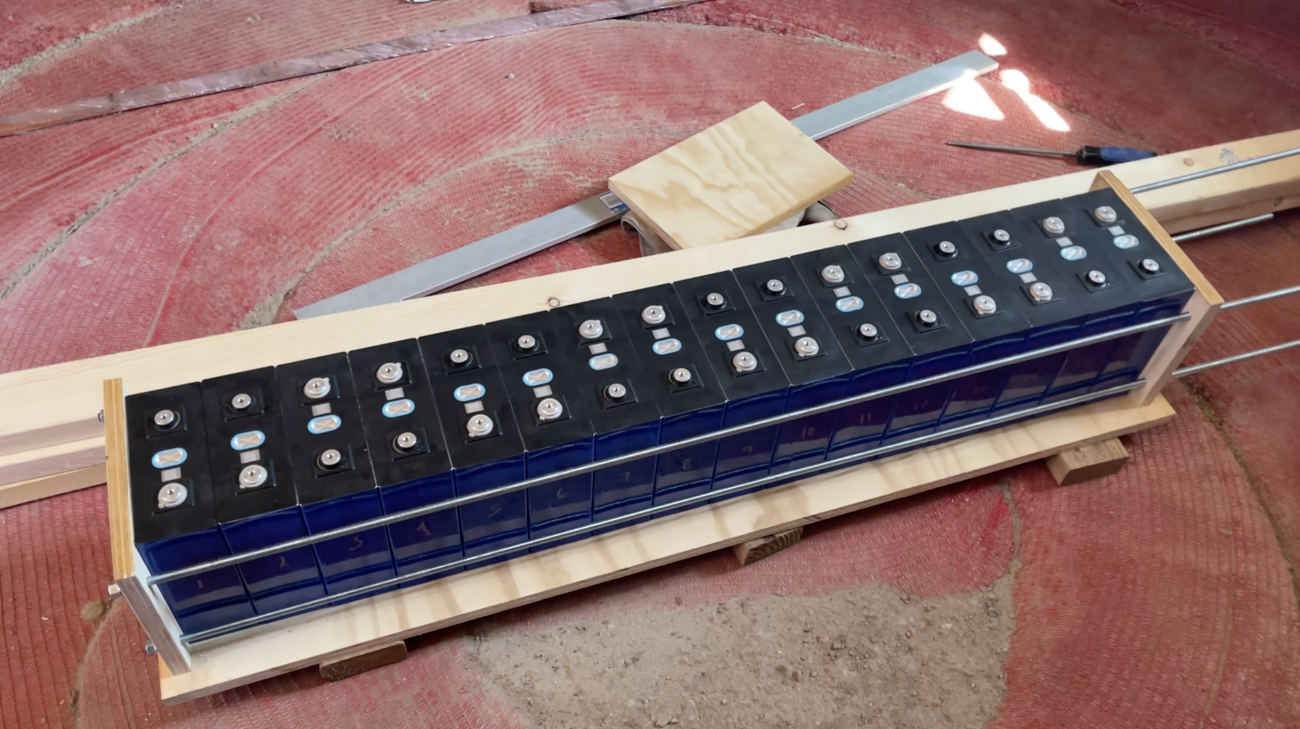
Lithium batteries need to be compressed so they don’t swell over time, so we got some heavy duty plywood, cut to slightly larger the size of a battery, stacked them end to end, and used allthread rod and nuts and washers to create a compression frame for each row of 16.

Then we welded a metal frame that would hold the weight of each row. Each cell weight about 11.5lbs, so each row was 184lbs. Huge thanks here to Juan and Michelle from Beginning From This Morning for helping us not only plan the battery setup, but the frame itself. A ton of thought went into making it.
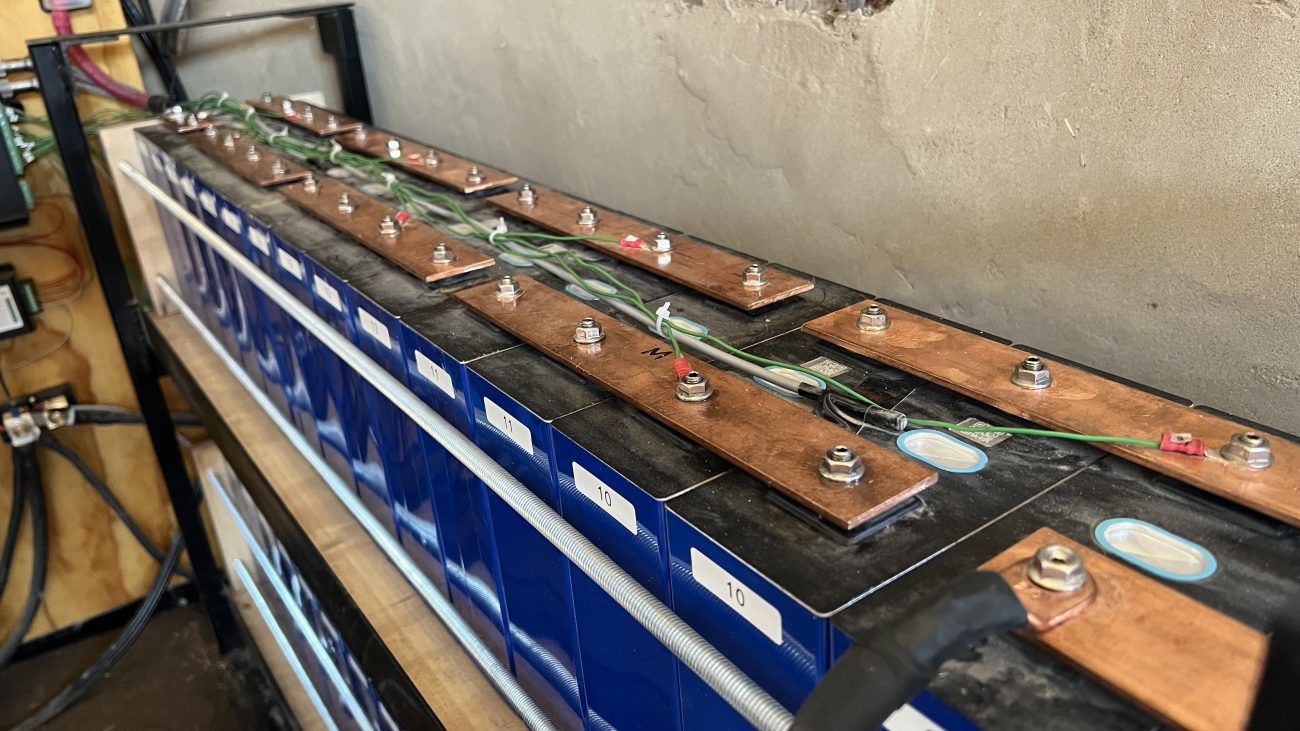
With our packs created, we slid them into the frame, and began to connect the bus bars. They were carefully measured, cut, and drilled so they slid down over the threaded posts so that 2 cells were connected in parallel and then each pack of 2 was connected in series. I know that sounds confusing, but this is what it looks like:
Then all we needed to do was connect the negative of the top row to the positive of the bottom row to continue the series connection. We used 2/0 welding cable for this and crimped our own lugs on.
Before we tightened the nuts down to hold everything in place, we needed to add the cell connections for the BMS. We’ll cover the BMS in more detail below, but for now just know that in order for the BMS to keep the cells balanced, it needs a wire connected to each cell’s positive terminal. This used small 18 AWG wire with ring terminals crimped on to the positive terminal for each group of 2 cells.
Finally, we needed to run heavy duty 2/0 welding cable off the first positive terminal and last negative terminal to the system posts. We’ll get into more detail for that below as well.
Protecting the System: Major Fuses, Disconnects, and Breakers
Before we get into wiring the BMS, let’s talk about the main sources of protection in the system. The first is a T-Class Fuse. The idea behind the T-Class Fuse is that during an unwanted power surge event, it will blow break the main connection to protect your equipment. You’ll create a 2/0 AWG wire and crimp on lug that runs from the positive post of the battery to one side of the fuse block. This should be as physically close as possible to the batteries.
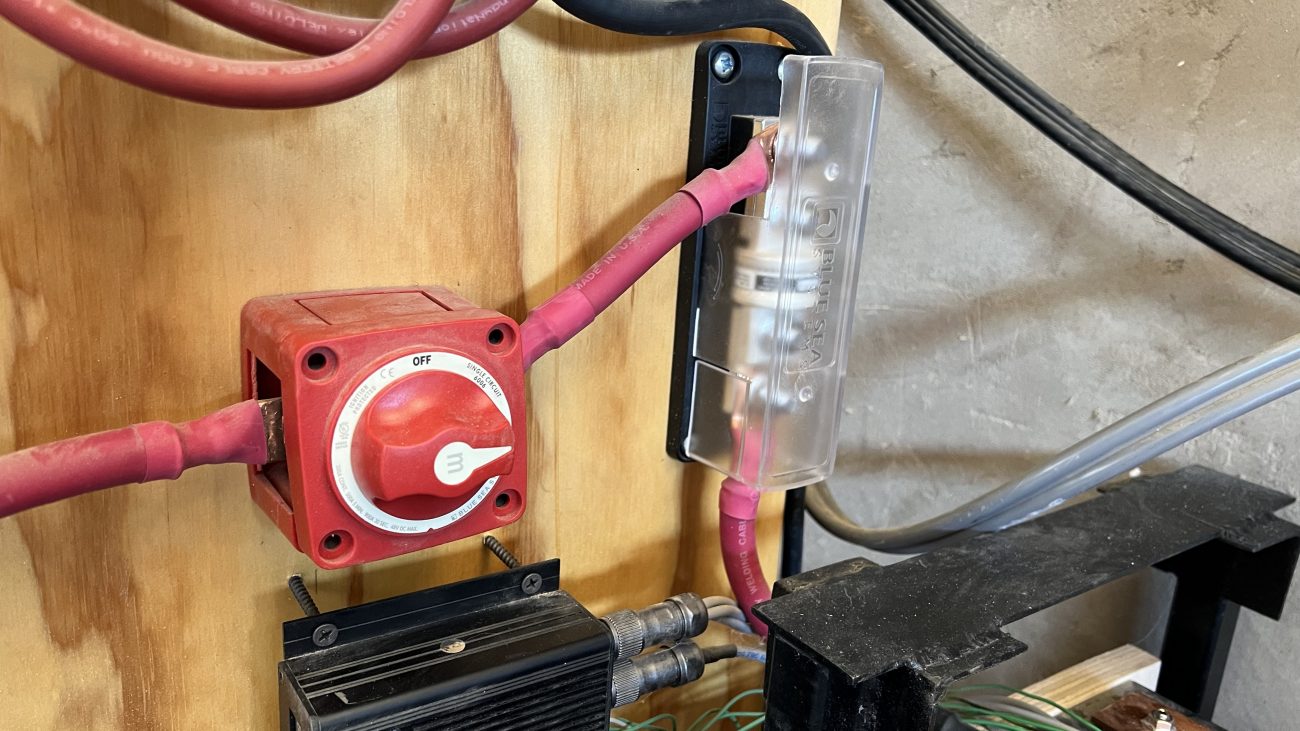
On the other side of the fuse, you’ll create another 2/0 wire that goes through a large switch or disconnect. This will allow you to turn off battery power to the other electronics, and shut the system down to do maintenance.
After that you’ll continue using 2/0 AWG welding cable cut to size with crimp lugs to connect to one side of the contactor, which is tied to the BMS. The other side will flow through a 200A Double Pole toggle or breaker and then is wired directly to the Inverter. The 200A breaker also protects the system in the event that the Inverter has a power surge.

The BMS uses the contactor to turn your system off if it detects under/over voltage or high/low temps - the system side is only activated if the BMS says everything is ok. Otherwise it breaks the connection.
The last major connection in this loop is a large 2/0 welding cable that goes from the negative input on the Inverter to the negative side of your Current Sensing Shunt (see below).
One important safety note: As you install any breaker or switch, always make sure it’s in the “off” position, and leave it that way until you start to boot up the system.
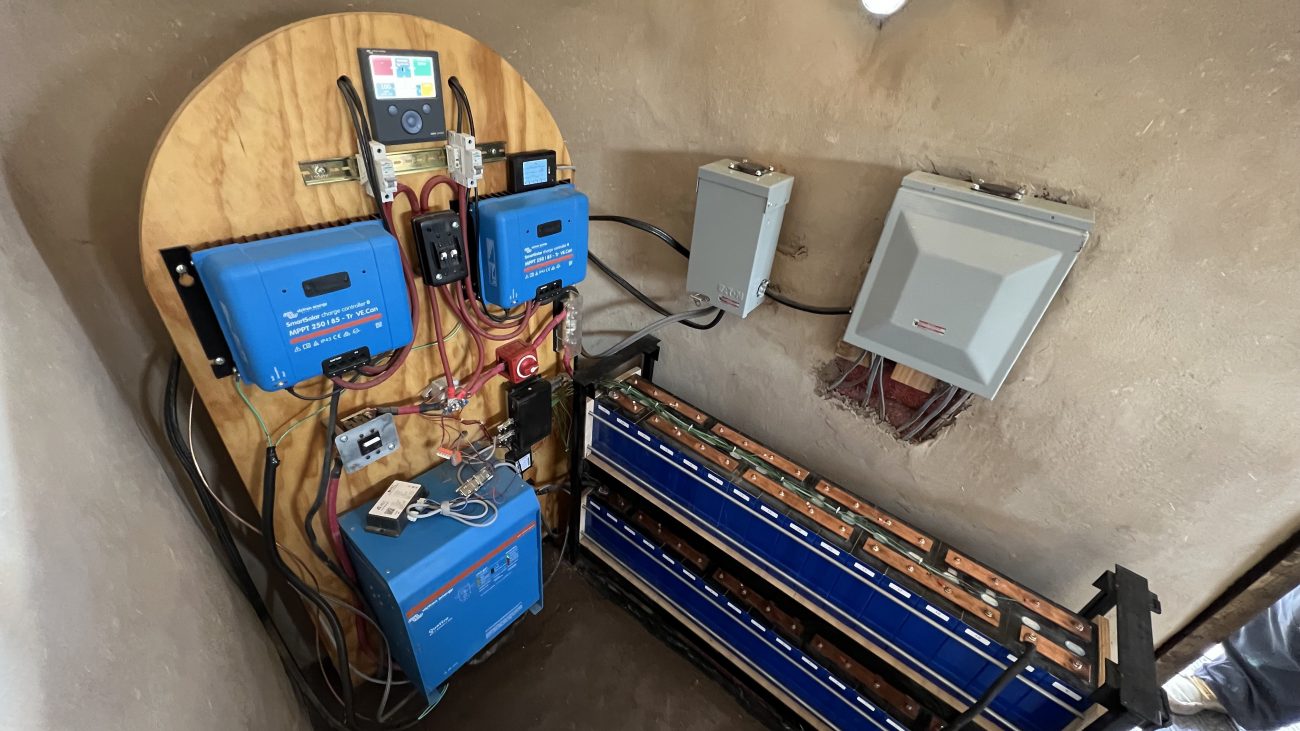
REC BMS Install
I can’t overstate enough how important a BMS or Battery Management System is for a large battery bank like this. You HAVE to protect these cells from over charging, under voltage, and temperature extremes. And if you want them to last for years and be a good return on your investment, the BMS needs to be able to balance the cells and keep them all close to the same voltage.
Like I mentioned, Lithium batteries are amazing, but need a BMS for these reasons:
- Over Voltage: overcharging the batteries can be very dangerous and cause swelling or fires. The BMS constantly checks for high voltage and shuts off the system if needed
- Under Voltage: batteries that have discharged too low can also be permanently damaged if tried to use during that state. The BMS checks for low voltage and will shut off the system until it reaches a safe threshold.
- High Temperatures: the stability of lithium battery cells depends on keeping them within their operating temperatures. If you’re charging them while they’re too hot, this could lead to a fire.
- Low Temperatures: lithium batteries will be damaged if you try to charge them and their internal temperature is below 32 degrees. So the BMS checks for cell temperature and shuts down the charging aspect if needed.
- Charge, Float, and Hysteresis: a good BMS will let you set these parameters so that over voltage and temperature issues never happen in the first place. The BMS should talk to your charge controller and help it fill and float the system safely.
- Balancing Cells: There are a number of reasons your cells voltages may not sync up at the same time - and keeping all your cells near the same voltages will drastically increase their life. A good BMS should be able to equalize or balance all the cells’ voltages by diverting some current from higher voltage cells to the whole pack or from the whole pack to a lower voltage cell.
Trying to run a large off-grid lithium battery bank without a BMS is asking for long term issues, reduced battery life and return on investment, and even worse explosions or fire. Spend the extra cash and get yourself a proper BMS.
We chose REC BMS for a few reasons.
- They have a great reputation for stability and customization, and are particularly knowledgable of using batteries off-grid.
- Their support is fantastic, and very technically detailed
- Their products can talk natively to Victron gear using the proprietary Victron VE.Can protocol. This was important for setting both charge controllers and the Color Control GX which is the heart of our monitoring system.
- Deep level settings are accessible via their new WiFi Module so you don’t have to connect a computer to make updates
- Measures battery temperatures via probes, but also has an internal temperature for the unit itself (we’ll talk about why this is important later)
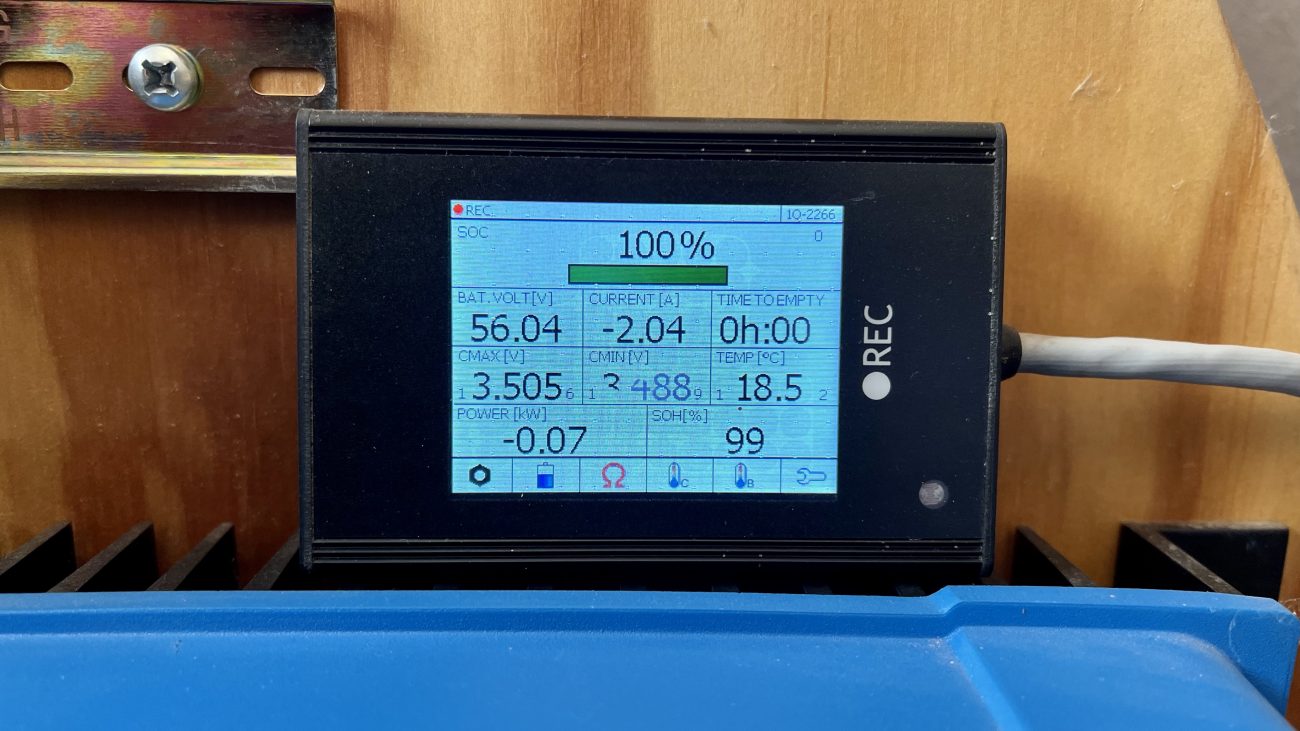
- Displays real time info at the cell level on it’s own touch screen
- Can be configured with a Precharge Delay. This should prolong the life of our equipment by sending a trickle charge to components so that they don't get hit with a large "in-rush" of current.
- Measures current using a precision shunt resistor - this gives a very accurate “State of Charge” percentage.
You may be wondering why we didn’t opt for some kind of built in BMS? It’s true, there are a lot of options on the market for lithium batteries that come with a BMS built it. Unfortunately this often inflates the cost quite a bit, and puts all these separate pieces like voltage and temperature sensors inside a closed housing. This means if something goes bad, finding and replacing those components will be a huge a pain. Or you might even just have to buy a whole new unit. By keeping things separate, long-term maintenance becomes easier.
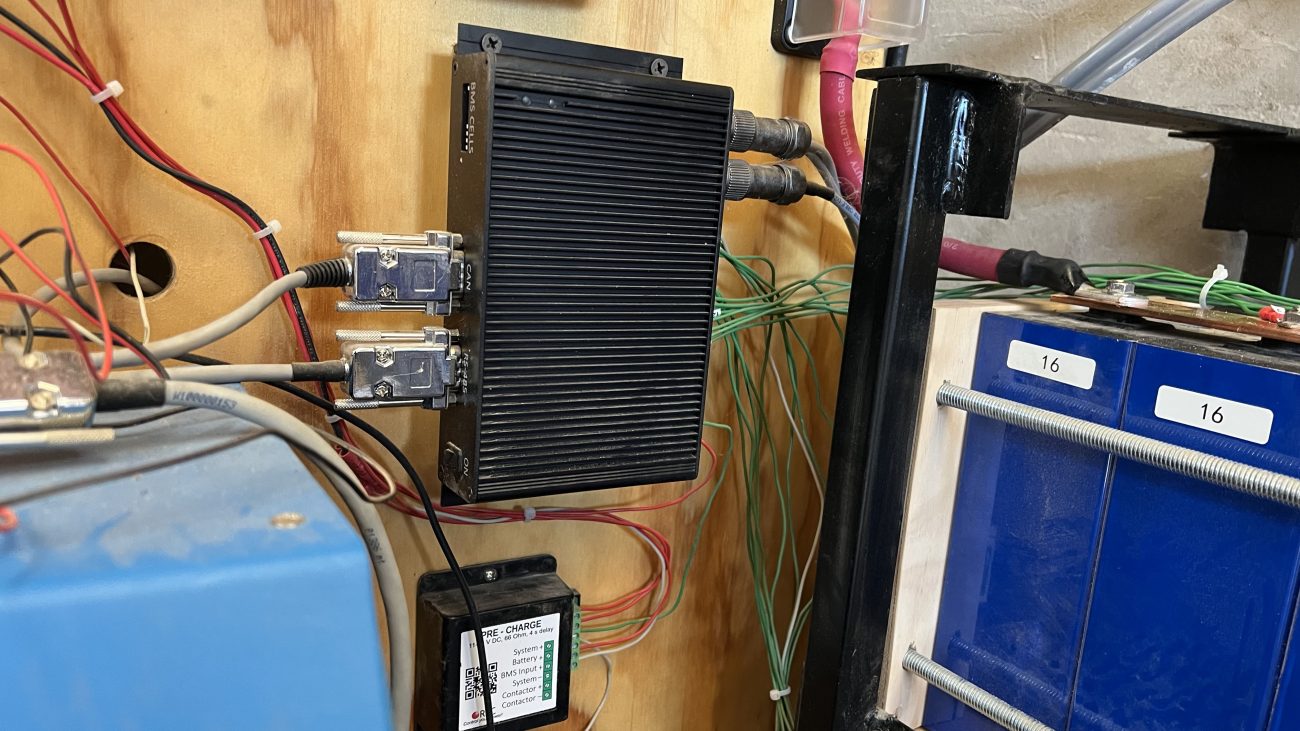
That being said, actually connecting our REC BMS was by far the most complicated part of our install. There’s a lot of moving pieces, a lot of wires, and a lot of strange connections. I’ll do my best to illustrate and explain how ours is setup, but make sure you read their manual in all it’s nerdy glory when you go to install your own.
This is our recommended shopping list:
- REC Q BMS 16S
- Current Sensing Shunt (200A)
- Temperature Sensors
- Precharge resistor delay (48V)
- WiFi Module
- LCD Touch Display
- Cable for Victron VE.Can
- Tyco Tyco EV200ADANA (48V) Contactor
- Current Sensor Harness
Note: if you go directly to the BMS page, you can add many of these options, build your own bundle, and get extra discounts.
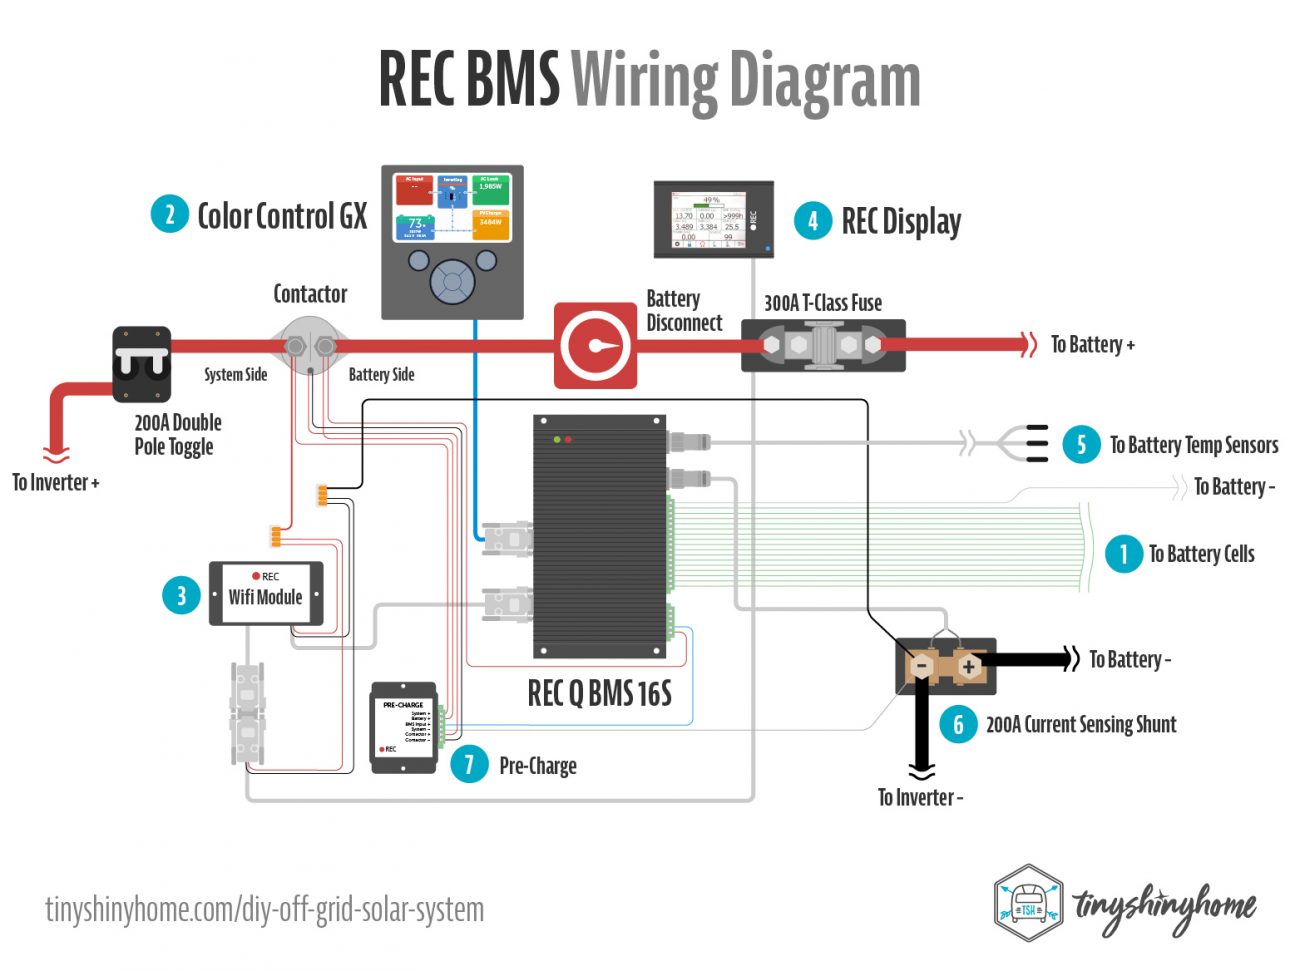
Step 1 - Turn off the BMS, pull the cell wiring harness out, and start running individual wires from each battery cell to the corresponding number. You can use small 18 AWG wire - one end will go into the screw terminal, and the other we crimped on ring terminals to go on the positive post of the cell. Keep in mind that the first input in the harness actually goes to your negative connection on the battery. Then you connect to all the positives in order down the line. Do not plug in this wiring harness until later!
Remember how we grouped our batteries in packs of 2? This was so we would have 16 cells which happens to be the exact number of inputs the REC Q BMS has. If we wanted more storage we would need to do it in sets of 16 to continue to create a 48V battery pack. So instead of 32 batteries we’d have to buy 48 and parallel them in packs of 3. If you really need more than 16 cells being monitored, REC does sell a Master Unit that acts as the Primary, and then you can connect multiple Q 16S BMS’s as secondaries underneath it. But that’s more complicated and expensive. We recommend keeping things as simple as possible.
Speaking of cells, if you have less than 16 cells, you can also use the dip switches on the unit to tell it exactly how many you’ll be using. Don’t forget that in this configuration you still have to run a positive connection to the 16th pin.
Wiring up 16 individual cells will take a while, but this will allow the system to not only keep track of each cell of your battery, it’ll also enable that important balancing feature we talked about earlier.
Step 2 - Now it’s time to connect your VE.Can Bus communication cable that goes into the back of the Victron Color Control GX. This allows the BMS to talk natively to the central hub of your power system.
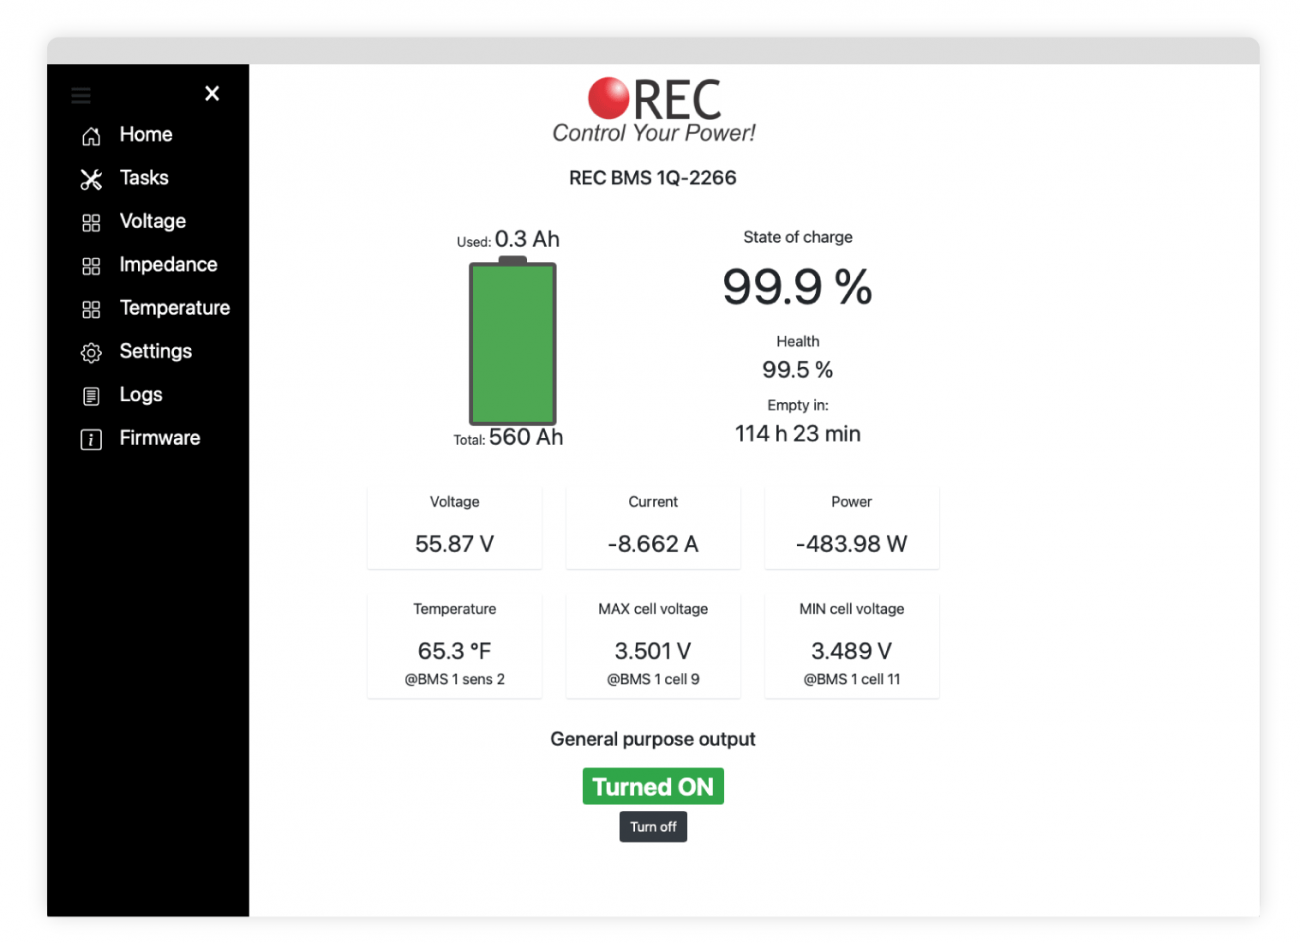
The next one gets a little complicated. It can go directly to your REC Touch Display, a small led touchscreen that gives you all sorts of useful info like State of Charge, Cell Temps, Cell Voltage, Amps being used, and more. Or you can connect it through the REC WiFi module.
We highly recommend getting the WiFi Module for a few reasons.
- If you don’t have it, you have to buy some PC software, and use a special RS485 to USB cable to even connect it. Then go through an arduous Windows driver installation setup. Because it connects to your RS485 port, that means any time you want to use it you have to disconnect your display. For someone who is Mac based like me, this would be a huge pain in the butt.
- The WiFi Module stays connected all the time, and is easily accessible from any device via direct WiFi connection. You still get access to the full programming features of the BMS, but in a much simpler and easier to use web version of the application.
- You can also choose to connect it to your existing WiFi network so that any device can connect quickly at any time without needing to connect to the unit’s specific WiFi network
- You’ll likely be doing a lot of tweaking to settings in the beginning, as well as monitoring, so being able to do this on any device is incredibly convenient.
- By the time you buy the PC software and cable, you’re halfway to the cost of the WiFi Module anyway. Totally worth the $100 upgrade.
So yeah, we recommend getting the WiFi Module.
Step 3 - That means your RS485 port on the BMS goes into the module’s main communication port. Note there are small positive and negative wires coming out of this cable that need to be connected to your main positive and negative post.
Step 4 - Use the WiFi Module’s display cable to connect to the REC BMS Display. This also has negative and positive wires that need to be connected to your main positive and negative post.
Step 5 - The temperature sensors. This cable comes with 3 sensors attached, just screw in the connection at the BMS and place the sensors where you like on your batteries with some tape.
Step 6 - The current sensor wire will connect directly to the positive and negative output screws on the top of the shunt. This provides an accurate system State of Charge back to the BMS. Remember that the positive side of the shunt is where you battery negative connects, and the negative side of the shunt is for everything else.
Moving on, we have the output wiring harness. Again, make all connections with this unplugged. You’ll plug everything back in later in a certain order.
Step 7 - Now, we mentioned the Precharge unit above. Even though this can seem like it’s really over complicating your setup, we think it’s worth installing. According to REC, it “charges the input capacitors of the system components before the main contactor switches on which eliminates high inrush currents at the switch-on of the contactor and prolongs the contactor lifespan dramatically.”
For the BMS wiring harness, you only have two connections. One that goes straight to the “Battery” side of your contactor. And one that goes to the BMS Input + on the Precharge Unit.
The rest of the Precharge connections are pretty self explanatory:
- System + goes to the “System” side of your contactor
- Battery + goes to the “Battery” side of your contactor
- System - goes to the “Negative” side of your shunt
- Contactor + goes to the positive contactor wire
- Contactor - goes to the negative contactor wire
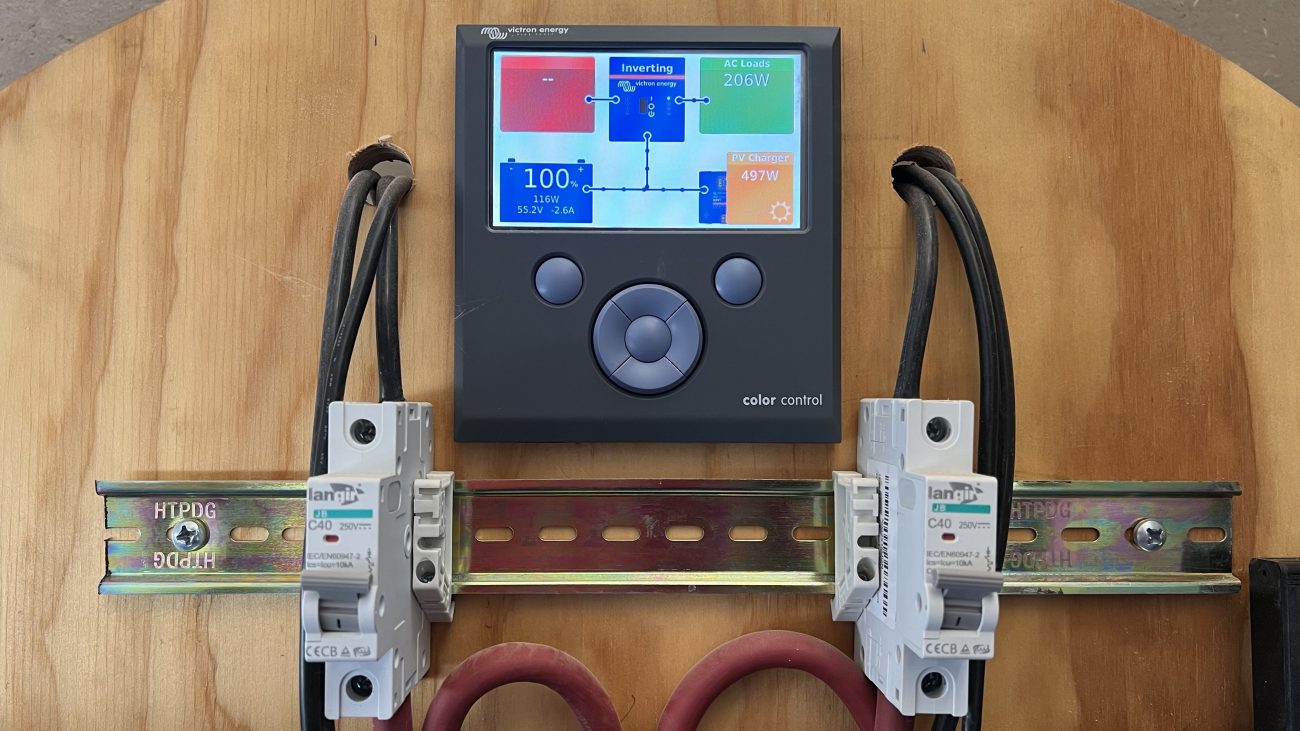
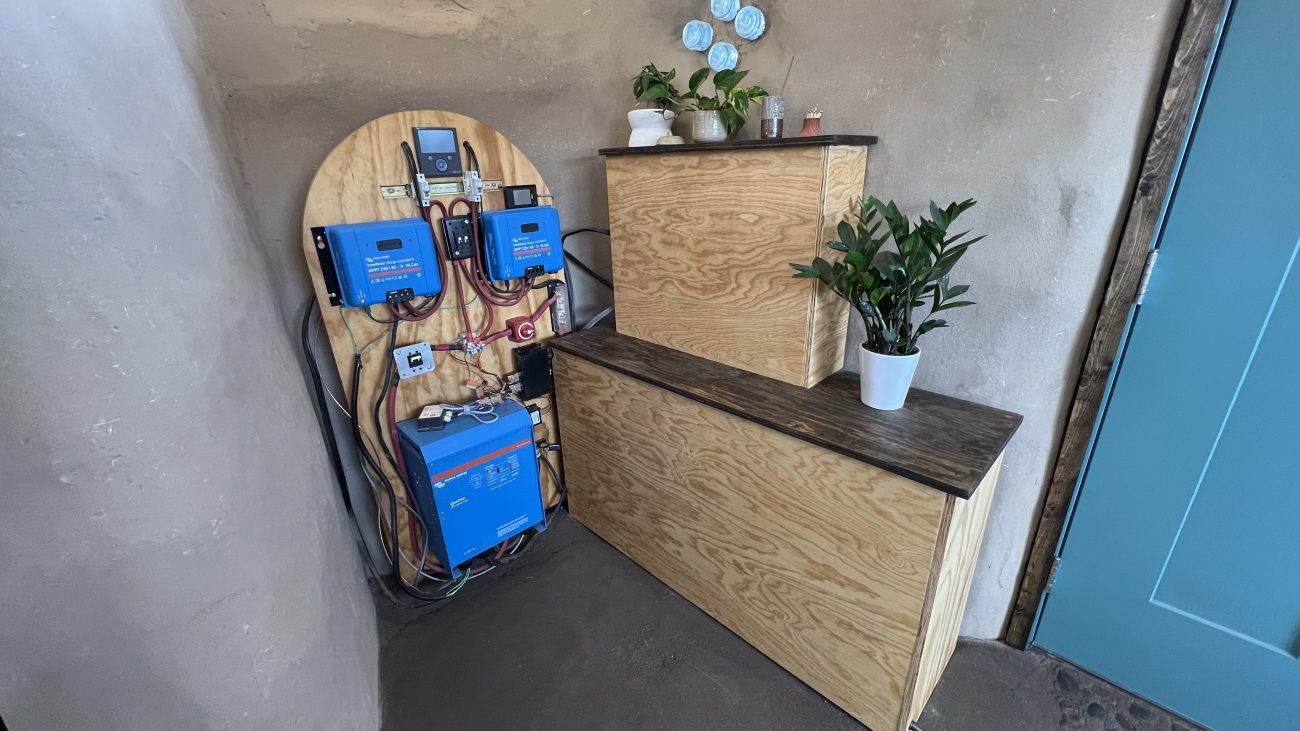
Victron Color Control GX & VRM Portal
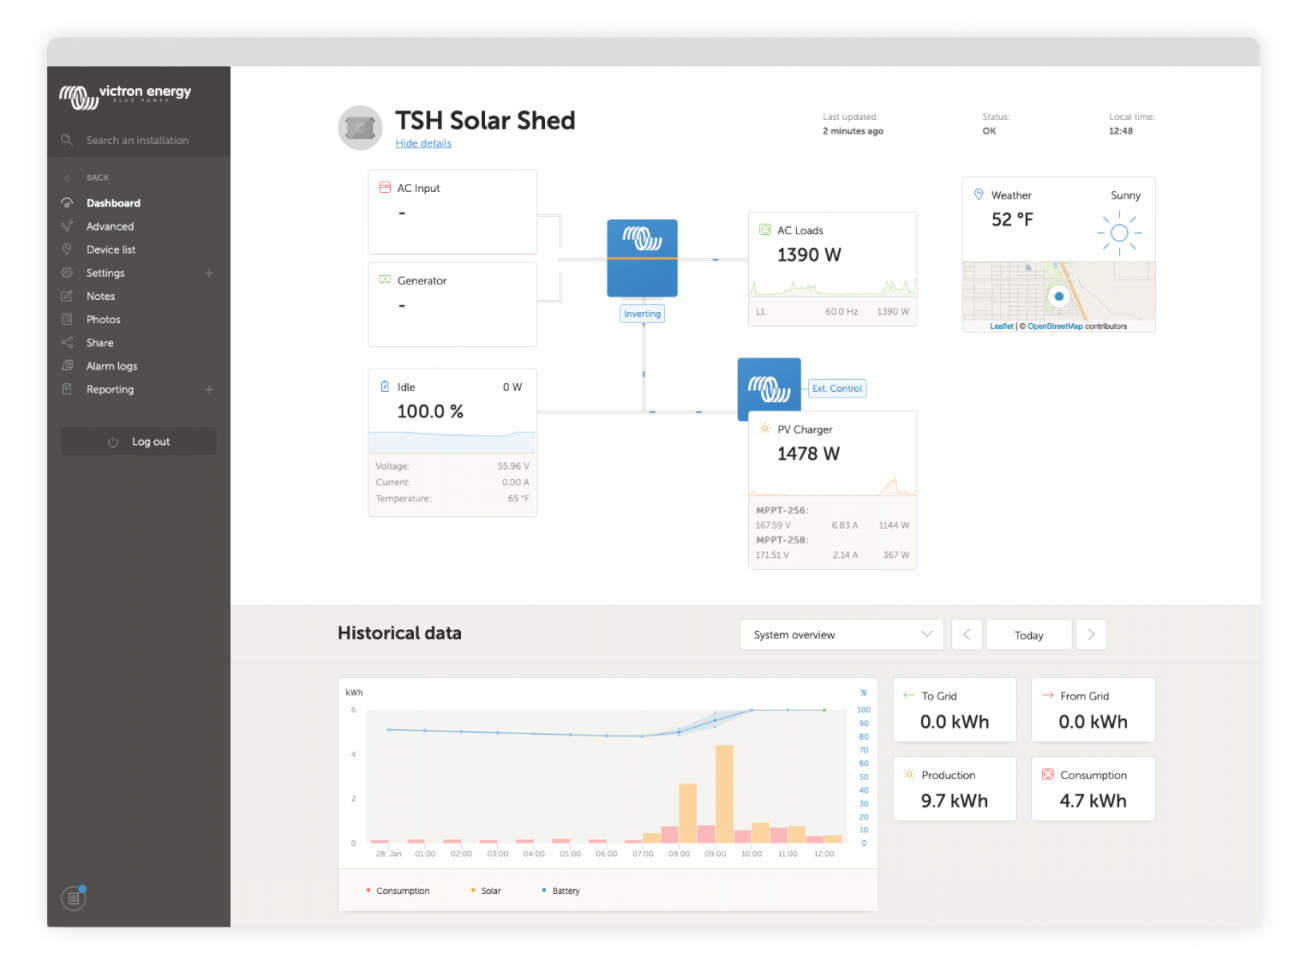
The Color Control GX is the communication center of you entire off-grid power system. It controls all products connected to it, gives live info at a glance, and even creates a Remote Management Portal (VRM) so you can access you system from anywhere in the world.
Before you fire up your system for the first time, you’ll want to make sure everything is connected to this display.
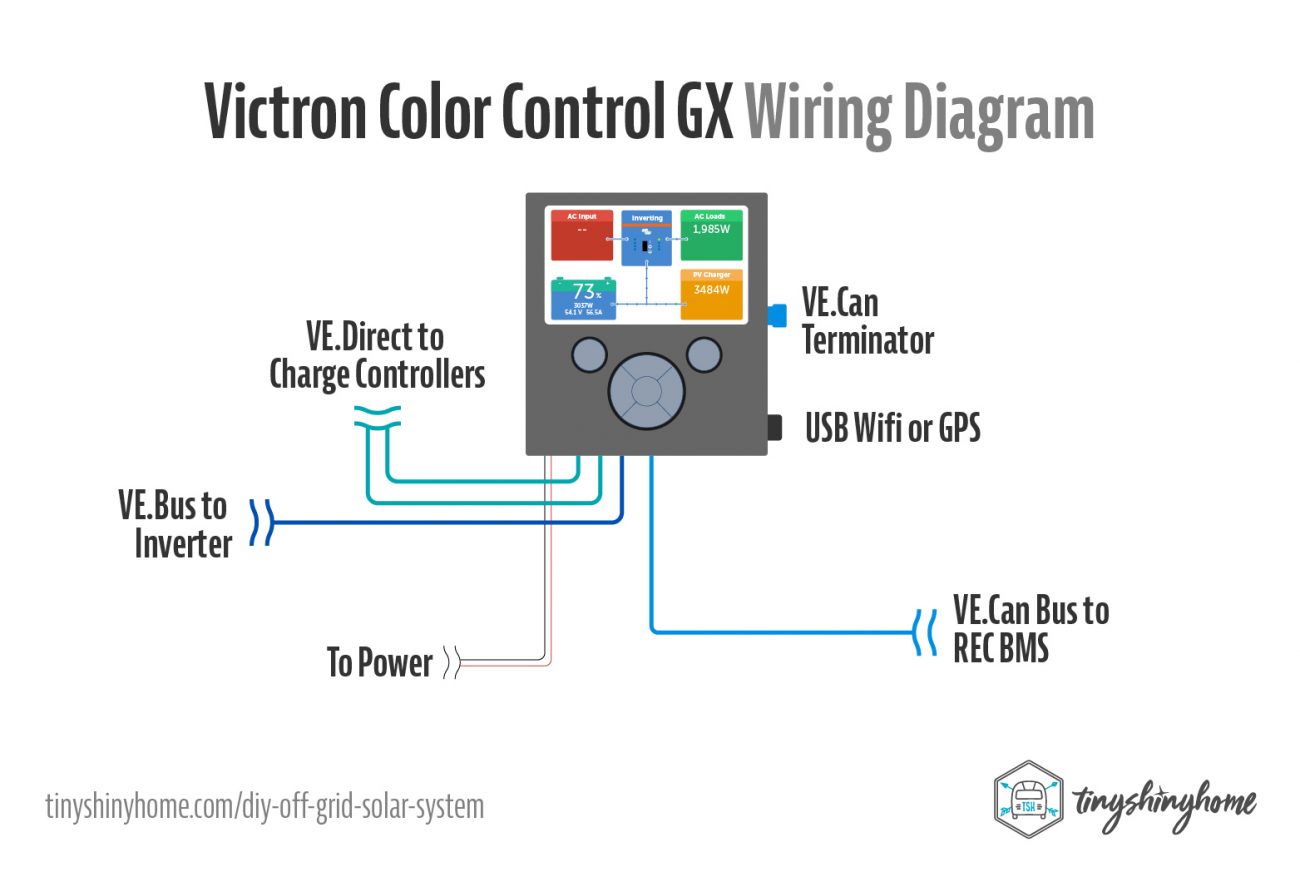
You’ve already connected the REC BMS via the VE.Can Bus, but in order for it to talk directly to everything you’ve got a few more cables to run.
To connect the Quattro Inverter, use a VE.Bus or Ethernet cable. And for the MPPT Solar Charge Controllers, use VE.Direct cables (one for each charger). The display also needs power, so connect its positive and negative wires to the positive and negative of the system.
You may need to put a Terminator Plug into your second VE.Can slot (it comes with one), and if you want to run the VRM portal full time, a USB WiFi adapter will allow you to connect the display to your network. Hardwiring ethernet is also an option. You can even get a USB GPS adapter if your system is on the move. Pretty cool!
Booting for the First Time
At this point, you’ve built out the base of your system. We’ll look at solar chargers and additional inverter connections in a minute, but now’s the time to boot up the system for the first time, and see how things are working.
Here’s the order.
- Plug in the Outputs wire harness on the BMS (simultaneous)
- Plug in the Cell wire harness on the BMS (simultaneous)
- Turn on the Battery Disconnect Switch
- Turn on the BMS - you’ll see a red light
At this point, the BMS is going to run a bunch of checks:
- Tests balancing switches
- Tests BMS address and cells number
- Tests temperature sensors, self-calibration and EEPROM memory parameters.
After 7 seconds - if all is well - the light on the BMS will turn green, you’ll hear the “clunk” of the contactor, and everything connected to the system side of the contactor will turn on.
REC BMS Settings
The BMS needs the proper settings in order to know how to charge and balance your batteries, as well as passing along crucial information like load and State of Charge to the Color Control GX.
For reference these are the settings REC shared with me for my particular cells. Note: your settings will likely be different. Consult your battery spec sheet, and reach out to REC to get specific numbers for your battery bank.
Voltage Settings
- Balance Voltage END [V]: 3.55
- Balancing START voltage [V]: 3.4
- END of Charging [V]: 3.55
- END of charging voltage hysteresis per cell [V]: 0.25
- Max allowed cell voltage [V]: 3.75
- Min allowed cell voltage [V]: 2.7
- Max allowed cell voltage hysteresis [V]: 0.2
- Min allowed cell voltage hysteresis [V]: 0.1
- Min Vcell discharge [V]: 2.95
Current Settings
- Shunt: 200A/50mV
- Current sensor coefficient: 0.007813
- Current sensor offset [A]: 0
- Max device charging current [A]: 180
- Max device discharge current [A]: 180
- Charging coefficient [C rating]: 0.5
- Discharging coefficient [C rating]: 1.5
Temperature Settings
- Minimum allowed temperature for charging [℉]: 32
- Maximum allowed cell temperature [℉]: 150
- Max allowed BMS temperature [℉]: 131
- Max allowed BMS temperature hysteresis [℉] 5
System Settings
- Operational capacity [Ah]: 560
- Chemistry: LiFePO4 Winston
Victron Color Control GX Settings
For now we’re really just looking to see the Color Control GX has turned on. Remember, the inverter itself should be shut off and the 200A Pole Toggle should also be shut off.
Depending on your setup, you will need to make some adjustments to the settings for the Color Control GX.
- Settings > System Setup > DVCC
- Main > On
- Limit Charge Current > On
- Maximum Charge Current > On
- Maximum Charge Current > 150A
- Maximum Charge Voltage > 56.8V
- Shared Voltage Sense > On
- Shared Temperature Sense > On
- Temperature Sensor > REC-BMS battery on Can Bus
- Shared Current Sense > On
- Settings > System Setup > Battery Monitor > REC-BMS battery on Can Bus
- Settings > System Setup > Battery Measurements > REC-BMS battery
If you’ve connected everything properly you should see your battery’s percentage, voltage, amperage, and wattage all on the battery portion of the screen.
Keep in mind that most systems will treat the battery pack as 50% full by default until it’s been charged to 100%. So if it is showing a lower percentage than what you think it should be, just be patient.
Now you can test the Inverter. Turn on your 200A Pole Toggle (you might get a spark, don’t worry), and then flip the power button on the Quattro. The green light should turn on, and the Inverter icon on the Color Control GX screen should change add a green light, and change the status to “Inverting.”
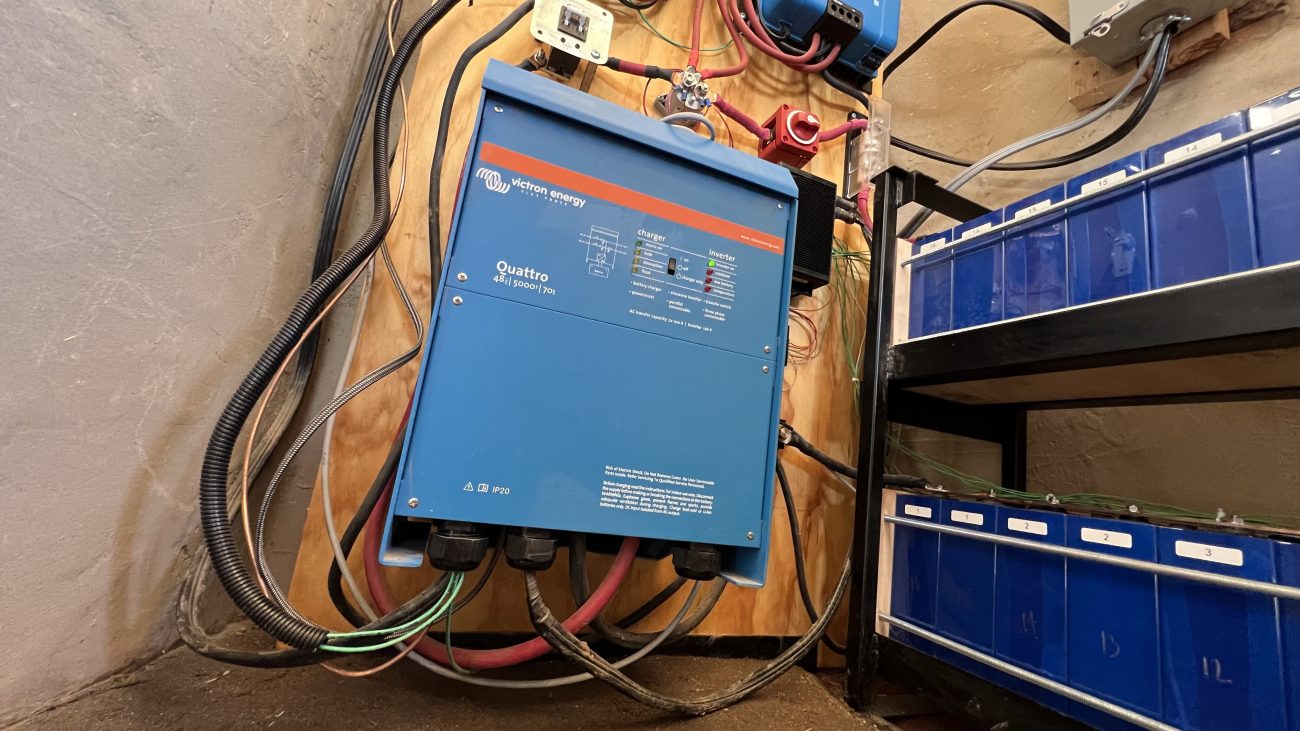
Victron Quattro 48V 5,000W Inverter
Congrats, you’ve got power! That’s not to say you’re finished yet, though. It’s time to make more connections. But first, turn everything off in this order:
At this point you should already have your positive and negative trunk wires providing power to the Inverter - and a VE.Bus connection to the Color Control Power Center.
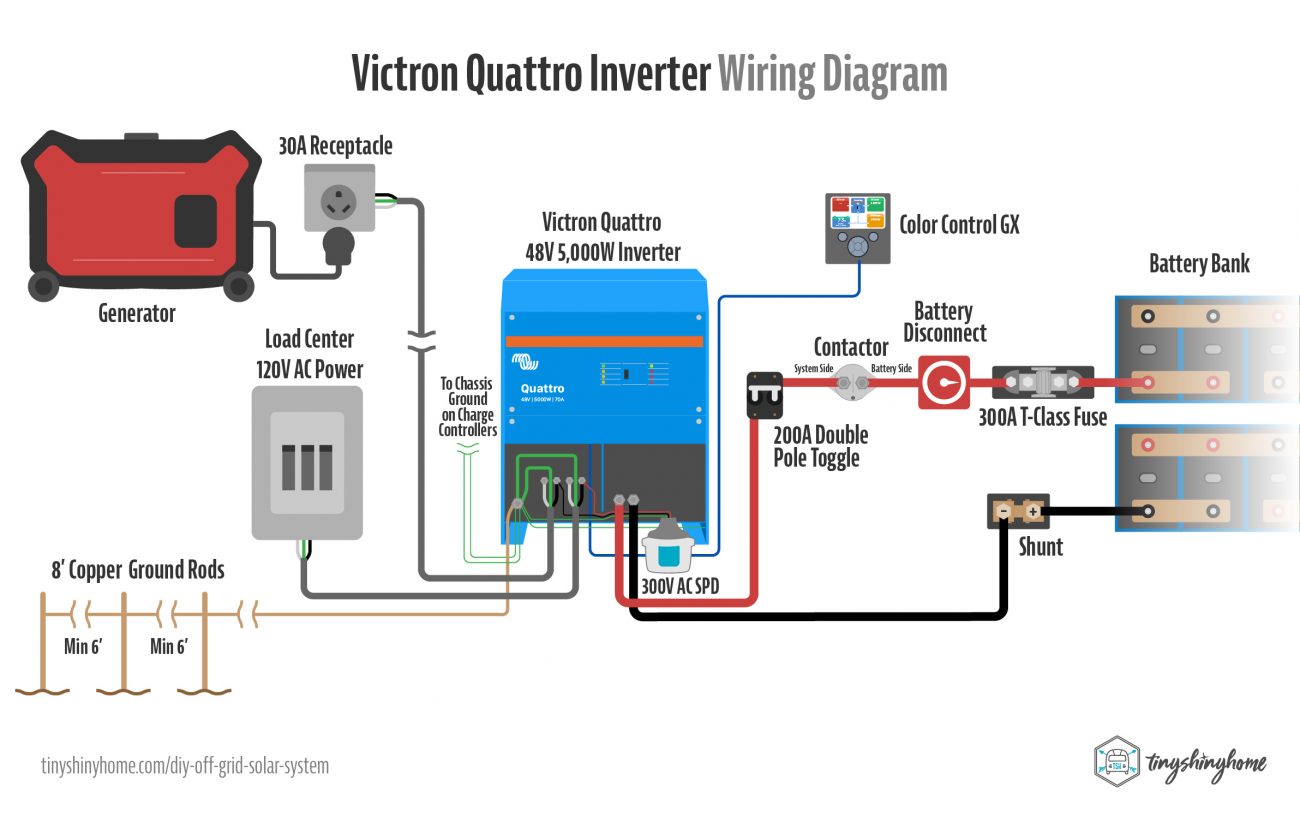
Generator Input & Charging
If you want to charge your batteries via a generator, simply run some 6/2 wire to the AC In-1 connection. Then connect the other side of the wire to a 30A plug. Note that we’re now in 3 wire territory. Black is Line, White is Neutral, and Green is Ground. Also know that you’ll need to change the charge settings for your generator input.
Our backup generator is a small Harbor Freight 3500W Predator. But Victron assumes you’ll be using something much larger. I think the default input current limit is upwards of 60A. Our generator puts out about 25A max, so we had to change this setting.
Unfortunately Victron doesn’t make this easy. We had to do the dip switch dance - a very convoluted way to set your input current via tiny switches behind the top panel of the Quattro. I won’t get into this here - you’ll have to read the manual carefully. But once it is changed you’ll see the number for Input Current Limit updated by going to Menu > Quattro Inverter on the Color Control GX.
Supposedly you can change this and some other settings by connecting the Quattro to your computer via an MK3-USB cable and software, but we haven’t tried it yet. Maybe one day.
Grounding
The Quattro requires all grounding cables to be connected together. Not just the main AC in and Out, but also chassis grounds for other equipment. As you can see in the diagram, both solar charge controllers and the Inverter itself all have chassis grounds that should be connected together. Finally, you’ll want to run a minimum 6 AWG bare copper wire to a copper grounding rod per your local electrical codes.
120V Power
Finally, we get the whole point of this setup. Clean, stable 120V household power! This is as simple as running a romex cable from the AC Out connection to energize your main panel box, and then connecting whatever you want on individual breakers. Because our inverter would be powering multiple things, we used larger 6/2 wire here to the main connections, and then standard romex to individual circuits.

Victron SmartSolar MPPT Solar Charge Controllers
Technically you can connect your solar earlier in the process, but we were still wiring our solar panels, trenching the conduit, and waiting on Amazon to deliver our final circuit breaker so it happened last for us.
Even though we installed combiner boxes at the ground mount array with individual circuit breakers and a lightning arrestor that should prevent any possible power spike to make it into the building, we added additional 40A Circuit Breakers for each main solar line going in front of the charge controllers inside.
This not only doubly protects the charge controllers and batteries, but allows us to completely shut off the solar from the inside of the building. With 7,200W of solar most days we’re running the system completely off of the sun so we need to be able to stop that power flowing through if we’re working on something.
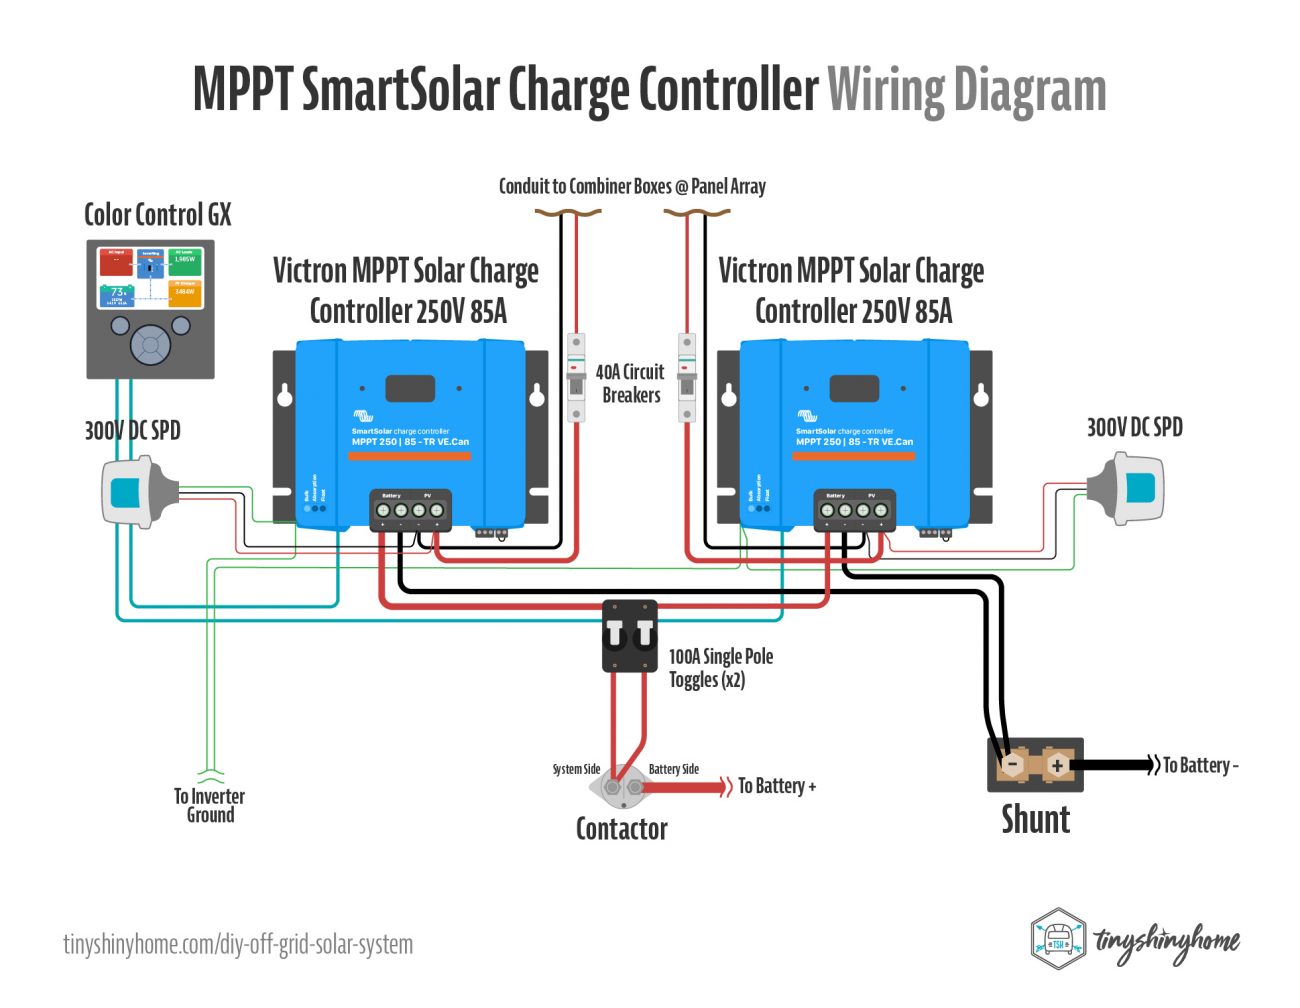
We went with two Victron SmartSolar Charge Controllers (MPPT 250V, 85A). Technically we could have gone through one, but since we were already future proofing by having two combiner boxes and heavy gauge wire run through the conduit, it made sense to set it up with 2 in case we ever put in higher wattage panels one day (highly likely).
The wire runs for these are pretty simple. The positive PV wire goes through the 40A Circuit Breaker and into the PV + input on the charge controller. The negative PV wire goes straight to the PV - input on the controller.
Then the Battery + connection uses 2 AWG welding wire with crimped ring lugs that flows through a 100A Single Pole Toggle before connecting to the System side of the Contactor.
These 100A breakers act as even more protection for the batteries and system as the power coming out of the MPPT charge controllers is higher than what the panels are putting in. MPPT is cool like that.
The Battery - connection also uses 2 AWG welding wire and connects to the Negative or System side of the Shunt.
Don’t forget those chassis ground connections to the Inverter main ground, and VE.Direct cables to the Color Control GX.
Booting the Solar Charge Controllers
Once all your panels are connected properly, and wires are run from the combiner box through the charge controllers, it’s time to turn everything on.
- Turn on the Battery Disconnect Switch
- Turn on the BMS & wait for the Contactor to turn on
- Flip on the breakers in the Combiner Boxes at the solar panel ground mount
- Turn on the 100A Pole Toggle Switches going from the MPPT Charge Controllers to the System
- Turn on the 40A Circuit Breakers going from the solar panel array to the MPPT Charge Controllers
I should note that I did this a bit backwards the first time and caused a bunch of headaches for myself. See, the SmartSolar MPPT Chargers are…well…smart. They should be able to sense your battery setup and adjust their settings when they’re booted up for the first time.
In my haste to be extra careful, I did not flip on the 100A Pole Toggle Switches until AFTER I turned on the 40A Circuit Breakers. This meant that there was no connection between the MPPT Charger and my batteries so it wasn’t able to auto-sense my setup and defaulted everything to 12V instead of 48V.
As you can imagine, this caused all sorts of failures, alarms, and more. It was assuming my battery pack was over voltage, triggering the BMS contactor. Fun times.
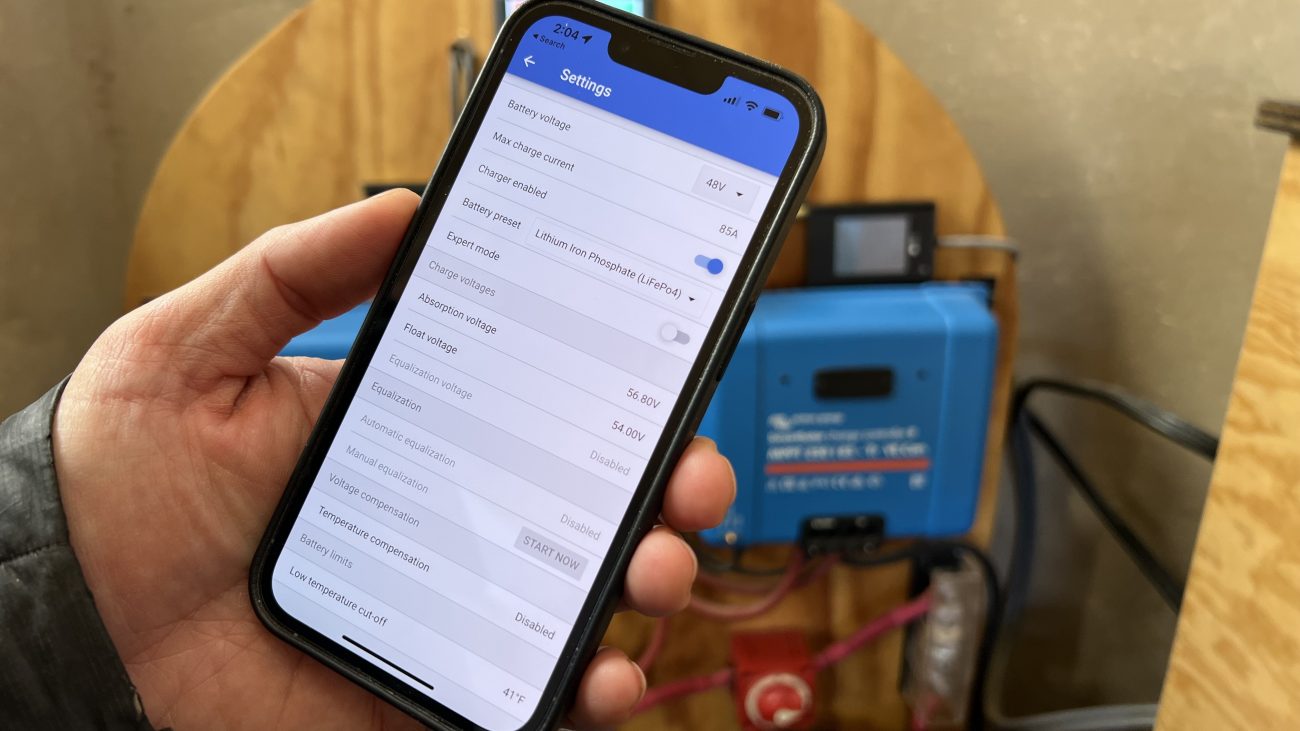
Thankfully the SmartSolar Chargers are Bluetooth enabled. Remember the hoops we had to jump through for the Quattro Inverter? Not the case with these. Just use the VictronConnect app on your phone or laptop to quickly connect and change any setting necessary.
In our case, we needed to make a few important adjustments:
- Settings > Battery Voltage > 48V
- Settings > Battery Preset > Lithium Iron Phosphate (LiFiPo4)
- Double check your Absorption and Float voltages as well.
Final Tweaks & Adjustments
Congrats - you’ve got power my friend! It’s been a long road, but by building the system and doing the install yourself you’ve saved thousands and thousands of dollars. High Five!
Moving forward I want to set a few expectations. Know that your new battery cells may take some time to balance. They might even overheat the BMS a few times as it works to get them within the right range.
We were constantly tweaking the BMS settings over the first few months trying to get it right, but still had a few shutdowns in the peak of the afternoon in the summer. It did its job, the VRM system sent us notifications, but it was still worrisome.
Finally I reached out to REC BMS, gave them the specs on my batteries, and they replied back with the EXACT settings I needed. I mean, as soon as I entered them the BMS never overheated again, the cells balance each day, and things have been running perfectly.
Don’t be like me - just ask and get the right settings out of the gate. Would have saved me a few months of stress.
Not having these settings right caused all sort of other issues. Because the internal BMS temp was reaching it’s max multiple times a day and rebooting, the WiFi Module and BMS Display were constantly loosing their connection during that reboot cycle. It didn’t affect the data flowing to the Victron Color Control, but it was still annoying.
I also had some initial issues getting the WiFi module to connect to our WiFi network because we are using a cell based setup, and the IP address scheme needed to be manually adjusted.
Thankfully REC’s support was fantastic, and they got me up and running.
Real World Impressions & Power Usage
At the time of this writing, we’ve had the system for over 6 months, and couldn’t be happier with the results.
It’s easy to throw around a bunch of theoretical numbers, but seeing this setup run silently and problem free in the background has been amazing. Especially once we got our BMS balancing settings locked in.
Because our house isn’t built yet, we’re still only using a fraction of this system. Currently, we average about 13kWH of solar production each day, and 10kWH of consumption. During the summer when we were running the air conditioner in our Airstream and Mini Split in the Solar Shed, that number was closer to 35+kWH.
I’m excited to see how it performs once we have the house built and even more appliances running. Because right now I know we’re just scratching the surface in terms of solar production during the day. It’s usually filled back up by 10 or 11 in the morning.
All in all, this system is a beast, and cost about half of what our neighbors have spent on their own pre-packaged systems. Even better, should we outgrow our current power needs, we can switch out components, solar panels, or add more batteries to create even more capacity and wattage.
What Would We Do Differently?
It’s not all sunshine and roses, though. Hindsight is always 20/20 so now that we’ve been using this system for 6 months full time off-grid - would we change anything?
Understand Alibaba’s payment and shipping better
Like I mentioned in the battery portion, the whole purchasing, deal making, and long shipping times from Alibaba were less than ideal. I had no idea what was going to happen, when it was going to happen, or if it was going happen. I had thousands of dollars invested in other equipment that depended on the batteries making it here. I had hundreds of hours in building our earthbag solar shed and ground mount that depended on these batteries. We had our friends coming to help us install them, it was really hot outside and we needed our air conditioning to work. It was like a giant jigsaw puzzle, and the not knowing was overwhelmingly stressful.
Now I have better idea of what to expect. Payment is weird, the vendors may wheel and deal, and shipping from China takes about 2.5 months. But I got a massive amount of storage at a fraction of the cost. Totally worth it!
Solar Panel Wattage
We bought used 240W panels from Santan Solar during their Sidewalk Sale for an amazing deal. $25 each! We were so psyched to have secured that much power for so little cost.
It wasn’t until we started researching what it would take to build the ground mount to house them on that we realized our mistake. The steel pipe, concrete, and IronRidge pieces totaled nearly 5x the cost of the panels themselves. Holy cow.
If we had to do it again we’d buy higher capacity commercial panels, and build a smaller ground mount.
The only upside here is that if we ever do want more power we can replace the panels we have with higher capacity panels pretty easily and have a TON of solar.
SmartSolar Battery Voltage
Having our charge controllers connected to the battery on boot would have saved us a lot of panicked calls and grief since it defaulted to 12V instead of 48V. We had no idea what was going on, and it took some time to track down why our new solar setup wasn’t working at all.
BMS Balancing Settings
And finally, let me reiterate again that I should have reached out to REC so much earlier regarding my balancing settings. If I had let this continue long term I probably would have fried the components of the BMS since it was overheating so many times a day.
This stuff is complicated, so don’t be afraid to ask smart people for help.
Lightning Protection
Since installing this system, the Summer of 2022 brought a historically strong monsoon season with epic storms, and a rogue indirect ground lighting strike that took out our Victron inverter, one of our charge controllers, and our BMS display.
This cost us thousands of dollars to replace, and we were without power for nearly a week. It sucked. Real bad.
It also led us to a months long journey researching additional lighting protection, desert soil conditions, warranties and even insurance.
We've written a new article and created a new video explaining what happened and what precautions we're taking in the future:
Cost Breakdown
Now you may be asking, “How much did all this cost again? Didn’t you say it was way cheaper?” Great question. With this article approaching 10,000 words, I’ve decided to create a separate cost breakdown and spreadsheet calculator to make sure it’s not too overwhelming.
Also I’ve tried to include links to each piece of equipment in this installation article so you can go ahead and start purchasing the necessary pieces if needed.
I’ll add the link to the cost breakdown here as soon as it’s ready, UPDATE: the cost breakdown is complete! See how much we spent total here.
How much will your off-grid solar system cost?
Get a better understanding of your project & save thousands of dollars with our solar cost calculator!
Besides the intelligent spreadsheet, it includes includes links to everything we bought for our off-grid solar power install + nearly 1 hour of behind the scenes videos with additional thoughts, details, & tips!
Wrapping Up
Whew! I’m not sure how I keep talking myself into writing these massively detailed posts, but here we are again.
Thanks to the internet, there is so much great information out there about DIY solar systems. While it’s my job here to do that research and compile what I’ve learned to make the best power system decision for me and my family, I couldn’t end this article without giving a shout-out to those that have come before us.
- Beginning from This Morning - by far Juan and Michelle were our biggest influence for the overall big ideas as well as detailed implementation like wiring the BMS and building the battery boxes. We could not have done this without them!
- Wild Wonderful Off-Grid and Handeeman - Both of these channels helped us understand how to build our massive solar ground mount.
- Will Prowse of DIY Solar Power - Should you need to go deep down the rabbit hole of all things lithium battery banks, Will is a wealth of information and does extensive testing. Highly recommended.
I hope our installation breakdown and wire guide give you a better understanding of how to build your own large off-grid solar power system, and do it in a way that is safe, stable, and cost effective.
If you found this interesting I have to let you know that we’re just getting started here on our off-grid homestead. Besides building all sorts of unique, sustainable structures we’ll be setting up rainwater catchment, even be creating other smaller independent solar systems for various uses. So much going on, and we’d love to share it with you! Make sure you’re subscribed so you don’t miss our next project.
Until next time!
Download Our Solar Wiring Diagram
Get up close and personal with this super detailed, impeccably illustrated hi-res PDF of our full off-grid power setup with a schematic representation of how everything in our 7200W, 28kWH, 120V off-grid battery and solar system connects together. Includes bonus individual component wiring configs, too!
Apparel
Grab a fun, comfy t-shirt & help support our family.


About the Author
Jonathan Longnecker is the strongly opinionated tattooed and bearded half of Tiny Shiny Home. He loves making music, figuring out nerdy solutions, exploring the outdoors, and living off-grid.
comments powered by Disqus