DIY Off-Grid Airstream Carport - Permanent Metal Truss Trailer Site
Introducing a brand new project here on the Tiny Shiny Homestead! It's time to create a permanent resting place for our renovated vintage Airstream so we can start building our family home in its place.
When we moved onto this raw land over 2 years ago, all we had was our renovated vintage Airstream that we had been traveling in for the last 5 years. We parked it right in the middle of the parcel and got to work building.
First was a fence to keep the cows out, then water storage and a solar powered water pump.
Then it was our earthbag solar shed office, off-grid solar system, and earthbag chicken garden.
We are so ready to start our house, but there’s a small problem. The Airstream is in the way!
That’s right, it’s officially time to build a permanent resting place for our Tiny Shiny Home. She’s carted us 100,000+ miles all over the US and Canada, and been a true home for our family of 6 for the last 5 years.
Step 1 - Planning & Design
So it can’t just be any old pole barn. We need to build something that protects this important piece of our family history for years to come.
Here were our requirements:
- Open frame design - we want to provide shade and protection over the trailer, but still allow for beautiful views out it’s many windows
- Gabled roof - Having the roof pitch to the East and West would allow us to keep most of the rain and hail off while also using the angle of the sun during different seasons to keep it warm in the winter and cool in the summer.
- Needs to double as an outdoor living space - Since we still don’t have a house, any covered area we create during this process would be a big win
- Withstand 100+mph winds - yes we live in the high desert with hurricane force updrafts during monsoon season as well as sustained 50+mph winds during the spring. Whatever we use needs to be rated for these conditions
- Metal for strength and durability - we decided on steel framing and metal roofing instead of building something out of wood or earthbags
- Catch Rainwater - Rainwater catchment, storage, and pressurization will be vital to providing water for the trailer
- Sustainable - As we’re doing our best to build everything out here as low impact as possible, the sourcing and sustainability of the materials is also important to us.
- DIY - Finally, we want something we can put together ourselves! As you know, this homestead journey of ours has been filled with learning and becoming more self-sufficient. Ideally we could find a company that could work along side us to design for our requirements, but then let us put it together as part of the owner builder opt-out.
- Off-Grid Grid - Finally, since this would be where the Airstream stays permanently, we’d need to use everything we’ve learned the last two years to create our own power, water and gray water waste utilities.
Yeah, kind of a tall order, we know. But like any good off-grid homesteader we did our research.
Watched video after video, scoured blog after blog. Even visited a few places locally. And finally settled on a company called Miracle Truss after seeing one of their buildings in person and being able to help put some of it together.
They certainly ticked all the boxes we mentioned above with a few bonus ones:
- Their buildings are American Made from Recycled Steel
- Come with a 50 year Warranty
- Clear span usability all the way to the peak
- Used in hurricane zones and massive snow load areas like Alaska
- Use metal trusses built like bridges for incredible strength
- But also use minimal standard lumber for flexibility and cost savings
- Easy to put together ourselves by renting a few pieces of equipment
- Fully engineering drawings provided for permitting, cement pad pours, and anchor bolt plan to help with out-to-out dimensions and truss locations
Let’s just say we were impressed.
So we reached out to Miracle Truss and told them what we wanted to do. They helped us work through designing the perfect Airstream cover that wasn’t too tall, but still had headroom to access the roof as well as a good sized livable outside area.
The process was very easy and straightforward, and we appreciated the knowledge and expertise they brought, asking the right questions, and making sure we were designing this thing right.
We’ll dig into the full costs of this project near the end, but if you’ve been following us for a while, you know that while we love to save money and do things as cheaply as possible, we also only want to do them once. A building like this can cost more upfront, but we felt like it’s a smart investment for the future of our homestead. As you’ll see, there are a lot of things we can do with a structure like this.
Disclaimer: Now, we wanted to make sure you know that while Miracle Truss isn’t technically sponsoring this project, we are working together. We’ll be creating marketing videos for Miracle Truss to help us offset some of the material costs of this build. We do also have an affiliate relationship so if you end up getting your own Miracle Truss building and tell them we sent you, we’ll receive a small commission.
But otherwise, all costs associate with the project - the metal trusses, the roof, the cement pad, equipment rental, rainwater catchment system, electrical, and lumber - all came out of our pocket.
We’re going to take you through the entire process step-by-step and you can decide if this kind of building makes sense for you.
Ready? Let’s get started.
Design Process
Like we mentioned, the design process was pretty straightforward. Besides our basic list of requirements, from a design standpoint we only had a few things we wanted.
The first was a gabled or double pitch roof. The goal was as much shade as possible for as much of the day as possible. While we love the look of single pitched roofs, we’ve been in the Airstream through enough seasons here to know that early morning shade is very important for keeping the inside naturally cool as long as possible, and that the setting afternoon sun is the hottest part of the day. With the long side of the Airstream facing East and West, we could use a gabled roof to shade it during those important times.
The second was that we wanted access to the Airstream roof for maintenance. Now the cool thing about Miracle Truss’s clearspan design is that the trusses allow for clearance all the way up to the pitch. Which meant we didn’t have to build something super tall which was also one of our design requirements. We love our views out here and don’t want to create things that obscure it.

So most of our conversations centered around finding the right height for the side trusses and pitch for the roof. In our case we ended up going with a 12’ vertical truss which worked out to almost 11’ of clearance on the inside of the frame. Our Airstream is only 10.5’ tall and it won’t be parked all the way to the edge so this should work out perfectly.
By building at a 3:12 pitch, the full structure only ends up being about 14’ tall at the peak.
We also went through a few iterations of the square footage of the building, trying to decide how much outdoor space we wanted covered in addition to the trailer.

Here we settled on a 19’x36’ cement pad which should give us extra space to the front and back of the Airstream as well as about 8’ of covered living area out to the front of it. This is close to the size of the deck we currently have, and we love that extra space. Of course now it will be covered and open up a lot more possibilities.
Anyhow, like we mentioned, Miracle Truss was super helpful especially in working with us to understand the right height of the building. Once we settled on a size and price, they put together full technical drawings which also went through an approval process.
Cement Pad Planning & Equipment Rental
These buildings are really cool because you can put them together yourself! But that doesn’t mean it’s simple. There are a lot of moving pieces, and things to think about if you’re going down this road. Let’s cover the high level basics here, and we’ll get into the details in later videos.
First is your foundation. One of the benefits of a metal truss design is that you can just pour footers for the trusses to bolt into, or you can lay an entire concrete pad. In our case, since we wanted to park the Airstream under the cover, a full pad made the most sense.
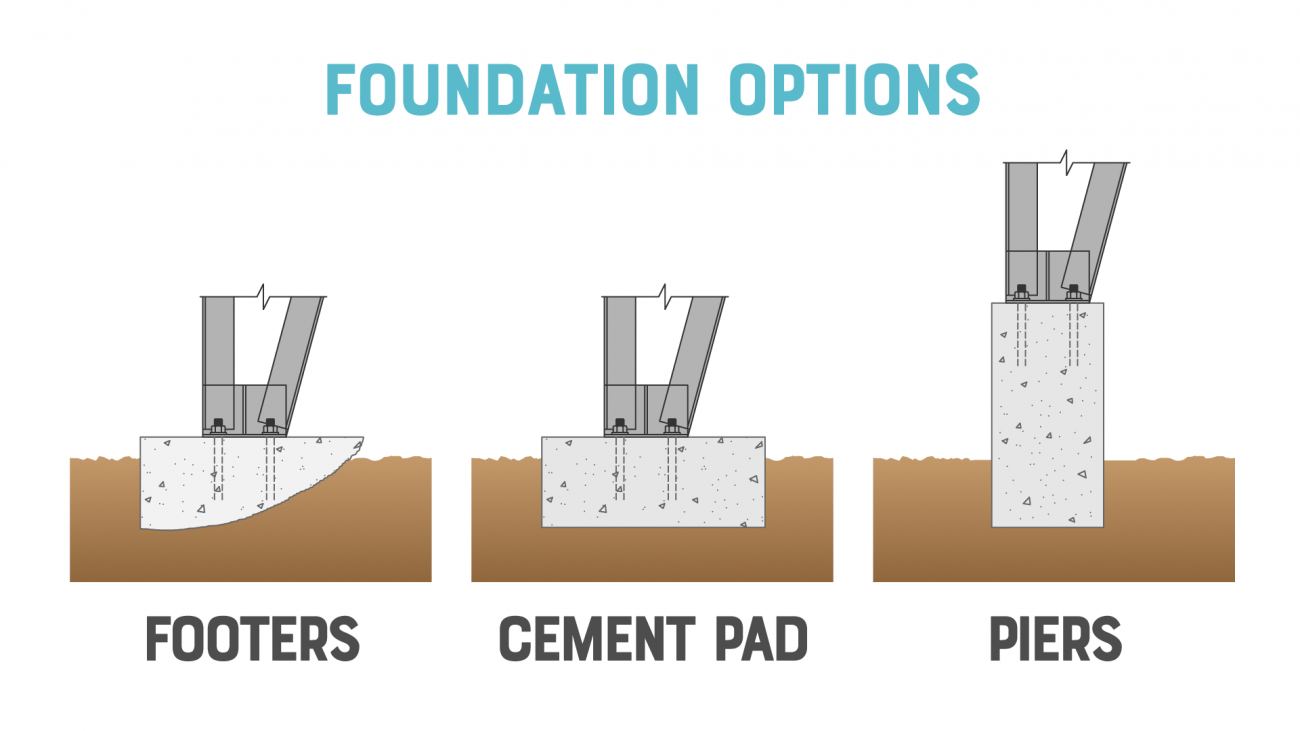
And while we’ve poured a few small cement pads, engineering one this large and strong enough to attach an open air building was out of our comfort zone. So in addition to working through the design of the cover with Miracle Truss, we also had to work with a local cement company to have this pad poured right. That included leveling the area, bringing in A/B mix and compacting it so things wouldn’t sink over time, digging the footers and reinforcing where the trusses would go, installing rebar, setting bolts, and more.
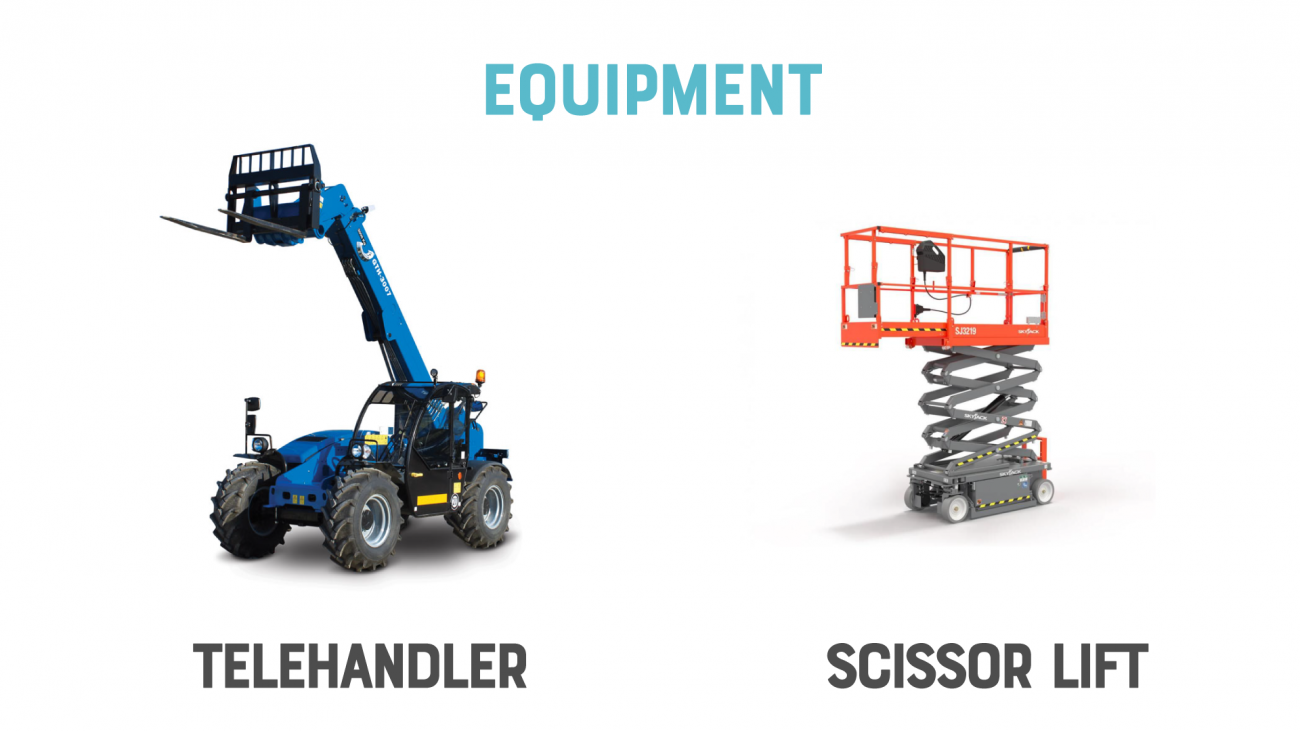
In addition, you will need some decent sized equipment to put this structure up. So we also needed to coordinate renting both a telehandler to set the trusses in place and a scissor lift to install purlins, roofing, and more.
Compared to most of our projects so far where we’ve built nearly everything ourselves from the earth on our land, this is a whole different ballgame. And we are learning A LOT.
Permitting
One major thing we forgot during this process was permitting! For the solar shed, we kept it under 200 square feet so in our county, permits weren’t necessary. And the chicken garden is mostly just a wall so it doesn’t really count. But even though we are in Cochise County and part of the owner-builder opt-out, any structure over 200 square feet that costs more than $1,000 still needs a permit.
The process was pretty straightforward - we called first to get some direction, then filled out the application online. This was considered an accessory structure, and we were able to opt-out of inspections for this building as well. We needed to provide a sitemap showing where it would be, making sure were at least 20’ from our property lines. We included Miracle Truss’s engineered drawings, but for an opt-out permit they aren’t even necessary.
All in all it cost us about $150, was approved within a few days, and only required an initial inspection to make sure we were properly setback from our fence lines. We should be able to email or text photos of the completed structure within 6 months for final approvals.
Next Steps
So with our materials on order, our place "cemented" on the schedule for a newly poured pad, and permit in hand we were ready to get going. But again, nothing is as easy as it sounds, especially in 2022. Between cement rations here in Arizona, gas prices slowing down shipments, and unavailability of the equipment we need to do the job, things quickly got complicated. But all this is a story for future videos.
Speaking of, what's coming up in this series?
Project Overview
- Planning & Design
- Cement Pad Pour, Footings
- Receive Materials, Shou Sugi Ban Wood, Erect Vertical Columns
- Put Main Trusses into Place, Rent Scissorlift, add Cabling, Purlins
- Metal Roof & Trim
- Gutters & Downspouts
- Utility Holes, Trenching & Planning
- Gray Water Septic
- Bury & Plumb Rainwater Catchment Tank
- Solar Pump House Planning & Foundation
- Solar Pump House Build & Electrical Run
- AC Power Plugs
- Plumbing Pump House
- Leak Testing + Airstream Wash Party
- Moving the Airstream
- Designing Outdoor Space
- Cost Breakdown
We cannot wait to get our Tiny Shiny Home protected and covered from the elements.
Keep scrolling below to watch videos of each phase of the project as we complete it!
2. Cement Pad Pour & Footings
The next phase in building our Airstream Metal Truss Carport was to get a concrete pad poured with anchor bolts for the prefabricated trusses. Instead of doing this ourselves, we brought in the pros at Willcox Rock & Sand, and we're so glad we did.
3. Receive Materials, Shou Sugi Ban Wood, Erect Vertical Columns
With the concrete pad poured, it's time to officially start raising our Miracle Truss Airstream cover. But first we need to take delivery of the materials, order lumber, Shou Sugi Ban it for longevity, and begin the process by setting the vertical columns in place. Wish us luck!
4. Set Top Trusses, Level, Plumb & Square Building, Tighten, and Install Purlins
With the vertical columns raised it's time to set the top pieces of our Airstream cover. But with equipment rental shortages we have to get a little bit creative. Then we take time to square, level, and plumb everything before tightening the bolts and installing the purlins.
5. Install Metal Roofing & Trim
Metal roofing is never our favorite, but we enjoyed having a scissor lift and working with the smaller panels for this gabled roof. Just because the main structure is complete doesn't mean the project is over! There's still gutters, rain tank storage, electrical, and so much more to do. Keep watching!
6. Gutters & Downspouts for Rainwater Catchment
With the main structure built, it's time to turn our attention to utilities. First up is gutters and downspouts for our wet delivery rainwater storage and collection. This involved installing gutters at the proper pitch, building 4" downspouts and fabricating custom brackets while digging a trench to allow the water to flow underground to our storage tank.
7. Utility Holes, Trenches, & Planning
The Airport project continues! With the metal truss building finished, and our gutters and downspouts installed we turn our attention to utilities. Planning water, power and septic all in a small space was massively complicated, so let's see what we came up with.
8. Gray Water Septic
The next step in our metal truss Airstream cover is to design and build our very first gray water septic system or dry well. This will drain all our unused gray water out of sight and smell from the trailer for years to come.
9. Bury & Plumb Rainwater Catchment Tank
After filling in our septic hole, there was one last big hole to fill. The rainwater catchment tank. We'll be burying it 3' below ground, plumbing it, and running the gutter downspouts into the top to catch water.
10. Solar Pump House Planning & Foundation
Join us as we start planning and building version 3 of our solar water pump house! This iteration will include a concrete pad, 6" walls, AC and DC power, and an overflow drain. In part one we build the frame, pour the pad, and set the main structure in place.
11. Solar Pump House Finishing & Running Electrical
The solar pump house build continues, but first we go back in time to show you the process of running 120V AC power up to the Airport. Then we pick back up where we left off with the pump house and add walls, hinged roof, trim, insulation, and the solar panel. We're getting close!
12. Running AC Outlets
I don't know what was going on today, but everyone was in a mood 😂. Mischievousness abounds as we run all our power lines from our freshly installed AC power.
13. Plumbing Pump House + Building Mini VRM 12V Power System
Time to get nerdy, friends! Today we plumb the water system AND build the mini VRM 12V power system for the Airstream Carport Pump House. Hold on to your pocket protectors!
14. Leak Testing + Airstream Wash Party
And the two systems shall become one! The water pump is finally connected to the 12V system, everything is wired and cleaned up, and that concludes our utility work until the trailer is in place. Speaking of, it's time to get it shined up and ready for its big move. Let the Airstream wash party commence!
15. Moving Day
The day is finally here, friends! It's time to move our Tiny Shiny Home from its original location for the last 2.5 years to its brand new permanent home under the Metal Truss Carport. Let's do this!
16. Designing Outdoor Patio Living Space
The day after we moved the Airstream to the metal truss cover, Ashley and Jonathan go to town to gather materials to design the outdoor living space. Let's see what they come up with.
Cost Breakdown
So how much did this project cost? It definitely turned out to be the most complicated and expensive project we’ve worked on so far.
Now we’re going to try something a little different here - instead of overwhelming you with every single individual thing we bought, we’re just going to share the high level costs associated with this build.
Item | Cost |
|---|---|
19'x36' Open Frame Miracle Truss Building | $13,500.00 |
2”x8”x12’ Boards for Purlins, Facia | $900.00 |
19'x36' Concrete Pad | $7,000.00 |
3,000 Gallon Enduraplas Tank | $3,250.00 |
Scissor Lift + Trailer Rental 1 Month | $1,700.00 |
Bucket Truck Operator | $500.00 |
Gutters, Downspouts & Fittings | $1,700.00 |
Gray Water Septic - Barrels, Pipe, Fittings, Gravel | $600.00 |
AC Electric - Conduit, Wires, 30A Receptacle, Outlets | $1,500.00 |
Pump House Structure, Insulation, Concrete Pad | $1,200.00 |
Pump House Plumbing, Filters, Pressure Tank | $1,400.00 |
Mini VRM 12V Solar System | $1,300.00 |
| Outdoor Furniture, Step, Lights, Decorations | $2,000.00 |
Grading, Finishing Gravel | $1,200.00 |
Tools | $300.00 |
Total | $38,050.00 |
So we spent about $38,000 on this project from start to finish, which sounds like a lot to us, but when you factor in the 50 year warranty on the Miracle Truss building, the entire pluming/pumphouse/electric/septic setup, and the concrete pad and finishing work. If we had hired this whole project out it would have cost so much more.
How's it Working Out?
It’s been about a month since we finished the Airport so we wanted to give a few updates.
First, we love it so much. The outdoor space, the added protection and shade, It all feels good. So far the shade vs. sun is working out just like we planned - parking the trailer on the SouthEast side means it is getting warmed during the winter, and should be shaded more in the summer.
The structure itself is super sturdy, and we’re not worried at all about the high winds here.
The pump house is working out great, too. The descaler has stopped almost all our calcium deposits, and the 4.5” of insulation, buried tank, and heated hose means we don’t have to worry about water freezing anymore.
Being able to relax outside checking our amazing view of the mountains while stoking a fire in our chimnea is pretty awesome. And so is having some overhead lights for when company is over.
And finally the graded and graveled area round the whole thing feels like home. For now at least.
Like we mentioned, the whole point of this project was to move the Airstream so we can start on our house. Which will be happening in the coming months.
So make sure you're subscribed because there is so much more to come. We’re just getting started and hope to see you again soon!
Apparel
Grab a fun, comfy t-shirt & help support our family.


About the Author
Jonathan Longnecker is the strongly opinionated tattooed and bearded half of Tiny Shiny Home. He loves making music, figuring out nerdy solutions, exploring the outdoors, and living off-grid.
comments powered by Disqus