Hyperadobe Earthbag Solar Shed Office Tour
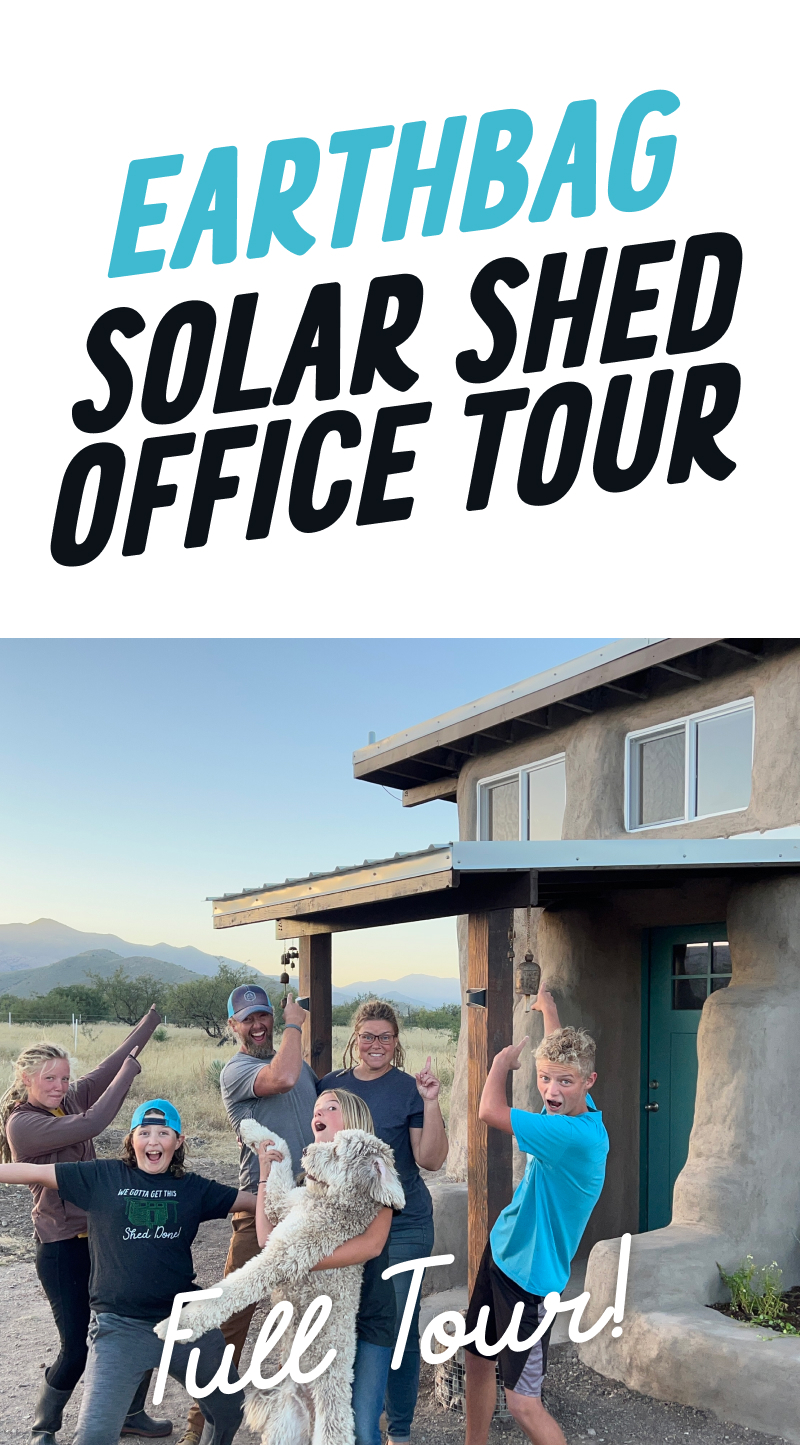
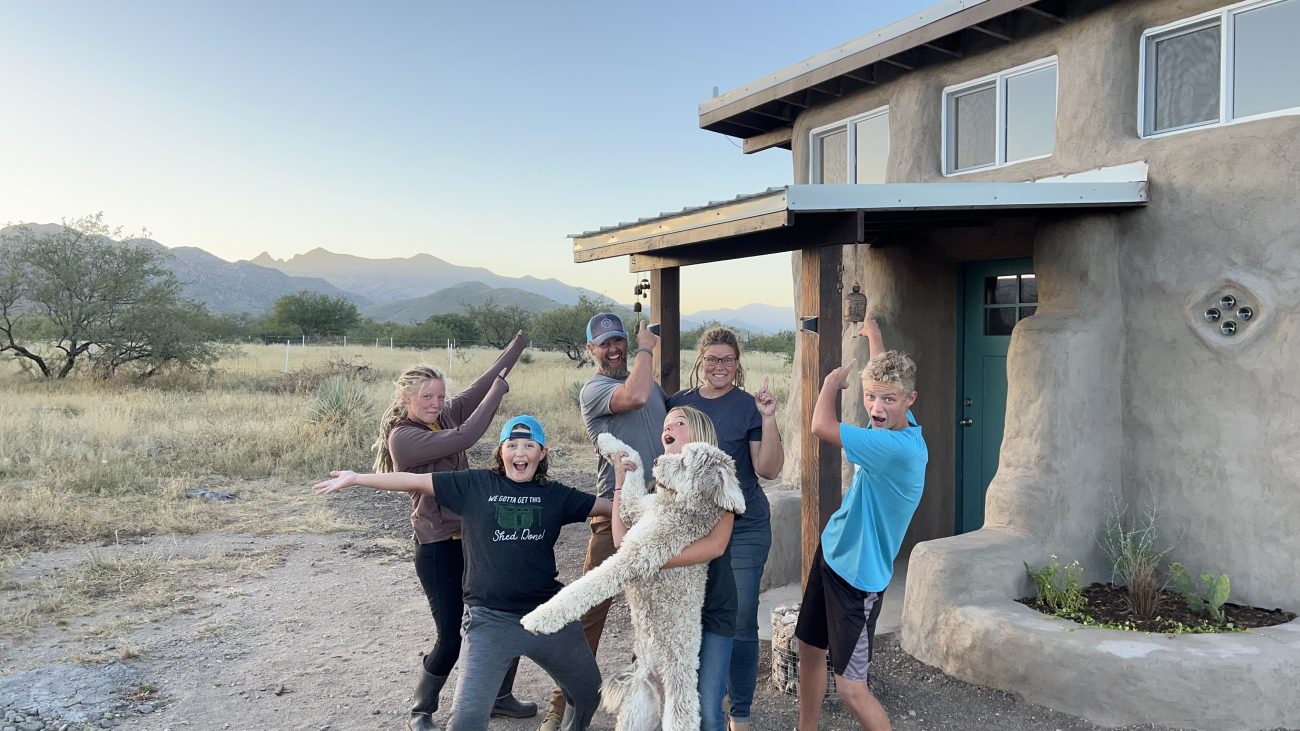
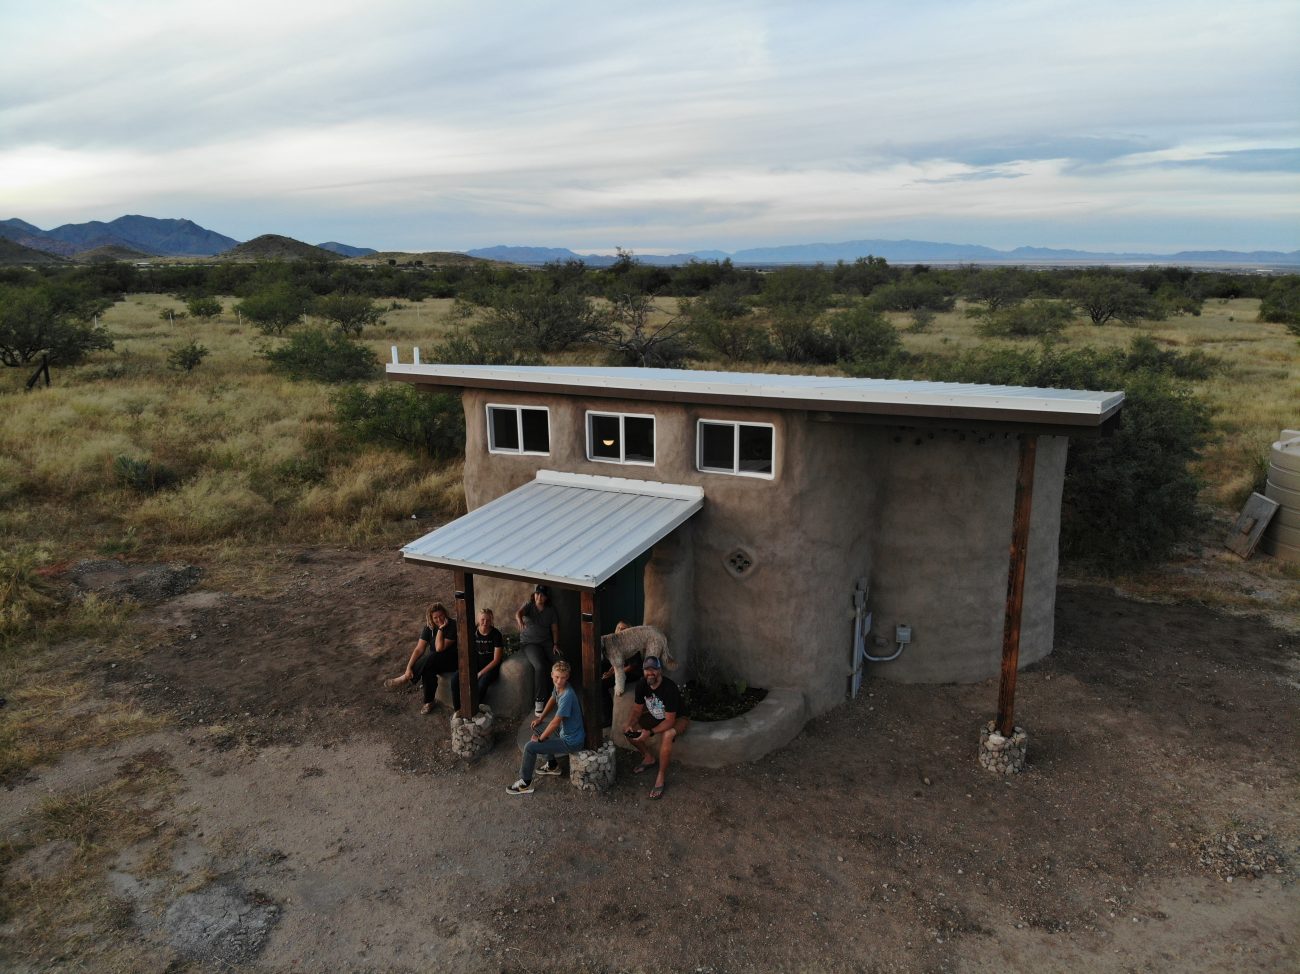
Hi there, we’d like to give you a tour of our hyperadobe earthbag solar shed office! This 200 square foot building took our family of 6 about 8 months to complete here on our off-grid homestead in SouthEast Arizona.
First, let’s give you a little background on what hyperadobe earthbag is, and why we built this sustainable, unorthodox structure from the dirt on our own property.
What is earthbag building, specifically hyperadobe?
Earthbag, sandbag, or as Ashley’s Dad affectionately calls it - “dirtbag” - is a construction technique using tubes or bags filled with dirt, cement, and water to build monolithic structures.
These natural, sustainable buildings are beautiful and organically shaped, and use minimal resources. In our case, we used 12 parts native soil to 1 part portland cement with some water added in our bags. When these elements are mixed appropriately and tamped into place they cure into basically a rock wall.

Superadobe Earthbag
This process uses solid woven polypropylene bags along with barbed wire to lock the layers into place as you go up. Cal-Earth Institute has popularized these types of building structures over the last 30+ years.
Solid bags and barbed wire are great for dome based structures, and provide incredible stability and simplicity.
Hyperadobe Earthbag
This process uses raschel tube netted bags that are UV protected and don’t require barbed wire as the mesh interlocks naturally from layer to layer.
We chose hyperadobe because the bags were half the cost, didn’t require barbed wire, and the UV coating meant we didn’t have to worry about covering them while building.
Plus the simplicity and safety of the process meant we had no hesitations letting our kids help during the entire project. That’s right, our whole family built this!
Why did we build this first on our property?
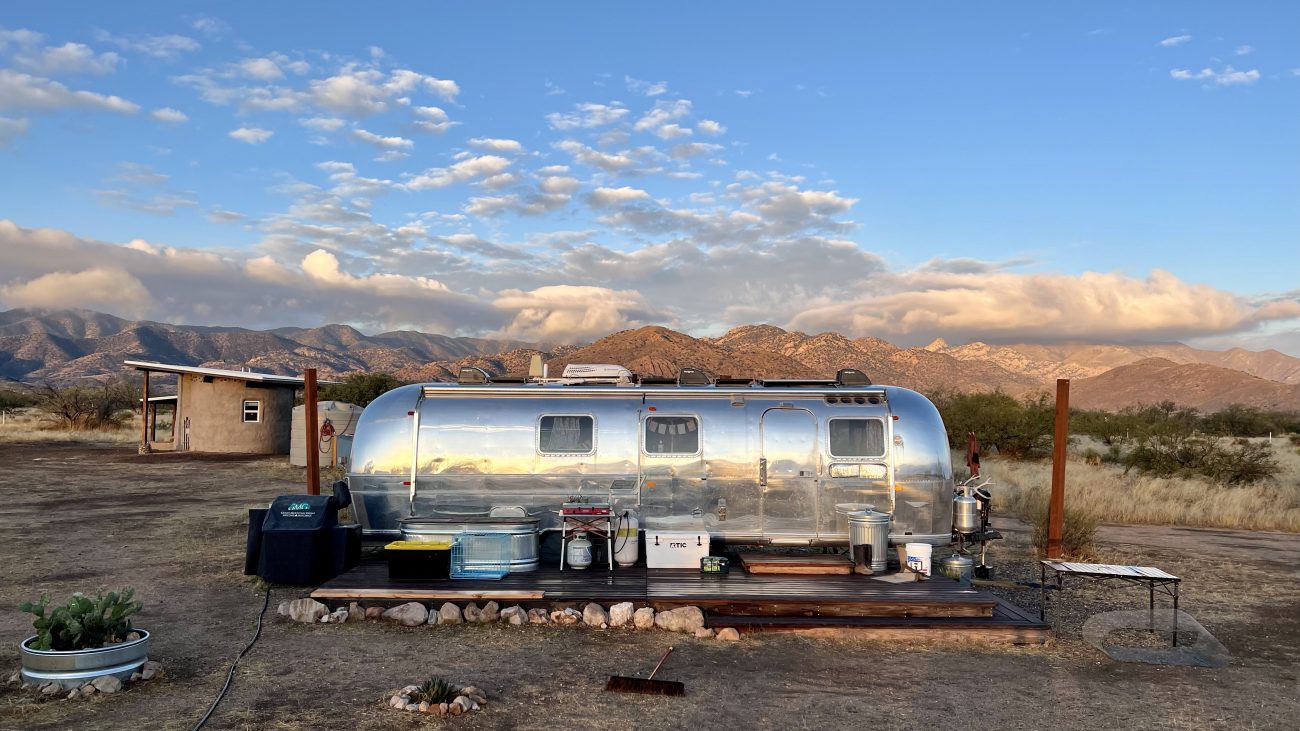
Our years renovating and living in our vintage Airstream instilled in us the value of multi-use spaces.
So when we set out to build our first structure, we knew we didn’t want to waste an opportunity to use it for more than one thing.
Solar Shed
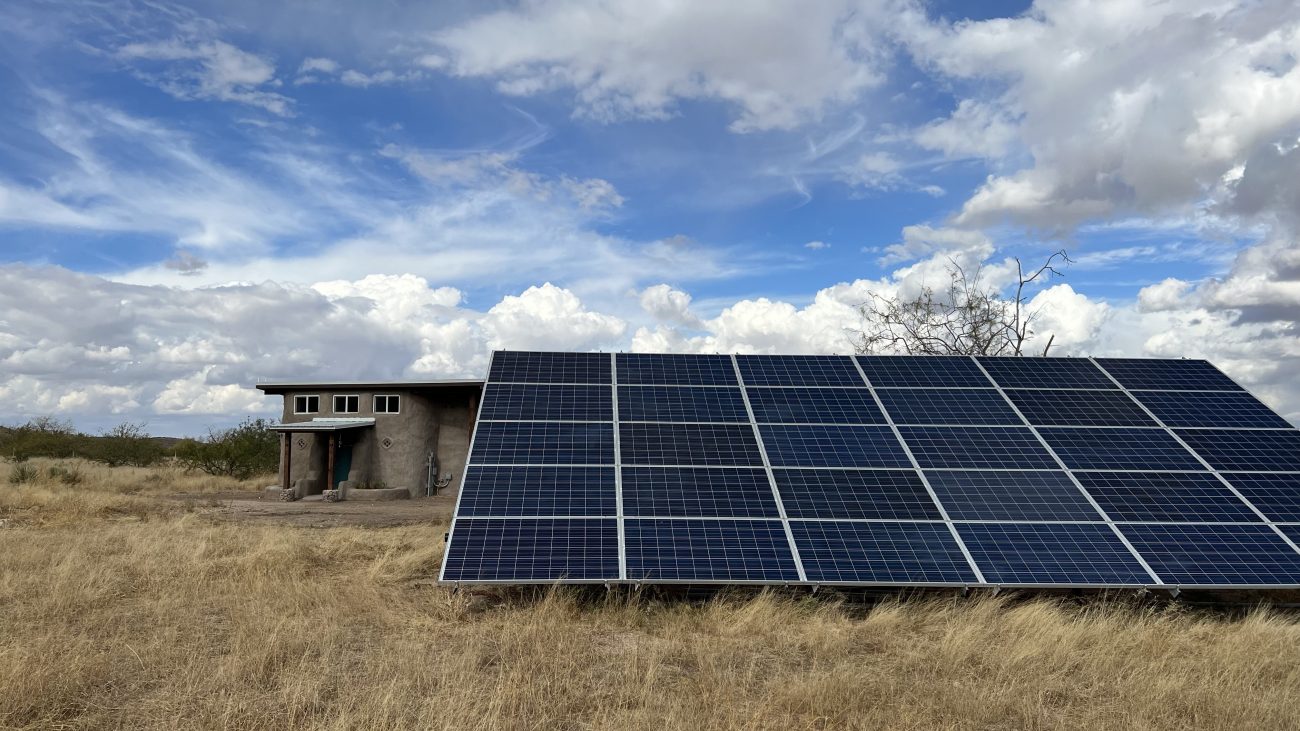
First up, our desert homestead is 100% off-grid. So a big part of this project was not only to build a climate controlled space to store our lithium batteries, inverter, charge controllers, and BMS - but to build a massive solar panel ground mount and trench those wires through the walls to power everything.
We won’t cover the ground mount here, but just know it was an important part of the process.
Office
Second, we needed an office. A place to work in quiet and solitude. Jonathan dutifully used his Tiny Standing Desk inside the Airstream for 5 years, and it was time for an upgrade. Also, with Ashley spending more time editing videos and writing articles the little 3 square foot corner in the trailer just wasn’t doing it anymore.
With a large adjustable standing desk and file cabinet storage this area lets us create more room in the Airstream and simplify work.
Guest Room + Hang Out Room
Third, our trusty Tiny Shiny Home was bursting at the seams. Our kids are growing quickly, our new dog is taking up all the floor space, and Mom & Dad deserve a little privacy after so many years sharing so little space.
This part of the building also give friends and family a place to sleep if they come visit, which is awesome!
Testing out Natural Building Techniques
Another huge benefit of building this small structure first let us experiment with a ton of natural building techniques:
- Hyperadobe earthbag
- Cob & Bottle Bricks
- Bottle brick windows
- Cob Plaster
- Earthen Floor
- Earthen Plaster
- Cement Plaster
- Buttressing
- Earthbag floors
- Bas Relief
- Passive solar
- Wooden rafters + decking + metal roofing
- Negative reveal ceilings
- Arched Entryway + Shelf
- & so much more
As we begin future projects, we’ll take everything we’ve learned and apply it moving forward.
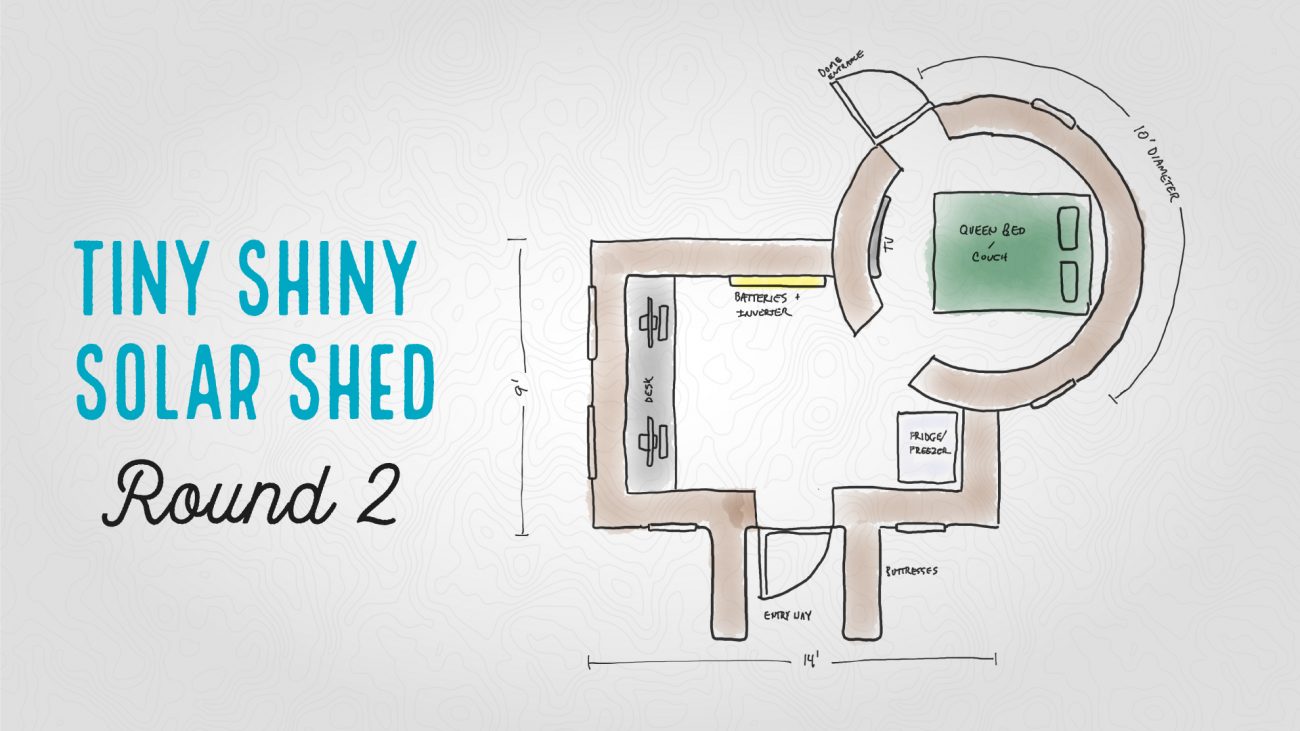
Building Specs
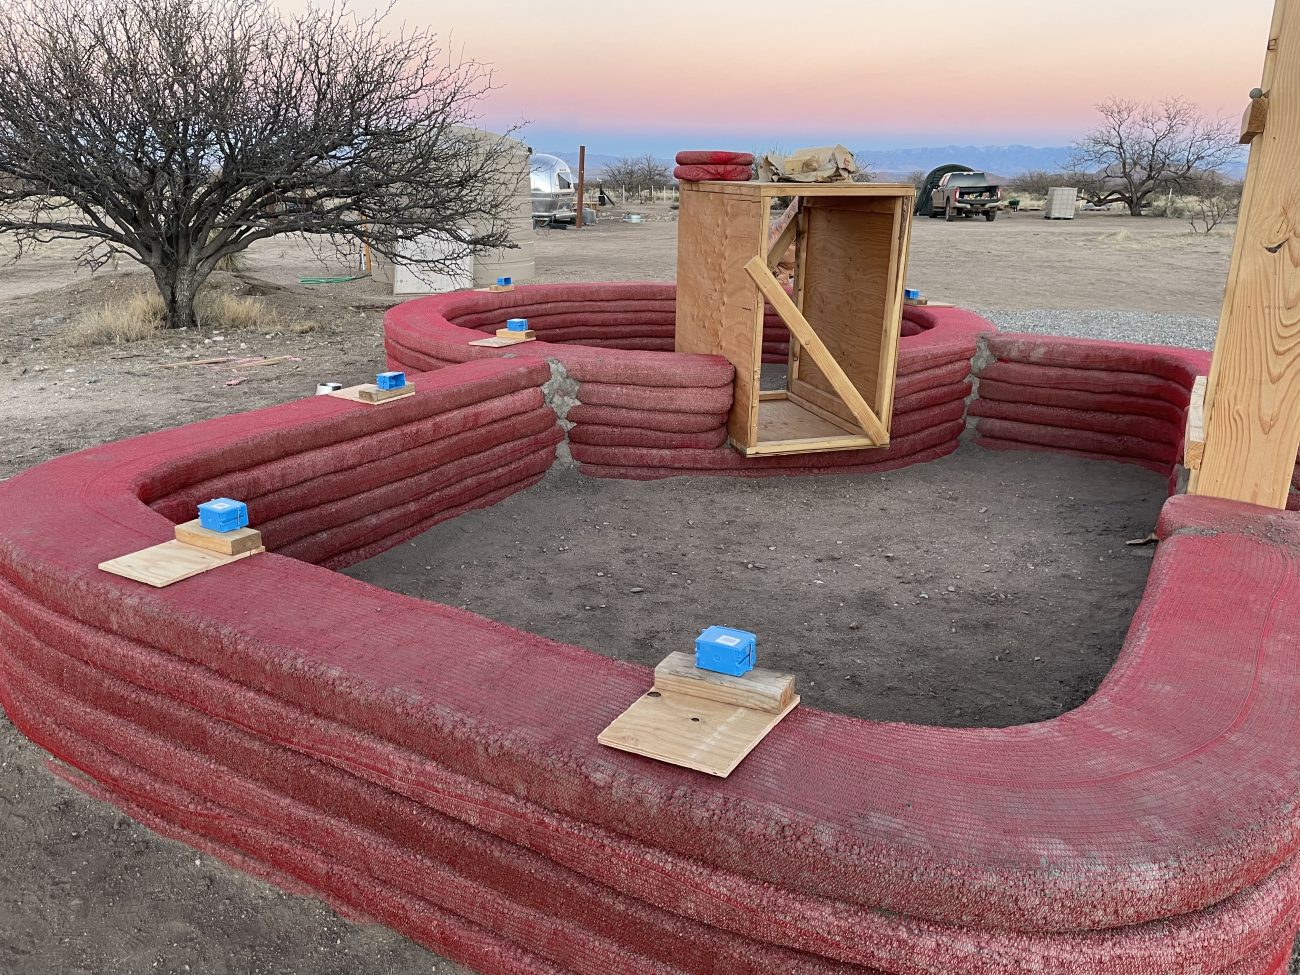
This solar shed office is a 9’ x 14’ rectangle intersected with a 10’ diameter circle. We used 3,400 linear feet of 16” hyperadobe tube netting, moving over 80 tons of dirt, clay, and sand.
This project took our family of six 11 months total, or 8 months of consecutive work.
How much did it cost? Since this was literally the first thing we’ve ever built - and we were dealing with COVID, wild fires, and insane material prices - we lost track of the costs on this.
We do know the cost of our solar system, and will be sharing more details on that later.
But we don’t know exactly how much the building cost. We’ll work to keep track of costs better on future builds now that we have some experience. What we can tell you is that hyperadobe bags cost about .15¢ per linear foot - so the main structure itself cost very little. It was the frames, doors, windows, roofing, furniture, etc... that turned out to be the majority of the costs.
Now that we’ve talked about the how and why, let’s get to the fun stuff and dig into the features of the building!
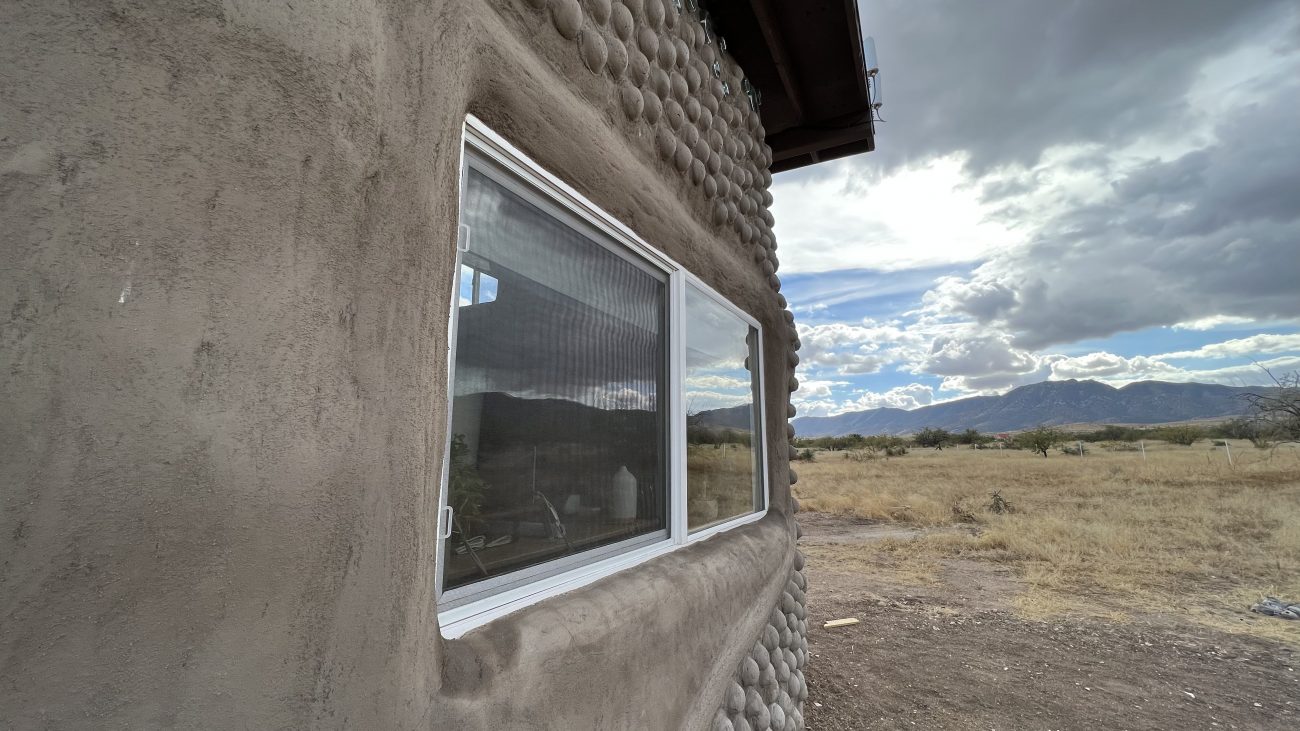
Clerestory Windows & Passive Solar
An important part of our experimenting for this structure was to use passive solar to shade the building in the summer and warm it in the winter.
This uses a row of high windows facing south to allow light in during the Winter, and a roof overhang to provide shadow during the Summer.
It’s important to note that earthbag buildings aren’t necessarily insulative, they use their thermal mass to absorb heat during the day and slowly transfer it through to the inside over time.
So in the summer, we’ve noticed it stays very comfortable for most of the day, and almost too warm at night as the heat transfers through. As we get into the winter months, with the added warmth of sun coming through the windows we expect that the transferable heat will keep things nice and toasty at night as well.
Besides helping keep the temperatures naturally regulated year-round, the high up windows provide beautiful natural light, and raise the ceiling to make the small space feel huge.
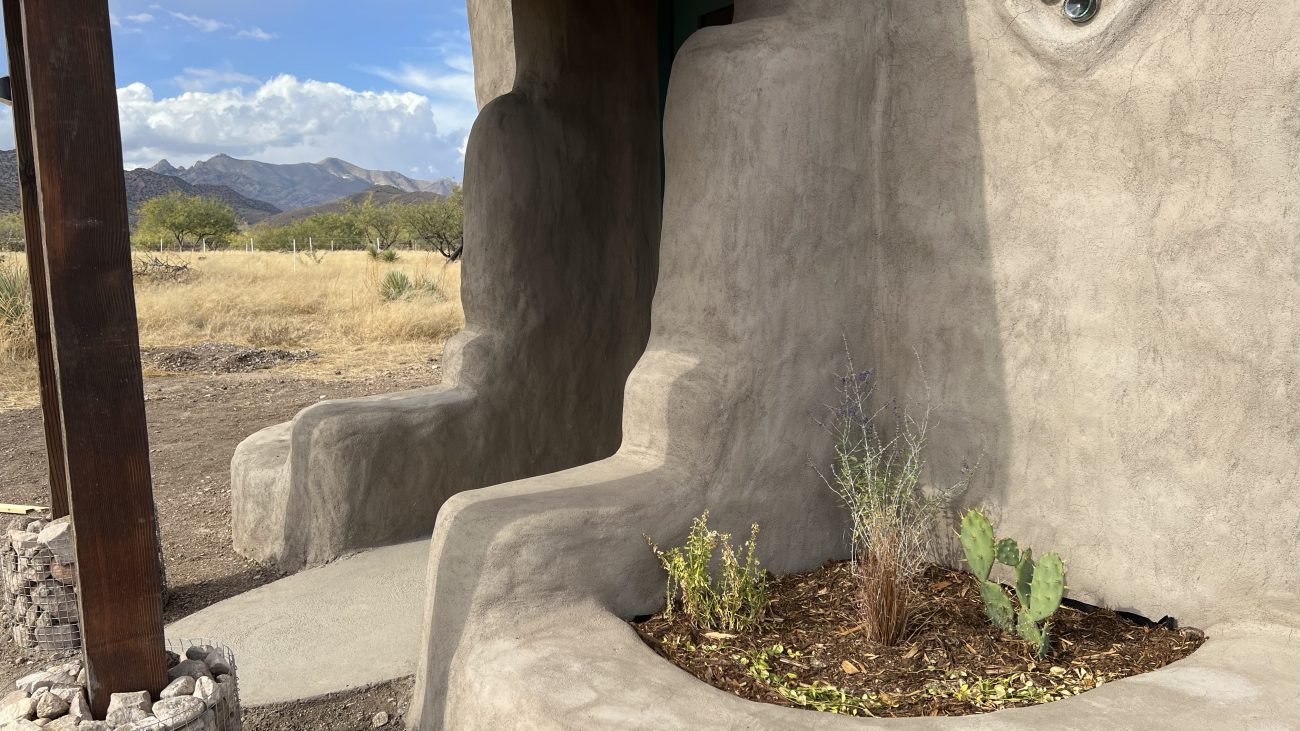
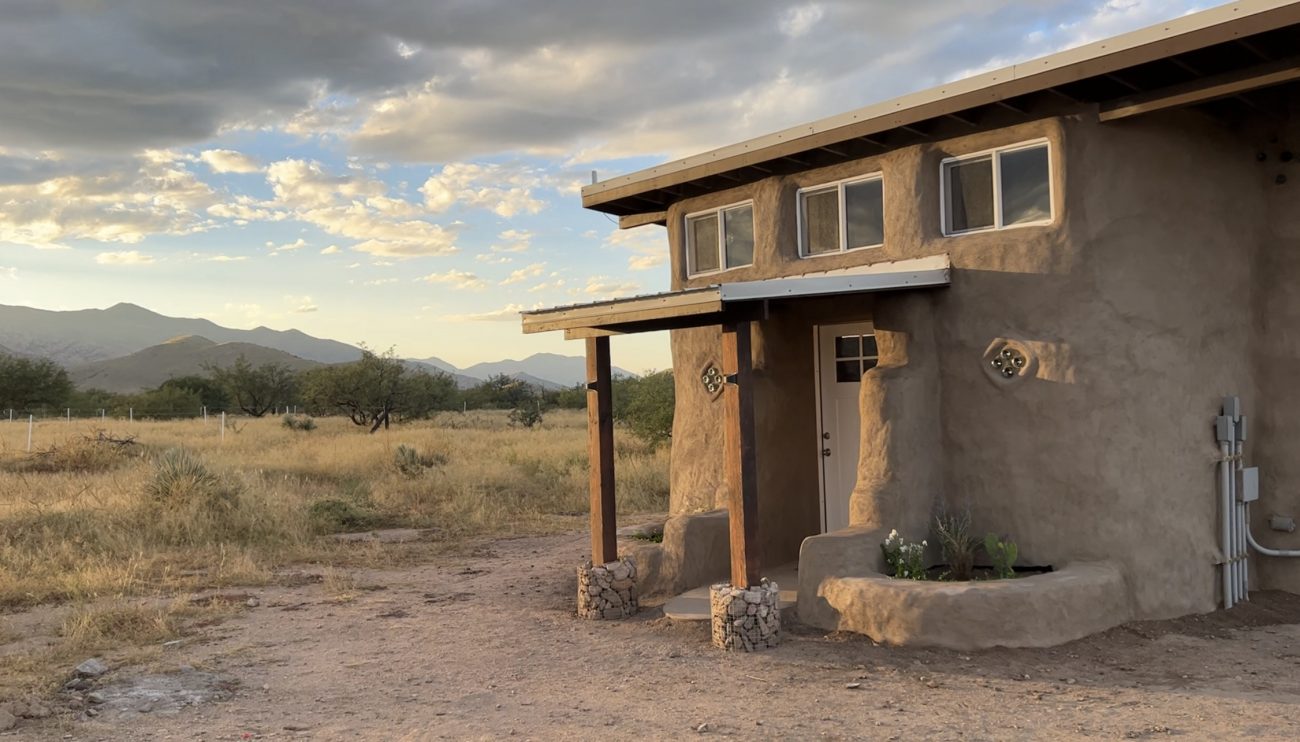
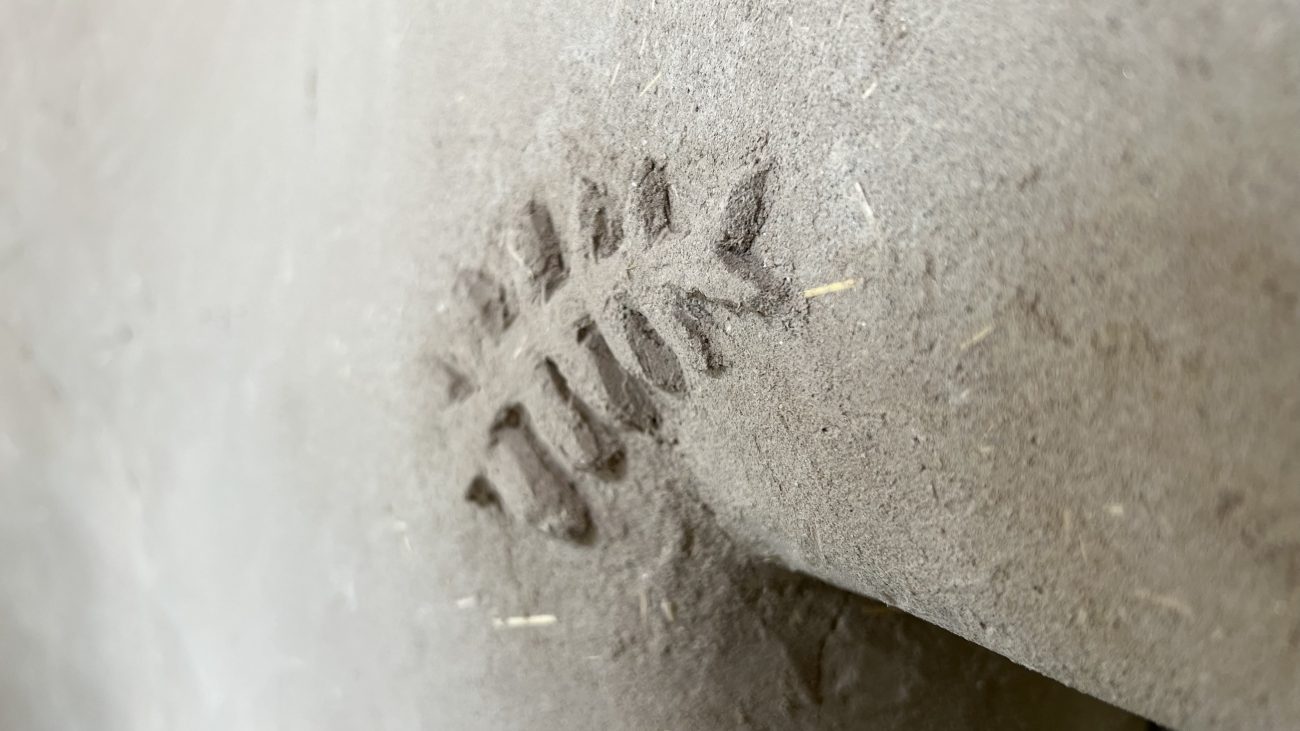
Structural Buttresses
When building with earthbag, long walls over 10’ need extra support in the form of interlocking buttresses. The south facing wall was the only wall that met this criteria so we designed buttressing around the front door to protect the entry way and create a beautiful entrance.
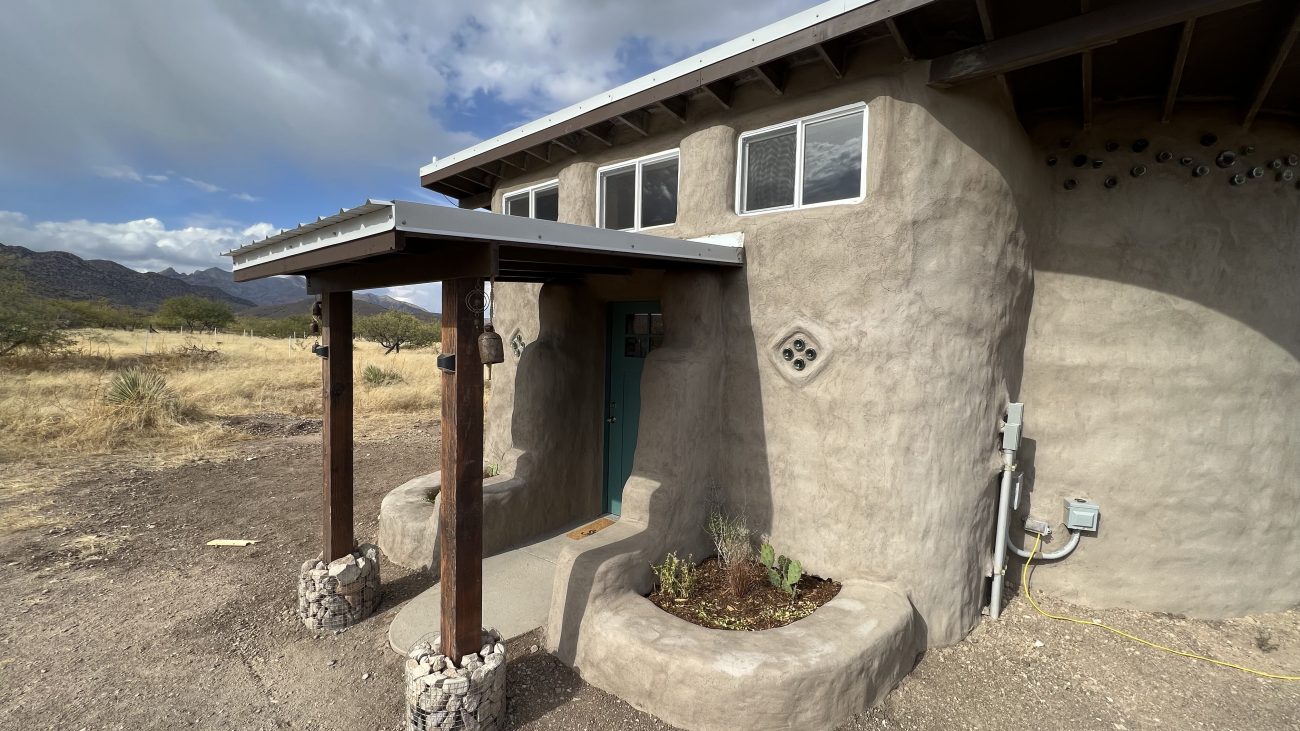
Front Door Overhang
In addition to buttresses, the front door really needed extra protection from the elements. We created a simple overhang with metal roofing to allow a clean, dry way to enter. Eventually we will use this surface to catch rain water as well.
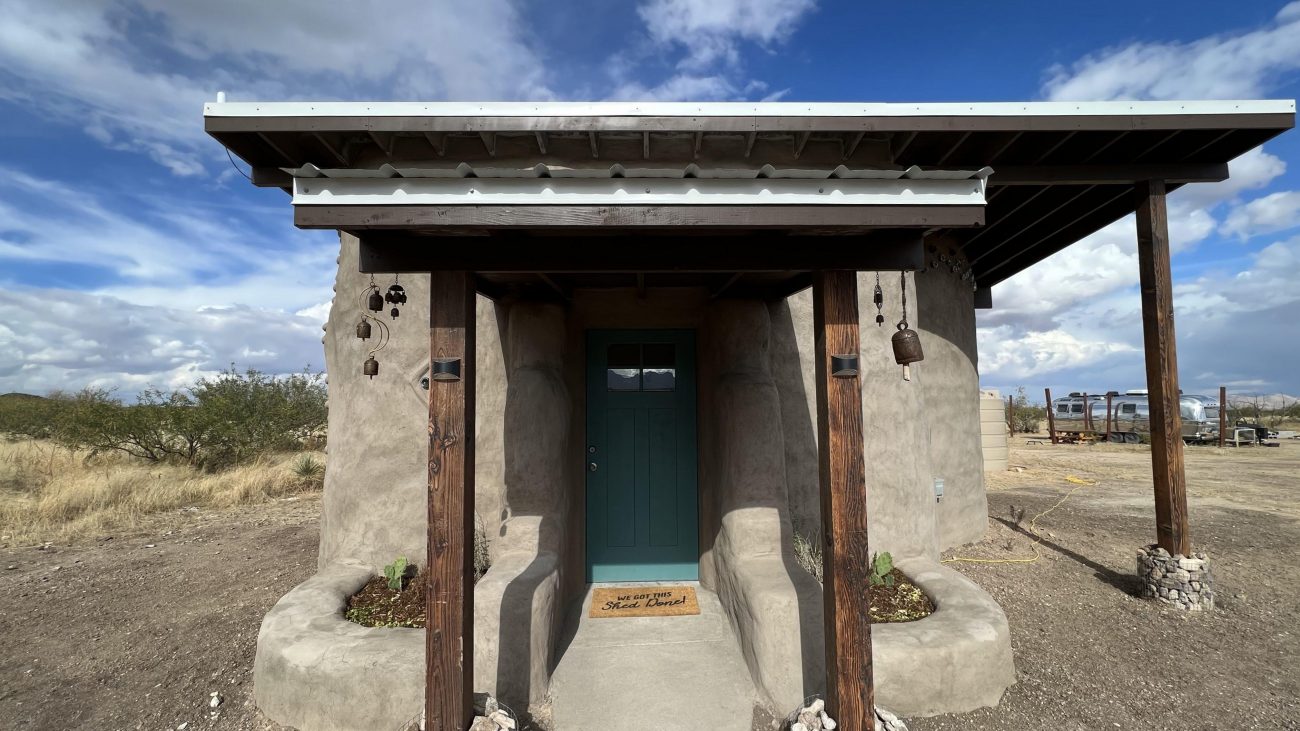
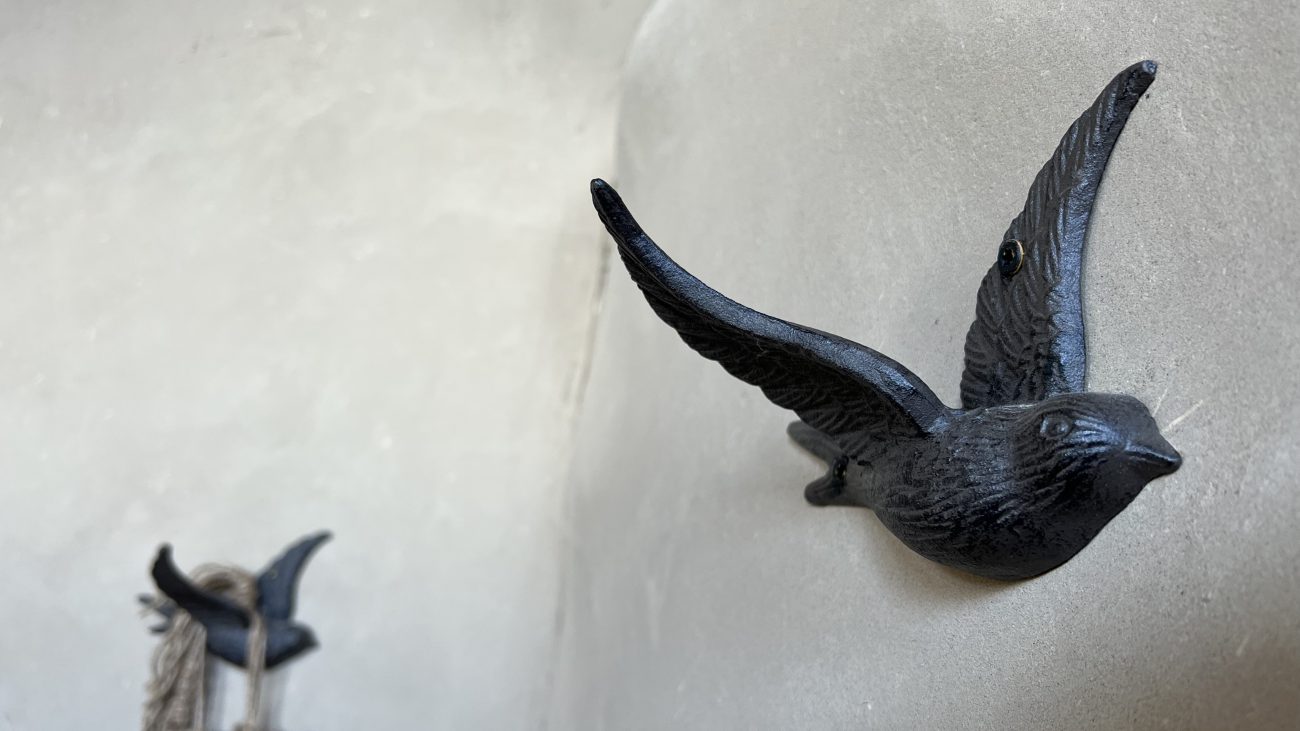
Flower Beds
Not everything has to be structural! Sometimes you need to add a little extra beauty. We used earthbags to build small flower beds connected to the buttresses and building so we could plant some greenery near the entry way.
The spaces use pond liner against the earthbag walls to protect them from excessive moisture.
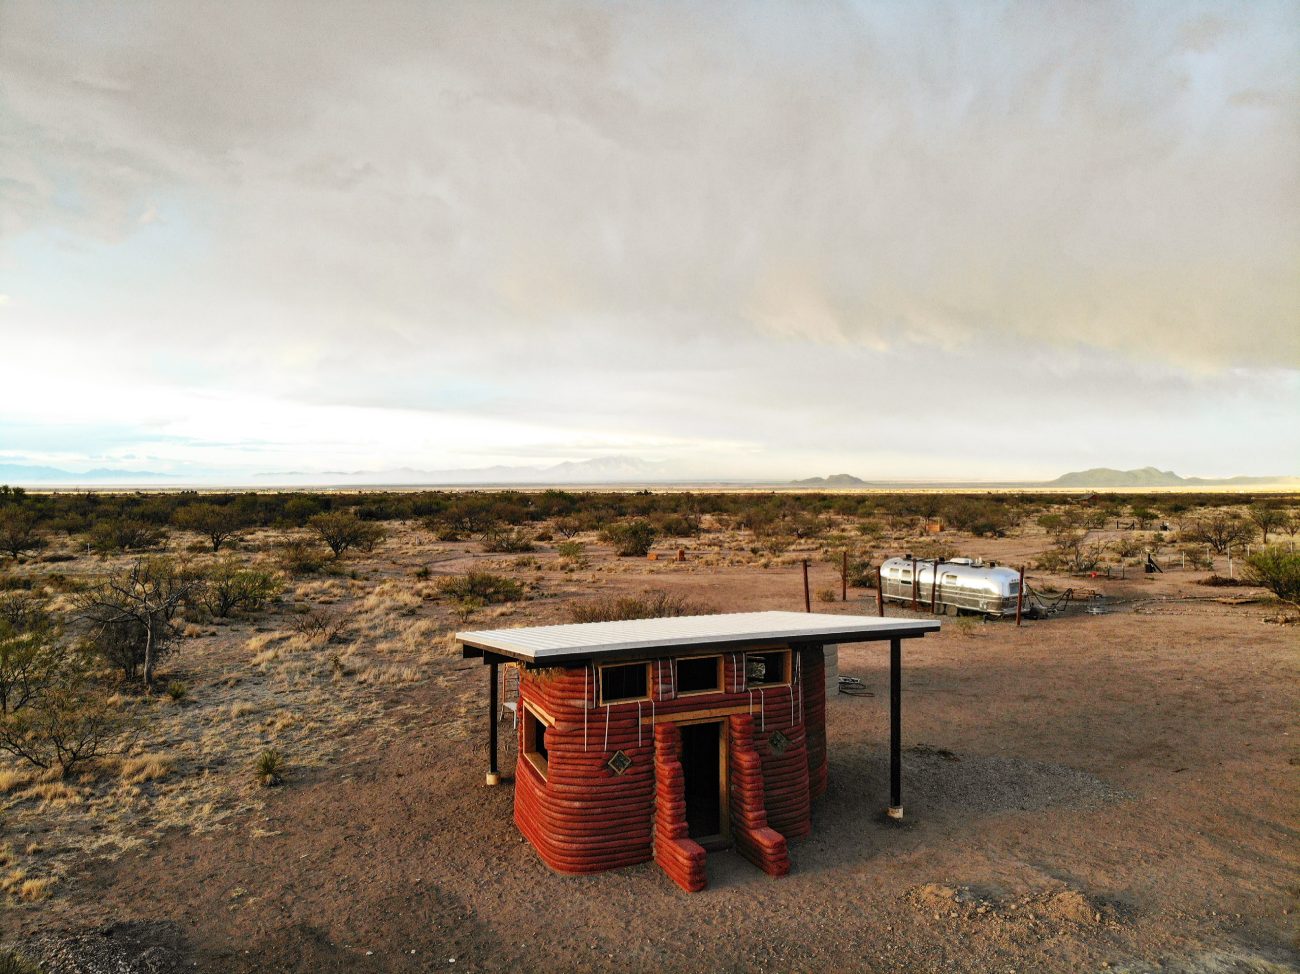
Single Pitch Metal Roof
Many earthbag buildings you see use a dome style roof to create a single monolithic structure and save on material costs. Roofs can be complicated, so why bother?
Here in Cochise County, the water table is rapidly dropping because of large orchards and diary farms so drilling a well isn’t a great investment. Many of us here believe rainwater catchment is the way forward, so the more surface area we can create to catch it the better.
Also, hyperadobe style bags aren’t as suited to domes, and we felt more comfortable going with vertical walls and a more traditional single pitched roof.
This would allow us to catch water and provide the right overhang for passive solar.
As you can imagine, safely engineering a roof attached to earthbags was tricky. We used hurricane strapping many layers down so that the weight of the bags would keep the roof on during wind events. And of course more traditional roofing techniques like hurricane ties helped as well. It’s not going anywhere!

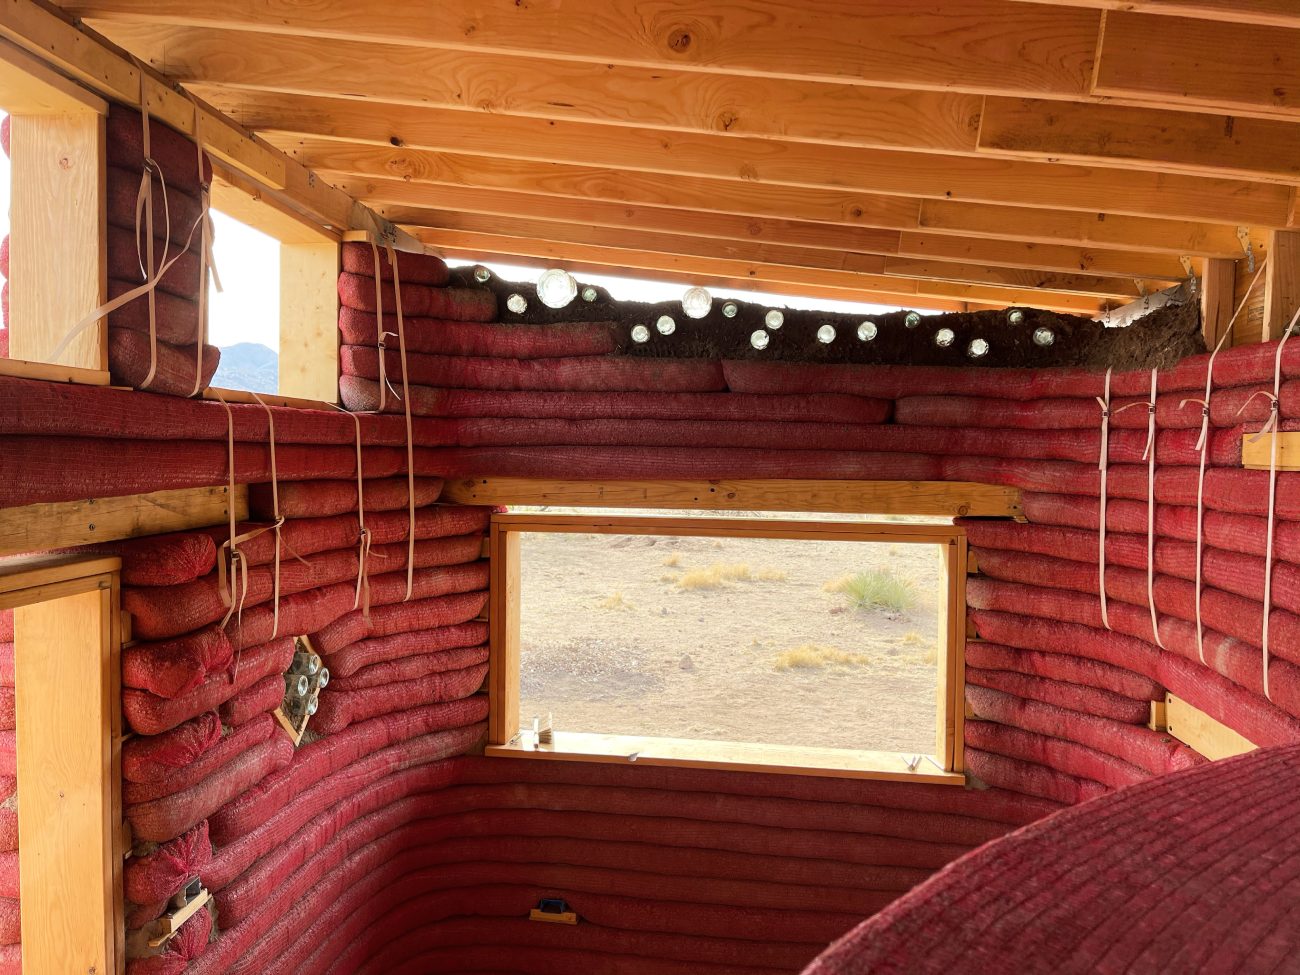
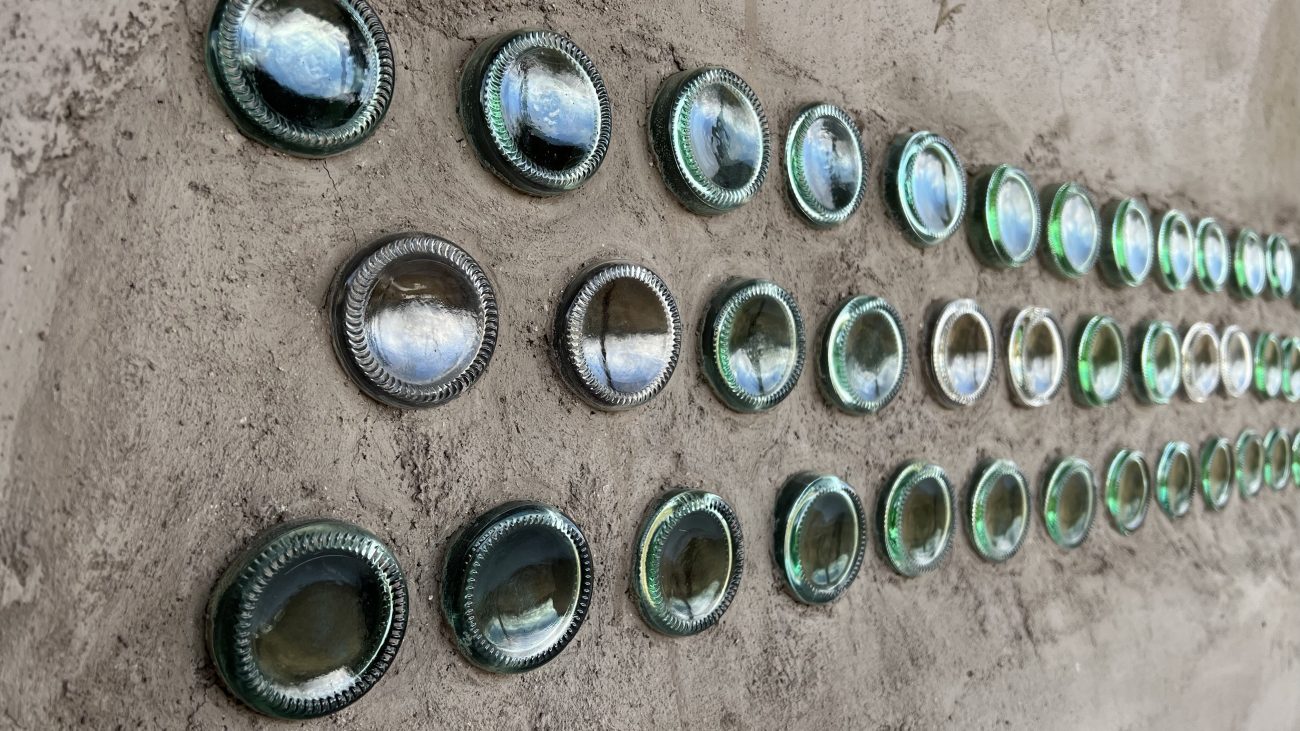
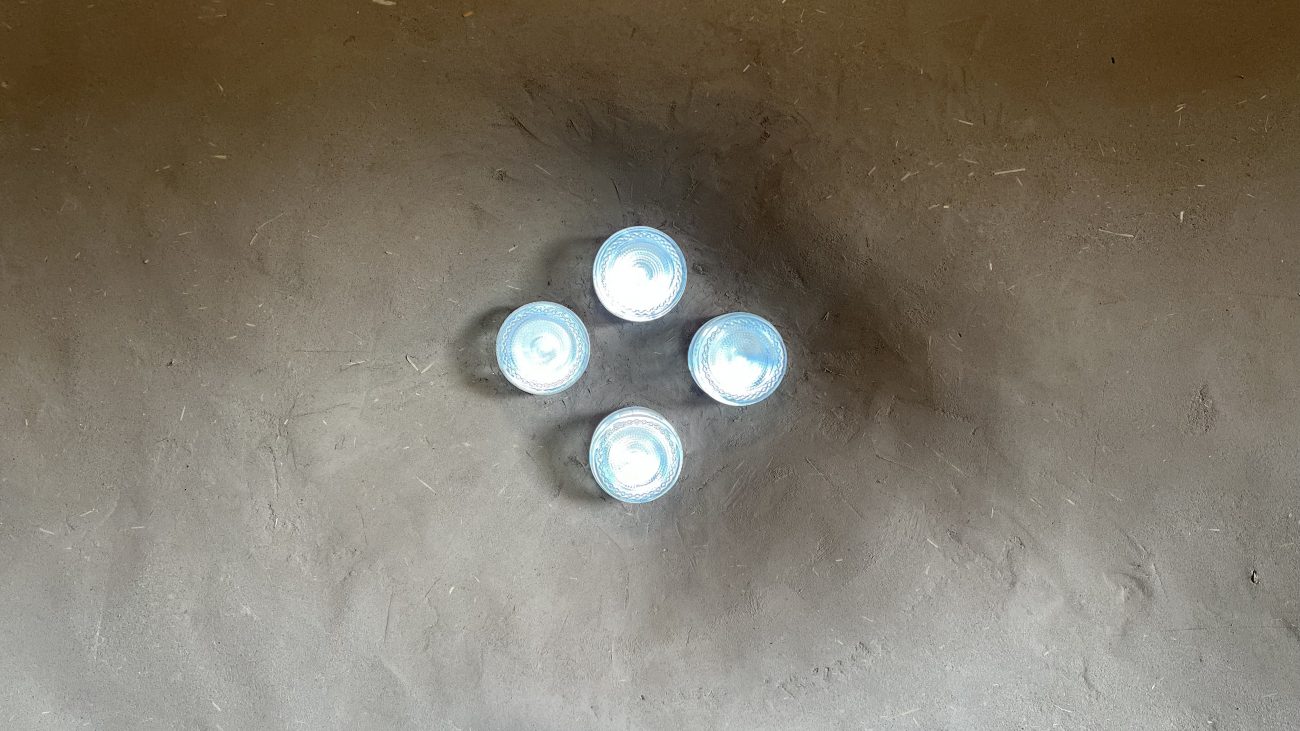
Cob & Bottle Bricks to the Roof
One downside of a pitched roof is that it doesn’t play well with laying earthbags. Once we had the roof installed, there was an empty triangle we needed to fill, and by that point the bags were too difficult to use.
So we cut wine bottles and taped them together creating bottle bricks, and embedded them in cob that we built up to the decking on the roof.
This was a pretty time consuming process, especially when cobbing up into the rafters to make sure everything was sealed up from the outside.
But, the bottles allowed us to use less cob, and they created gorgeous light design features inside the building that light up during different times of the day. Just check out that morning view!
Exterior Earthen Plaster
Another cool thing about hyperadobe bags is that applying a cob or plaster coat them is easy because of the built in mesh. Protecting the outside of a building like this requires a few layers and steps.
- Create a clay, sand, and straw cob to fill the cracks between the bags
- Create a thinner and wetter version of the cob to scratch coat the entire surface of the bags and even out inconsistencies
- During this phase you can also build up any decorative features or window framing
- Create a sand, clay, and cement plaster to cover the scratch coat and protect from the elements.
- During this phase you can add any bas relief elements from the same mix (see below)
We really wanted to use a full earthen final plaster, but our high winds and monsoon rains ripped off our first scratch coat over the summer and we had to re-apply. Because of this we went with a cement fortified exterior final plaster with the hope that it will withstand our weather events. We’ll see how it goes!
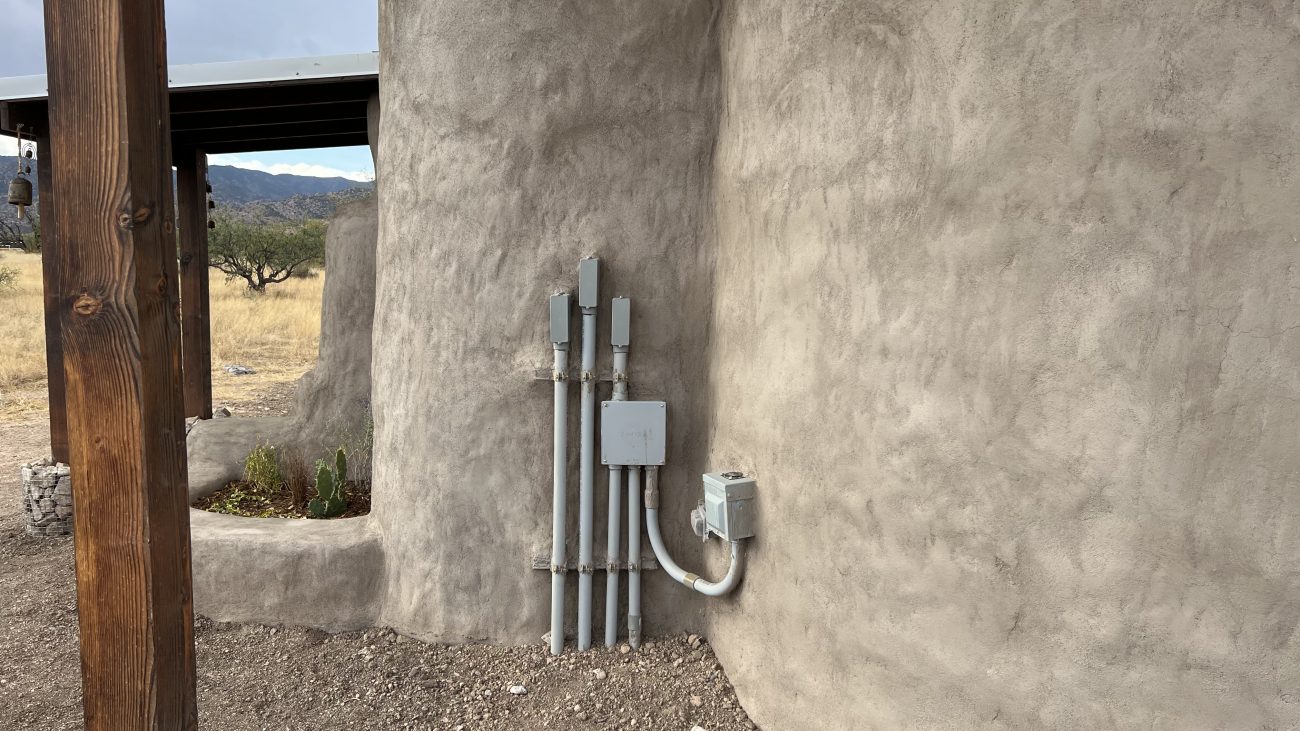
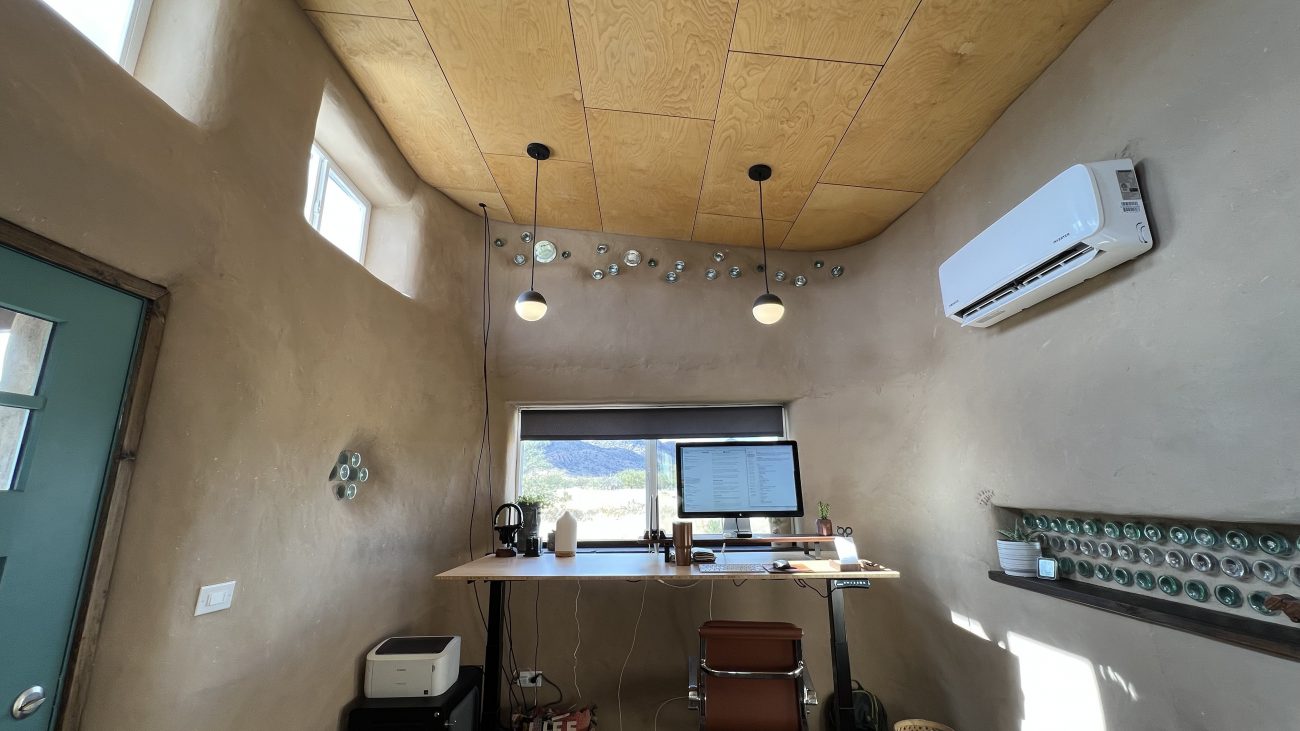
Off-Grid Power Center and Solar Ground Mount
Like we mentioned above, a big part of this building was to provide a temperature controlled space to house our batteries and solar gear.
Since we’re off-grid, it’s up to us to provide our own power. We built out a 7,200 watt solar panel ground mount array that connects to a 28kwh lithium battery bank and 5,000 watt inverter.
The plan is that this will power our Airstream, everything inside the solar shed, and eventually our house. Because of this, the wires running in and out of the building were complicated. We had:
- 4 solar wires coming into the solar charge controllers inside
- 1 6/2 wire going to our Airstream
- 1 6/2 wire going to our house (eventually)
- 1 6/2 wire going to our generator input plug (so we can charge batteries via generator in case of an emergency)
- 1 6AWG bare copper wire going to a grounding rod outside the building
Download Our Solar Wiring Diagram
Get up close and personal with this super detailed, impeccably illustrated hi-res PDF of our full off-grid power setup with a schematic representation of how everything in our 7200W, 28kWH, 120V off-grid battery and solar system connects together. Includes bonus individual component wiring configs, too!
Since earthbag walls are solid, we had to plan ahead for all this and put in PVC piping, then lay conduit and trench all the lines to the respective places. While not part of the “build” it was obviously integral to the function of the structure. And it was so much work!
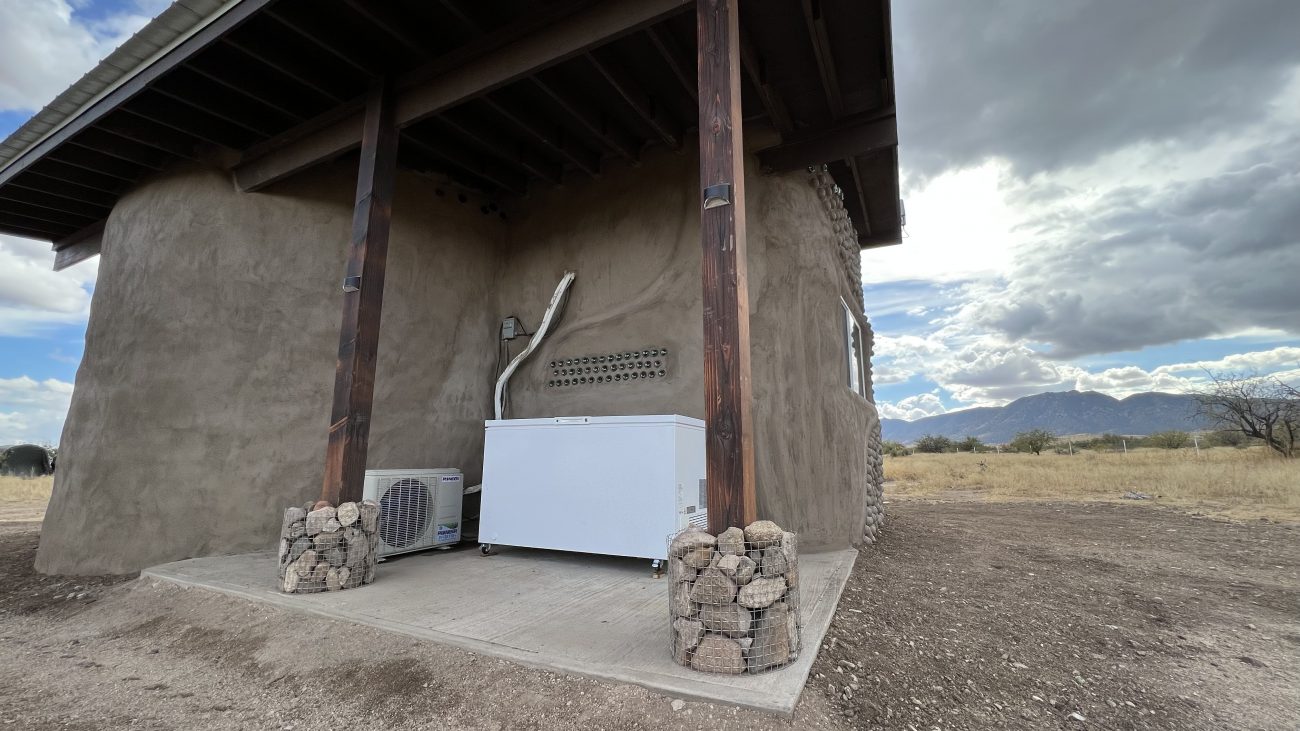
Back Patio + Deep Freeze
The circle offset with the rectangle provided us with some empty space out back, so we poured a concrete pad to create more usable space.
This let us mount our mini split air conditioner and put a deep freeze for food storage. As you can imagine, our little refrigerator in the Airstream was bursting at the seams for our family, so the freezer was a welcome addition.
The extended roof provides nice shade, and the potential to store some small items to keep them out of the rain and wind.
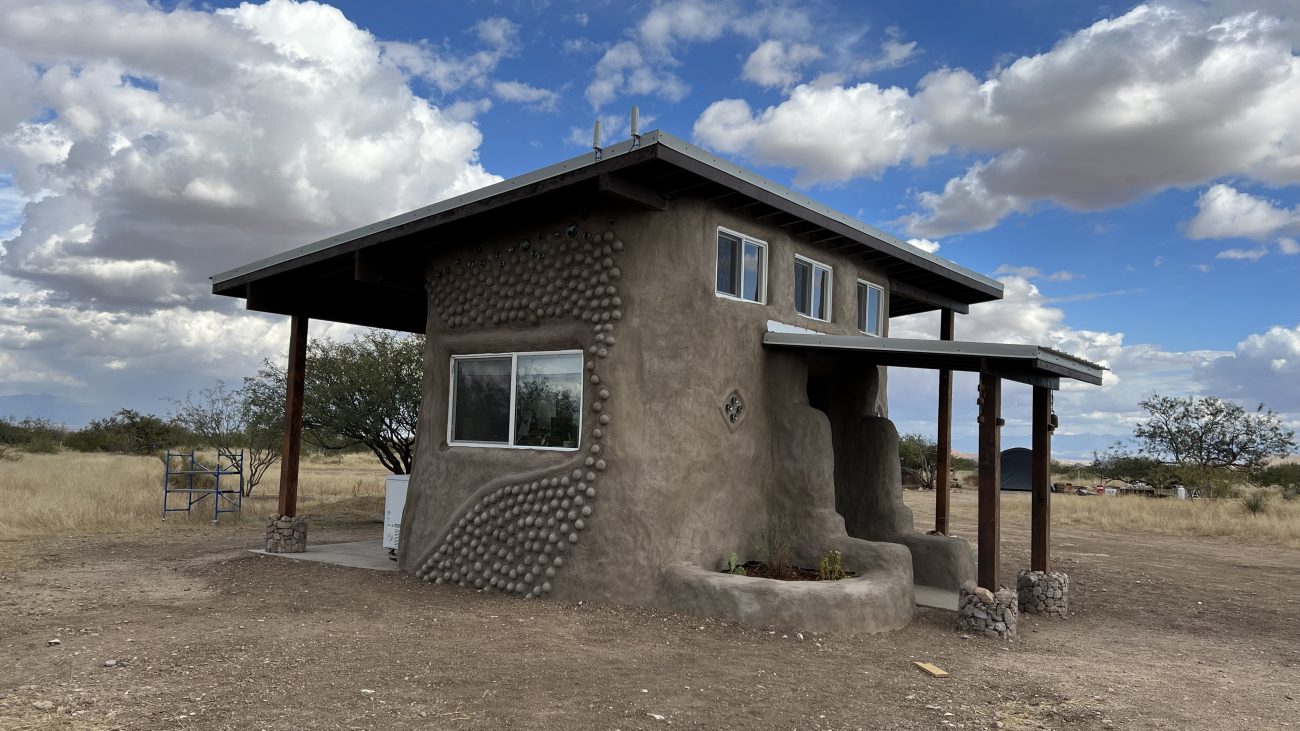
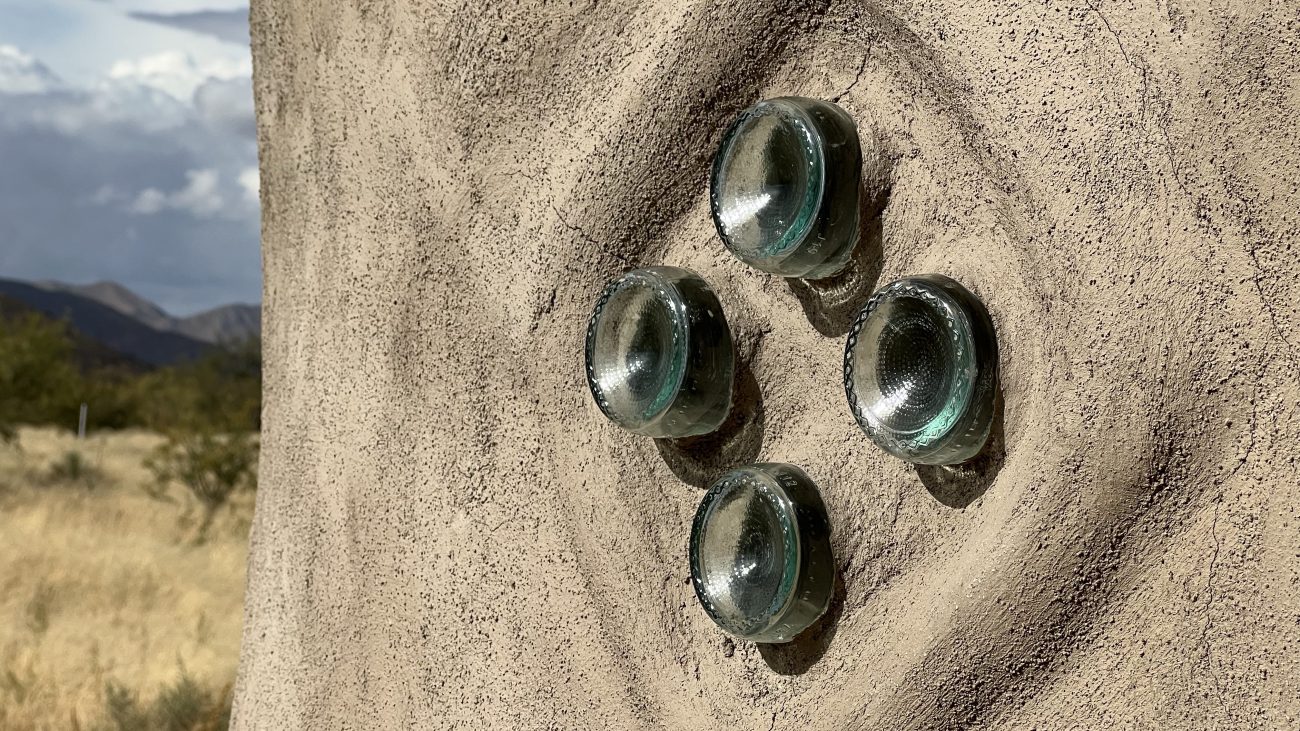
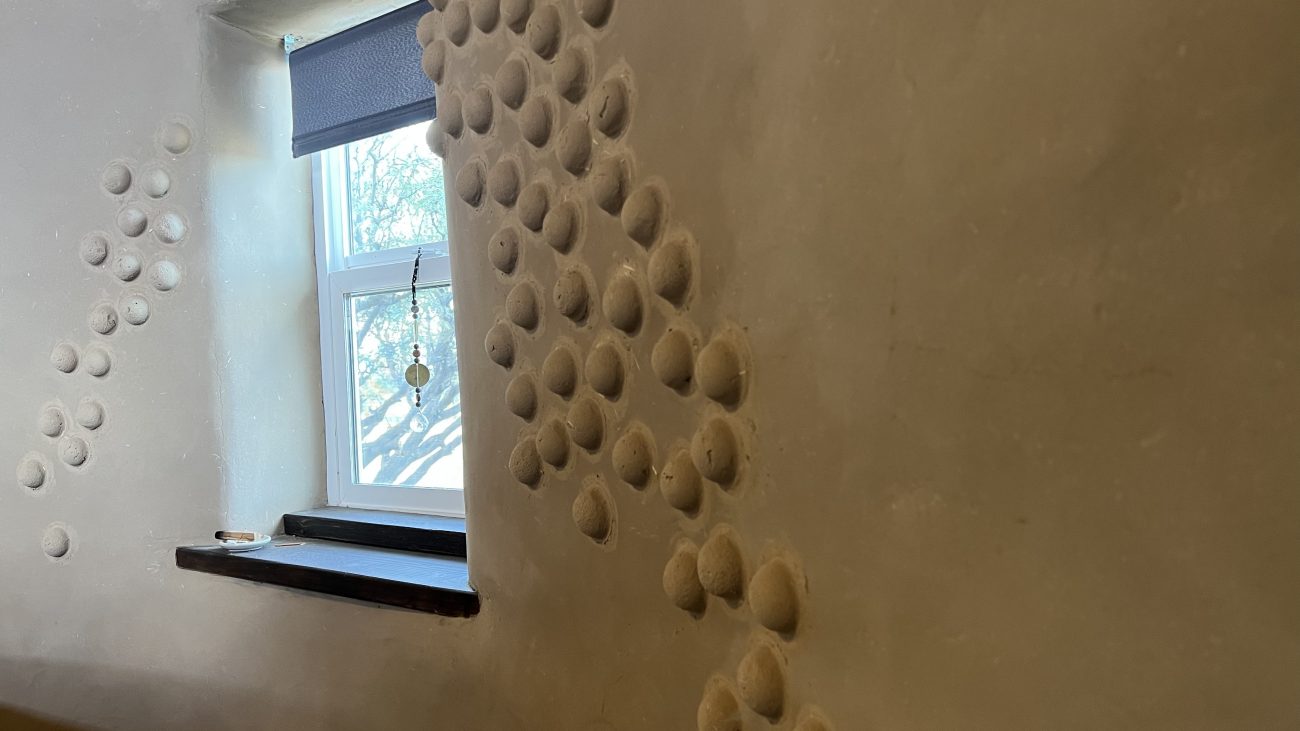
West Facing Wall - Picture Window & Bas Relief Balls on the Wall
This wall gets pounded by the sun in the afternoon, but is also the gateway to an incredibly gorgeous view of the Dragoon Mountains. So we had a bit of a conundrum. We wanted to see the view, but didn’t want it to heat up too much.
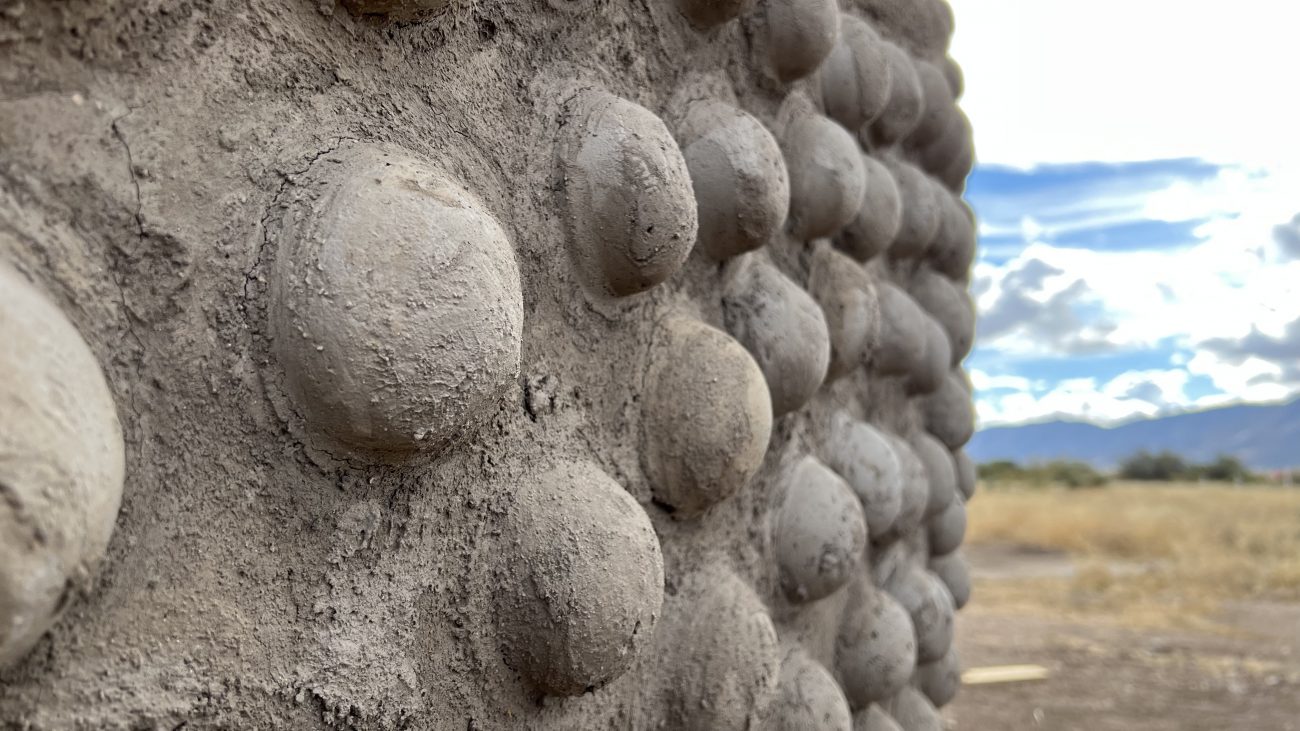
Enter bas relief or earthen sculpture works. By affixing these “balls to the wall” they cast shadows and create small microclimates on the outside of the building. Remember that whole thermal mass thing? Well, if there’s less heat on the surface of the bag then it transfers through less. That’s the idea anyway. So you end up with a delightful artistic pattern that also helps keep the building cooler.
The final piece of this puzzle was to add a dark pull down shade to keep the sun from heating up the building too much through the window. So far it’s working great!
Earthbag Subfloor & Earthen Floor
When we started building this solar shed, we always planned on raising the floor about 4-6” up to the correct level, but assumed we’d be doing it with gravel or maybe even cement. But by the time we were ready to install the floor, getting a cement truck out to our off-grid property wasn’t an option, so we tried something different.
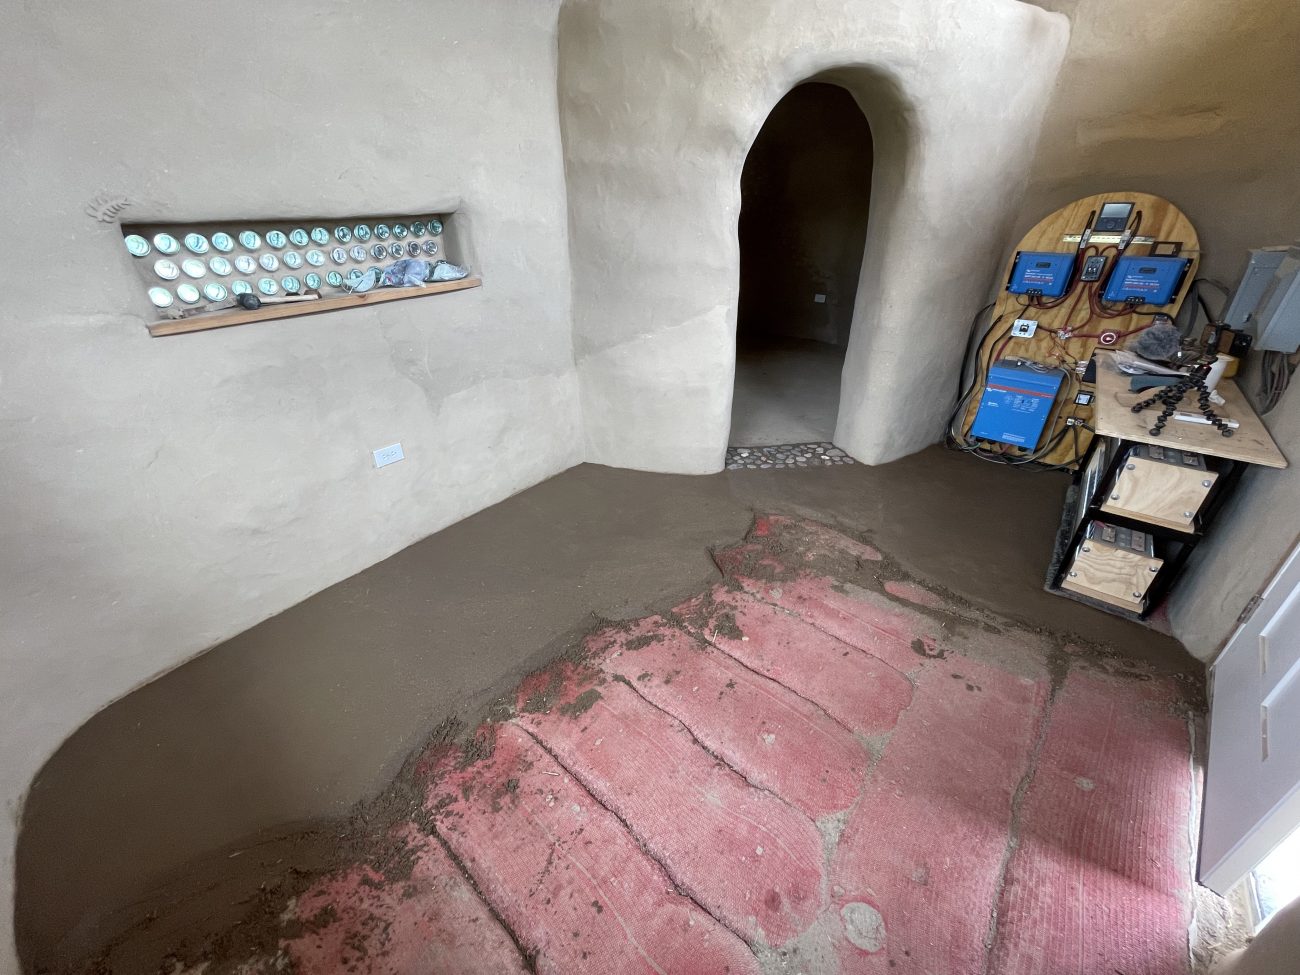
We already had hyperadobe earthbag material left over, and dirt was free. Why not use bags to fill 5” of that space? So that’s what we did. Starting with crusher fines, we leveled out the floor, put in a plastic vapor barrier, and started laying earthbags on top. This combined with the 12” rubble trench for the walls, a higher ratio of cement in the first bags underground, and grading dirt away from the building should protect it from moisture. I mean, most of the time out here it’s so dry and the humidity is so low this could be considered overkill. But we do have those monsoon rain and flash flood events we need to prepare for.
Moving on, we always knew we wanted to experiment with an earthen floor in this building. But man was it a lot of work! And our first mix cracked like crazy and we had to rip it out and start over. Eventually we found the right mixture (2 parts mortar sand, 1 part native soil, finely chopped straw, water) and put down a gorgeous earthen floor.
We sealed it with multiple coats of boiled linseed oil until it was water resistant, and used a natural bio-wax for extra protection. It’s like walking on magic, friends. Maybe there’s something to that whole grounding thing after all?
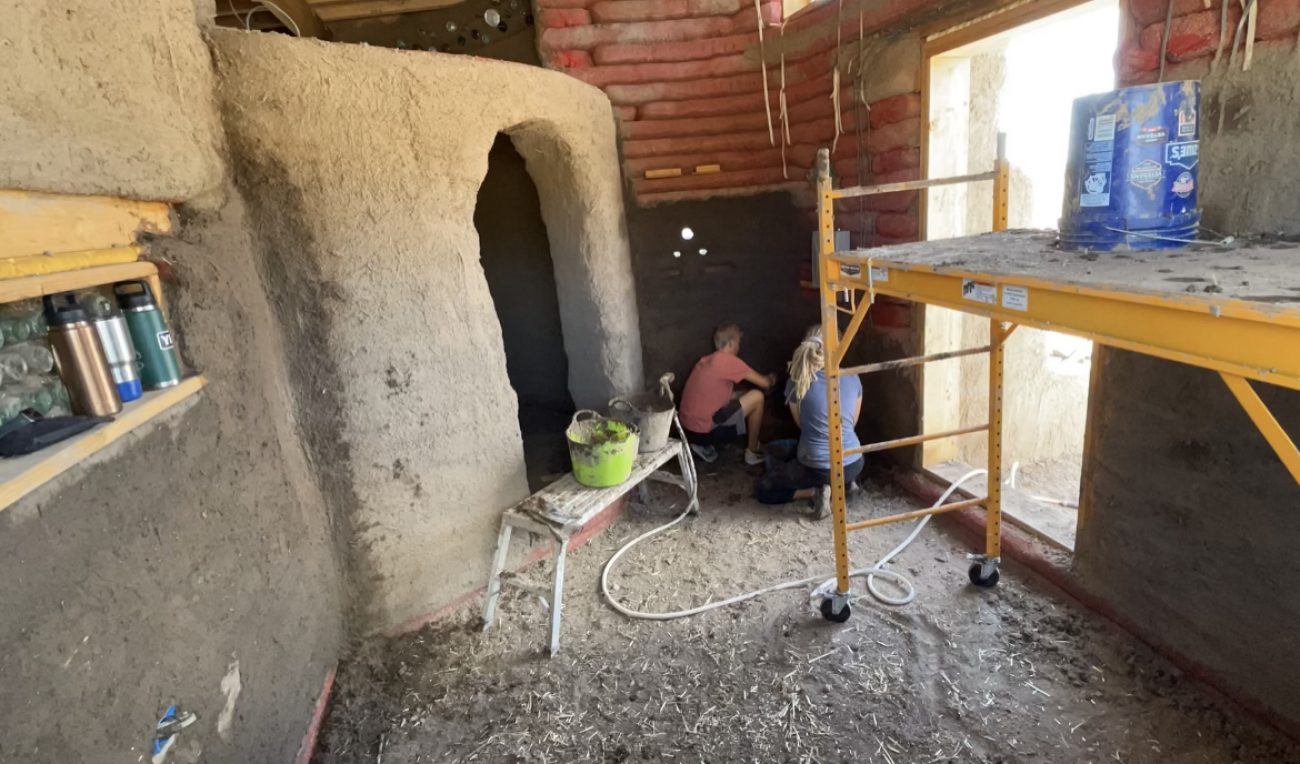
Interior Earthen Plaster
Another important experiment we wanted to try with this building was true earthen plaster. Like the outside, there were several steps to this.
- Run Romex lines along the bags to outlets, switches, and lights (you can’t put them inside the wall like in a traditional building)
- Create a cob scratch coat from clay, sand and straw to fill in the cracks
- Build the wall all the way up to the ceiling after installing (see below)
- Create a cob brown coat to cover the electrical lines, even out inconsistencies
- Create a final earthen plaster from beach sand, native sand, finely chopped straw, and toilet paper
The final plaster was applied as a thin coat, and then re-compressed with a plastic trowel after partially drying to keep from cracking. This created a beautiful smooth finish with a lighter color that brightened up the interior. Between the earthen floor and the earthen plaster, walking inside just feels like a warm hug. It’s so relaxing, organic, calming, and inviting.
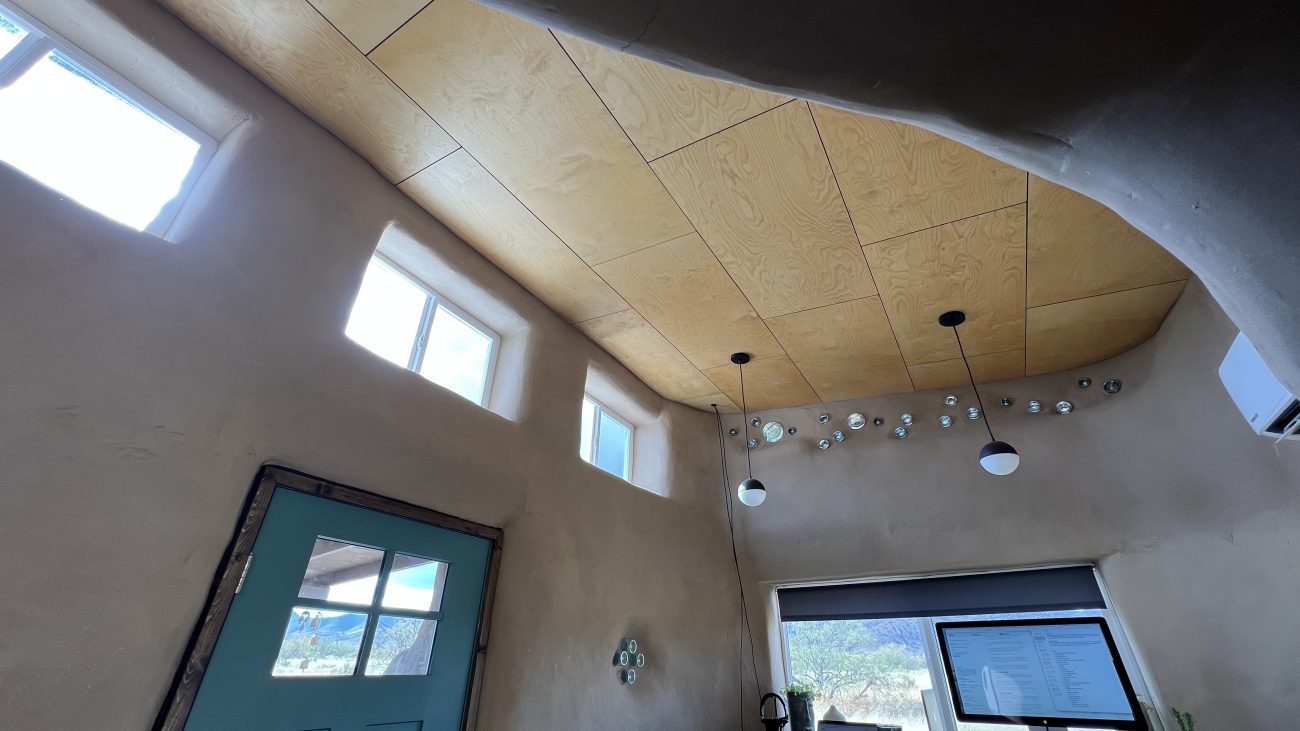
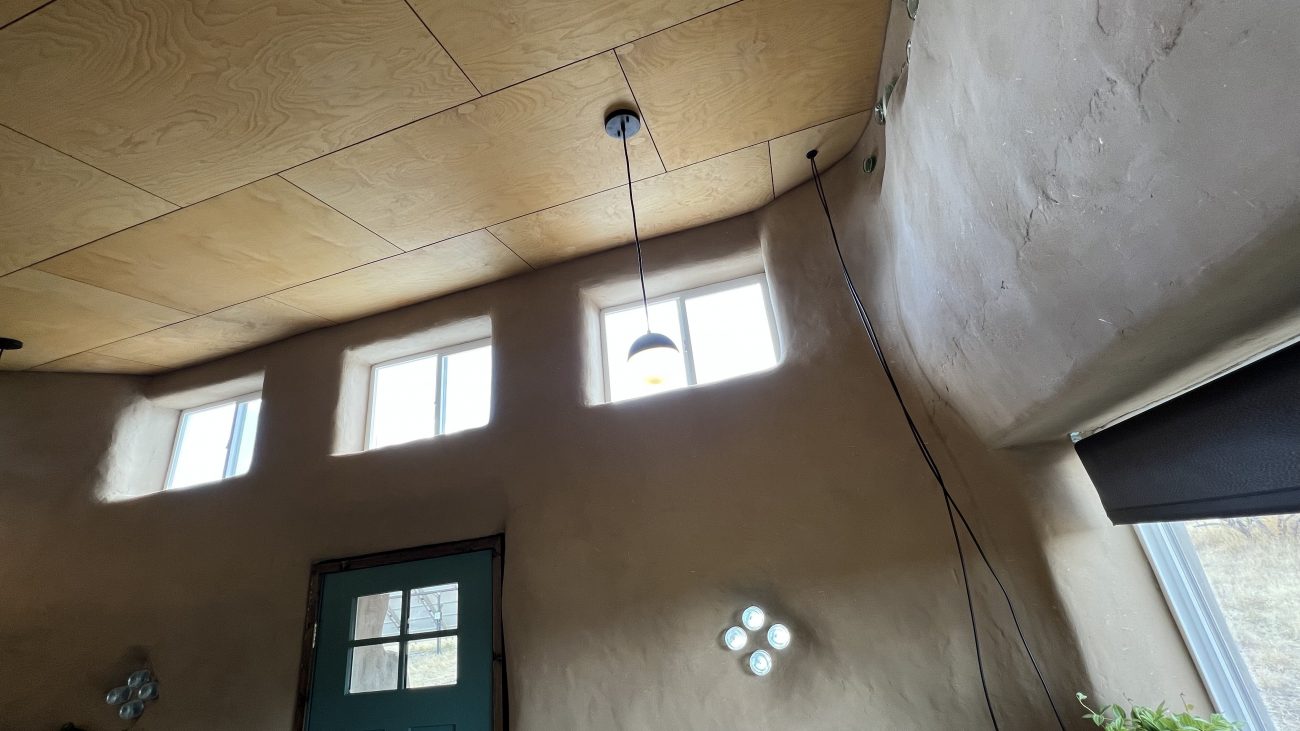
Negative reveal plywood ceiling
After all that work on the roof, and building up the cob to the decking to seal it in, we still had to figure out how to make a ceiling for this shed. A lot of people would have just left the rafters exposed, but because we wanted this to be a more climate controlled building we knew we needed to insulate it.
Starting with denim insulation, we filled the cavities between the 8” rafters, and then set to work on a unique ceiling technique. Negative reveal ceilings use purlins and rafters painted black with panels evenly separated and attached over top. The black inset areas create a floating effect.
Even with the supply chain shortage, and wood prices through the roof (hah) we were able to source some beautiful birch plywood and cut into 2’x4’ sections, glue and brad nail into place using quarters to space them. We added a little linseed oil to seal the panels, and we’re still amazed at how well it turned out.
This ceiling truly brought a very modern feel to the interior in contrast with the natural organic walls that we LOVE. When you wake up and see the light dancing on these panels from the bottle bricks, you know it’s going to be a good day.
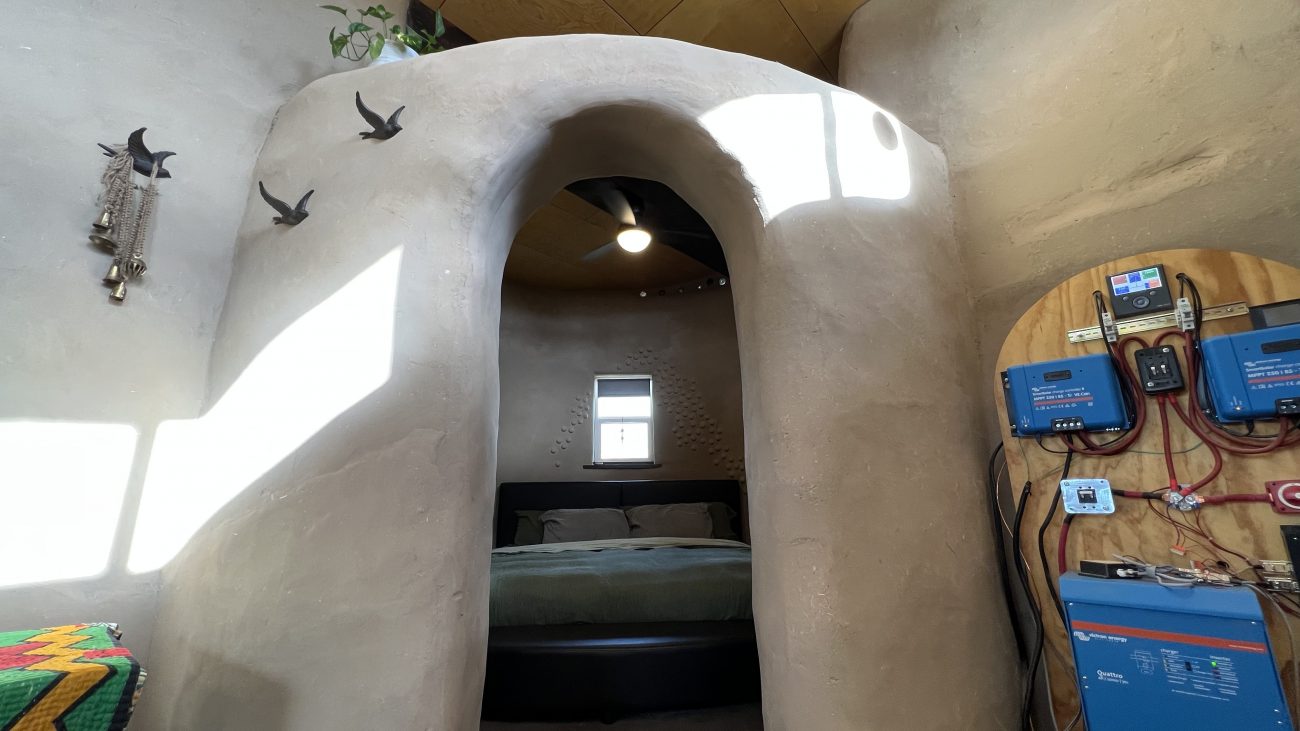
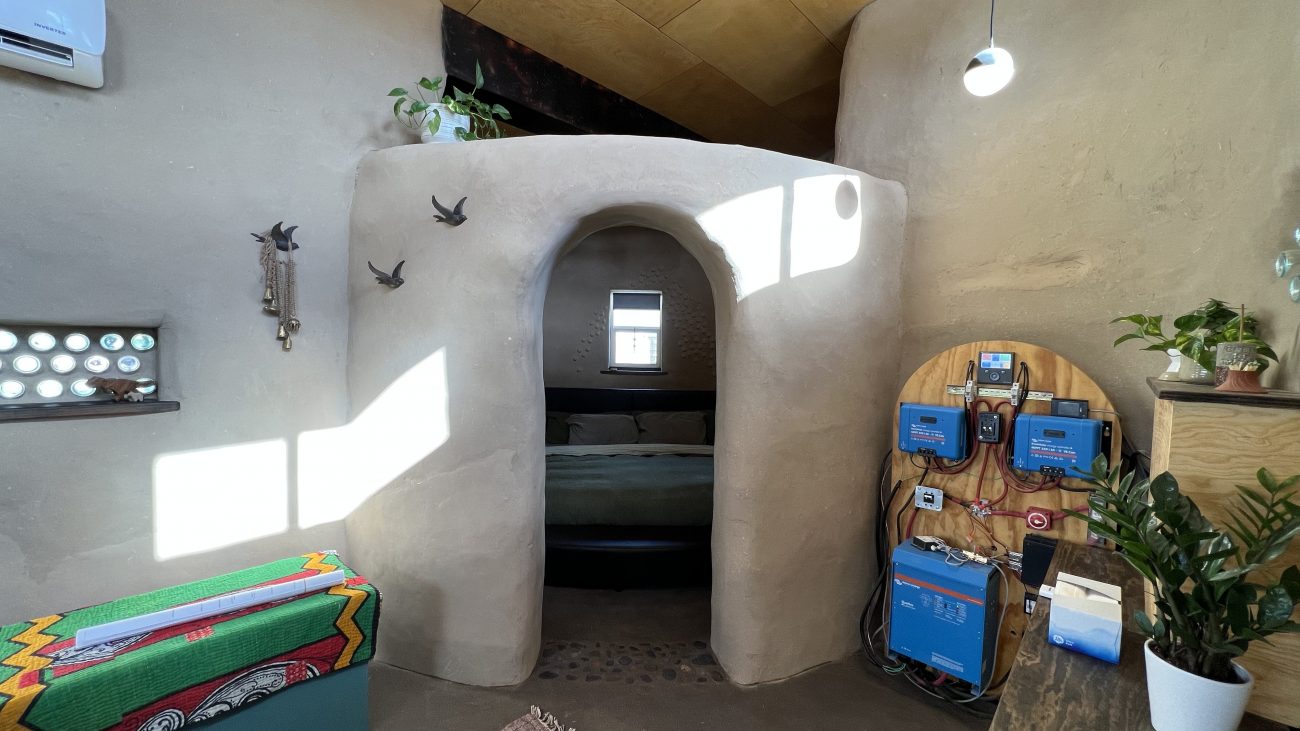
Archway Shelf
This may be our favorite feature of the whole building. We mentioned buttresses before, but it’s important to know that where the circle and rectangle intersected also had to be reinforced. So they interlock which just means that one one layer the circle bag goes all the way through and on the other layer the rectangle bag goes to the inside of the circle. Kind of hard to explain, but here’s a picture.
Since this was such a small building, we wanted a walk-thru door, and definitely wanted to experiment with earthbag arches. However, the further we got into the build, we got worried about the archway being supported with 10 or so bags on top so we decided mid-build to just stop laying bags there. It wasn’t structural, didn’t need to go to the ceiling, and turns out allowing that space above greatly increased airflow and temperature regulation. Also it looks really really cool.
The shelf creates a great focal point and place to add some plants and decorations. We dig it.
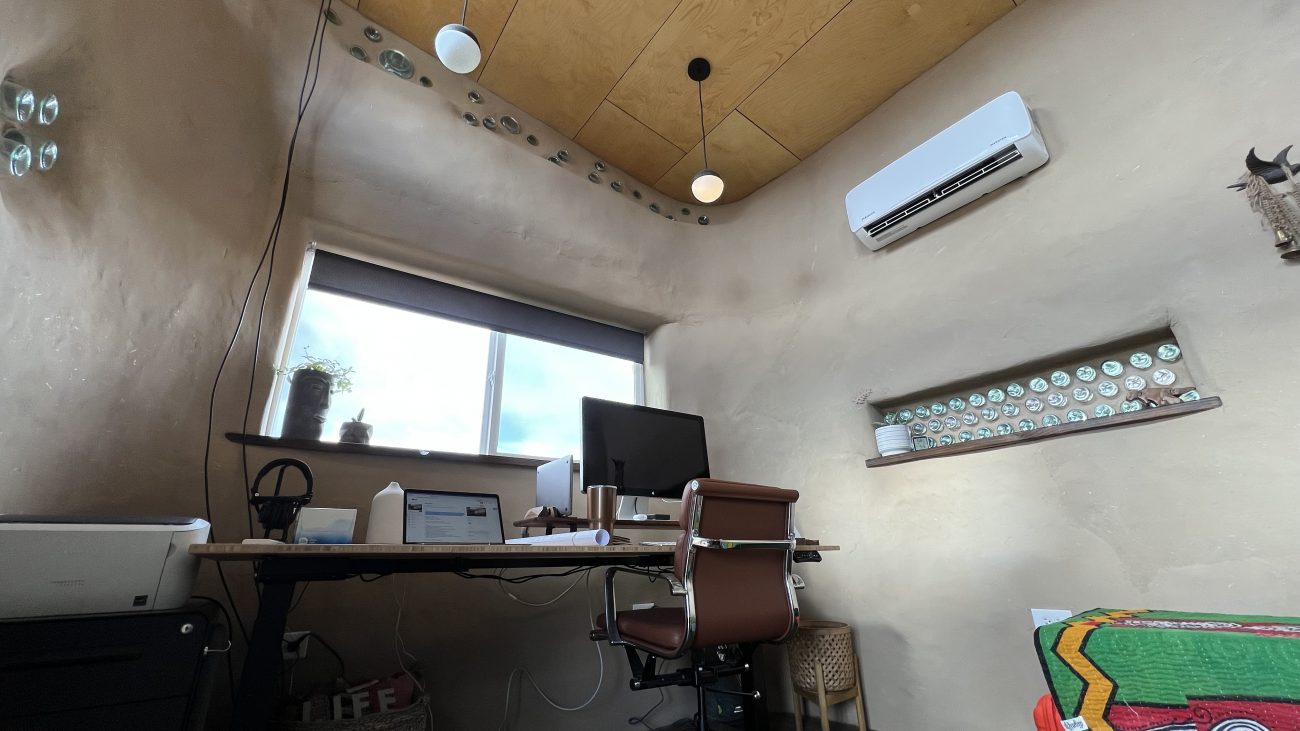
The Office - Adjustable Standing Desk Workstation
Finally, we get to the office part, right? That’s definitely how I felt after 8 months building this thing. Like I mentioned before, I’d been rocking a tiny standing desk in a tiny corner of our tiny shiny home for years. It was time for an upgrade.
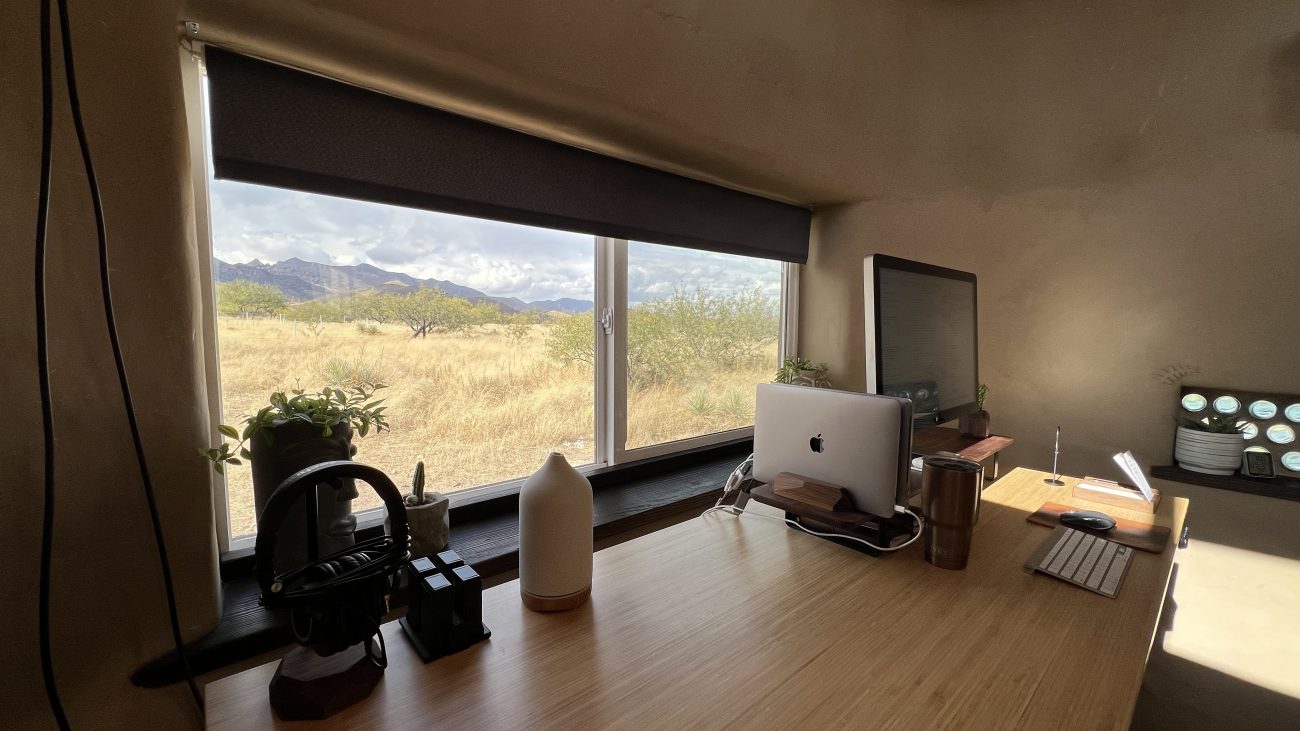
The plan was always to use the entire west facing wall and center the desk around that gorgeous picture window. We originally wanted 2 desks - one for Jonathan and one for Ashley that could raise and lower independently.
But it turns out it was cheaper and simpler to get one really long one and both of us use it. So we grabbed a Flexispot Bamboo Top Standing Desk to fill the space. After some initial issues getting the legs to function, and super helpful support on their end we got it working.
To round out the ensemble I snagged a rollable filing cabinet with magnetic seat on top and swanky office chair from Laura Davidson. I can’t even tell you how great it feels to have a real desk again!
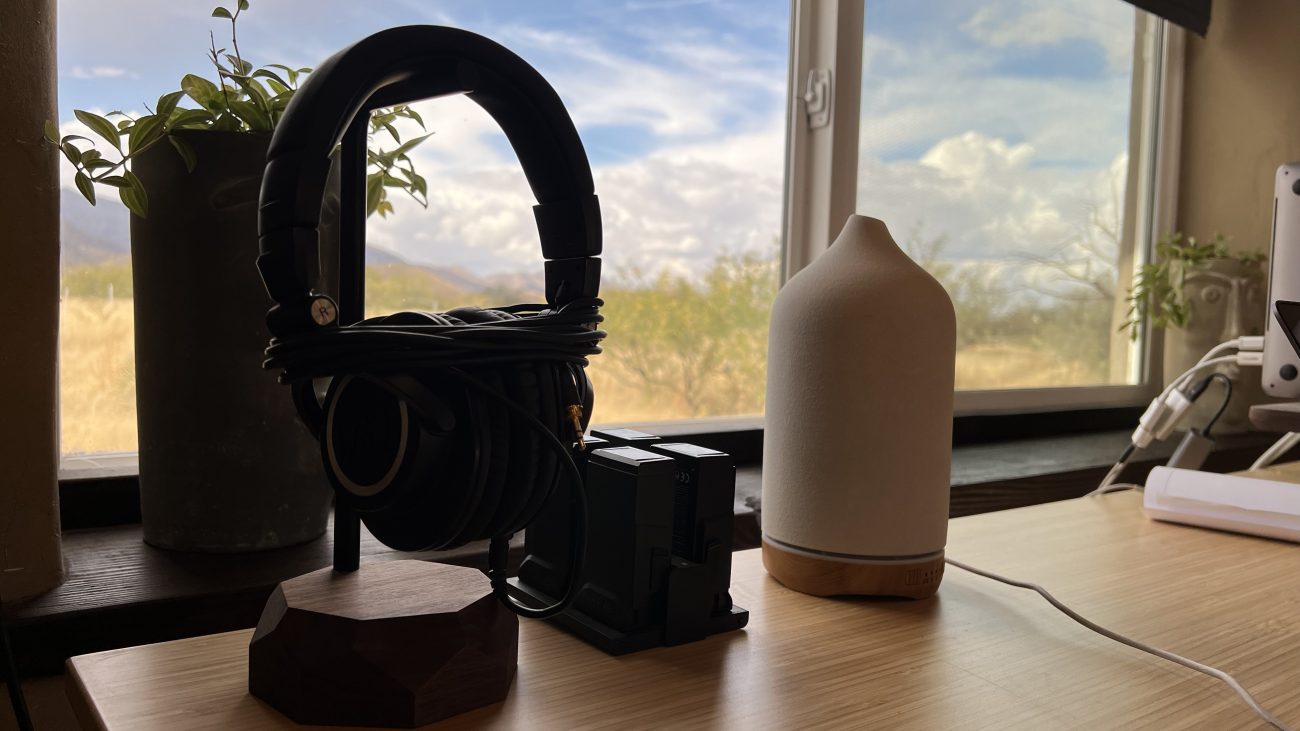
Desk Accessories
Since it had been years since I had a desk to put anything on, I went all out with my newfound space.
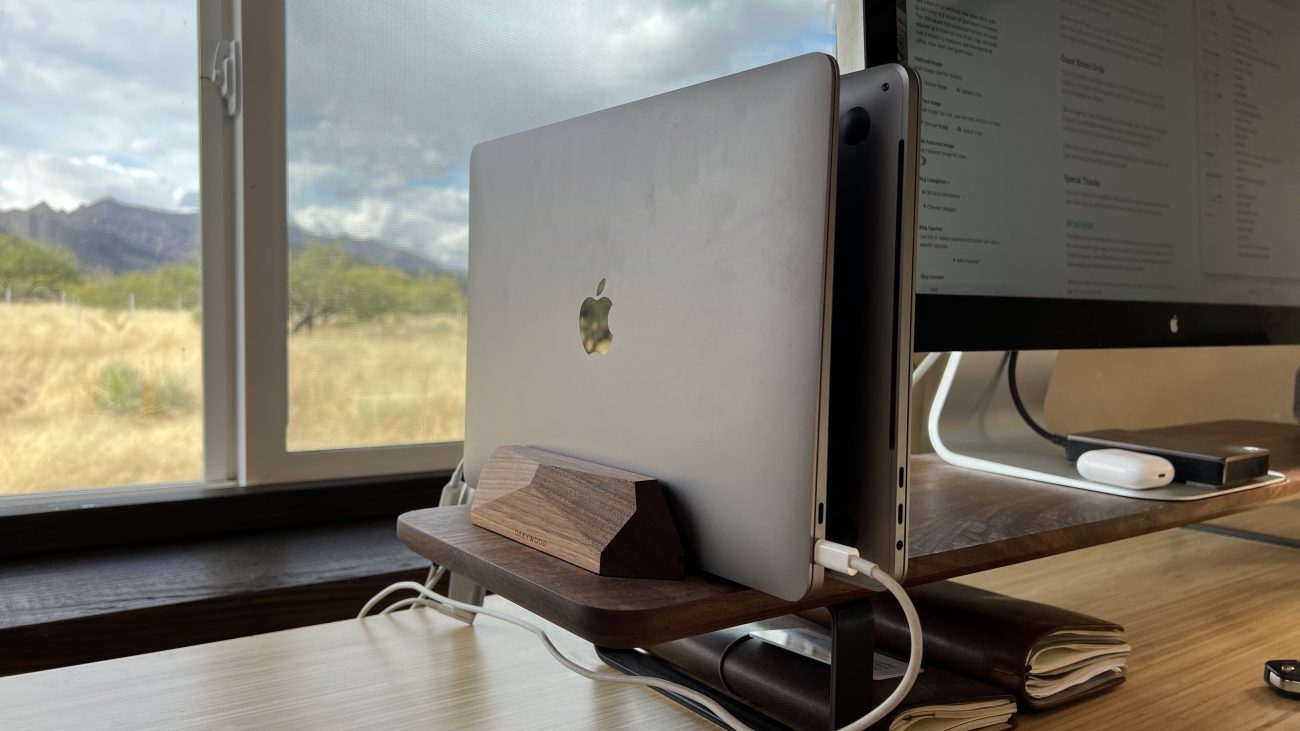
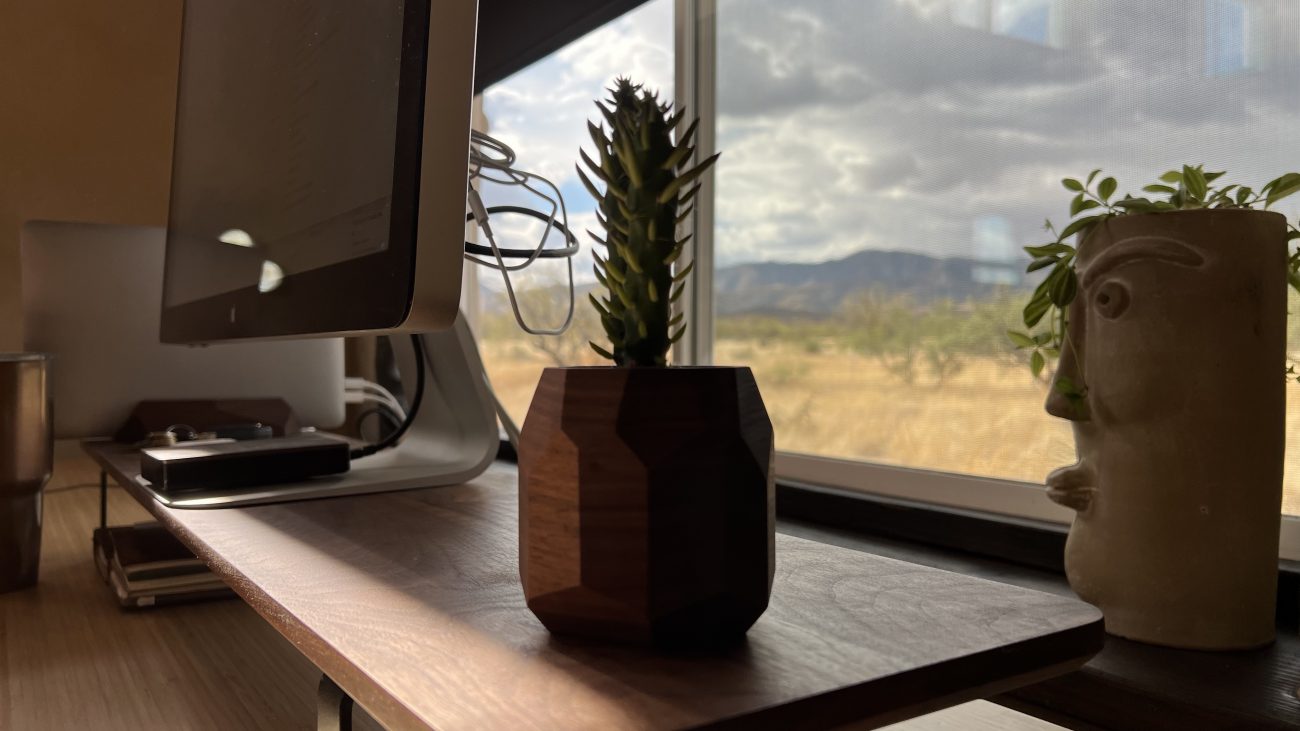
We reached out to Oakywood, and they were kind enough to send us a monitor stand, headphone stand, dual laptop stand, geometric pen holder (that I put a cactus in), and phone/watch chargers for review. Let me tell you, the quality and style of these accessories is second to none. I love the natural walnut juxtaposed with the mathematical honeycomb patterns. It just fits the inside of the solar shed like a glove.
They also make wireless phone chargers, felt keyboard pads and more. Seriously, go check them out, and use our affiliate link if you see something you like.
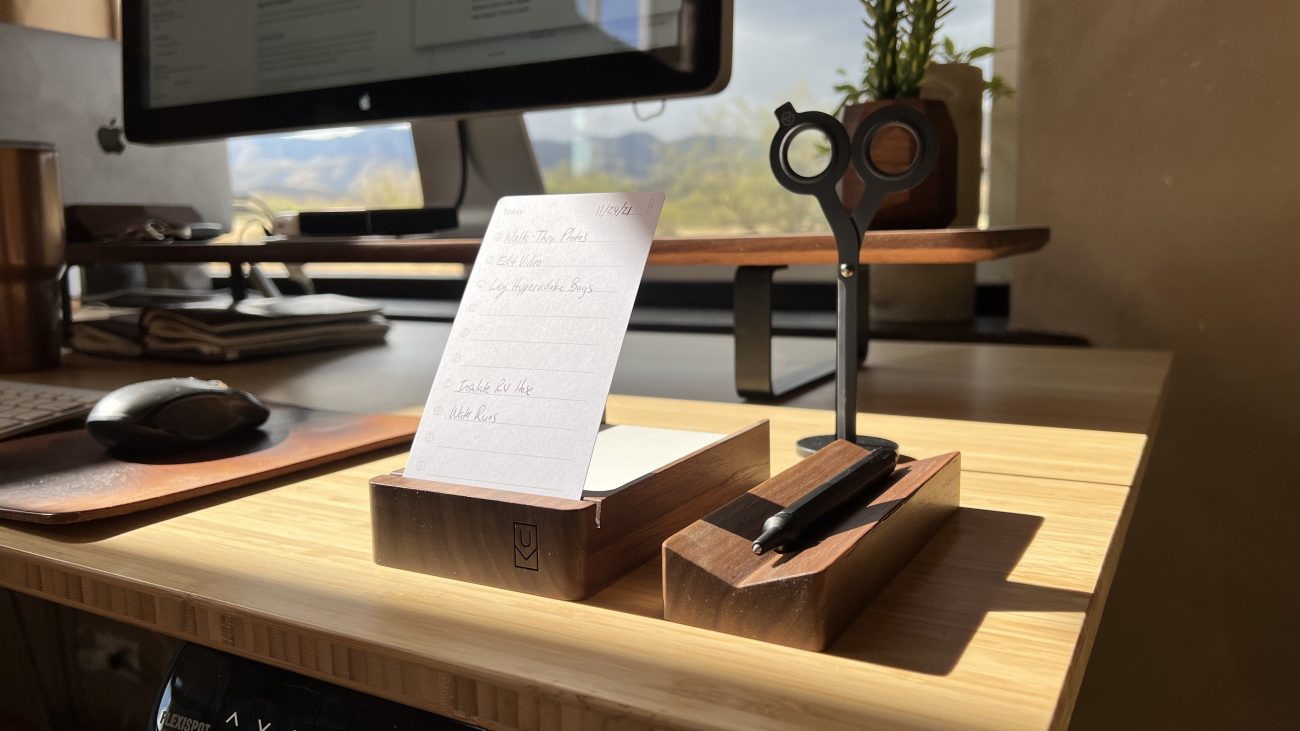
I’ve been an Ugmonk fan for a long time, and finally had some space to put their super minimal desk accessories. Analog is a simple daily to-do system (in matching walnut!), and I just had to grab those crazy cool HMM magnetic scissors.
Now, let’s get some work done!
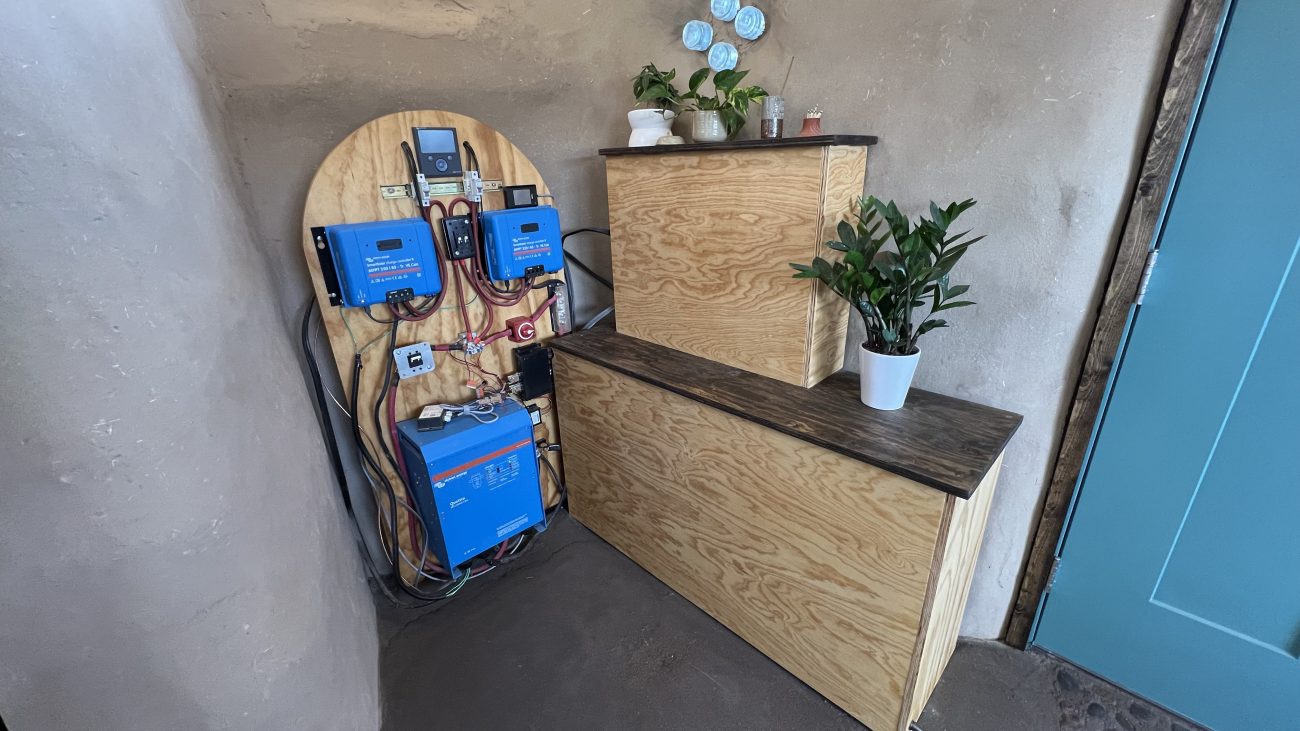
Power Corner - Lithium Batteries, Charge Controllers, BMS, Inverter
Tucked away behind the door is our power corner. It’s where our 28kwh lithium battery bank lives along with access to our Victron solar charge controllers, 5000 watt inverter, Color Control GX, REC BMS, and more.
It’s also where we mounted our circuit breaker boxes for power out (to the Airstream and house) and for all the lights and outlets in the solar shed itself.
The batteries are housed in a custom steel frame and compressed with heavy duty plywood and allthread rods. But we didn’t really want to see that mess all the time so we built some 3-sided plywood boxes to cover both the batteries and circuit panels. For now we’ve left the other gear visible for airflow and access purposes.
We’ve also put together an in-depth installation guide and cost breakdown of our off-grid solar setup.
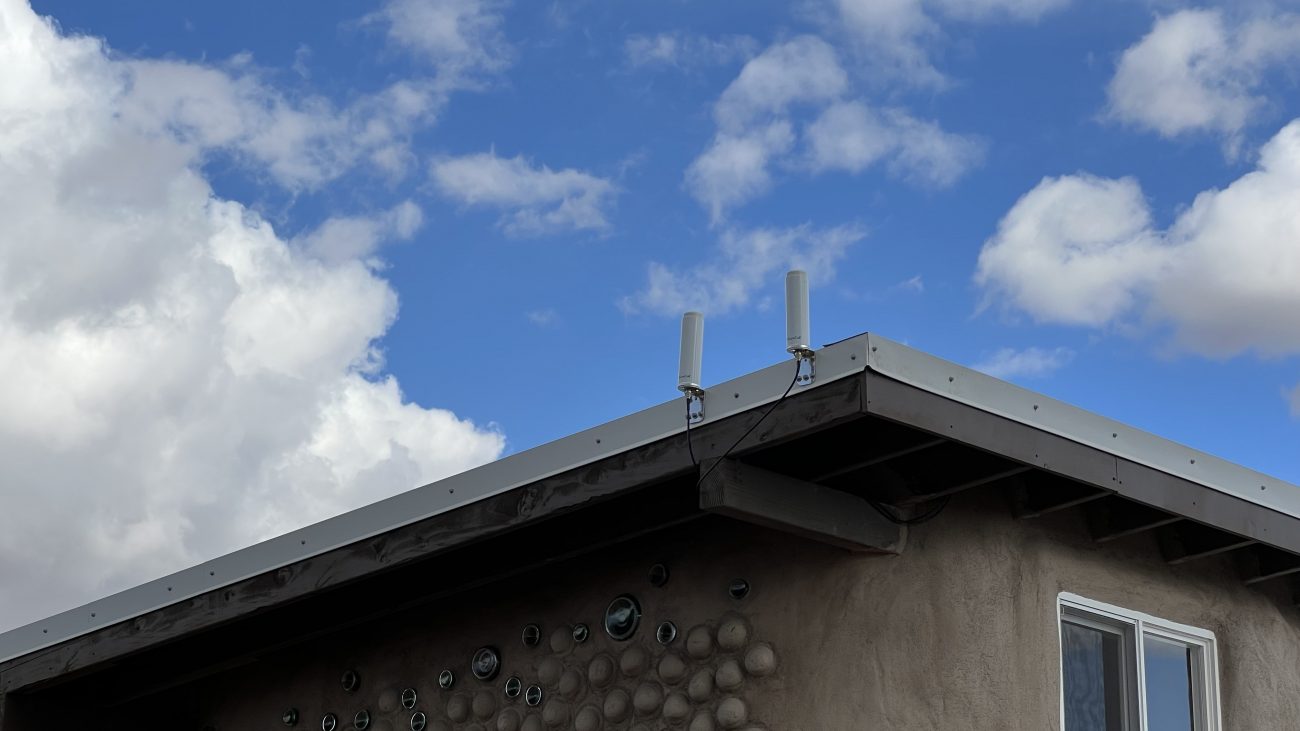
Mobile Internet Setup
Another important part of our office was internet! Coming from our off-grid traveling days, we were already setup with a robust off-grid cell based solution that we simply transported into this building. This includes an Omni Directional 4G Antenna connected to a WeBoost 4GX Cell Booster connected to a Pepwave Surf Soho Router. Our mobile hotspots tether directly to the router with their signals increased by the booster to provide fast, reliable internet in the middle of nowhere. We have a detailed explanation of that setup here.
The setup is slightly modified in that we still have an additional Pepwave router in the Airstream that we’re connecting via external wifi antennas. Long term we’ll probably run data cables, but this is a good temporary solution.
Need a reliable, boosted internet setup?
In this beautifully designed PDF, we cover our exact internet setup - from carrier plans to boosters to routers to antennas.
We'll even tell you how we installed it and how it all connects together.
Get Access for $19Also, yes we know about Starlink - it’s not available here yet, and there are potential issues with the 100+ mph winds we get as well as our proximity to the Dragoon mountains. Also, how they may choose to throttle speeds and terms of service once it’s out of beta. We’re keeping an eye on it, but for now we’re getting comparable speeds with our cell based setup without the $500 investment for the dish.
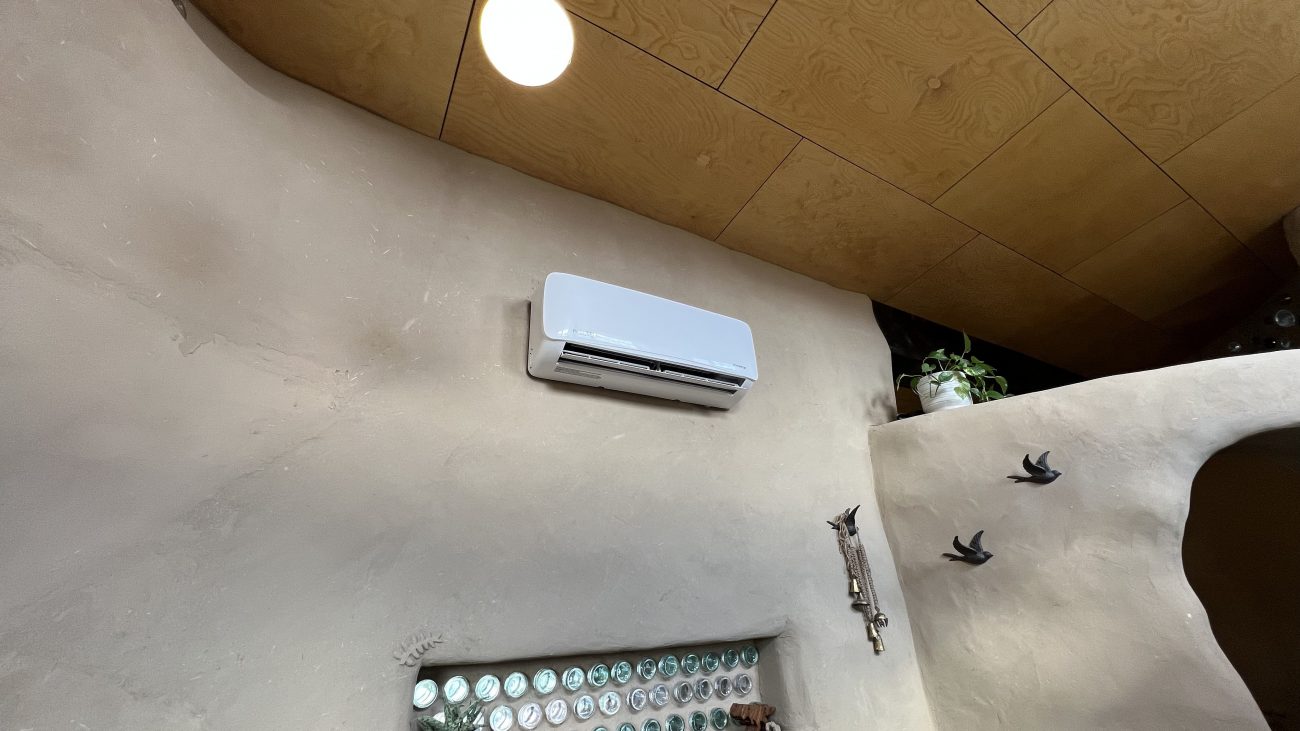
Thermal Mass + Mini Split Air Conditioner
There are a lot of assumptions about earthbag buildings. Many think that because the walls are thick, it must hold its temperature really well, right?
Sort of, but not in the way you might think. Technically, earth has a very low R -value, even with thick walls. It’s not necessarily insulating. But it does have thermal mass properties which means that as the sun warms the building during the day, that heat is absorbed slowly through the walls and released inside overnight.
So in a more real world scenario, the building is very cool in the morning and midday, but starts to warm later in the evening and overnight.
We did a few things to combat this. We already talked about passive solar, and how a roof overhang casts shadows over our clerestory windows in the summer, but lets light come through them in the winter.
The roof also overhangs as much as possible while still being structurally safe, with the hopes that we minimize the amount of time the sun is hitting the outside walls.
Next, we used a technique called bas relief on the west facing wall. By applying a bunch of spherical shapes, they cast their own shadows, create tiny microclimates, and should keep the sun off the walls in some capacity.
We also put 7” of denim insulation in above the ceiling panels.
But the true insurance for keeping this building temperature regulated is our mini split air conditioner. Hardwired into our solar electrical setup, these newer cooling and heating units are crazy efficient and nearly silent. Crucially, they also can provide heat as well.
Between the 16” walls, passive solar, and ceiling insulation we rarely see our mini split pull more than 600 watts of power to keep things temperature controlled. Which is just crazy. So far we’re super happy with the results.
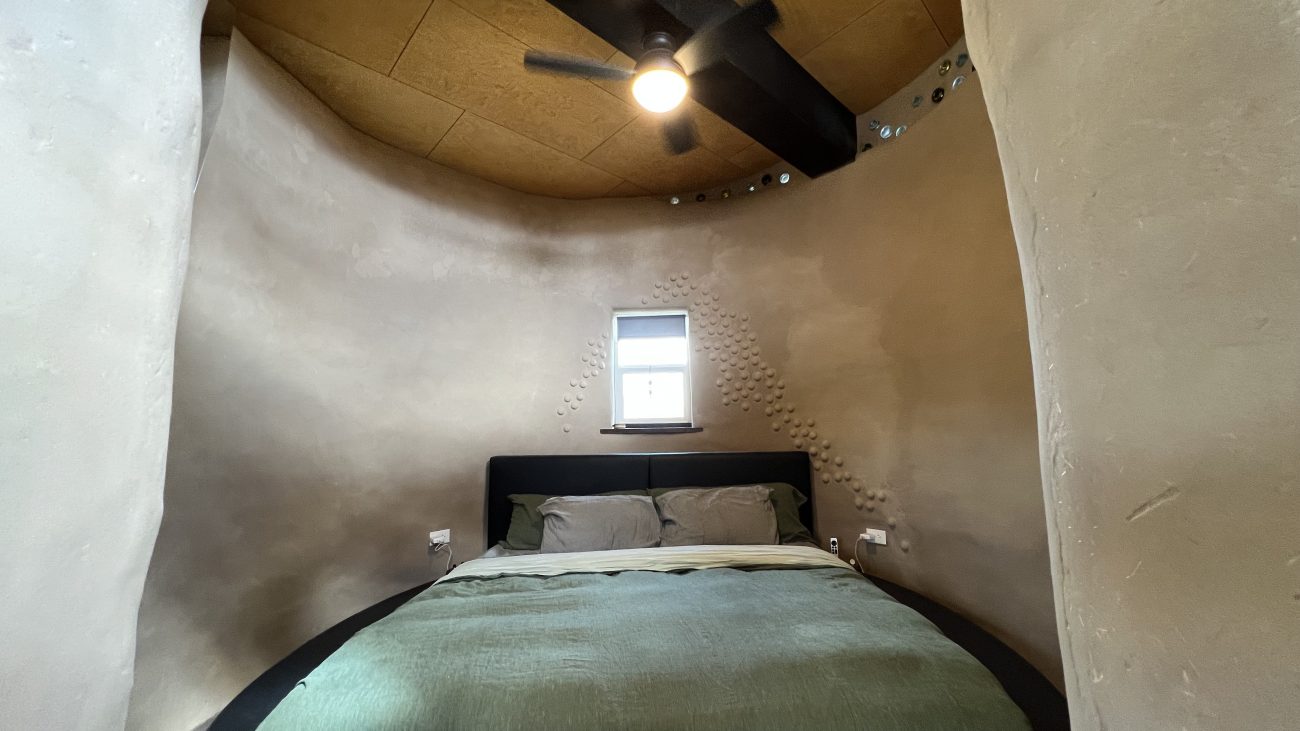
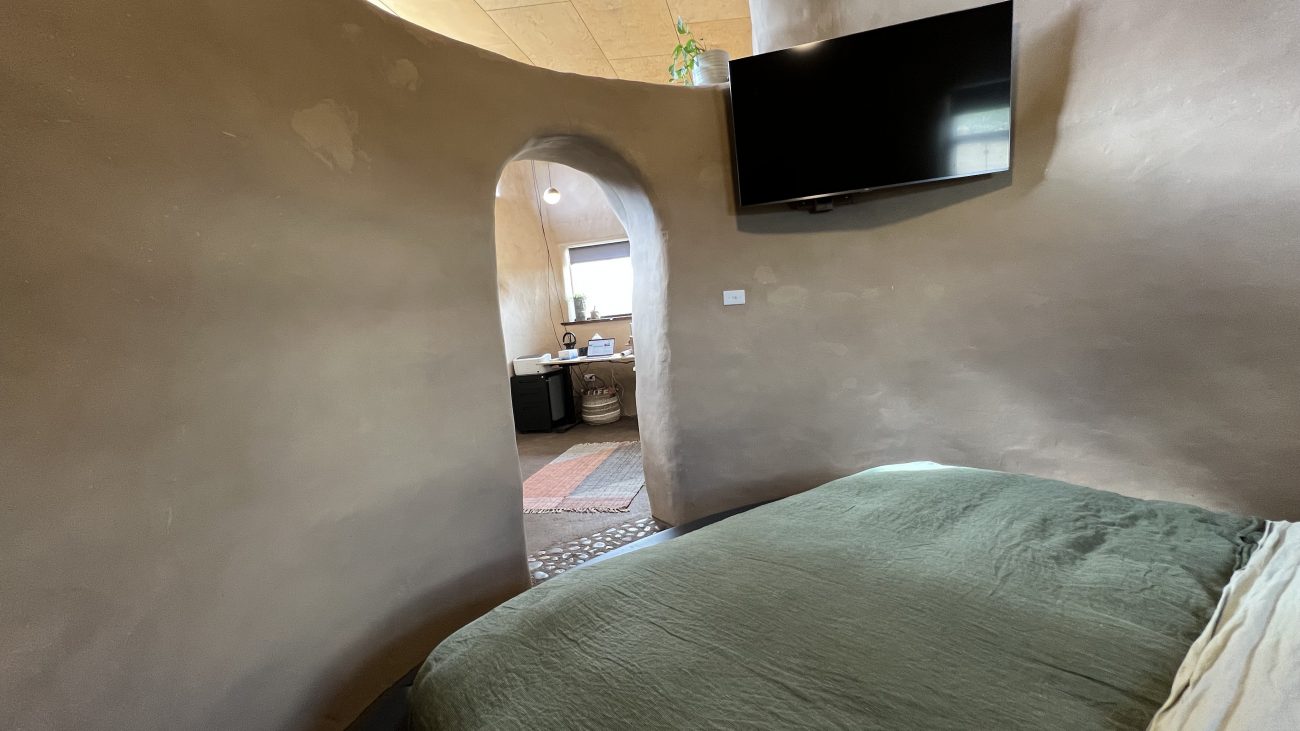
Guest Room Circle
The 10’ diameter circle that intersects our rectangular office only has one function - to house a bed for guests and TV for hanging out and watching movies together as a family.
We managed to cram a King sized circular bed in there, and a 50” television hung on the wall. After spending so many years watching stuff on my computer monitor in the Airstream, this was a huge upgrade :)
Other than that, there’s just some power outlets and a ceiling fan to provide light and keep air moving. Simple and easy!
Special Thanks
While our family of 6 completed the bulk of this work ourselves, we have to take a few minutes and thank those that helped us get this shed done.
Tiny Shiny Homies
This Patreon style community is our membership area where we share behind the scenes videos, get input on future projects, and special live video calls. Our Homies support - both affirmational and financial - truly helped us find the time, energy, and materials to push through and finish.
There’s already over 70 Homies and counting - go here if you’d like to become a part of our community.
Ashley’s Dad
He came out for a week and helped us plan and build the roof, which we definitely could not have done ourselves. His math ninja skills and years of construction experience were a huge boon, and we learned so much. Thanks, Dick!
Factotum Farms
Our friend and neighbors Jason and Selena have helped us in so many ways! For this build, Jason brought his tractor over, moved dirt, dug the holes for the solar ground mount, and used his plasma cutter to cut our 3” pipe. And they both helped us put a bunch of cob on the walls.
Mike & Tina
Mike also brought his tractor over more times that we could count and moved dirt from our pit over to the solar shed for us to use. Oh, and he helped us put on our metal roof, too. Thanks, Mike!
Beginning From This Morning
Juan and Michelle are longtime friends, and we were so excited that they came and visited the homestead after finishing their vintage bus restoration. They brought their large solar system expertise and welding gear to help us get our off-grid power system designed and setup. Again, we couldn’t have done this without their help. Thanks, Juan and Michelle!
The Results
Now that we've finished this project - and have been using it for several months - we're happy to report that we love this little building.
It has a warm hug zen kind of vibe as soon as you walk in, the earthen floor feels amazing under your feet, and the insulation and mini split keep it comfortable year round.
As an office, it's wonderfully contemplative with its organic shaped walls and view of the mountains. And as a guest room it's cozy and quiet.
We can't forget about this building's main purpose: power for our off-grid property. What once was us constantly checking to see if we had enough gas for the generators or if the Airstream power bank was getting topped off each day has been replaced with not even thinking about it most of the time. The massive solar array and battery bank take care of business.
But more than anything else, this project has shown us that even with no construction we can create something truly amazing with minimal impact on the environment. It allowed us to experiment with so many natural building techniques that we'll be using as we design and plan our house build. And it's given us the confidence that our family can do this together.
Here's some additional pictures of the completed project:
Documenting the Full Build
Curious how we actually built this solar shed office? We extensively documented the entire process here on the site and on YouTube.
- Solar Shed Office Part 1: Planning & Research
- Solar Shed Office Part 2: Switching to Earthbag & Digging the Foundation
- Solar Shed Office Part 3: Rubble Trench Foundation + Prep Work
- Solar Shed Office Part 4: Laying the First Course of Hyperadobe Bags
- Solar Shed Office Part 5: Door Frames, Cleats, & Laying Multiple Courses Above Ground
- Hyperadobe Earthbag Dolly Bucket System + How We Lay Our Hyperadobe Bags
- Solar Shed Office Part 6: Electrical Outlet Boxes
- Solar Shed Office Part 7 - 60 Daily Videos of Progress
- Solar Shed Office Part 8: Scratch Coat, Electrical Wires, Insulation & Ceiling Panels
- Solar Shed Office Part 9: 45 Daily Videos Completing the Project
- Watch all 140 Videos on YouTube
- DIY Off-Grid Solar Power System for Homestead - Installation & Wiring Guide
- Off-Grid Solar Power System Cost Breakdown
And finally, we created a 2+ hour movie documentary time-lapse of the entire build here:
Whew! Still here? Thanks so much for taking a tour of our little solar shed office.
This is the first of many projects on our homestead so stick around if you want to see what we do next!
Become a Tiny Shiny Homie!
Subscribe to our patreon-style community & help support our family so we can keep making things for you! Get early access to ad-free videos, special behind-the-scenes updates, & goodies like exclusive stickers and name drops in our videos.
Signup & Become a HomieApparel
Grab a fun, comfy t-shirt & help support our family.


About the Author
Jonathan Longnecker is the strongly opinionated tattooed and bearded half of Tiny Shiny Home. He loves making music, figuring out nerdy solutions, exploring the outdoors, and living off-grid.
comments powered by Disqus


