Gray Water Septic Plans & Installation for RV's & Tiny Houses
What’s a gray water septic? Why would you use it? How does it work? And is it even legal? All great questions. Let’s dig in.
What’s a Septic System?
A traditional septic system is a way for a house or building that doesn’t have access to city sewage pipes to send all of its waste water - from sinks, showers, and toilets - into a buried waterproof tank that is large enough for the solids to settle at the bottom.
The remaining liquid exits the tank into the leach or drain field via perforated pipes which then uses the soil as a natural filter to remove harmful bacteria.
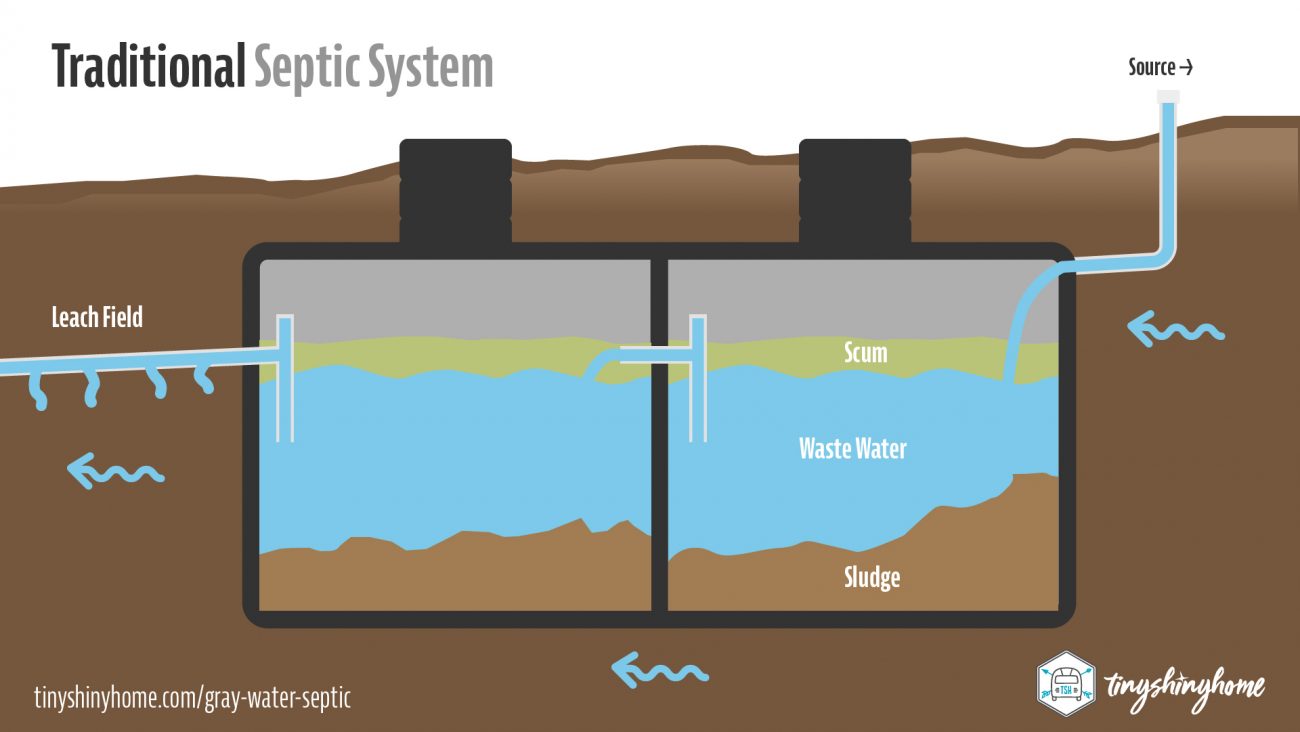
There are plenty of rules, regulations, and permits around traditional septic systems for good reason. If they’re not installed properly you run the risk of injecting harmful elements into your soil or overloading the ground and causing backups and tainted areas on your property.
But on the flip side of that, septic tanks installed correctly can also be great for the environment because you’re essentially taking all the water you use and filtering it back down into the ground to replenish the water table.
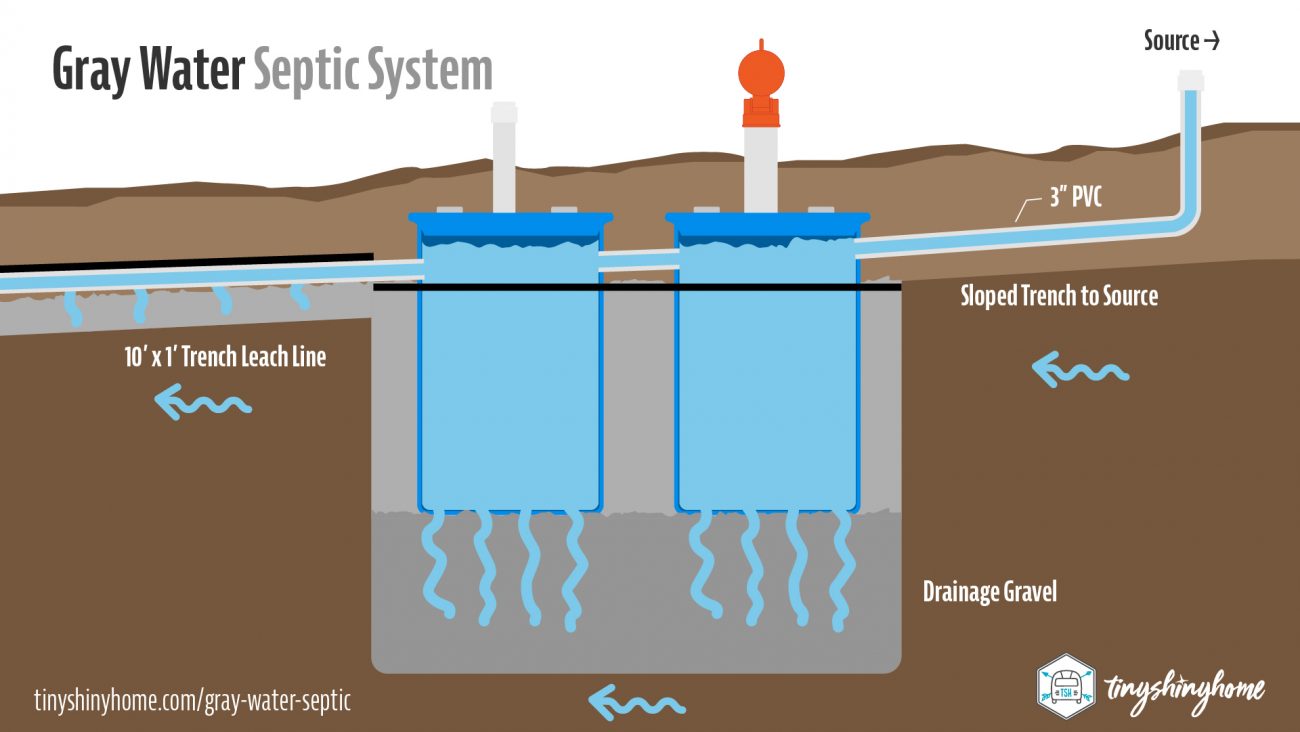
A gray water septic is very similar to a traditional septic, but only deals with gray water, not black water.
What’s the difference?
Gray Water - this is waste water that comes from bathroom sinks, washing machines, bathtubs, and showers. It should contain very low levels of contamination and be easy to filter and discharge.
Black Water - this is the waste water from toilets that contain fecal matter. In some states or countries, your kitchen and dishwasher are also considered blackwater because of the food particles and grease that will come from them. The level of contamination is much higher and requires more work to filter.
So when we talk about a gray water septic, this should only be for water that comes out of a bathroom sink, shower, or washing machine (and only using approved soaps).
Why Do You Need a Gray Water Septic?
In most cases, as long as you are using biodegradable soaps and cleaners, you should actually be re-using your gray water as much as possible via irrigation or watering for gardens.
But sometimes, you might want to make that gray water infiltrate back into the soil. Here are a few reasons why:
- Stinky Smell - sending your gray water to an open air basin can definitely result in that unpleasant gray water smell permeating your area. Especially if you have a lot of wind.
- Bacteria - Unless you completely enclose that basin, any animals you have like dogs, cats, goats, chickens, etc.. will be drawn to drink it and could get serious bacterial infections.
- Nowhere To Go - Finally, maybe you don’t have a way to create a basin or trees to plant, and it would be simpler for your gray water to just go into the ground.
So we’ll reiterate here - if you can safely repurpose your gray water, please do that first! It’s such a better way to use it and is much better for your immediate environment.
But if your’e in a specific situation like we mentioned above where you need all the gray water to go underground, then this gray water septic plan is for you!
Is it legal?
Obviously we can’t answer this question for every situation, but many local codes encourage gray water re-use and for single family installations there shouldn’t be too many requirements related to a true gray water septic. It’s when you start adding the black water to the system that you have to deal with codes and inspections.
Of course, as always, please consult with your local government codes to make sure before proceeding.
How does a gray water system work?
What we’ve pieced together from various sources of inspiration is an idea similar to a normal septic system, but much smaller and easier to install yourself. Because there’s no large solids or grease that needs to settle in the bottom of the tank, we can send the gray water down into the ground as quickly as possible.
The trick is to make sure we never over saturate the ground and cause it to seep up to the surface.
We’ll be using drainage gravel and plastic barrels with holes to allow quick drainage, as well as overflow tanks and a leach line.
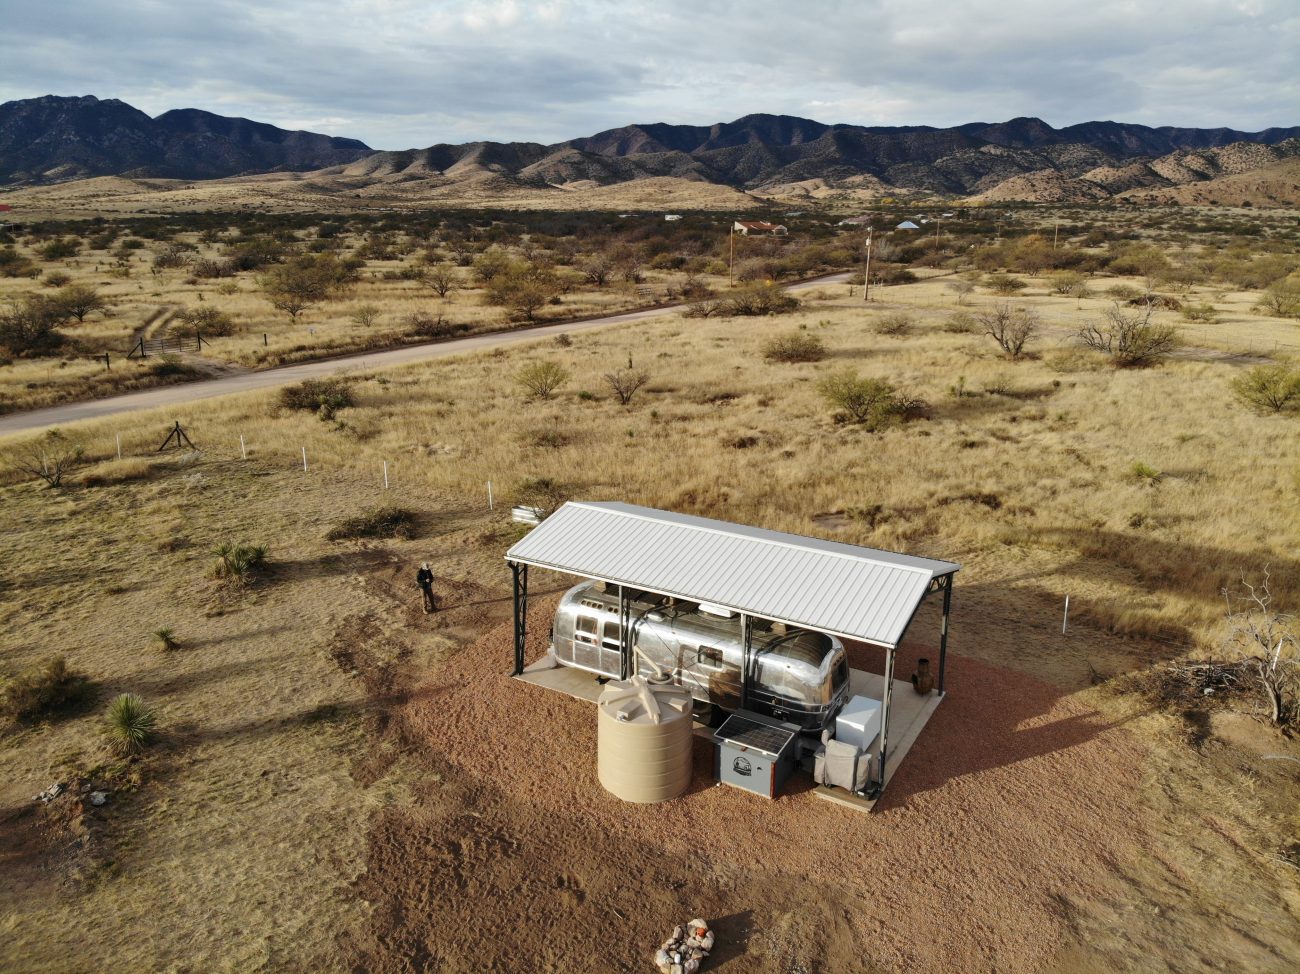
Today we’ll be walking you through how to build a small gray water septic system. This one is sized for our renovated 1972 vintage Airstream that is permanently parked on our off-grid homestead. It has a 40 gallon gray tank, and we as a family of 6 don’t use more than 75 gallons per day.
Is there a rule for sizing your system? Not really that we could find. There are plenty of guidelines for traditional septic systems, but this is because in the US the average water use is 60 gallons per person per day. So those are operating on a much larger scale, and are dealing with the aforementioned fecal matter and food grease.
Since we’re using so little water, and because there are no solids involved, our system will include 2x 55 gallon barrels and a 10’ leach line field.
This will allow us to completely flush our full 40 gallon gray tank into the first barrel and the second barrel is used as a backup if somehow another 40 gallons came right after. With our lower pressure solar powered water pump system this wouldn’t even be possible, but any septic system should be over sized just in case.
The 10’ leach line is also extra insurance in case both were to ever fill up and the water needs somewhere else to go.
Now that you’ve got the high level idea, let’s grab the materials and show you how to build it step by step.
Gray Water Septic Supplies
Thankfully this is a very simple system. You’ll need:
- 2x 55 Gallon Plastic Barrels
- 10’-20’ of 3” Schedule 40 PVC
- 1x 90 degree 3” Schedule 40 PVC Fitting
- 2x 3” Schedule 40 Couplers
- 1x 3” Threaded Fitting + Screw Cap
- 2’ of 4” Schedule 40 PVC
- 1x 4” Schedule 40 Coupler
- Footloose Sewer Cap
- 4 tons drainage gravel
- 30 sqft vapor barrier vinyl
- 1x Tube of Waterproof sealant
Building Your Own Gray Water Septic
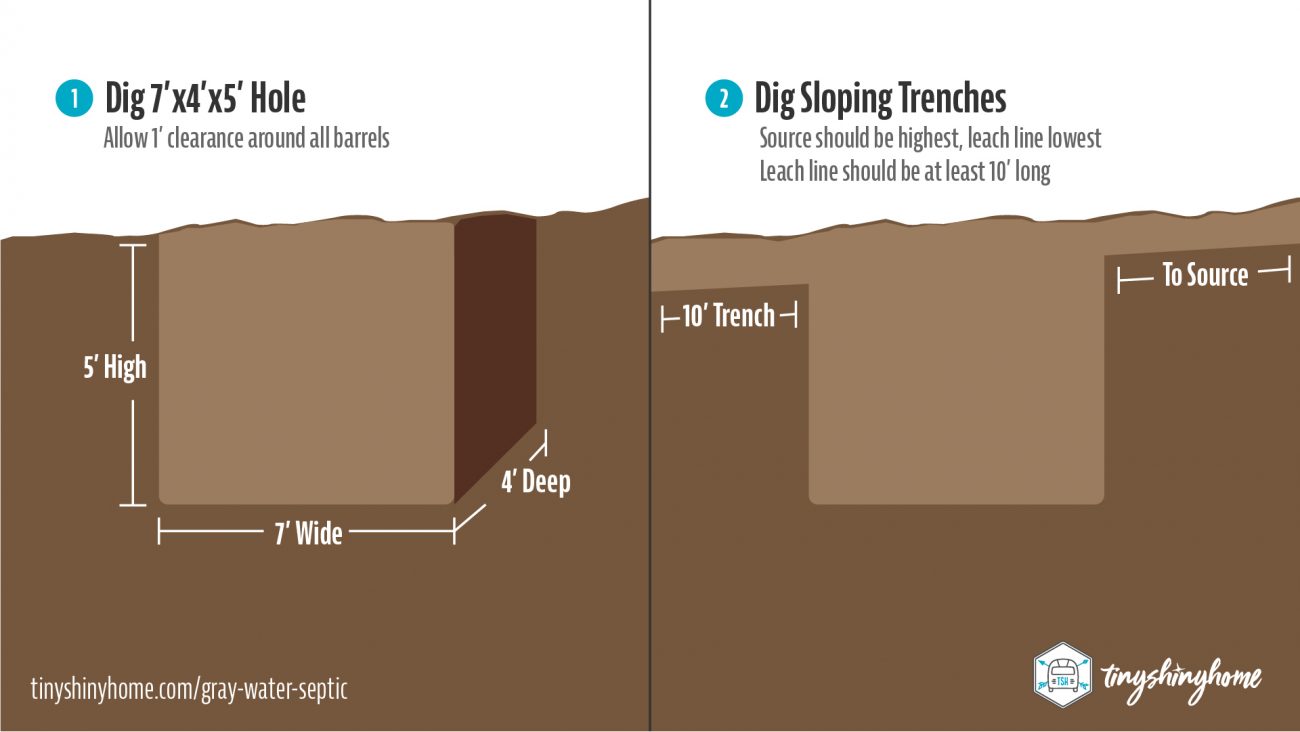
Step 1 - dig the hole for the system. A few things to keep in mind here. First, you need to know where the source will be. Where is all that gray water going to be coming from? Plan the septic location at least 20’ away from your source.
Ideally you want the septic to be sloped away from this output, and if you can use your land’s natural elevation drops this will make things easier.
If you can’t, then you’ll have to make sure your lines and the hole are all still sloped at roughly 1/4" drop per foot, and this will affect how deep you have to dig.
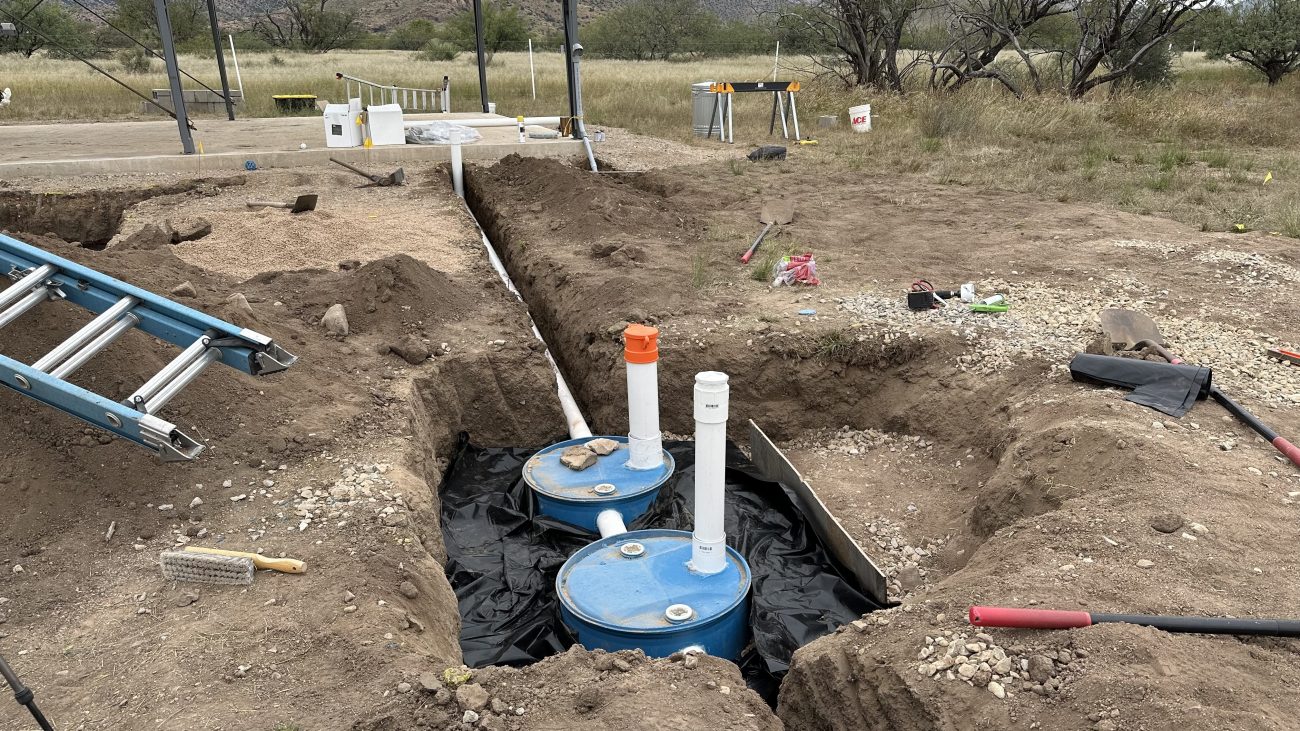
Assuming you’ve got a natural elevation drop, for this system you’ll need a hole that is roughly 7’x4’x5’ deep. The depth is important for drainage and you should allow one foot of space and drainage rock around each barrel.
Step 2 - dig your trenches for the pipe connecting from the source to the septic and then from the septic out to the leach line. These don’t have to be super deep, but for the leach line we recommend digging down at least 2’ so you have room for the pipe and gravel below grade.
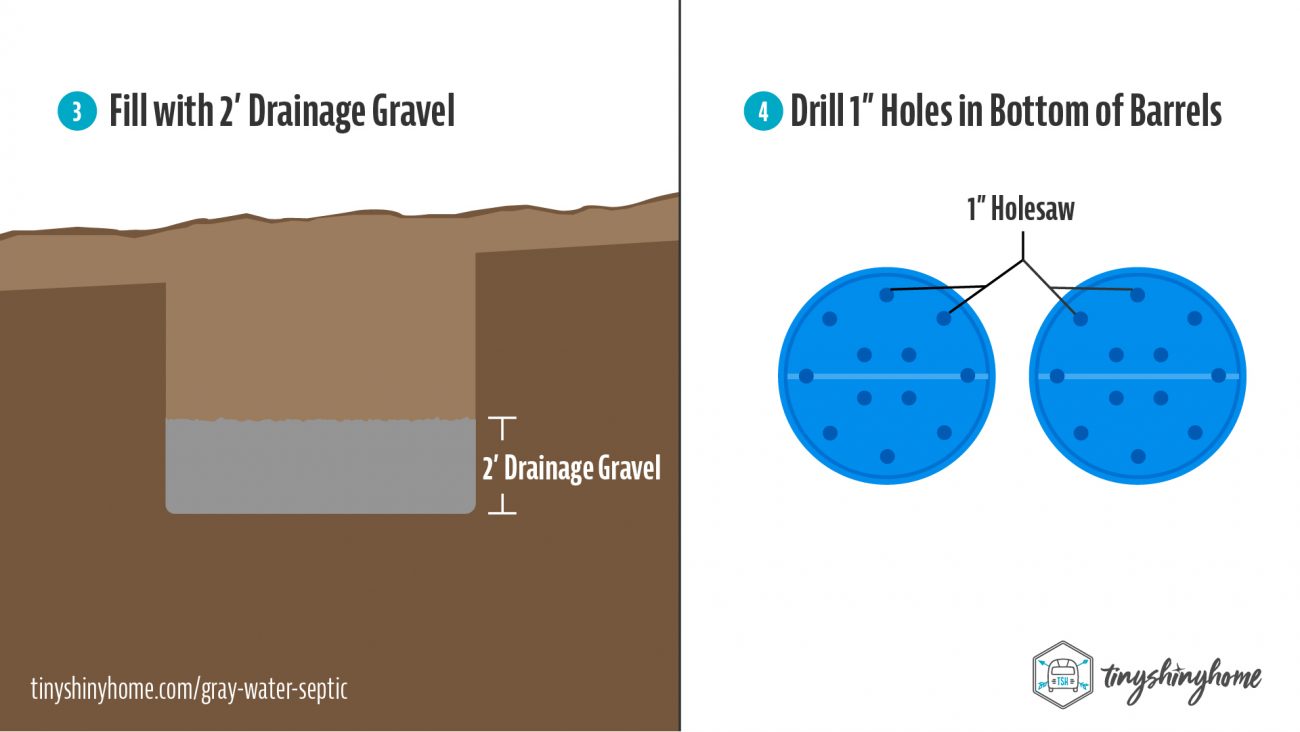
Step 3 - Now that the site is prepped, start bringing in your drainage gravel. This is usually different than regular gravel - check with your local rock yard and see what they recommend. Bigger rocks mean more opportunity for water to infiltrate quickly.
Fill the bottom of the main hole with 2’ of drainage gravel.
Step 4 - Take your two 55 gallon barrels, flip them upside down, and drill at least 12 1” holes in the bottom. We used a cross pattern to space them evenly.

Step 5 - Since we’re going to connect the barrels with 3” Schedule 40 PVC get a 3.5” hole saw and cut out holes across from each other on each barrel. Keep in mind that each hole should be sequentially a little bit lower as you go from the source to the leach line.
Step 6 - Now set the barrels in the hole on top of the gravel, letting the large 3.5” holes facing each other and lined up with the source and leach line. At this point you can test fit the pipe to make sure everything is going to work - you may find you need to adjust the depth of your trenches during this stage.
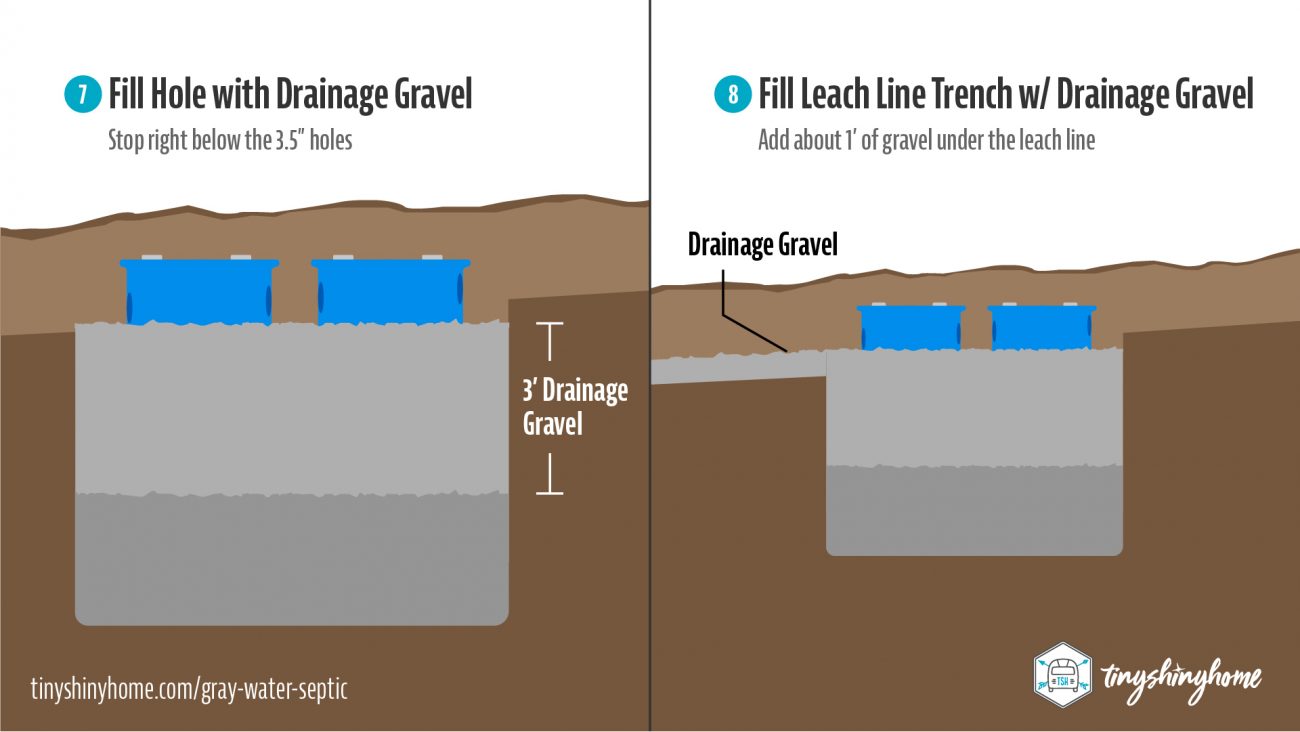
Step 7 - With the barrels exactly where you want them, fill the rest of the hole with drainage gravel all around the barrels stopping right below the holes for the PVC connections. You can either tape off the holes so no rocks get inside while filing or you can leave the PVC pipes temporarily inserted.
Step 8 - Add about 1’ of drainage gravel to the leach field trench. There should still be enough room for the PVC to sit on top of the gravel.
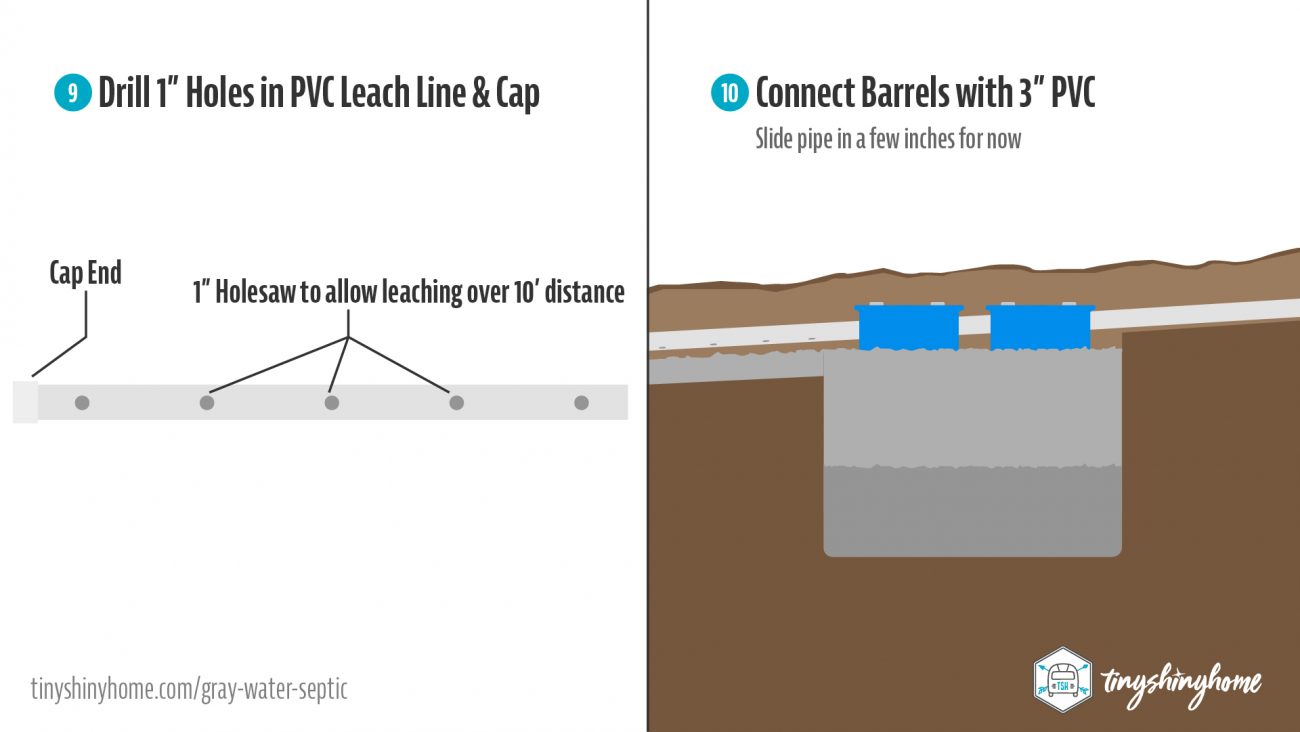
Step 9 - Take your 10’ PVC leach line and drill some 1” holes in the bottom of the pipe. Add a cap to the far end to force the water down to the perforated holes.
Step 10 - If you haven’t already, slide all the 3” pipe into the holes on the sides of the barrel a few inches, and get them where you want them.
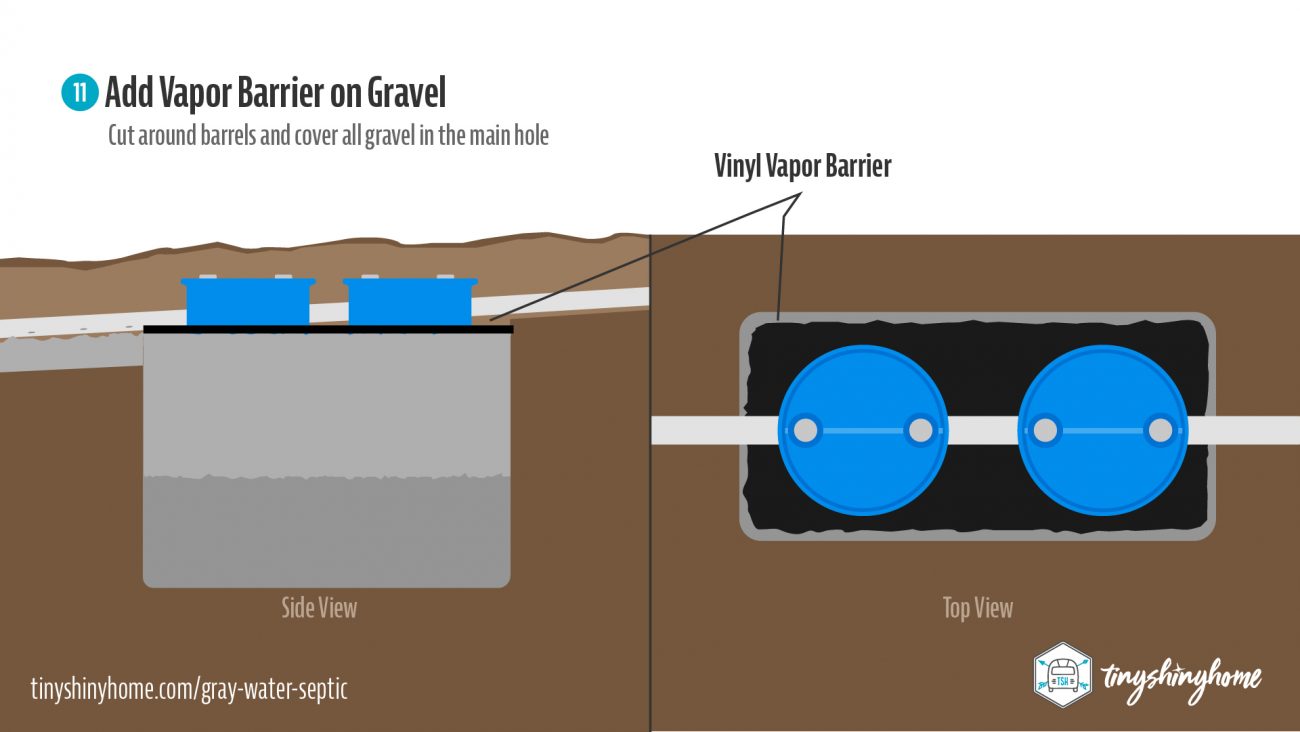
Step 11 - Clean off the tops of the barrels and put down a vinyl vapor barrier covering all the gravel in the main pit. Cut around the barrels so it sits right against the edges.
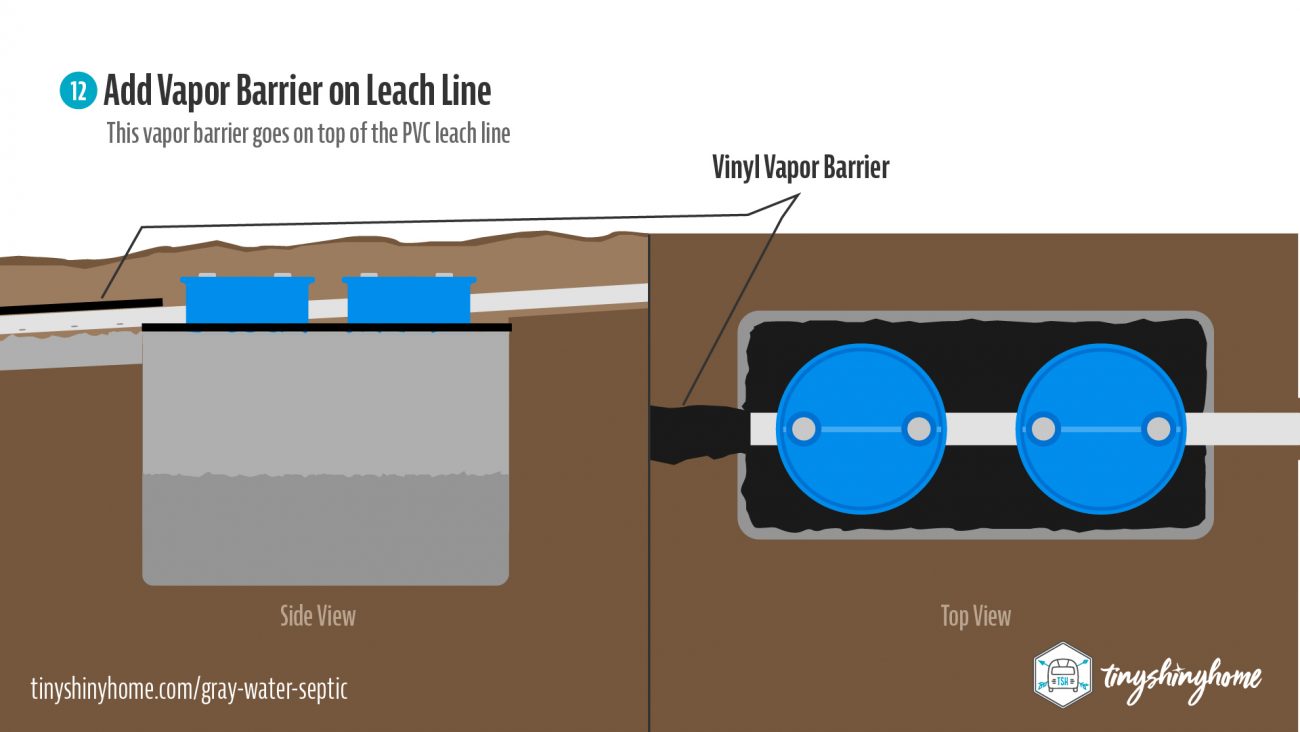
Step 12 - The vapor barrier for the leach line goes above the perforated PVC pipe.
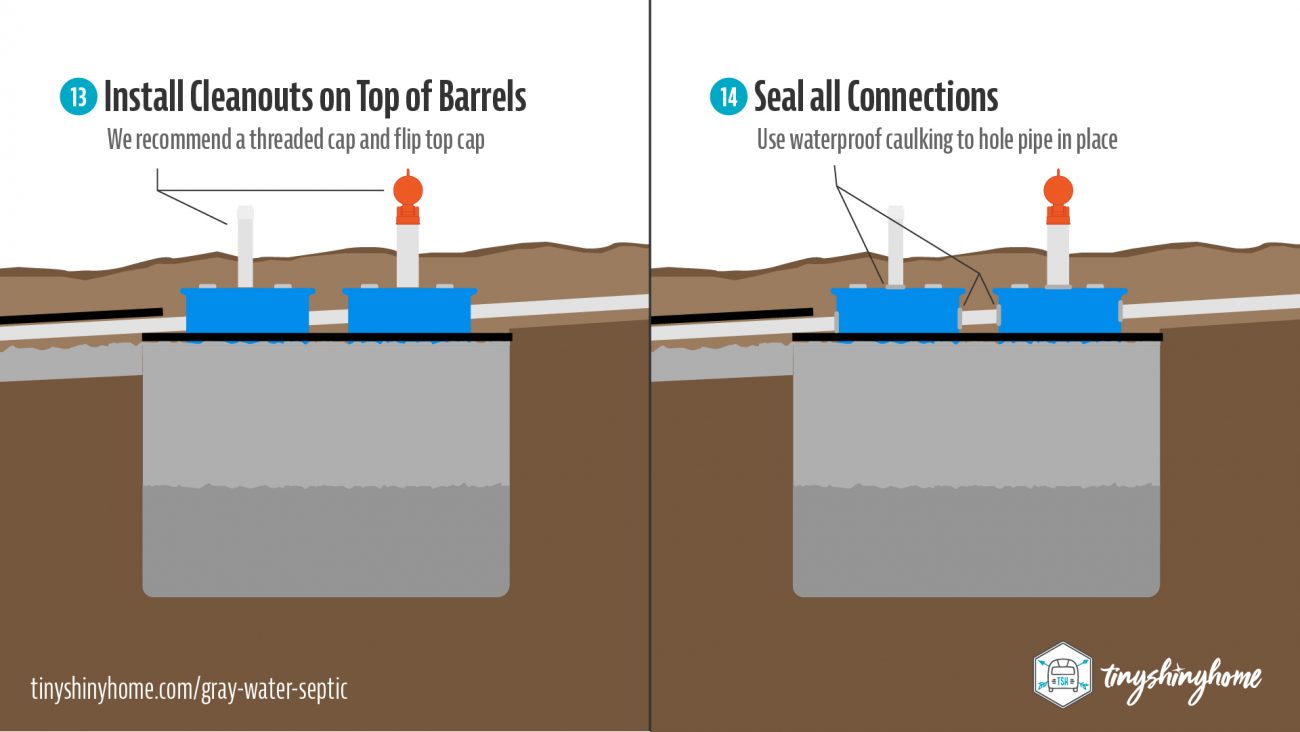
Step 13 - Now it’s time to install your clean outs and finish up! We did 2 types of clean outs, but really you can do whatever you like here. The idea is that you want access to both barrels in case they need to be pumped or cleaned in the future.
This is the easiest way we found to do this. Cut a 2”-3” section of pipe and glue it to a coupler. Drill a hole in the top and push the pipe down in until the coupler stops it. Now measure from the top of the coupler to ground level and add a few more inches.
Measure and cut that pipe, glue it in to the coupler, and then install the cap on top.
We did a 3” pipe on one barrel with a threaded coupler and threaded plug cap.
On the other barrel, we did a 4” pipe with a footloose sewer cap for easy access to pour liquids directly into the septic with one hand.
Step 14 - Now that you have everything in place, it’s time to seal all your connections. Run a bead of waterproof caulking around all the places where the pipe enters the 55 gallon barrels.

Step 15 - Finally, once the caulking has set and dried, begin to fill back in the trenches and hole with your remaining dirt back to ground level. Compact as you go, and watch the vertical plumb of the clean outs.
We definitely recommend putting rocks or a barrier around the clean outs to protect them and make it visually obvious that something is there.
When you’re ready, make your source connections and run some tests! Use the clean outs to visually inspect what’s happening while the gray water comes in.
Wrapping Up + PDF Download
And that’s pretty much it! Now you have a system that will naturally filter and infiltrate your gray water into the ground in a safe and less stinky way.
If you need a permanent copy of these plans and steps, we have a PDF guide available for purchase here - otherwise feel free to reference this video or the article on our site as you build your own.
Download the Gray Water Septic Plans
Get up close and personal with this illustrated hi-res PDF visual representation small gray water septic system. Use to infiltrate gray water safely and effectively into the ground on your property for RV's and tiny houses. Includes bonus step by step illustrations, too!
Happy gray watering - we’ll see you next time!
Apparel
Grab a fun, comfy t-shirt & help support our family.


About the Author
Jonathan Longnecker is the strongly opinionated tattooed and bearded half of Tiny Shiny Home. He loves making music, figuring out nerdy solutions, exploring the outdoors, and living off-grid.
comments powered by Disqus