Planning Solar & Electrical Installation in our Airstream Renovation
“Can I get some details on your solar setup?”
We’ve had that question asked so many times since we finished our Airstream Renovation that I’ve lost count.
I’ve had two main reasons for not digging into a big fat nerdy post about our solar panel and battery installation:
- I wanted to actually use it for a while in a variety of real-world situations to make sure I could recommend it
- I really, really didn’t want to write it. Way too much work :)
But here we are. One year in, and I have a much clearer idea of how our choices have worked out so far. And I finally psyched myself up enough to get this all put together.
This is part one, we'll call it "the plan" wherein I'll take you through the why's of what we did. Part two will focus on the actual installation.
Before we get started, a disclaimer. I’m not an electrician. I am not an expert on any of this. I’m simply telling you what we did and what worked for us. If we did something stupid, be kind :)
Ready? Deep breath. Ok, let’s get to it.
Article Overview
- Planning your power
- Sizing your watts and amp hours
- Solar panels
- Series or parallel
- Lithium vs lead acid
- BMS
- Solar charge controller
- Converter
- Inverter
Planning Your Power
To understand your solar setup you have to first understand your power usage. In our 5th wheel trailer, the battery indicator was useless. I had no idea how many amp hours I had or how many amps anything was using.
I killed at least two batteries within a year!
So a big part of the process was doing the math and figuring out how much power we used in our previous trailer and then how much we wanted to be using in the Airstream on a daily basis.
I wish I could tell you a surefire way to calculate all this up (and there are a few worksheets out there), but our biggest resource was other people already traveling full time and camping off the grid.
Their input was invaluable, and gave me a much better idea of how much power real people use, living and working full time on the road.
In case you haven’t read up on our other design choices and goals with this Airstream renovation, we were sick of staying in parks and wanted to camp off the grid as much as possible. Boondocking as they call it. So our choices were centered around not being connected to a power plug most of the time.
What was cool about this process was that we weren’t designing a solar setup around an existing power installation. We got to design everything from the ground up.
We got to choose exactly how we would live in terms of power usage.
Create Your Own Wire List Guide!
Quickly plan and assemble your very own digital wire list guide with this handy template. Use our exact wiring as a guide, and organize your installation by wire number, color, gauge, polarity, and more.
Our goal was to run native 12v as much as possible since we were going to have a big battery bank and solar. And if we needed to plug up, the rest would be low power enough that we could run the whole rig off a single household plug. That’s right, we don’t really need 30amp!
12v for all the things
All our appliances run on 12v and/or propane - except for the air conditioner.
- Novakool Marine Fridge - 12v only, no propane. Residential compressor FTW! (3-4 amps)
- PrecisionTemp Tankless water heater - 12v and propane, but highly efficient (1.3 amps)
- Suburban Furnace - 12v and propane (4.7 amps)
- Shurflo water pump - 12v only (5 amps)
- Atwood Range/Oven - propane only (0 amps)
- Green Mountain Grills pellet smoker - 12v and wood pellets (3-5 amps)
- Campchef outdoor stove - propane only (0 amps)
We also made sure to gauge wires generously so that all other small electronics ran on native 12v, too.
- weBoost 4G-X (.6 amps)
- Pepwave Router (.2 amps)
- Verizon Jetpack hotspot (.3 amps)
- ATT Unite Explore hotspot (.3 amps)
- Battery display
- Blue Sky solar charge controller
- Blue Sky solar remote display
- Pioneer radio (.4 amps)
- Winegard TV/radio booster (.1 amps)
- LED lights and switches (.01 amp/ea) - we have 34
- LED hitch light (.7 amps)
- Fan-tastic vents (1-3 amps/ea)
- Blue Sea Systems 12v sockets
- Aukey dual USB charging ports (1-2 amps/ea) - we have 8
- Nature's Head composting toilet fan (.01 amps)
- Barker Power Jack (up to 30 amps)
- Honeywell Sleeping Fan (.01 amps)
120v for the rest
This leaves us with only two items for 120v. Our residential outlets and the air conditioner. I know what you’re going to ask.
“Can you run your AC off your batteries!?”
No, we can’t. And we didn’t want to.
This whole process is all about evaluating your every day needs, how you want to live, and the expense of buying and installing it. For us, we felt like the cost to have a big enough system to run an air conditioner wasn’t worth the investment or complexity. If it’s too hot, we can deal with it or move. Those wheels on the house come in handy :)
That being said, we do have a small 1,000 watt inverter that stays on most of the time so we can use:
- MacBook Pro (2x) when charging (5.3 amps each)
- Apple Cinema Display (5-10 amps)
- Ninja blender (65.1 amps)
- Wahl hair trimmers (.8 amps)
- Canon laser printer (43.2 amps)
We don’t have a microwave (we think they do bad things to food) so 1,000 watts works just fine.
The only items we have that we need to be plugged in to shore power to use are:
What’s awesome about this is that we can literally plug the whole trailer up to a 20amp plug and run the AC and outlets. This makes staying in our friends’ driveways a breeze. It also means we only need one 2000 watt Honda EU Generator to charge the batteries and run the plugs. And if we got an easy start capacitor for the AC we could run it off that single generator, too. One day we may splurge on that!
Download our Electrical Diagram
Get up close and personal with this super detailed, impeccably illustrated hi-res PDF of our full off-grid power setup. Get a visual schematic representation of how an entire 12V and 120V system connect together.
Amp Hours
We settled on a 400 amp hour lithium battery setup. Based on other friend’s real world usage it felt like a good “middle of the road” size for living and working full time in the Airstream. It’s plenty big enough to go for days without a charge, but not so big that it would take 2 years of boondocking to pay off.
We’ll get into more details about the battery in a bit. This is just a high level for planning.
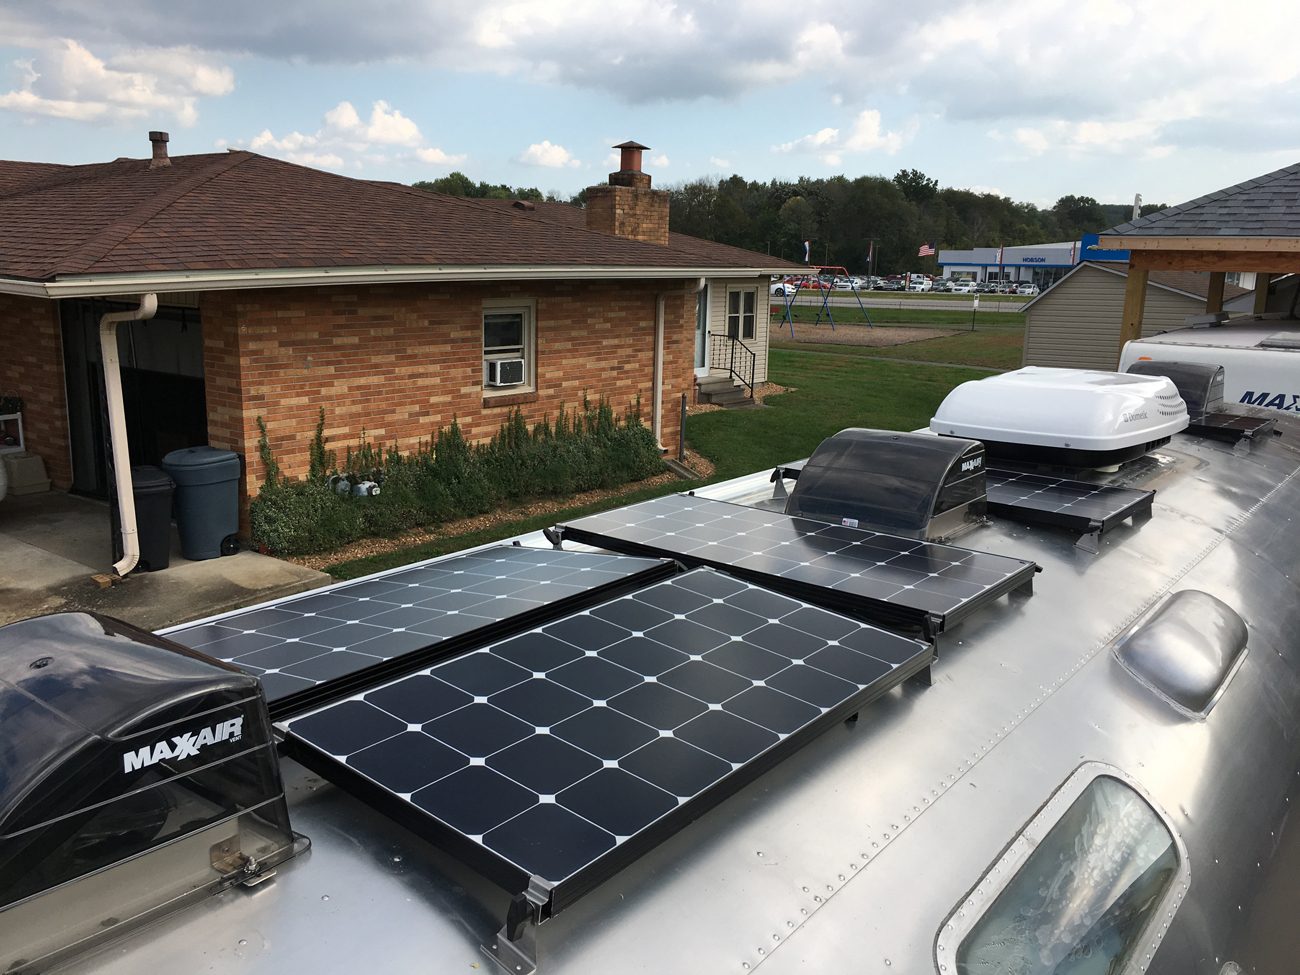
Solar Panels
With a fairly large 400ah battery bank, we wanted to put in as much “automatic” solar power as possible. And by that I mean there’s a bunch of panels on our roof that we don’t have to mess with :)
After lots of research, comparing and measuring we settled on cramming five 100 watt Renogy Eclipse Monocrystalline panels on the roof. And I do mean cramming. It was quite the operation to get them all to fit! But that give us 500 watts or about 30-35 amps of peak power coming in to charge the batteries.
While 500 watts have been great in the summer, we’re finding that we have to be more mindful of what direction we park and make sure we tilt the panels at 45 degrees during the winter months.
When renovating the Airstream we knew that the winter months could be difficult so we installed an exterior plug for a solar ground deploy. At some point we may add another 200-400 watts in something more portable that folds up and stows away in the truck. For now tilting is working great so it’s just a matter of convenience vs. hassle.
Series Vs. Parallel
Did you know it matters how how you connect all those solar panel wires together? I didn’t realize there were different ways to do it until I started researching all this. There are three basic options:
- Series - Usually used for smaller systems with a MPPT solar charge controller. When you connect your panels together the voltage increases, but amperage remains the same. Then the MPPT controller translates that into the power to charge your batteries. Because the amperage stays low, you can use smaller gauge wire, BUT series has one big downside. If one panel is shaded, the maximum output for each panel is dropped to the same as the low producing panel.
- Parallel - Often used in 12v systems, connecting your panels this way increases the amperage and keeps the voltage the same. This requires a heavier gauge wire, but doesn’t have the shading problem that series does.
- Series-Parallel is also an option if you’re running into maxing out your controller. This just means you group some panels together via series and then parallel into your controller.
We chose to go Parallel, but with an MPPT controller. So we have a positive and negative 10 AWG wire run from each panel down into a distribution block. It takes those 10 wires and converts to two heavy gauge wires that run straight into the solar charge controller. And all is right with the world!
For a more detailed explanation, check out Renogy's series and parallel article.
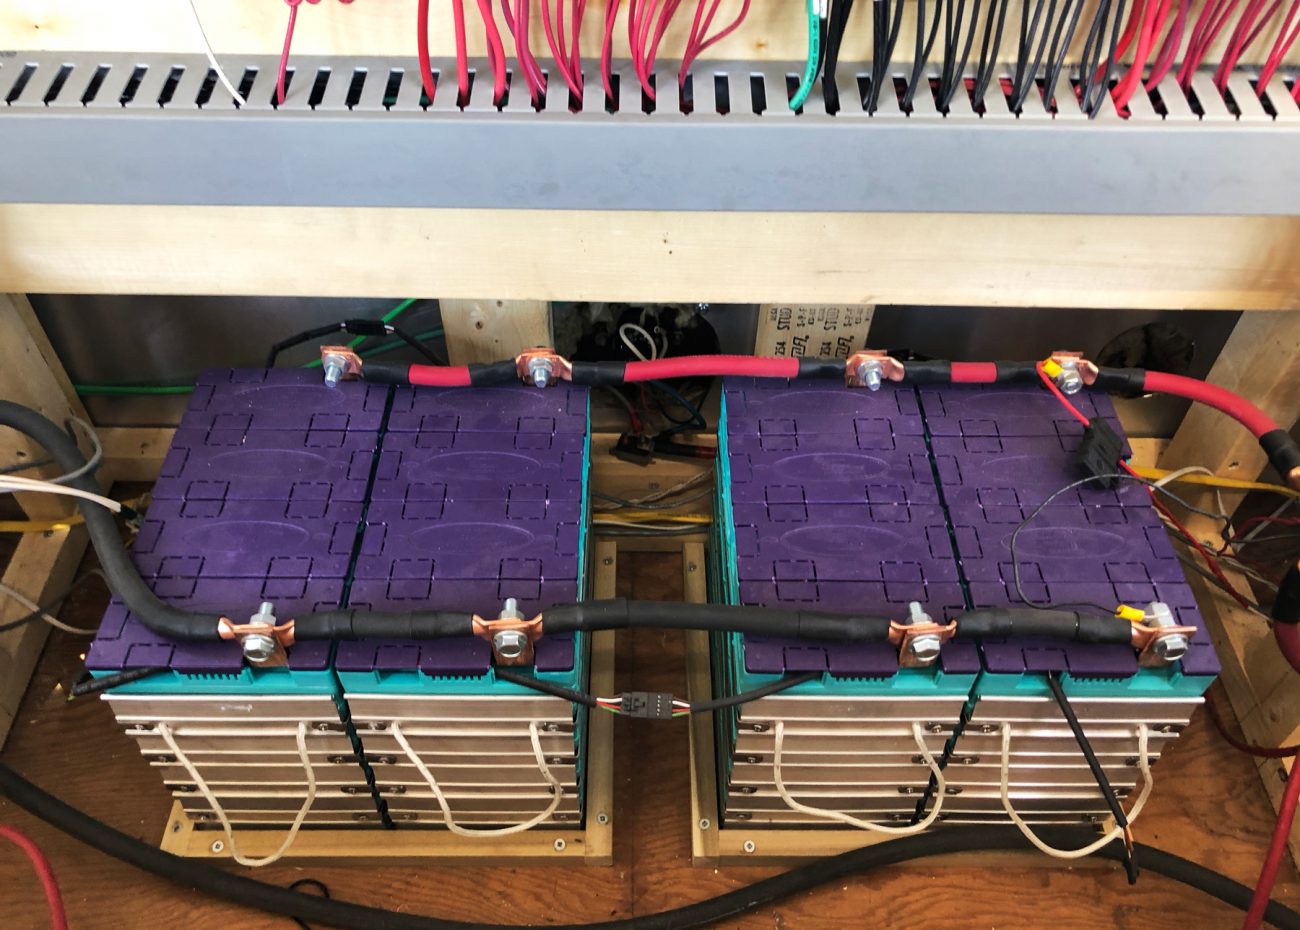
Lithium Batteries vs. Lead Acid Batteries
Look, this is already a long post so I’m not going to dive too deep on the differences between Lithium and Lead Acid batteries. Just the top reasons for why we chose lithium.
Lead Acid batteries are cheap and dumb (in a good way). You can use a simple controller to pump power into them, connect them with wires to make a big bank, and it's super easy to find a replacement if one goes bad.
The downsides? They are big, heavy and not very efficient. They say if you buy 200amp hours worth of Lead Acid batteries you only end up with about 100 that are usable. Their output drops as they loose a charge. Oh, and make sure you don’t let them fall below 75% or their life is drastically reduced.
If you just use your camper for short trips then lead acid batteries make a lot of sense. The batteries are going to get charged up back home and the extra weight/space isn’t a huge deal. Plus they are cheap!
But if you’re living and working full time in your trailer, Lithium makes a lot more sense. These work a lot like the battery in your phone or laptop. They are much smaller and lighter, sustain their power even as their charge drops, and can deplete to nearly empty without causing damage.
They also don't release noxious gasses and can be stored inside without having to worry about venting (other than for temperature reasons).
Plus that 200 amp hours is actually 200 amp hours. I know you’re thinking, “what’s the catch?”
The monies.
Yeah Lithiums are super expensive and require a “brain” to protect them from temperature extremes and under/over voltage situations. They charge and top out at slightly different voltages than lead acids so finding the right charge controller and converter can be tricky. Basically it’s going to cost more and be more complicated to setup.
But once it’s setup it should be fairly worry free unlike lead acids where you’re constantly thinking about not letting their charge drop too low and damaging them.
For us, the amount of money we would be saving camping off the grid (and not paying to stay at a park) made sense for our investment. Also, because the Airstream is our primary residence, we were able to deduct the cost on our taxes and get a hefty percentage back.
Disclaimer: I’m not your tax guy, talk to him and see if it works in your state.
We went with four 100 amp hour batteries from Elite Power Solutions. Sadly, they don’t ship directly anymore so you’ll have to find one of their authorized dealers to pick one up. So far they’ve worked perfectly!
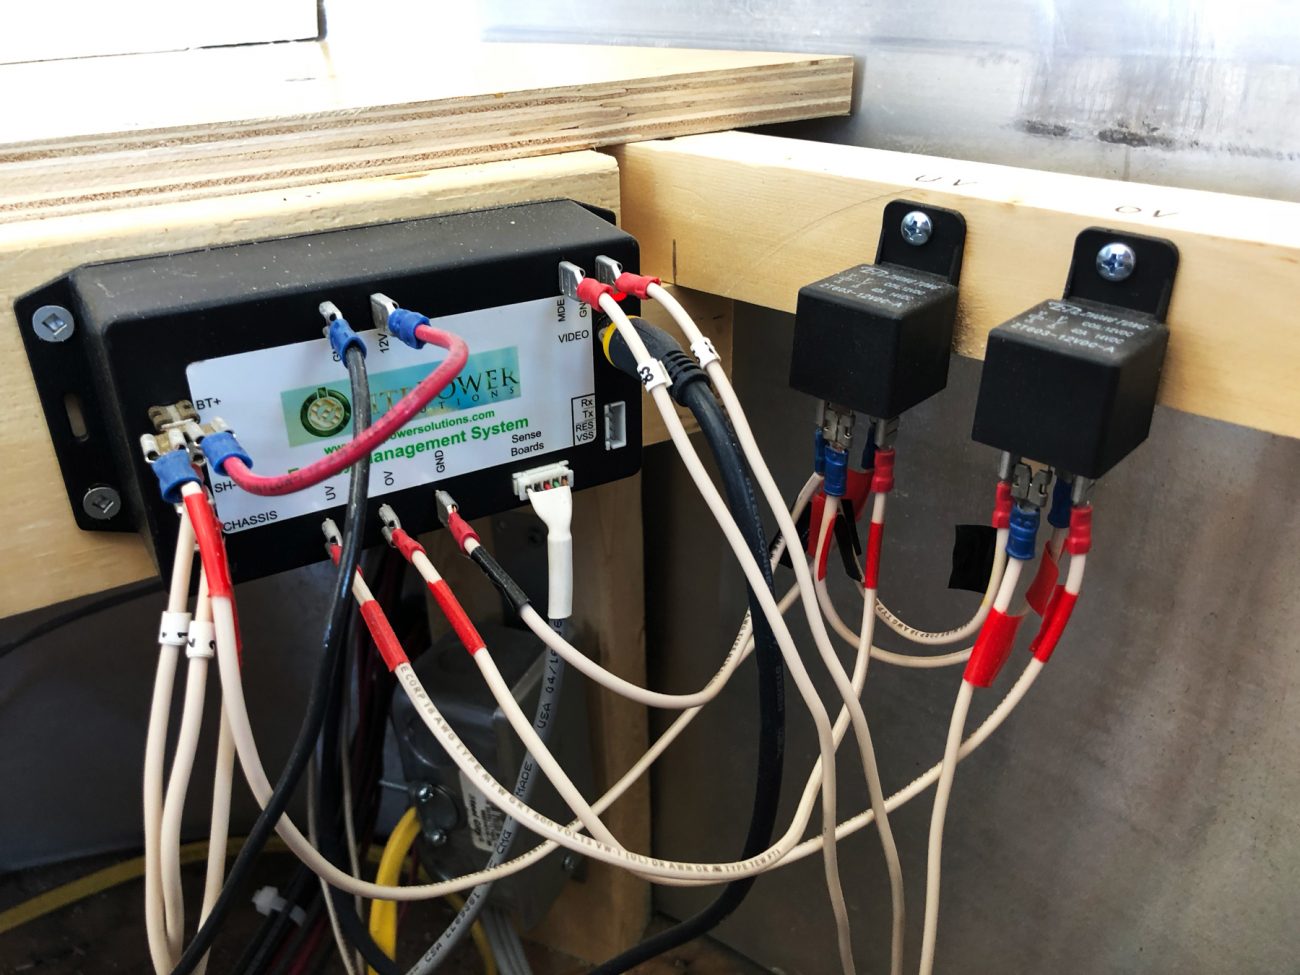
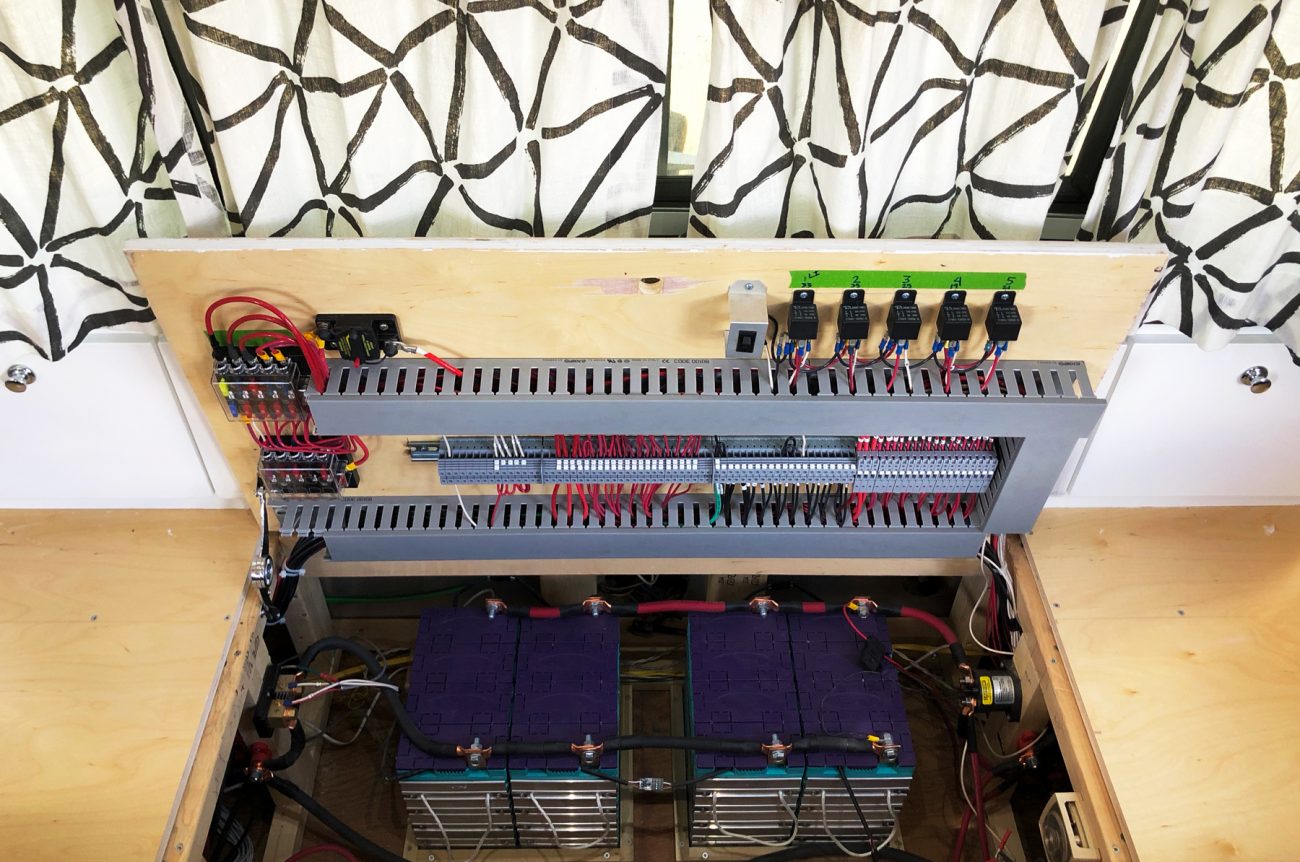
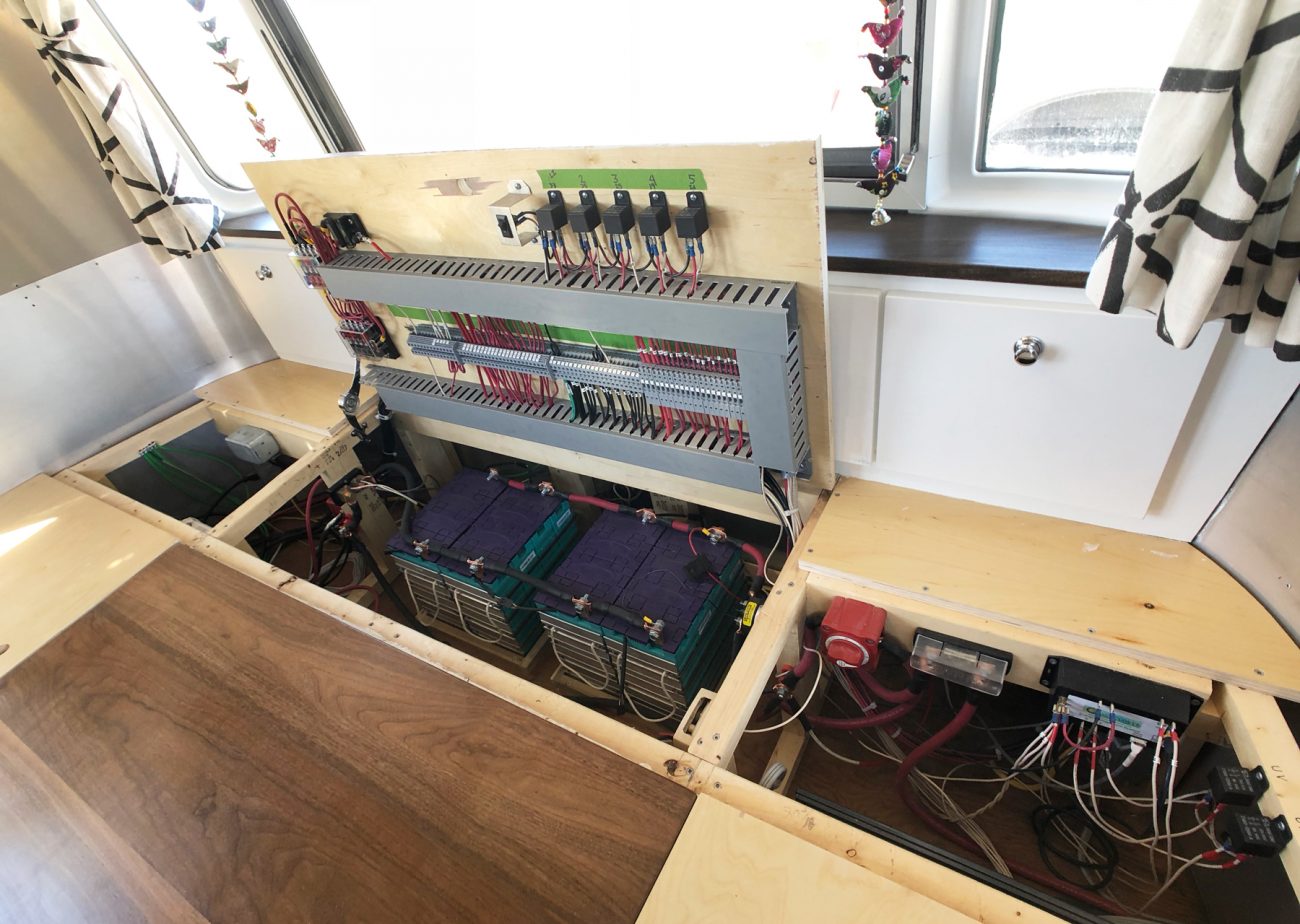
BMS
Nope, it’s not about your bowel movements! Lithium batteries need a “brain” remember? That’s called a Battery Management System. This little box keeps tabs on each cell, monitoring voltage and temperature. If a cell isn’t charging as fast as the others it’ll shut the other ones off so the slow one can catch up. Too hot or too cold? It’ll turn everything off to protect them.
Think of this guy as your insurance policy for all the money you just dropped on those beautiful lithiums. He’s going to keep them healthy and running smoothly.
Our BMS also came from Elite Power Solutions - generally you probably want to get your BMS from the same company that makes the batteries. They even re-programmed it for us as we needed to run our bank as 12v.
Our BMS has a bunch of connections that let you wire up relays that will turn off if the voltages get too high or low or the temps do the same. It also has a video feed out that you can connect to a monitor to get a handy visual display of your batteries.
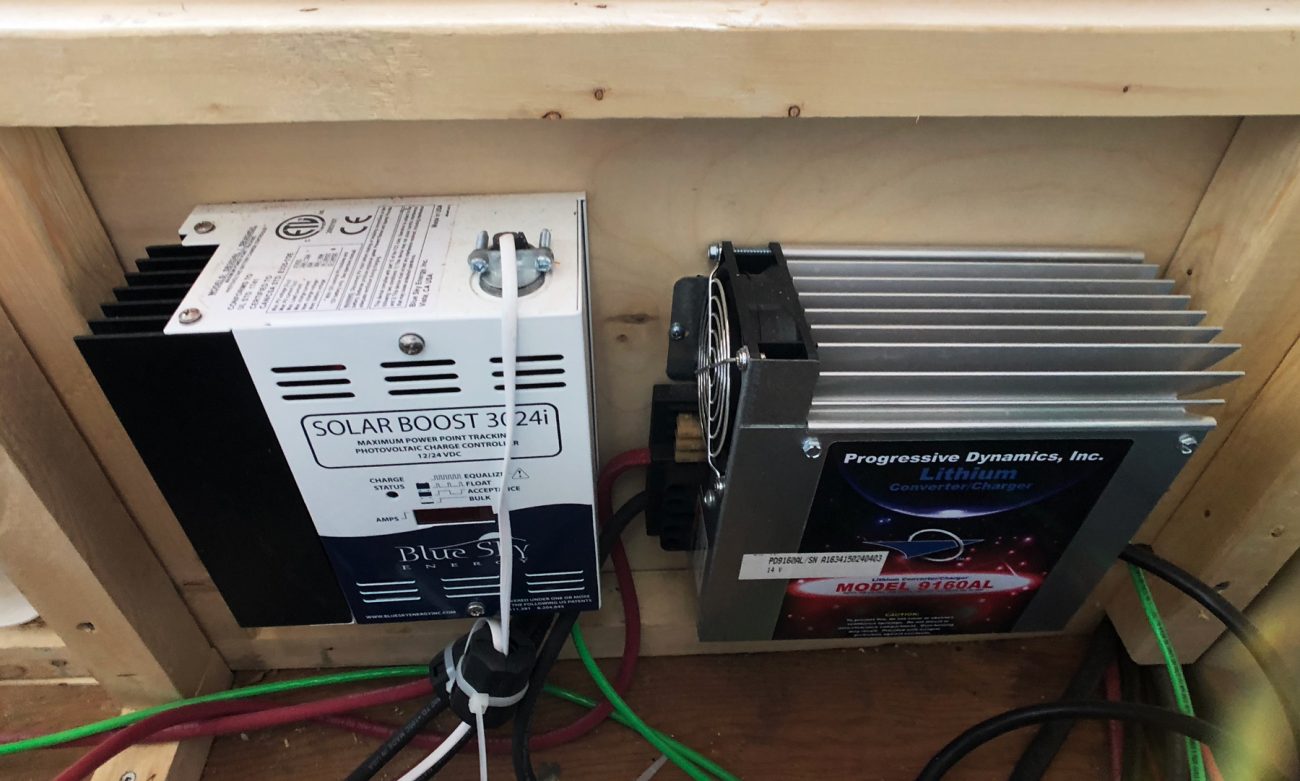
Solar Charge Controller
In order to wrangle all that power coming in from your solar panels into safe, usable energy that charges your batteries you’ll need a solar charge controller. These little boxes come in all ranges of very dumb to very smart and we opted for an MPPT (maximum power point tracking) controller. And it’s pretty smart! Maximum Power Point Tracking uses it’s computer brain to calculate how to wring the most out of your setup. It’s pretty interesting, but not worth digging too deep into here. Basically it works.
We got a Blue Sky Energy SB3024DiL which matches up with our solar panel capacity nicely. It maxes out at 40 amps at 12 volts and connects with the IPNPRO Pro Remote Display that let us program a bunch of extra settings to make sure it charged our lithiums properly. Plus knowing exactly how many amps are coming in is never a bad thing!
Converter
Your converter has two functions:
- It takes 30/50 amp or 120v power from being plugged in and converts it down to 12v for all your 12v appliances.
- It uses that converted power to charge your batteries.
Believe it or not, we had more converter woes than any other part of this process. I attribute it to the the fact that we pieced all this together ourselves and that Elite Power Solutions didn’t have a great offering (maxed out at 15 amps which meant it would have taken way too long to charge our big battery bank). Also their batteries run at 14.2 volts instead of the more industry standard 14.6 so we had issues with converters over charging the batteries and eventually had to have our Progressive Dynamics Unit re-programmed with a lower voltage.
Whew.
At any rate, it works great now and with the 60 amps it puts out we can plug up our trusty 2000w Honda Generator and have that bank back full again in about 6-8 hours.
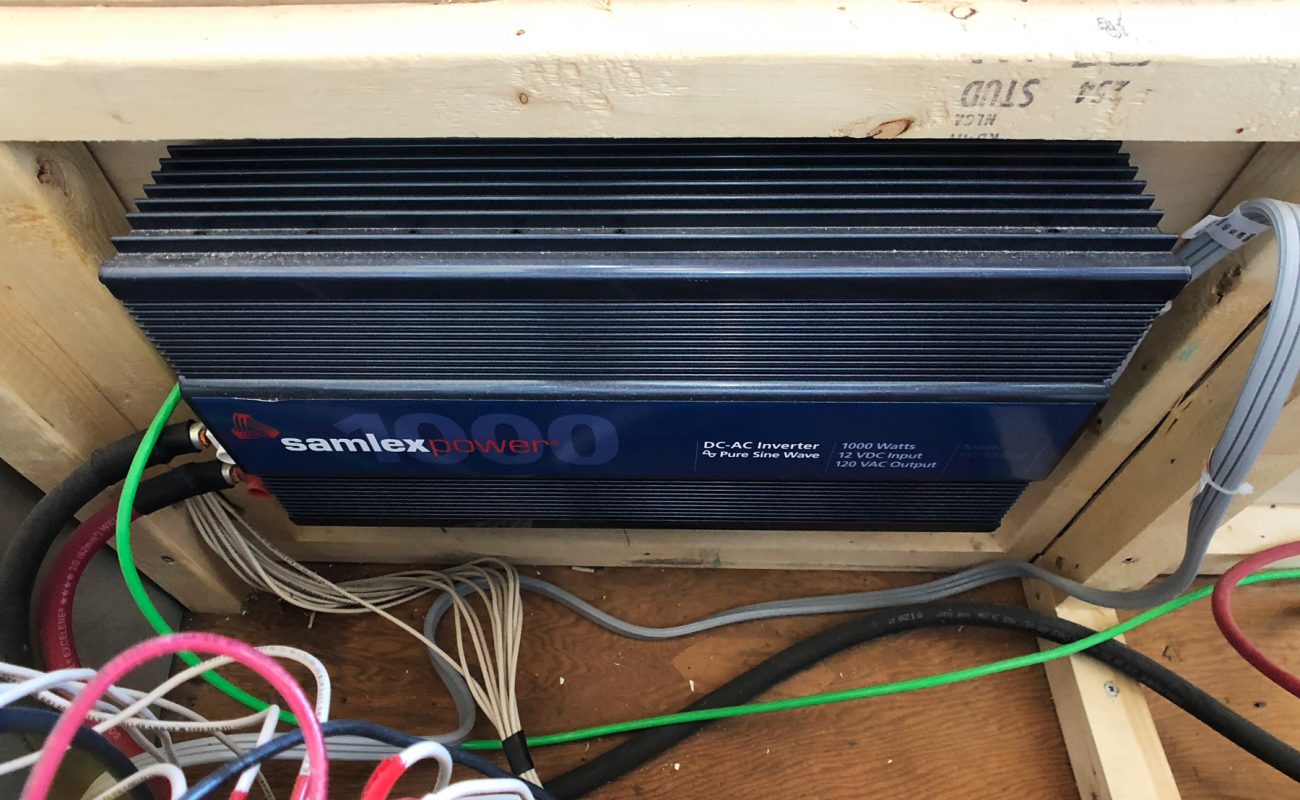
Inverter
During this whole process I kept getting the converter and inverter confused. The names were too similar and I couldn’t quite suss out what the difference was between them. Finally it clicked, but for those of you not quite sure yet here it goes:
- The converter takes 120v power and converts to 12v. Or 120v → 12v
- The inverter takes 12v power and converts to 120v. Or 12v → 120v
So the inverter lets us run our household plugs off of our 12v lithium battery bank and solar. Like I mentioned above, we specifically built our power system with low wattage needs so a 1000 watt inverter has mostly worked for us. If I had to do it again, I probably would have jumped up to 2000 watts for the occasional high power need.
Up Next
"That's great!" you say, "but how did you put all this stuff together?" C'mon now. I just finished this one! Give a guy a minute to catch his breath! Do not fear - the next article in this series will dive into just that - how we installed our system.
Until then, ask me anything in the comments below.
How much will your Airstream renovation cost?
Get a better understanding of what your project will cost with our renovation calculator!
Besides the intelligent spreadsheet, it includes includes links to everything we bought for our renovation + over 20 short videos where we share behind the scenes thoughts, details, & tips!
Apparel
Grab a fun, comfy t-shirt & help support our family.


About the Author
Jonathan Longnecker is the strongly opinionated tattooed and bearded half of Tiny Shiny Home. He loves making music, figuring out nerdy solutions, exploring the outdoors, and living off-grid.
comments powered by Disqus


