Remote Off-Grid Mini 12V VRM Solar System for our Homestead - Installation & Wiring Guide
Looking for the simplest way to create a small, self-contained, 12V solar system that can be monitored remotely? You’ve come to the right place!
Hi there, we’re Jonathan & Ashley from Tiny Shiny Home. Our family of 6 spent many years traveling full-time in our renovated vintage Airstream before finding some off-grid property in Cochise County, Arizona to settle on.
Our dream here is to build a sustainable off-grid homestead from the ground up using solar power, water catchment, and natural building techniques to create an oasis in the desert.

Small 12V Solar System Goals
We’re already powering most of our property via our massive DIY 28kwh solar system, but in the name of redundancy we’ve also setup several small, independent 12V solar powered systems that we use for pump houses and sheds.
Now, I want to be clear - there are absolutely simpler and cheaper ways to create a small DC system. Our first pump house literally just had a small solar panel, cheap charge controller, a battery, and an RV pump. We’ve pushed thousands of gallons through that thing, pressurizing water for our trailer and building multiple earthbag buildings with it.
There is nothing at all wrong with keep things simple.
But as we started to install more mini 12V systems in various locations on our property that didn’t have access to power or internet, we felt like we should start investing in a better way to keep tabs on all of them.
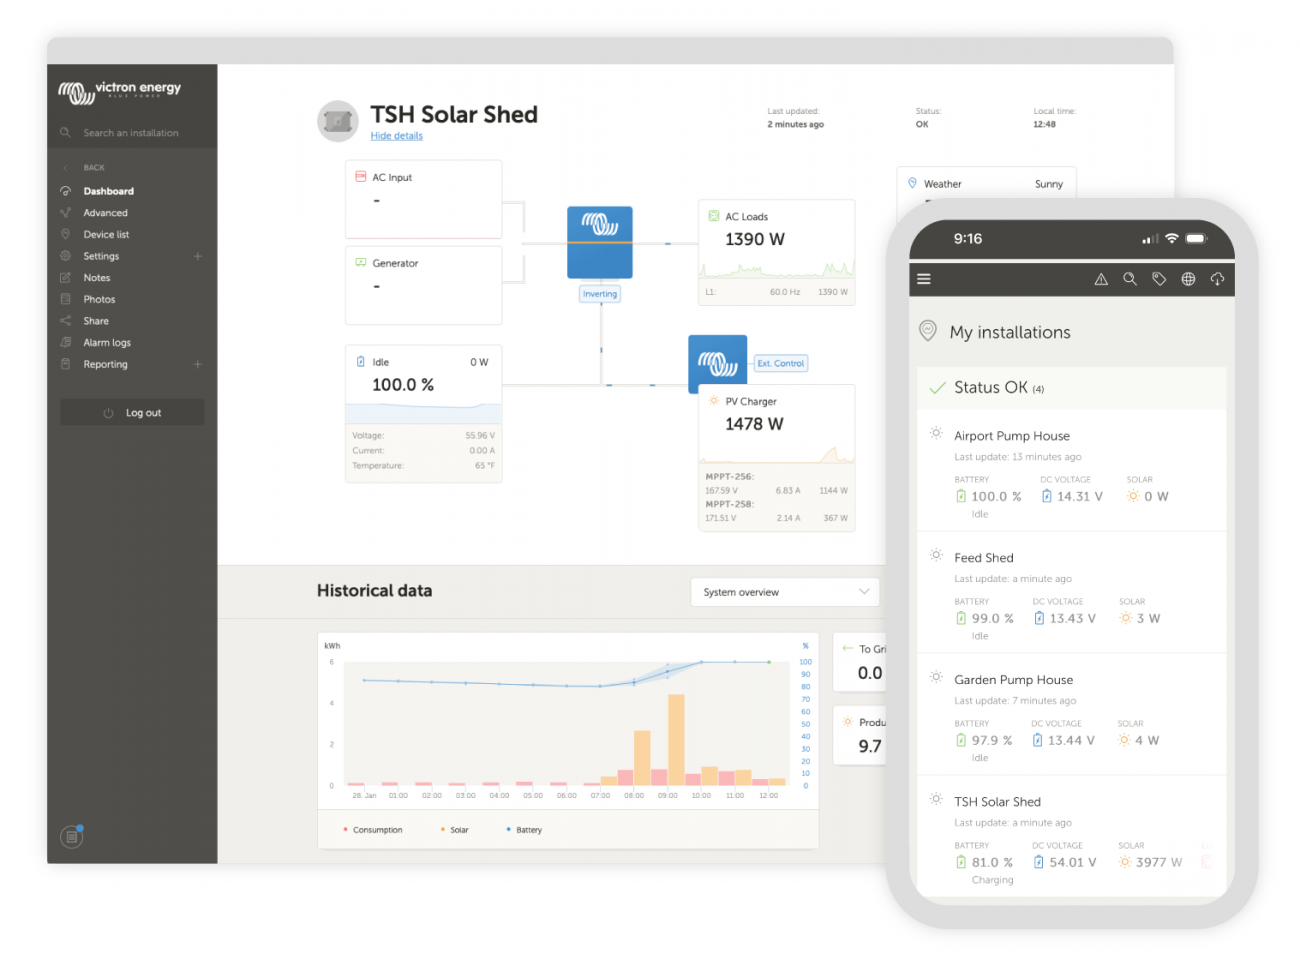
Our main solar system was already setup with a Victron Quattro Inverter, Smart Solar charge controllers, and a Color Control GX that was passing data to Victron’s VRM - a remote management portal that you can access from anywhere on any device.
We’ve been super happy not only with the performance of the gear, but the VRM itself. Victron’s website and apps are well designed, provide deep levels of customization and reporting, and continue to have active development unlocking new features like widgets on iOS or enabling bluetooth connectivity for data transfers for nearby components.
So with all that in mind, we decided to use the Victron VRM as a base for all our other smaller systems as well. This would allow us to quickly see all our power installations in one spot.
Our biggest issue was that each power system or building we wanted to connect was scattered all over our 6 acre property, buried beneath metal roofs or inside earthbag walls, and not near a wifi internet connection.
We’re going to get nerdy and figure out how to make this work, but first let’s talk high level specs.
High Level Specs & Use Cases
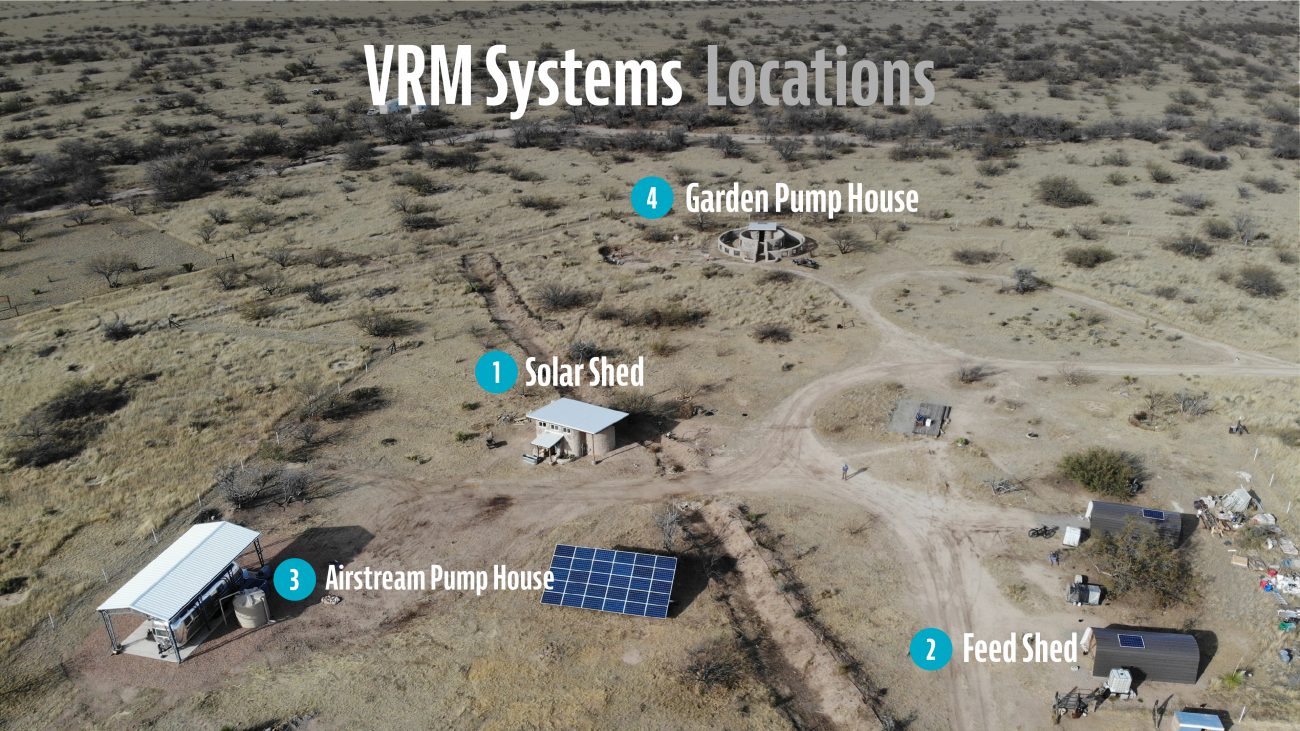
Currently we have 4 VRM systems:
- Solar Shed (Large Full System)
- Feed Shed (Mini VRM System)
- Airstream Cover Pump House (Mini VRM System)
- Earthbag Chicken Garden Pump House (Mini VRM System)
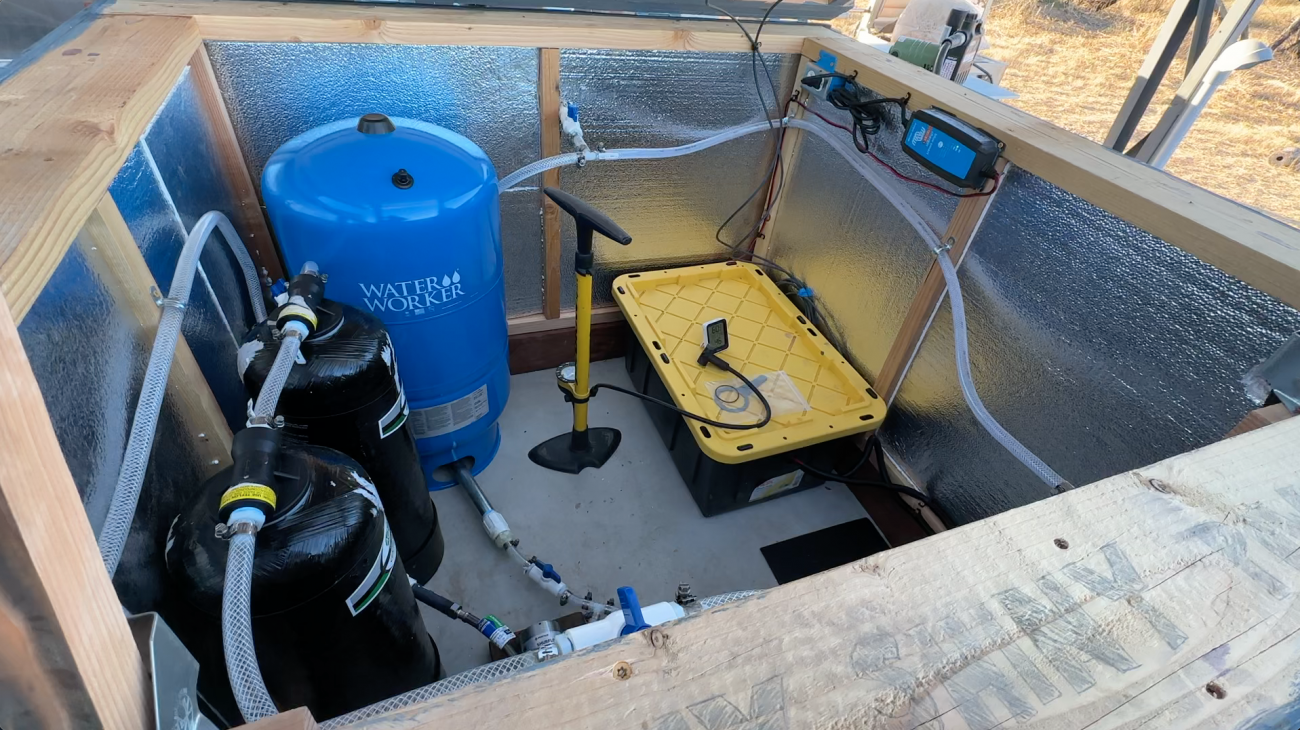
Our Pump Houses usually run a 12V water pump, lights, and RV tank pad heater, and our Feed Shed has LED lights and venting fans. These are intentionally low power systems, and we’re not trying to pull any high draws from them.
Here's a few high level specs before we dig in:
- Battery Storage - we usually go with a 12V 100AH Deep Cycle Lead Acid Battery. These are easy to grab pretty much anywhere, fairly inexpensive, and resistant to the wild temperature swings we can get here in the high desert. They’re tough and don’t need fancy BMS’s or special protections.
- Solar Panel: While a small 100W panel is big enough for this size system, we've been using these 240W Santan Solar panels instead because they're so cheap.
- Smart Solar Charge Controller - Since we’re sticking to the Victron Ecosystem, the Smart Solar 75V/15A is the perfect size for the 240W panel without breaking the bank.
- Smart Shunt - In order to relay data about the battery’s state of charge, the Victron Smart Shunt quickly connects to the battery while also having a data connection port.
We also make sure to install fusing and protection as well as small load centers with blade fuses for each item we want to power. But we’ll cover that in more detail later.
My general goal here is just to give each system plenty of breathing room to power what it needs to and get charged back up each day. Are the oversized? Probably. But the batteries and panels are so cheap I’d rather get them setup, not have to worry about them, and have options for future expandability.
Also, a Disclaimer: I’m not an electrician. All information here is solely for entertainment purposes, and should you feel uncomfortable doing this yourself, all electrical work should be performed by qualified individuals according to local electrical codes.
Article Overview
- Small 12V System Goals
- High Level Specs & Use Cases
- Remote Mini VRM Wiring Guide
- Internet Connectivity & Victron VRM Portal
- Self-Contained Power System Storage Tote
- Wiring the 12V Mini VRM Victron Solar System
- Settings
- Ruuvi Temperature Alarms
- Connecting 12V Loads
- Cost Breakdown
- AC Power Option
- Wrapping Up

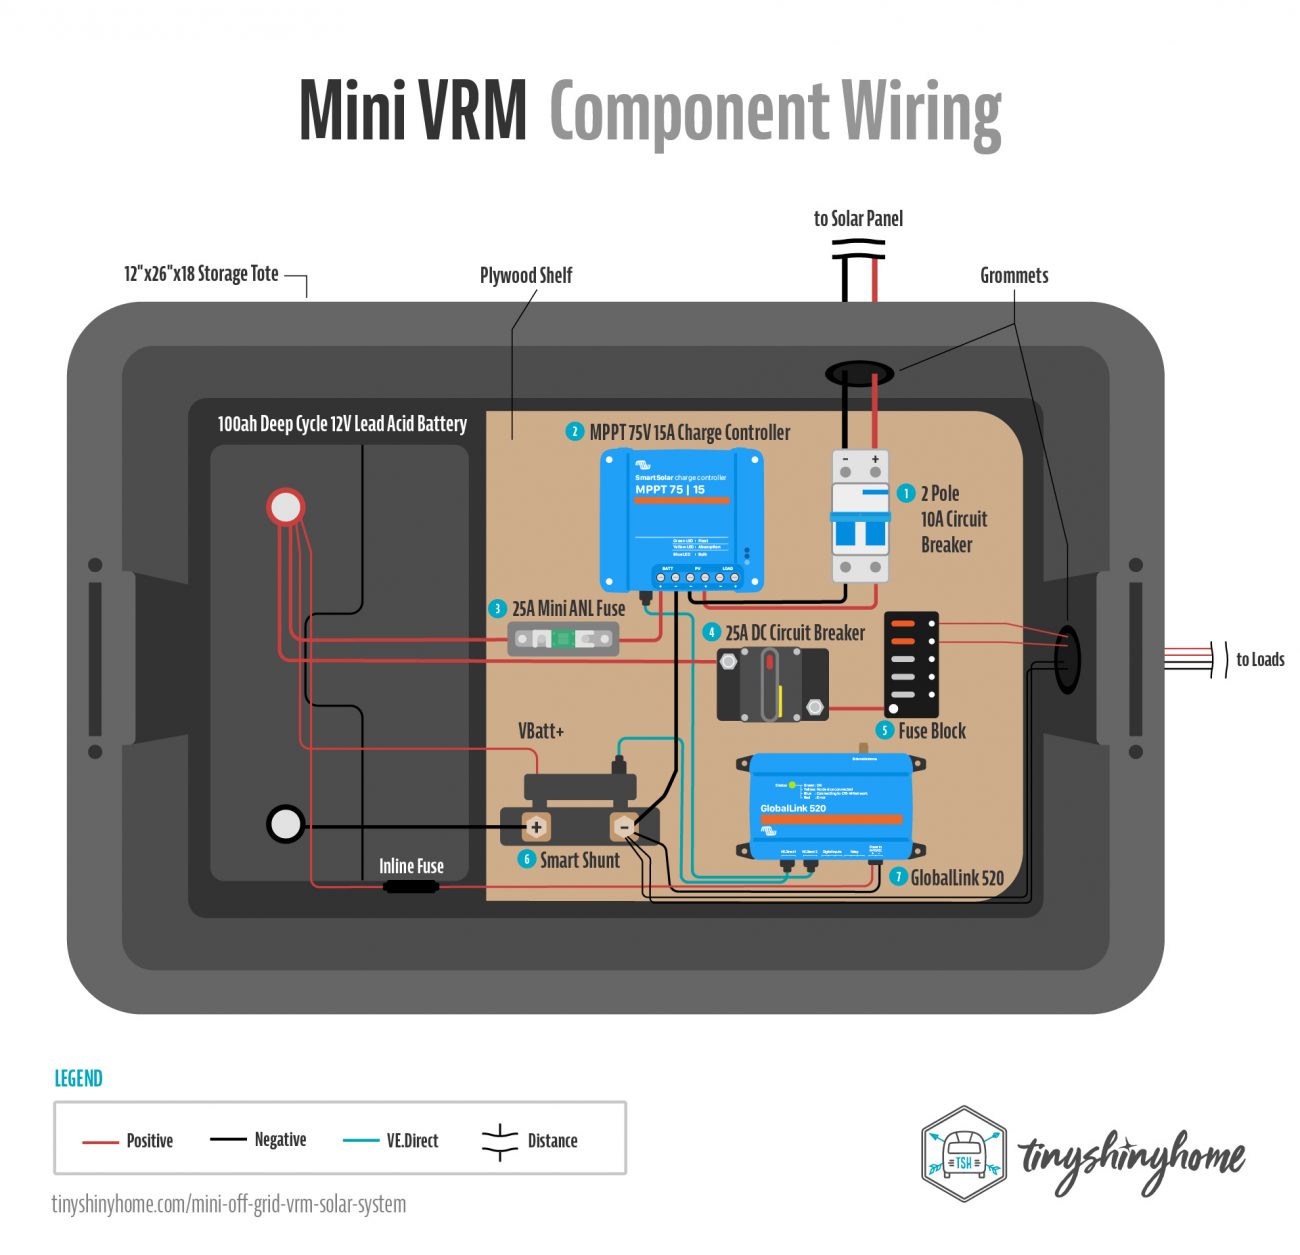
Mini Solar System VRM Wiring Guide
Wondering what this thing looks like all connected up? As part of this deep dive, we created a very detailed replica of our wiring setup.
I know I'm a visual person, and sometimes I just need to see it all laid out no matter how many words there are to explain it.
If you'd like to download a these vector PDF's for reference that you can zoom in on, grab a copy here:
Download Our Mini VRM Wiring Diagram
Get up close and personal with this super detailed, impeccably illustrated hi-res PDF schematic visual representation of our mini 12V solar systems. Use this with remote cell-based Victron VRM monitoring to keep tabs on your system at all times. Includes bonus individual component wiring configs, too!
Internet Connectivity and the Victron VRM Portal
The biggest hurdle in this whole idea would be connecting the various Victron components to our VRM for monitoring. To do this you need a GX device from Victron that will serve as the central “brain” for the system. Then you have to have a network to connect the GX device to so it can push the data up to the cloud.
Because our various buildings and locations were spread out all over our 6 acres and not near our wifi network, this is where things got tricky. Let’s look at our options.
- Color Control GX - This unit has a screen built in and multiple ways to connect components. But if you’re not near a wifi network, you need a cell based modem to connect to the internet. This is by far the most expensive option at around $550 - plus the $250 for the modem and you have to use your own data plan. Definitely overkill for a small system like this.
- Cerbo GX - This unit has even more inputs, but no display so it comes in a bit cheaper at $350. There’s also the “S” version with fewer inputs that cost $270. But you’d still need that $250 modem and your own data plan if you’re not near a wifi network. For our little 12V system, this still felt like it was overkill.
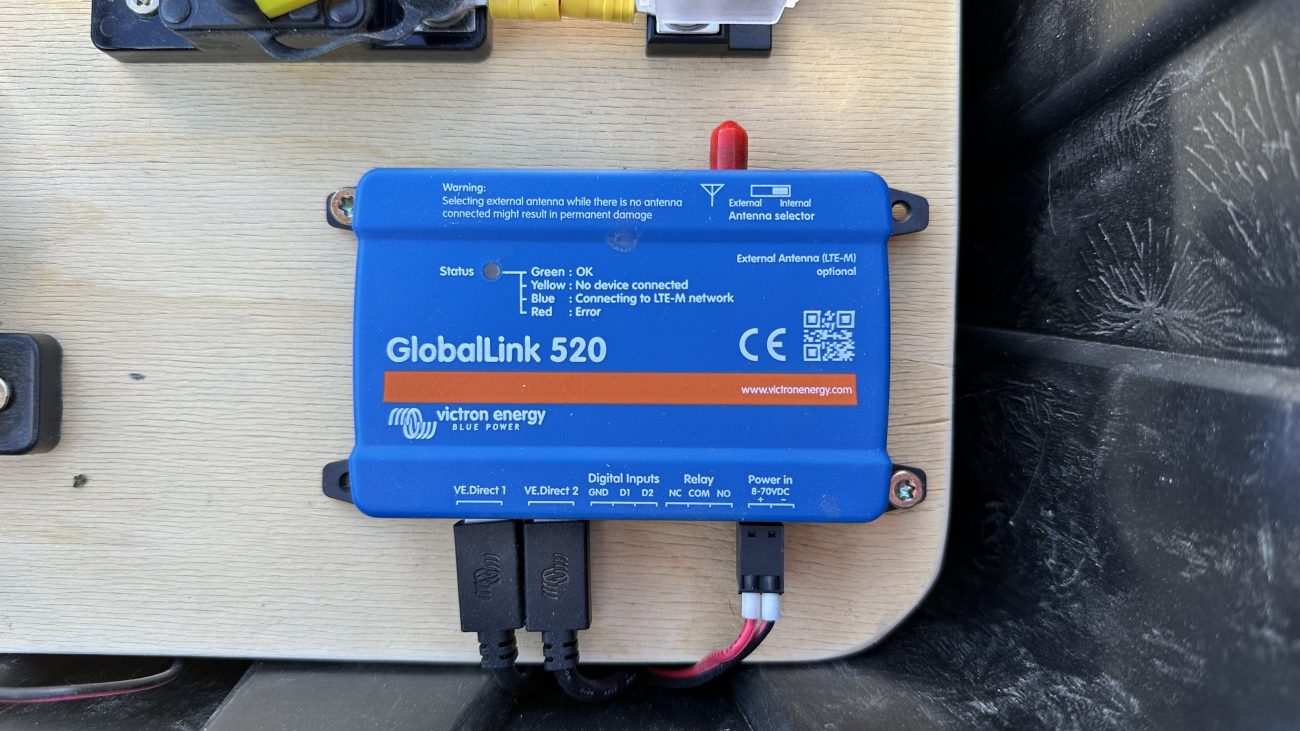
- GlobalLink 520 - This unit was definitely more like it. It’s a very simple GX device with only 2 physical inputs, and it comes with a built in LTE-M antenna and 5 year data plan for only $230. With such a simple system, we didn’t need to monitor more than the solar input and battery SOC so this seemed like a good option.
- Raspberry Pi + Venus OS - Not only does Victron do a great job of keeping their software up to date, they’re also super hacker friendly. Case in point, the software that actually runs on their GX devices is available as an open source download that you can then install on any computer you want. Many folks have bought cheap Raspberry Pi mini computers, installed the Venus Firmware and made their own versions of the GX devices.
While this sounds cool on paper, you still need either need a close wifi signal or some kind of cell attachment with your own plan to connect remotely. And by the time you buy all the pieces you might need and bring your own data plan, it’s not much cheaper than the GlobalLink. Plus it’s so much more work to get it setup. - LoRaWAN Module - Finally, the most nerdy of options. Long Range Wide Area Networks - or LoRaWan use “Internet of Things” gateways to pass small bits of data very long distances for free. Like anywhere from 1-18 miles. There might be one in your area - check the map to see if you have coverage nearby. If not you can even setup your own gateway if you want for others to use.
While this is fascinating that Victron even makes this module, it is pretty limited. It only connects directly to one piece of equipment so you’d only be monitoring one thing at a time. And at $80, it doesn’t make a lot of sense for our particular install.
As you may have seen in the diagram we went with the GlobalLink 520 - it hit the sweet spot of functionality, simplicity, and cost for our sized system. We could run hard data connections to the solar charge controller and smart shunt which then passes that info into the VRM for monitoring and reporting.
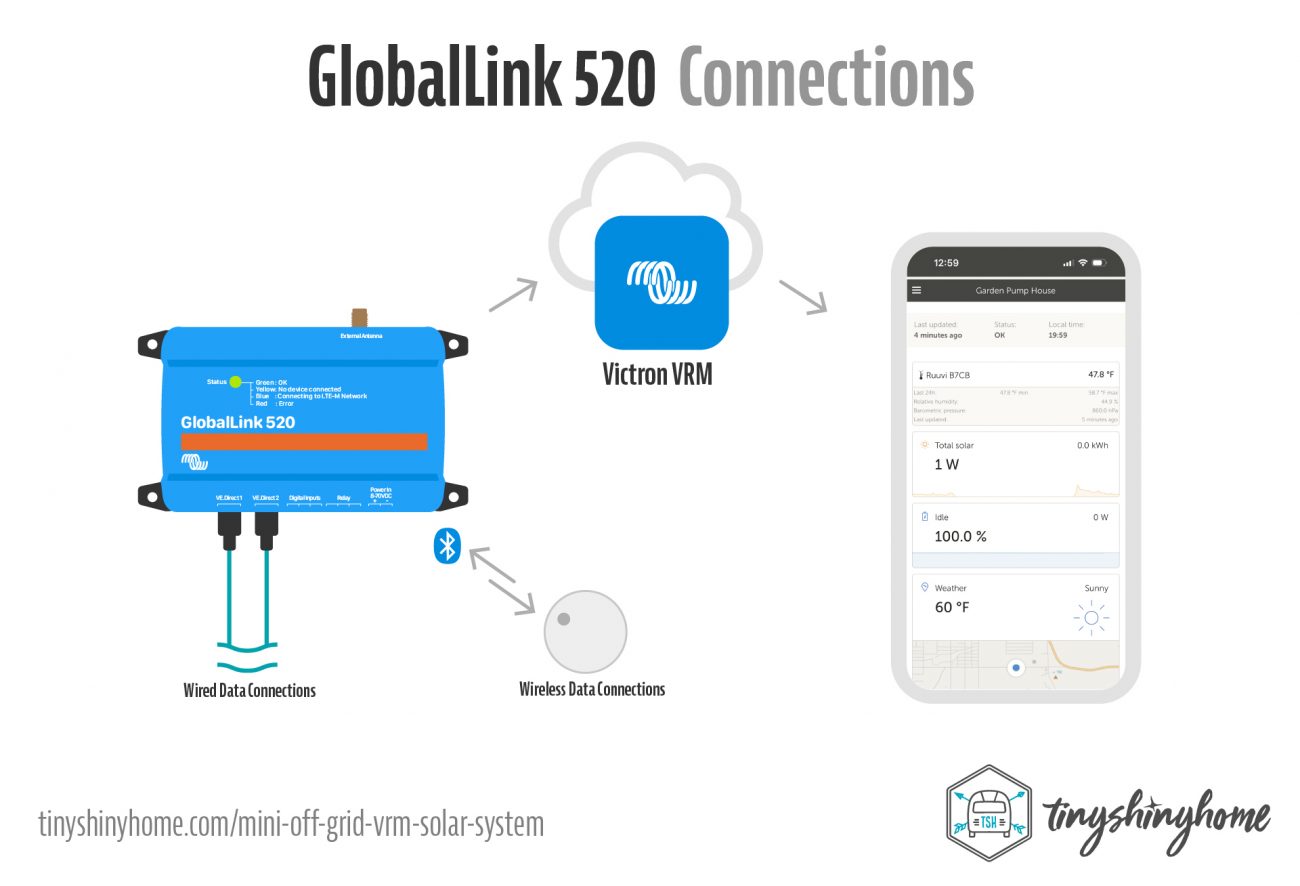
Recently, Victron upgraded the firmware on these units to allow even more components to connect via Bluetooth and pass the data to the VRM which expands the possibilities with this little unit quite a bit. I’ve got my eye on a compatible Ruuvi Humidity and Temperature tag. Would be awesome to know if a pump house is dropping below freezing inside and get a notification.
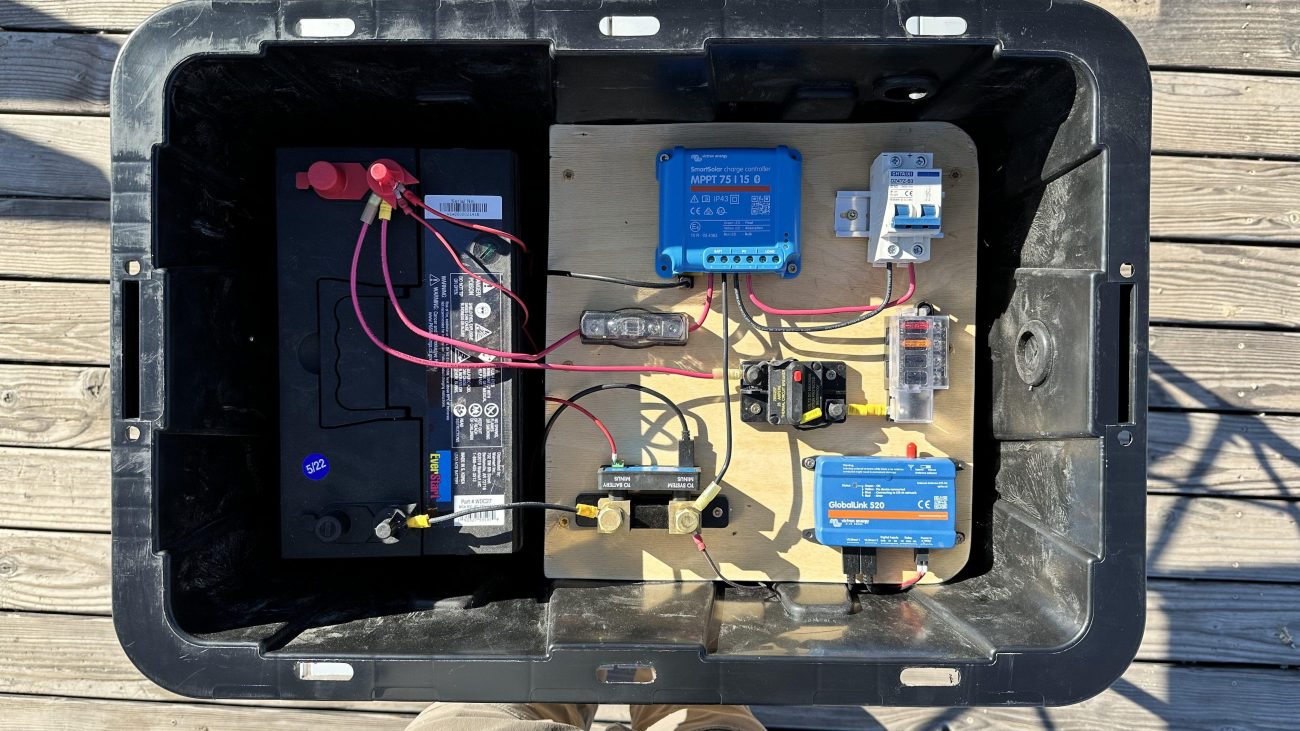
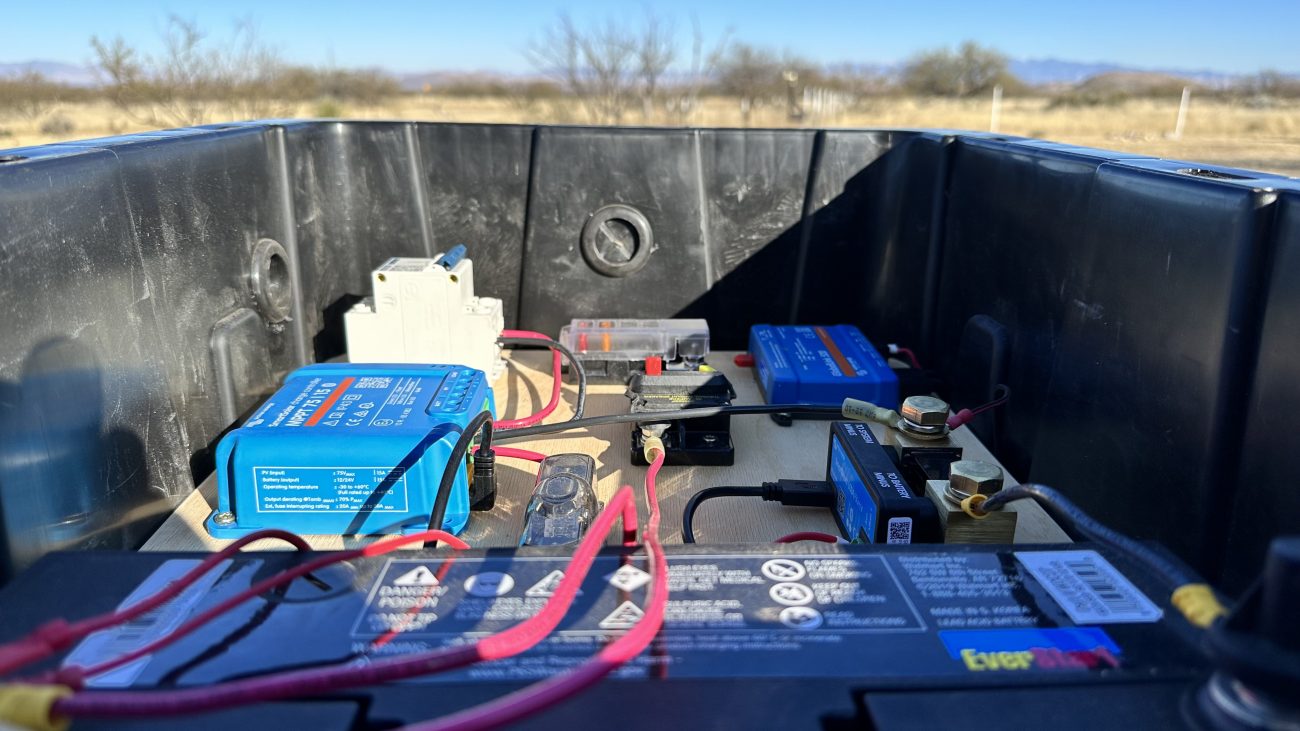
Self-Contained Power System Storage Tote
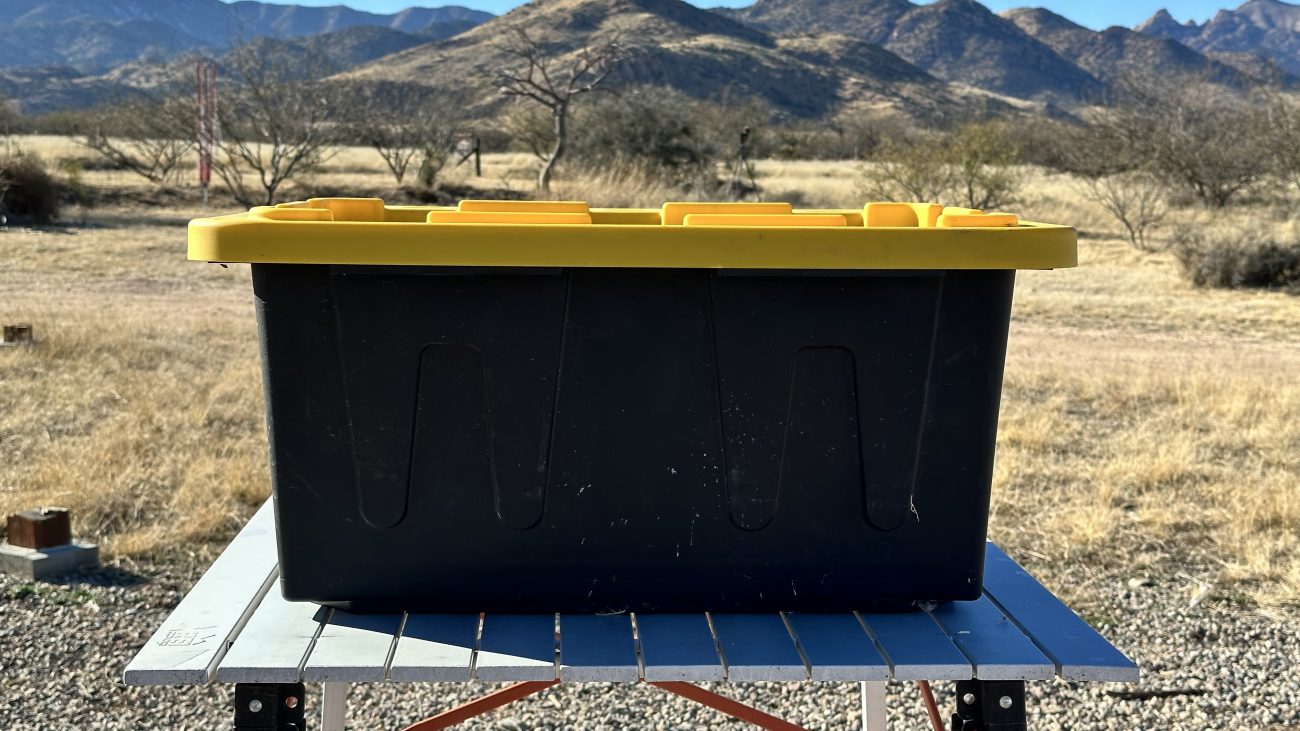
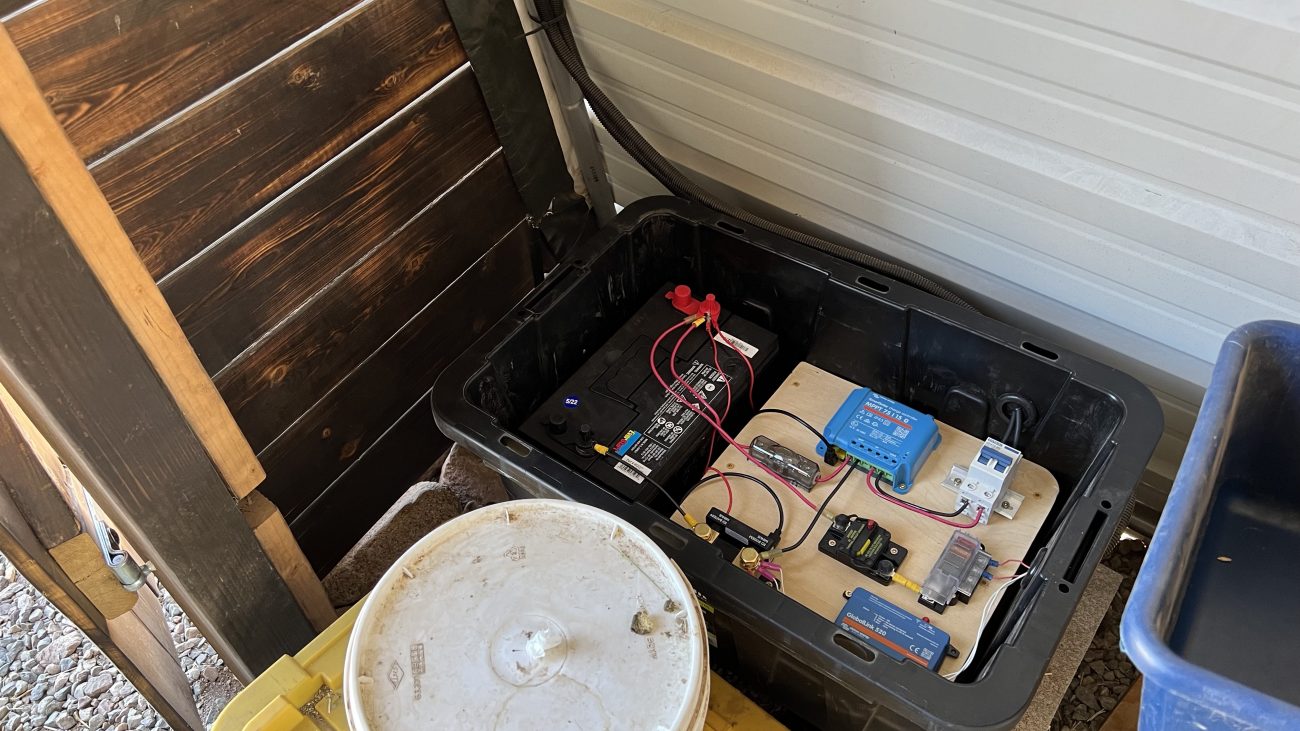
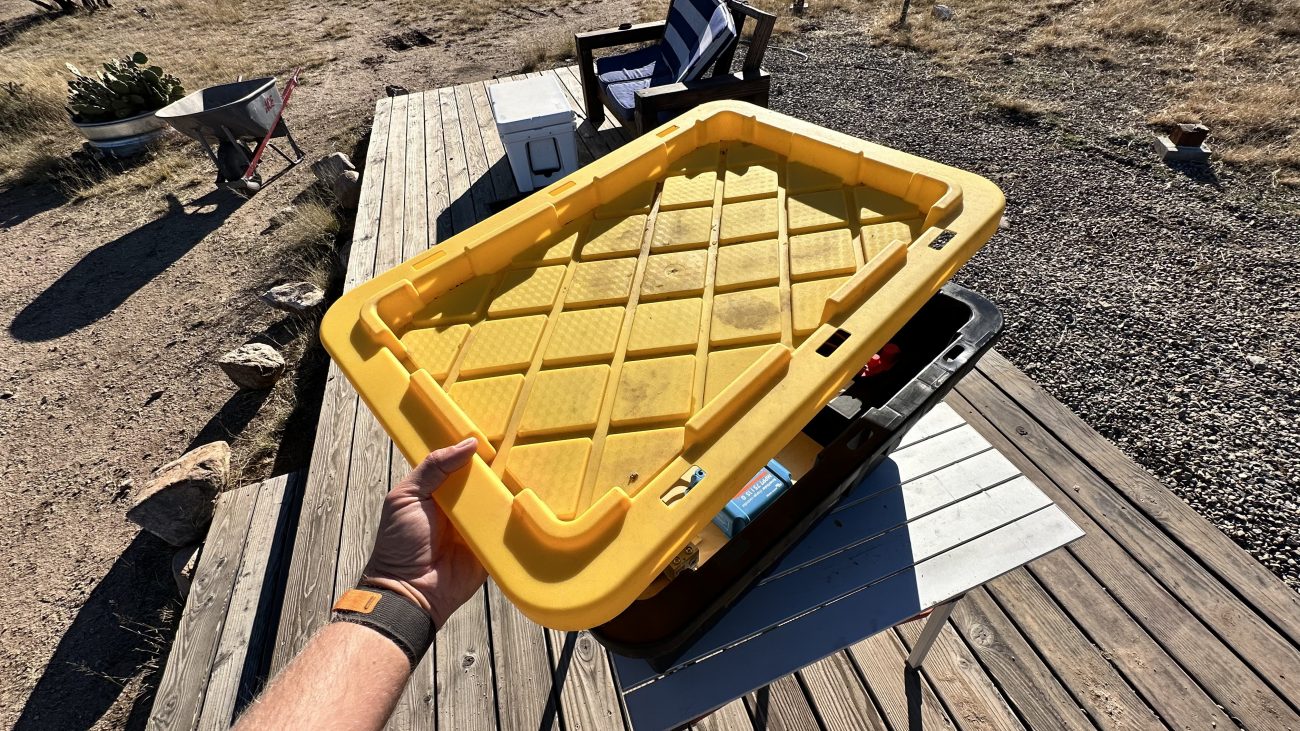
Since each of these 12V systems would be inside pump houses or dusty environments like our feed shed, I wanted a way to protect and contain all the components.
Turns out these plastic storage totes from the hardware store are a great off the shelf solution that don’t cost much. A 12"x26"x18" bin is the perfect size to put your battery and a few pieces of scrap wood for a mounting everything to for easy access.
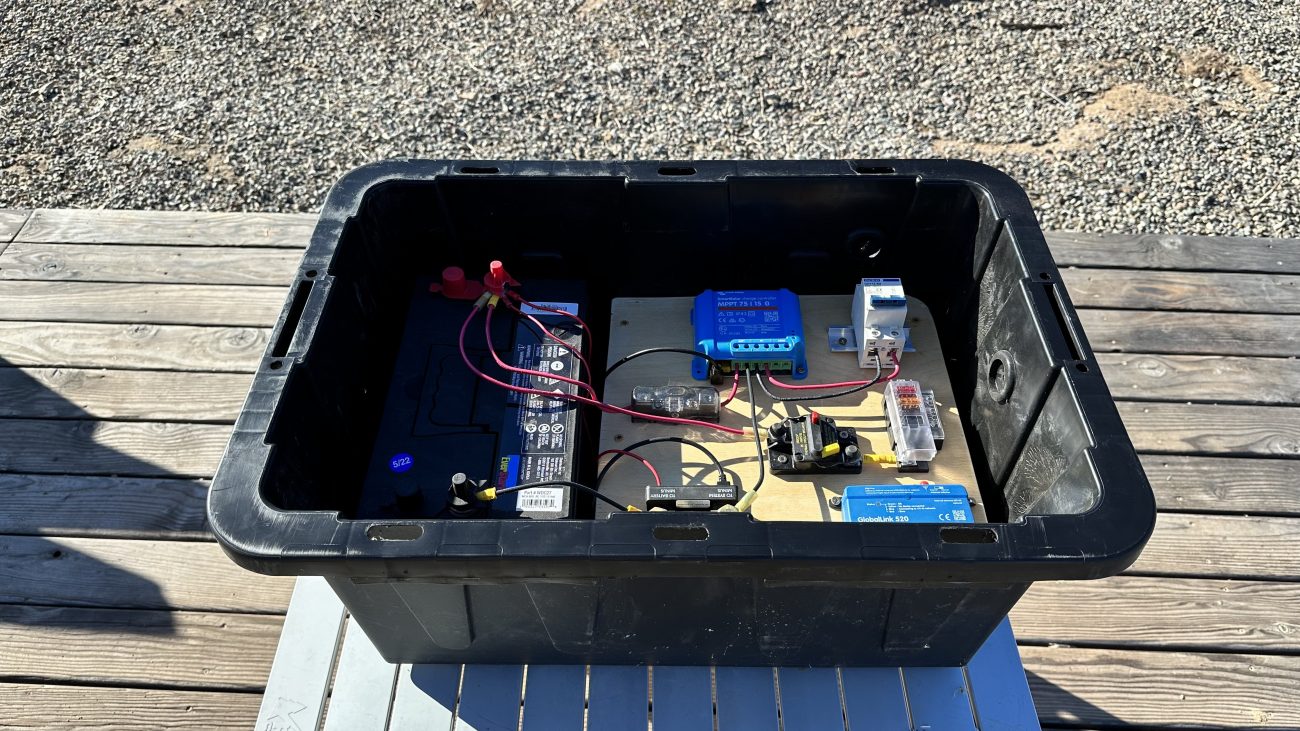
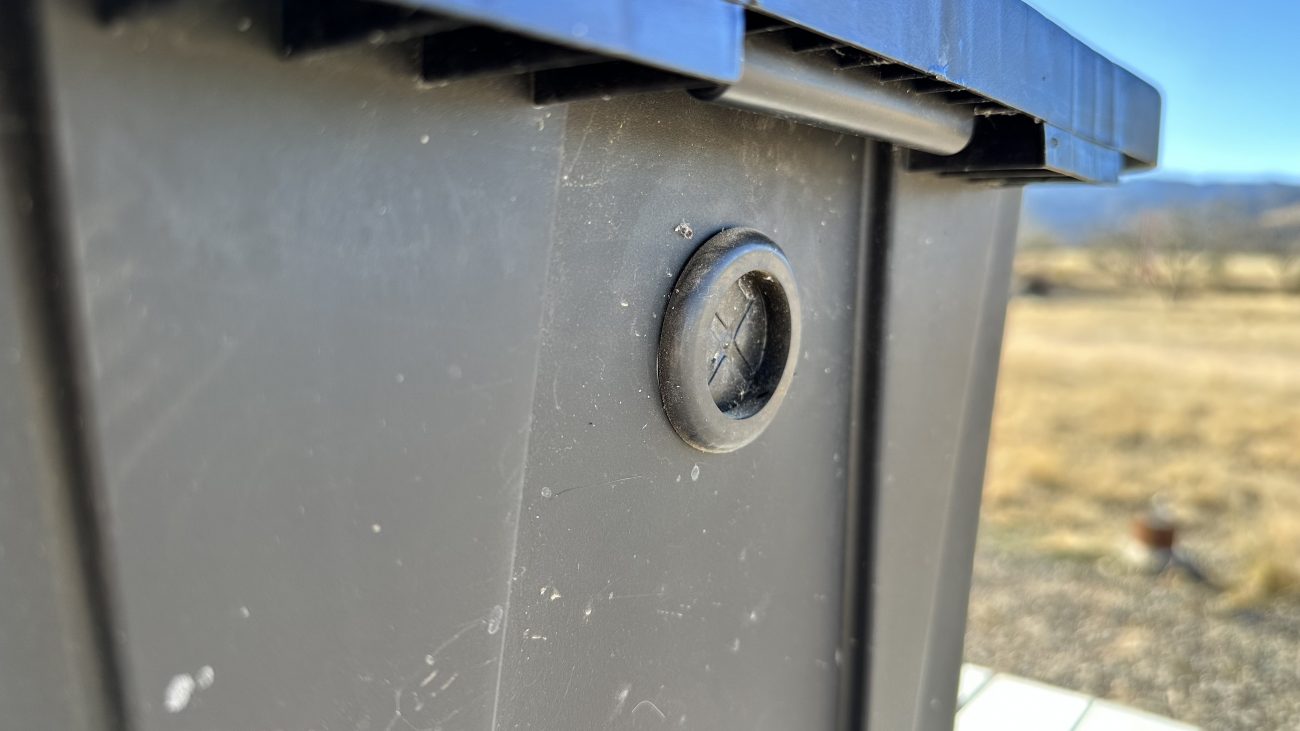
The walls are thin and easy to drill through to install rubber grommets to run wires through, and while they aren’t water or air tight, they do provide considerable protection for everything. Plus since the lid isn’t sealed, the battery can still vent. If you want to add more venting, it’s easy to cut a hole in the side and add your vent of choice.
This allows you to put everything except the solar panel in the box carry it wherever you want, then run the wires in when you’re ready.
All 3 of our mini VRM systems live in these boxes and we’re big fans.
Wiring the 12V Victron Solar System
Alright, let’s look at how this is all connected. Since everything in the storage tote is so close together, 10AWG or 12AWG wire should suffice for most connections. But of course if you’re running a high load over a long distance that should be sized appropriately.
Use this simple chart to calculate what thickness wire you need or check out this helpful deep dive for additional info.
Length |
Amps |
5A |
10A |
15A |
20A |
25A |
30A |
40A |
50A |
60A |
70A |
|
|---|---|---|---|---|---|---|---|---|---|---|---|---|
15ft |
16 |
12 |
10 |
10 |
8 |
8 |
6 |
6 |
4 |
4 |
||
20ft |
14 |
12 |
10 |
8 |
8 |
6 |
6 |
4 |
4 |
4 |
||
25ft |
14 |
10 |
8 |
8 |
6 |
6 |
4 |
4 |
2 |
2 |
||
30ft |
12 |
10 |
8 |
6 |
6 |
4 |
4 |
2 |
2 |
2 |
||
40ft |
12 |
8 |
6 |
6 |
4 |
4 |
2 |
2 |
1 |
1/0 |
||
50ft |
10 |
8 |
6 |
4 |
4 |
2 |
2 |
1 |
1/0 |
1/0 |
||
60ft |
10 |
6 |
6 |
4 |
2 |
2 |
1 |
1/0 |
2/0 |
2/0 |
||
70ft |
10 |
6 |
4 |
2 |
2 |
2 |
1/0 |
2/0 |
2/0 |
3/0 |
||
80ft |
8 |
6 |
4 |
2 |
2 |
1 |
1/0 |
2/0 |
3/0 |
3/0 |
||
90ft |
8 |
4 |
4 |
2 |
1 |
1/0 |
2/0 |
3/0 |
3/0 |
4/0 |
* Numbers in AWG unless otherwise noted. Wire size based on a 3% or (0.36 V) voltage drop for 12V. Always oversize wires if voltage drop is critical.
I wish each connection was consistent, but you’ll be encountering everything from crimp on ring connectors to spade or butt terminals to screw clamps. I recommend having wire strippers, crimpers, screwdrivers, and a box of connectors on hand.
We mentioned earlier we were using a 240W used solar panel from SanTan Solar. It runs at 37V or 8A and generally PV wire is 10AWG.
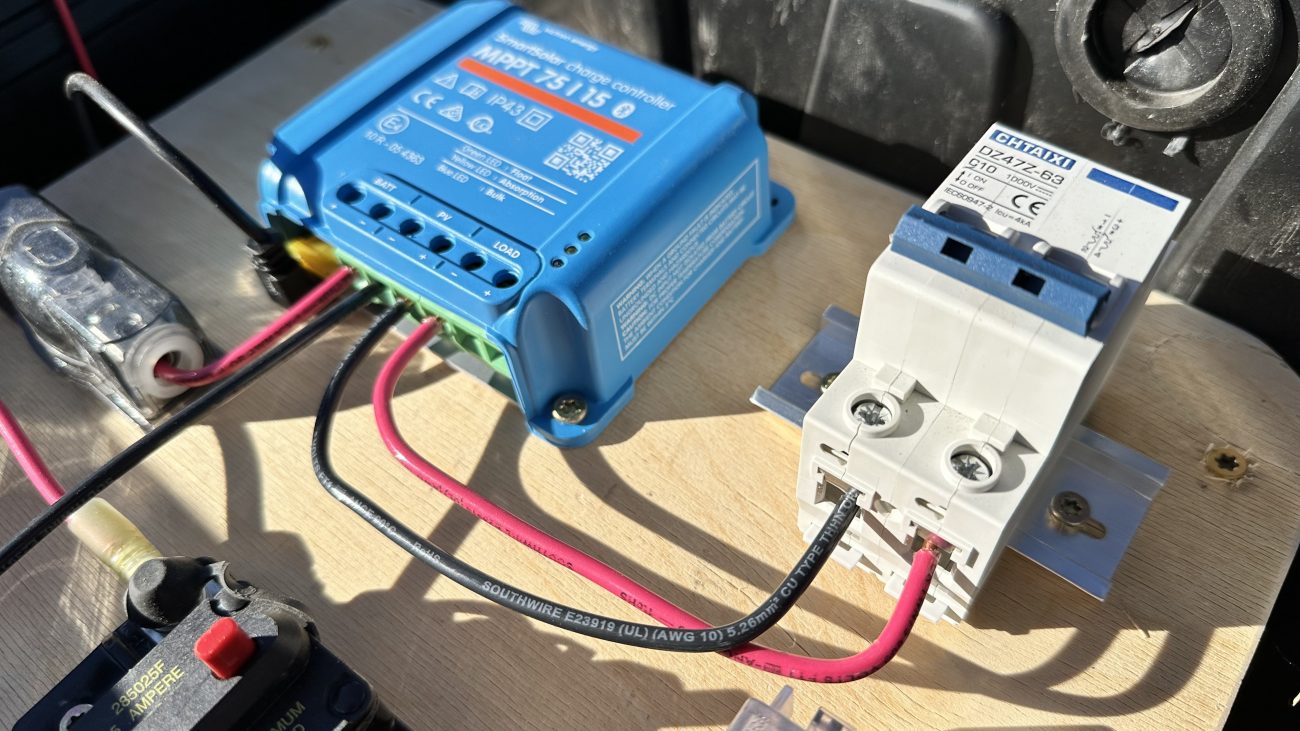
Step 1 - You want to start by running the PV positive and negative wire to a 2 Pole 10A Circuit Breaker. This is to protect the charge controller from any spikes coming from the panel.
Step 2 - From the breaker we go to the positive and negative PV in connections on the Victron Smart Solar MPPT 75V/15A.
Step 3 - Coming out of the charge controller, the positive wire runs through a 25A Mini ANL Fuse and cover to the positive post of the battery.
This is an additional source of protection for the battery from any spike that might come from the charge controller.
Step 4 - From here we come off the positive post of the battery through a 25A DC Circuit Breaker.
Step 5 - Then we add a small fuse block or load center. This will allow us to isolate each item we want to connect and fuse them individually.
Now for the rest of the Victron Gear.
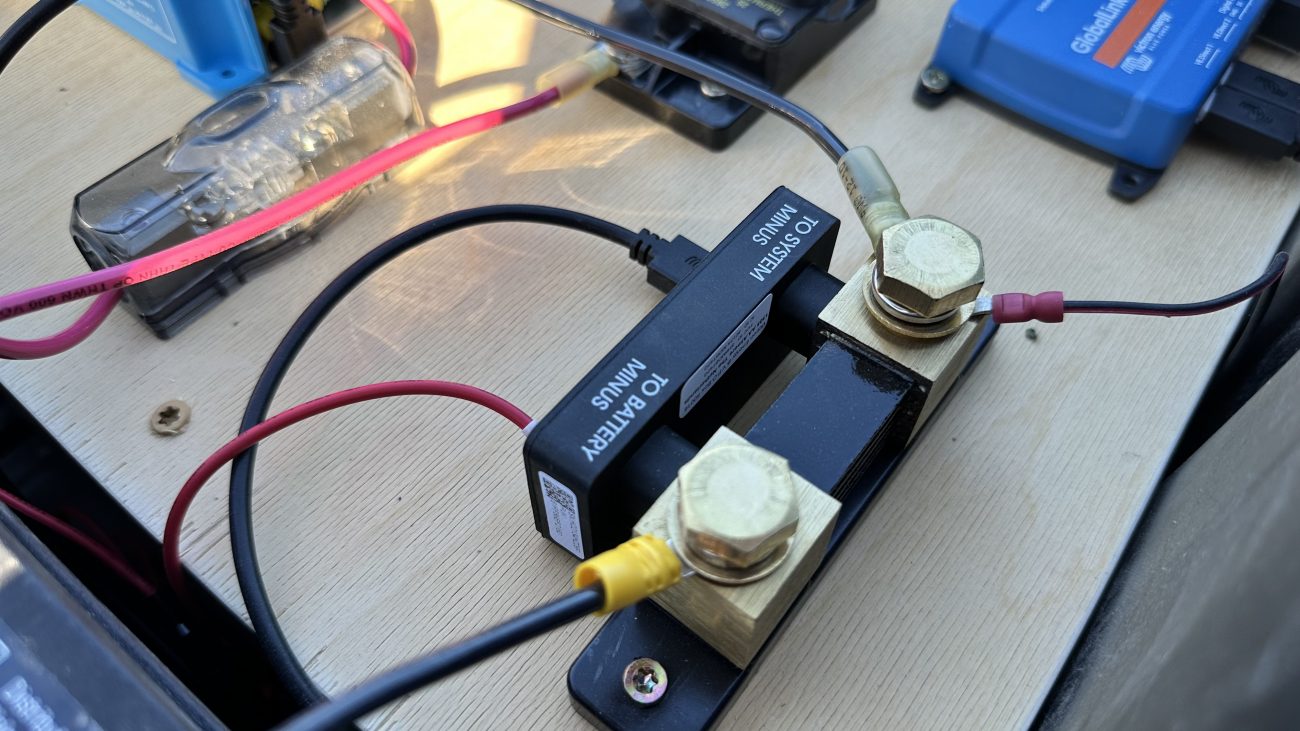
Step 6 - The Victron Smart Shunt connects its battery minus side directly to the negative post of the battery. The system minus side is where all other negative wires will connect together. There’s also a VBatt+ wire that connects directly to the positive battery post.
Step 7 - Finally, the GlobalLink 520 is hardwired directly the positive and negative posts of the battery so it always has power. At this point you can also connect the Solar Charge Controller and Smart Shunt to the GlobalLink with VE.Direct cables so they all start talking to each other.
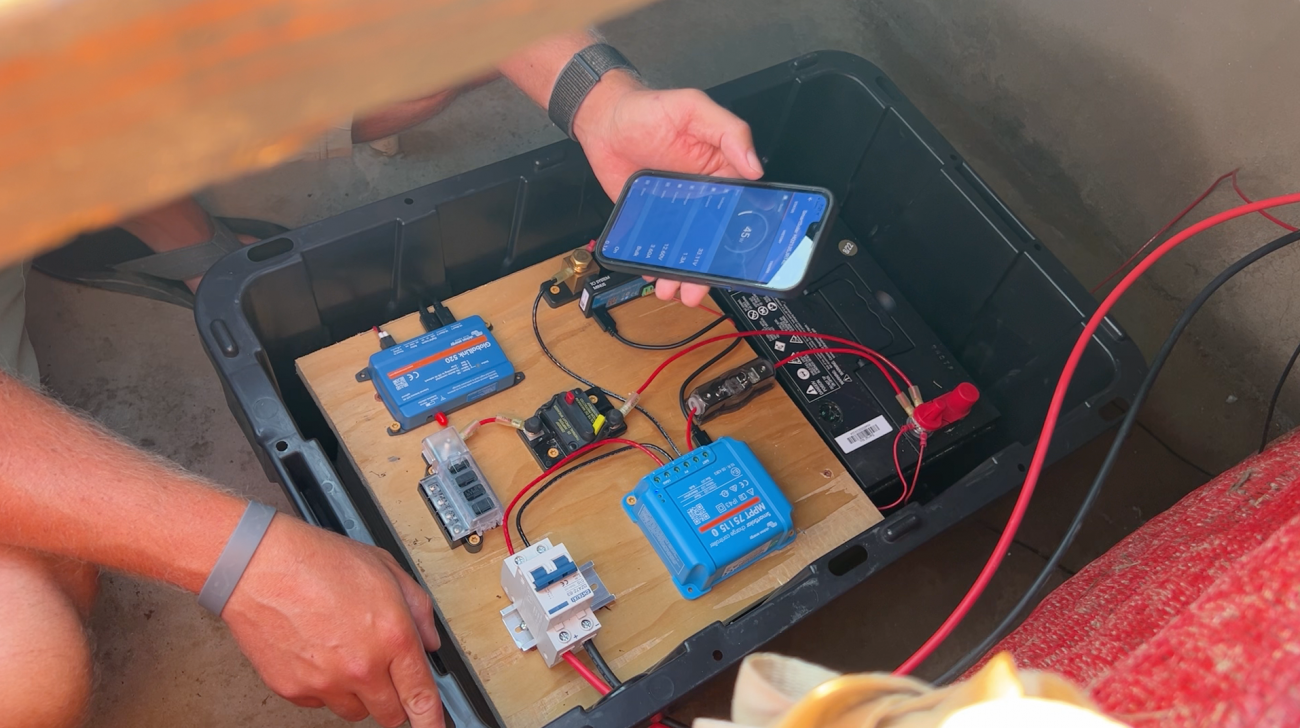
Settings
Before we connect any loads, let’s tweak our settings on the Victron components. The easiest way to change settings is to use the Victron Connect App on a smartphone or tablet. This is done via Bluetooth so you just have to be close by and you’ll see the option to connect.
Funny story - I bought my Lead Acid batteries at a local Walmart, called up maker of the battery (Everstart) to see if I could get some specific numbers from them - and the support person I talked to had absolutely no idea what settings I should use. Didn't have a spec sheet to reference or any information online. Not very helpful! So we'll be going with generic 12v Lead Acid battery settings.
Victron SmartShunt Settings
First, we want to tell the system the voltage and capacity we’re dealing with. In our case that meant:
- Battery Capacity: 100Ah
- Charged Voltage: 13.2V
We didn’t feel the need to change any of the other settings and left them as is.
Victron Smart Solar MPPT 75V/15A Settings
Then we want to tell the charge controller how to charge the battery.
- Battery Voltage: 12V
- Tap “User Defined” for Battery Preset
- Absorption: 14.3V
- Float: 13.4V
- Equalization: 14.3V
The rest of the settings we left as is.
Victron GlobalLink 520 Settings
Finally, we would need to connect this device to our Victron VRM Portal. If you don’t already have a VRM account, make sure to create that first. Then click “Add Installation” and choose the GlobalLink 520 Icon.
It’s going to ask you for the VRM Portal ID that is located on the back of the GlobalLink. It might be on the box as well, but learn from my mistake and take a picture of this number before you do your full install.
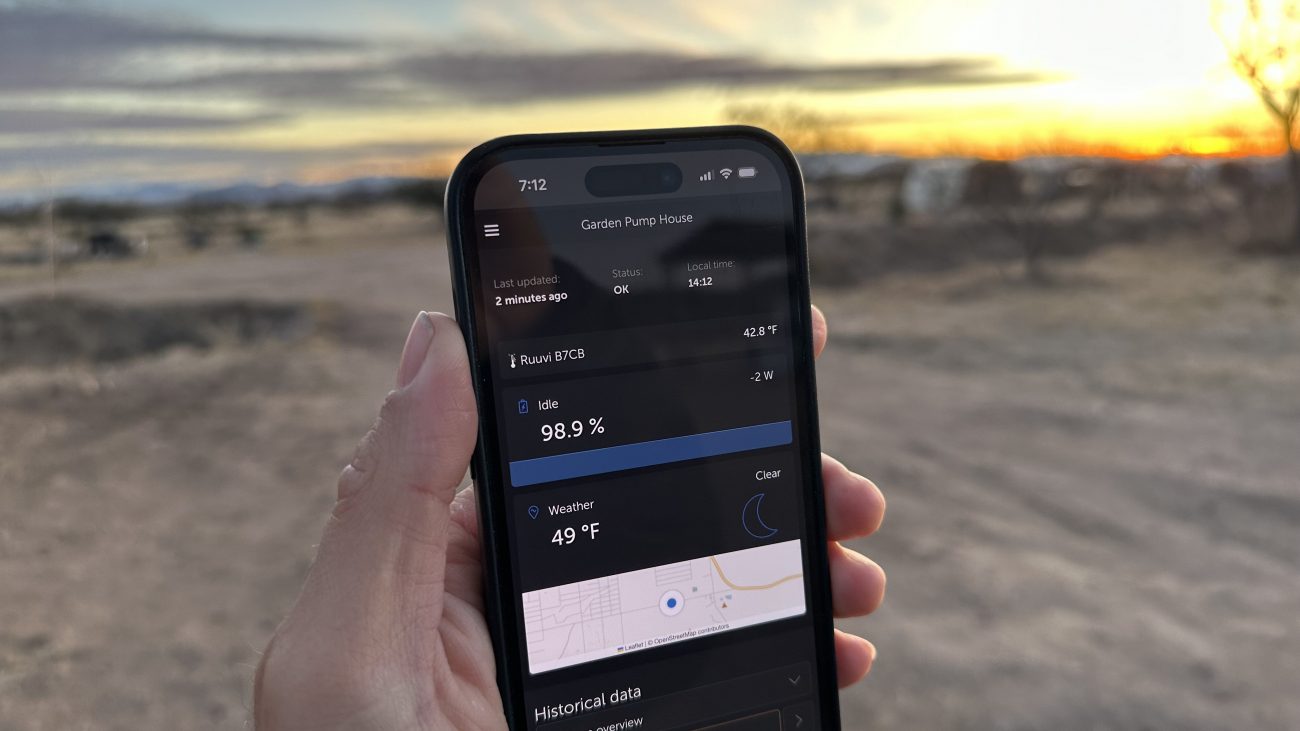
Pop in that number, give it a name, and as long the GlobalLink is connected to the LTE-M network, you should see it load in your VRM. That’s it!
To keep data usage low, the GlobalLink updates every 15 minutes, and you’ll see your solar input wattage and battery state of charge. And now that you’re connected to the VRM you can setup your own custom alarms and notifications or turn on custom widgets and run reports.
Ruuvi Temperature Alarms
I mentioned earlier that I had my eye on some Ruuvi Humidity and Temperature sensors since Victron had updated the GlobalLink 520 to connect with them wirelessly. Well, I couldn’t contain my curiosity any longer and ordered some while I was working on this installation guide.
I wanted to use these devices to keep tabs on the temperature inside our pump houses - even going so far as to setup VRM notifications for freezing conditions.
Here’s how it works. First download the Ruuvi app on your phone (iOS or Android), then pull the plastic battery stopper out, and find the device via the app. Here you can setup some settings, and give it a name - but really what you are doing is activating it so that the GlobalLink can see it.
Now go place it near your GlobaLink. Open the Victron Connect App on your phone, and connect to the GlobalLink. Go to Settings > Smart Devices and wait a minute for the Ruuvi Tag to show up. Activate it, and that’s pretty much all there is to it. You’ll need to wait until the VRM refreshes to see anything (remember, it updates every 15 minutes) - but then the temperature sensor will show up on your dashboard.
To create custom notifications, go into that installation in the VRM, Settings > Alarm Rules. Select “Add New Alarm Rule”, choose the Ruuvi Tag as the device, then the Temperature parameter, then set your specific amounts on the next screen.
This was confusing for me - I initially set my temps in Fahrenheit, but the VRM seems to only read this setting in Celsius. So these were my final settings:
- Low: -2
- Clear low alarm above: 0
- High: 43
- Clear high alarm above: 37
Then just make sure you have your notification settings turned on to deliver via email or push on your phone. Fancy!
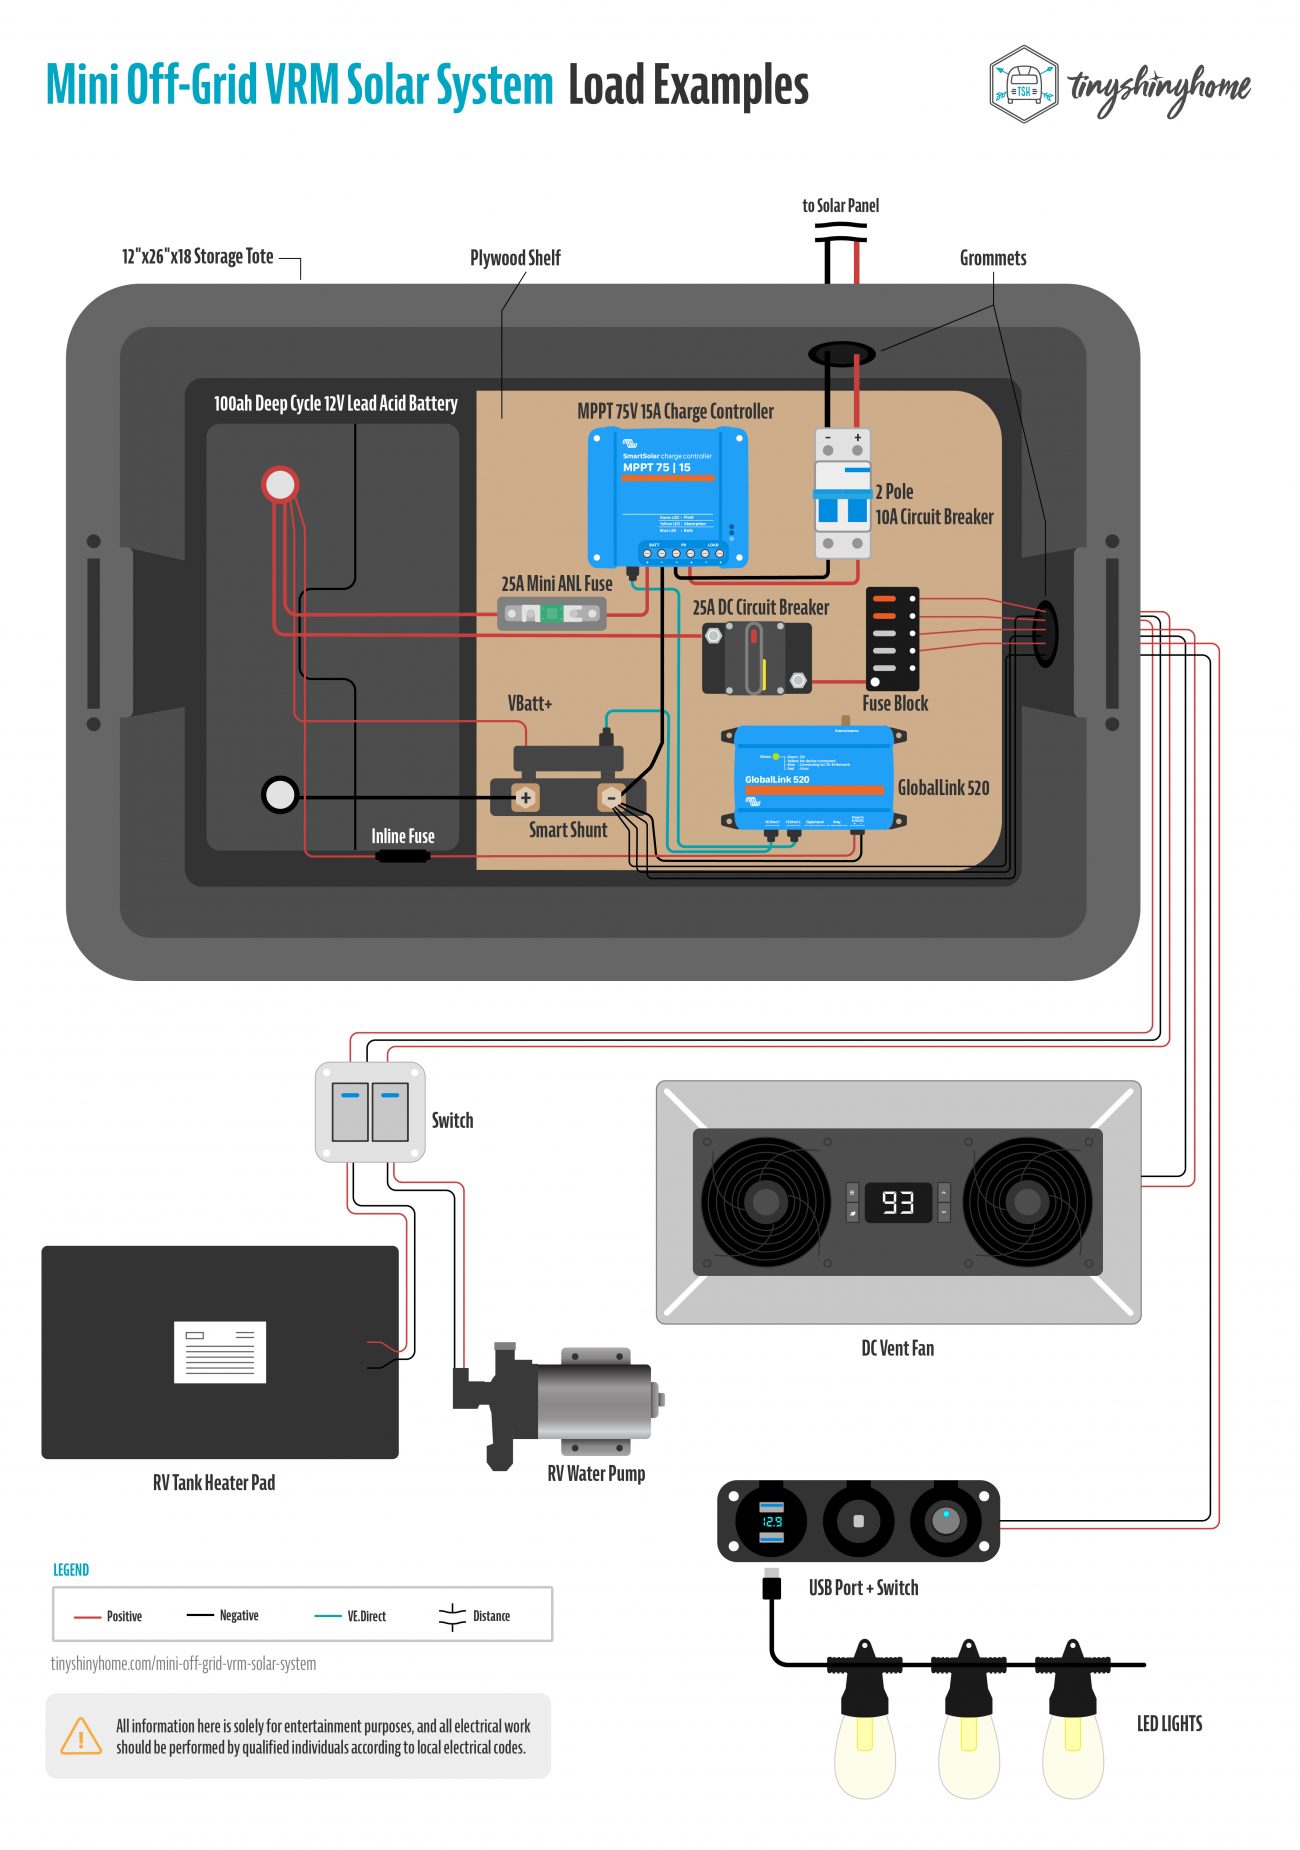
Connecting 12V Loads
Now that the main system is connected, it’s time to add your loads. From a high level standpoint, you’re going to be connecting the positive wire from your item to an individual spot on the load center and then adding the proper sized blade fuse (1.25x the max amperage it should draw). The negative wire will go to the system minus side of the Smart Shunt.
I’ll walk you through a few examples of how we are using our systems, but really what you connect and how you use it are totally up to you.
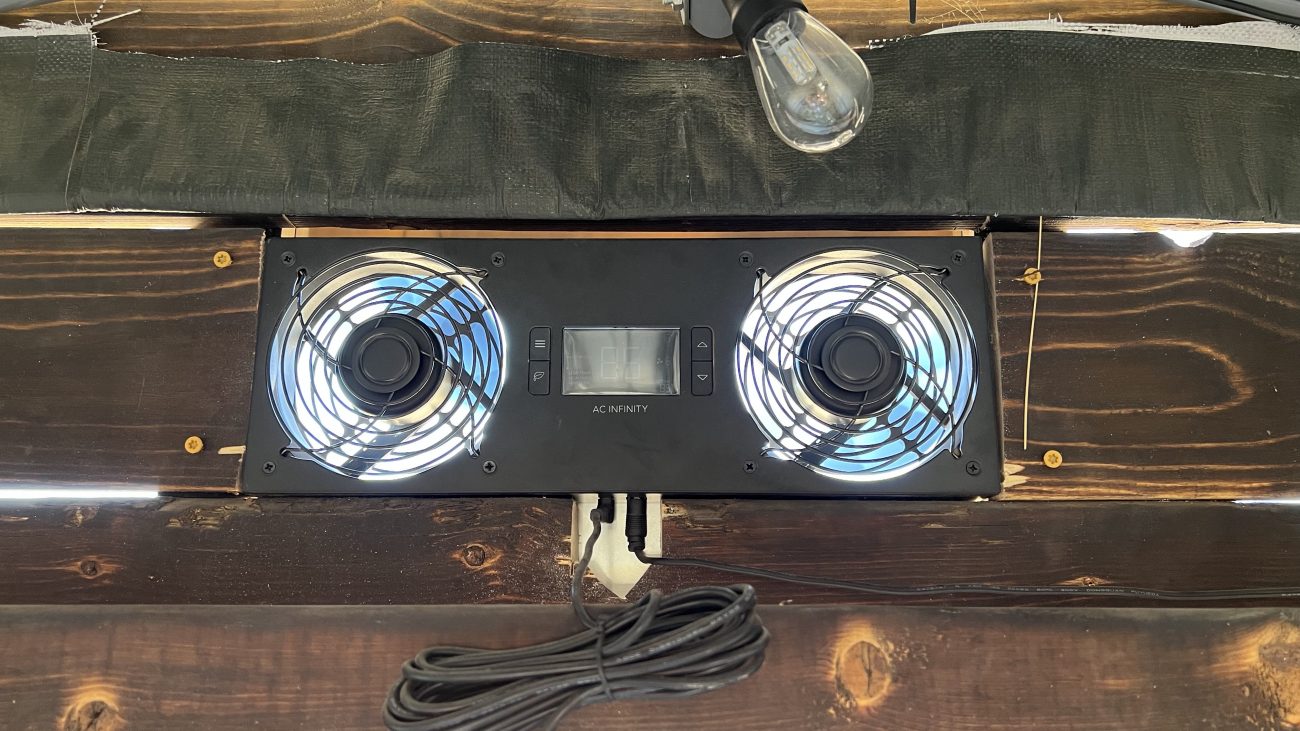
Venting Fans
This AC Infinity AIRTITAN T8 was the perfect size to fit over our barn doors in our feed shed, used DC motors so all I had to do was chop off the AC power brick and wire directly to the 12V system, and it has a temperature and humidity sensor with programmable alarms and settings to tell the fan to come one exactly when we want it to.
USB LED Lights with Switch
We found these super simple string lights that run very low power, have shatter proof bulbs, and connect using a USB connection. Technically USB is 5V so we needed a 12V USB outlet, and the model we found even had a switch for the whole thing. This worked out perfectly as an easy to access light switch for whoever was using the shed. We also used the same lights and switch for our chicken coop. These are very easy to wire as they come with most of the connections already installed. We just needed to run a positive and negative wire to the switch and plug in the lights.
12V RV Water Pump
Creating pressurized water from a holding tank was the main reason we even started making these small 12V systems. At the time, we didn’t even have AC power on the property and needed a way to get pressurized water to our trailer. Since then, we’ve seen the value of having redundancy and making sure our water source isn’t connected to a single main power source.
This Shurflo 3.5gpm 12v Pump is a little power house. We’ve been using one in our renovated vintage Airstream for 5 years without a hiccup. Then we put one in our first solar power pump house over 2 years ago and have pumped thousands and thousands of gallons without any issues. Highly recommended especially if you combine it with a larger pressure or accumulator tank. Anyway, we usually run these through a switch for easy access, and it’s just a matter of connecting the positive and negative wires together.
RV Tank Heater Pad
Something we’ve been trying recently is looking for a low power way to keep the inside of our pump houses warm enough in the winter so they don’t freeze. The jury’s still out on whether these tank heater pads actually do their job, but theoretically they should come on when it gets cold and provide some warmth near your water lines.
Similarly, you just need to connect the positive and negative wires, and can also run through a switch if you want.

Cost Breakdown
So what should the whole system run you? Great question. Here’s a detailed breakdown:
Item | Cost |
|---|---|
| $19.00 | |
| $45.00 | |
| $8.00 | |
| $40.00 | |
| $30.00 | |
| $34.00 | |
$120.00 | |
| $16.00 | |
| $119.00 | |
| $130.00 | |
| Victron GobalLink 520 | $230.00 |
| $13.00 | |
| $5.00 | |
| $46.00 | |
| $25.00 | |
Total | $880.00 |
So it’s not the cheapest, obviously. Again, you can do this much more simply - but if you’re looking for a way to connect a small system to a remote management portal we think this is a great way to do it.
It’s great having rock solid cell based connections to pass our data to the cloud and be able to view the status of each system at any time.
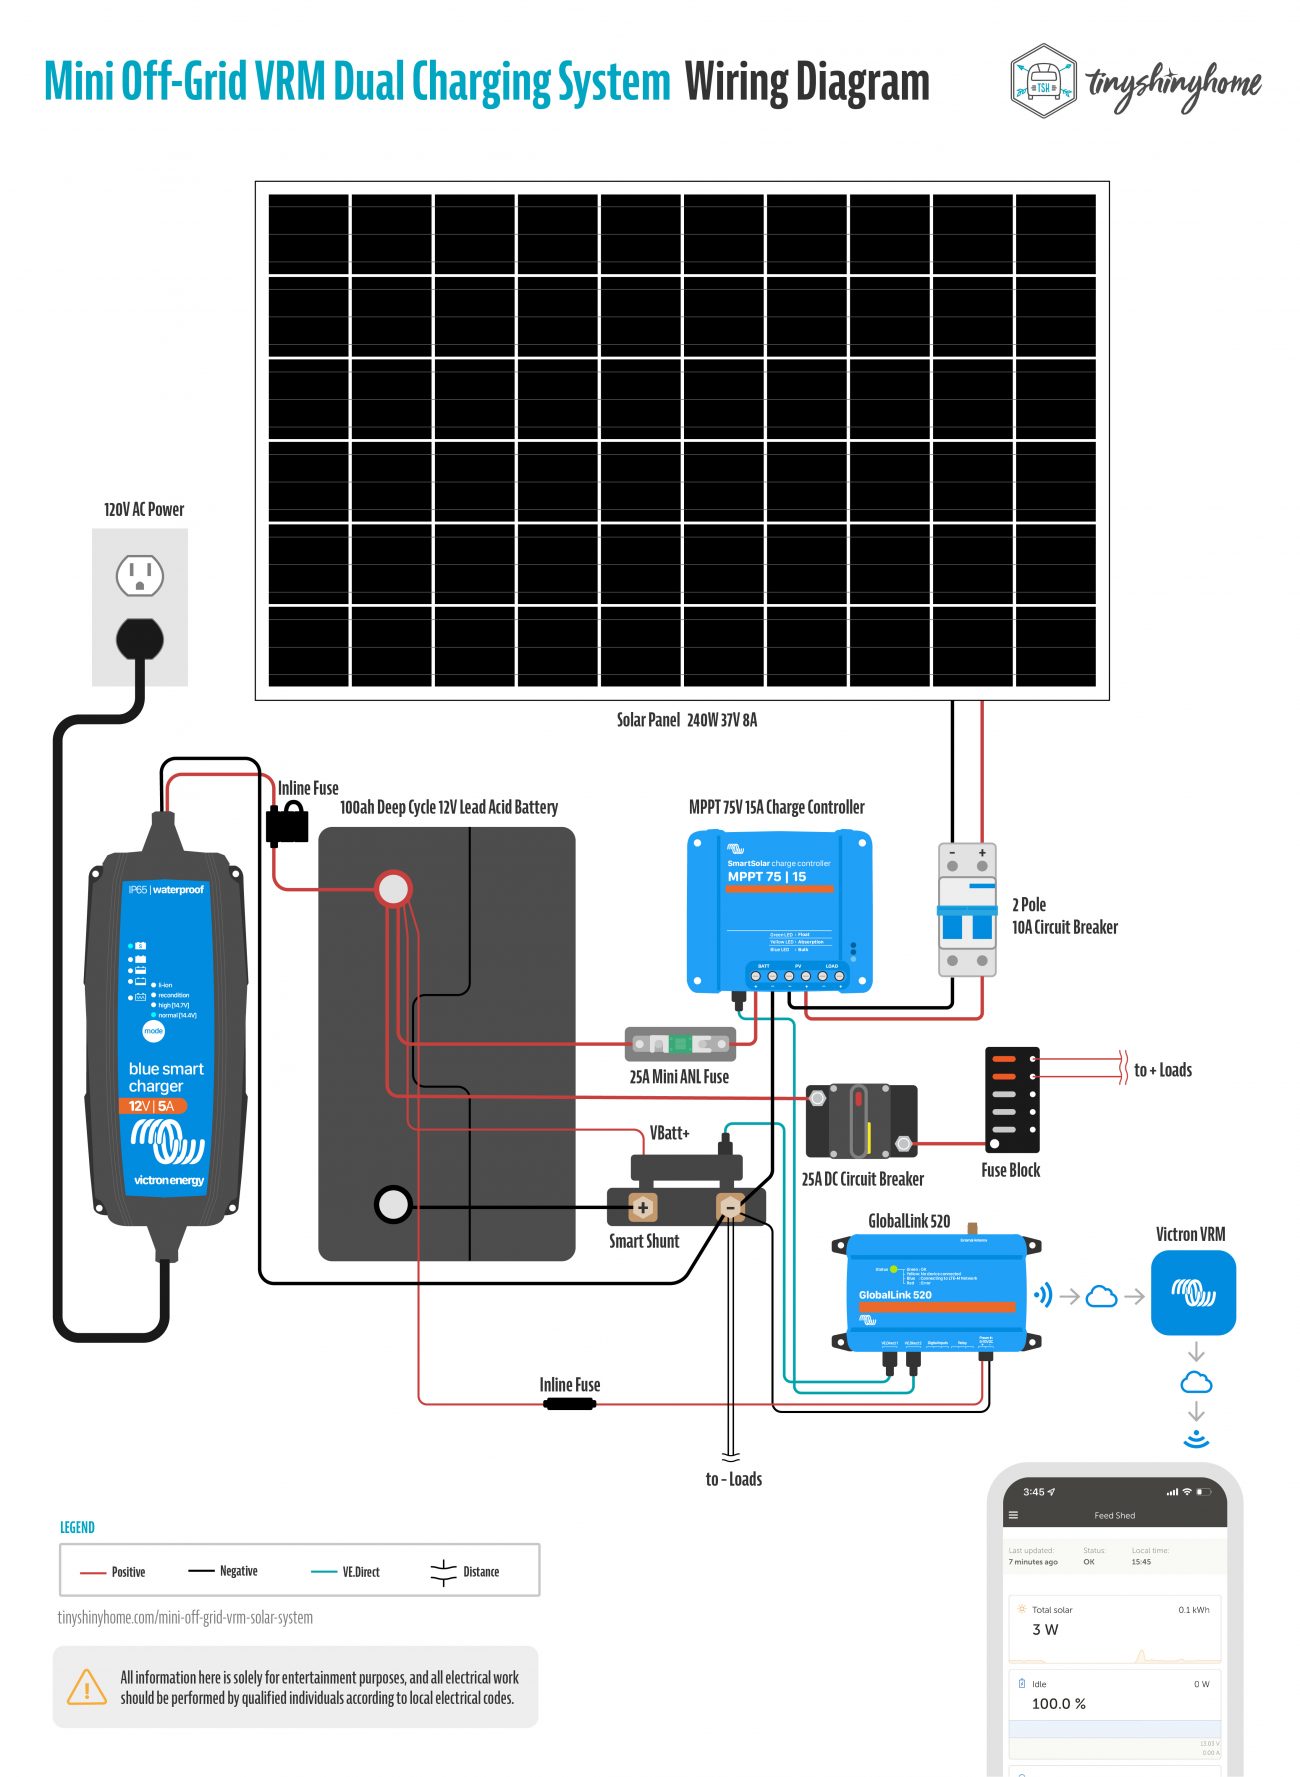
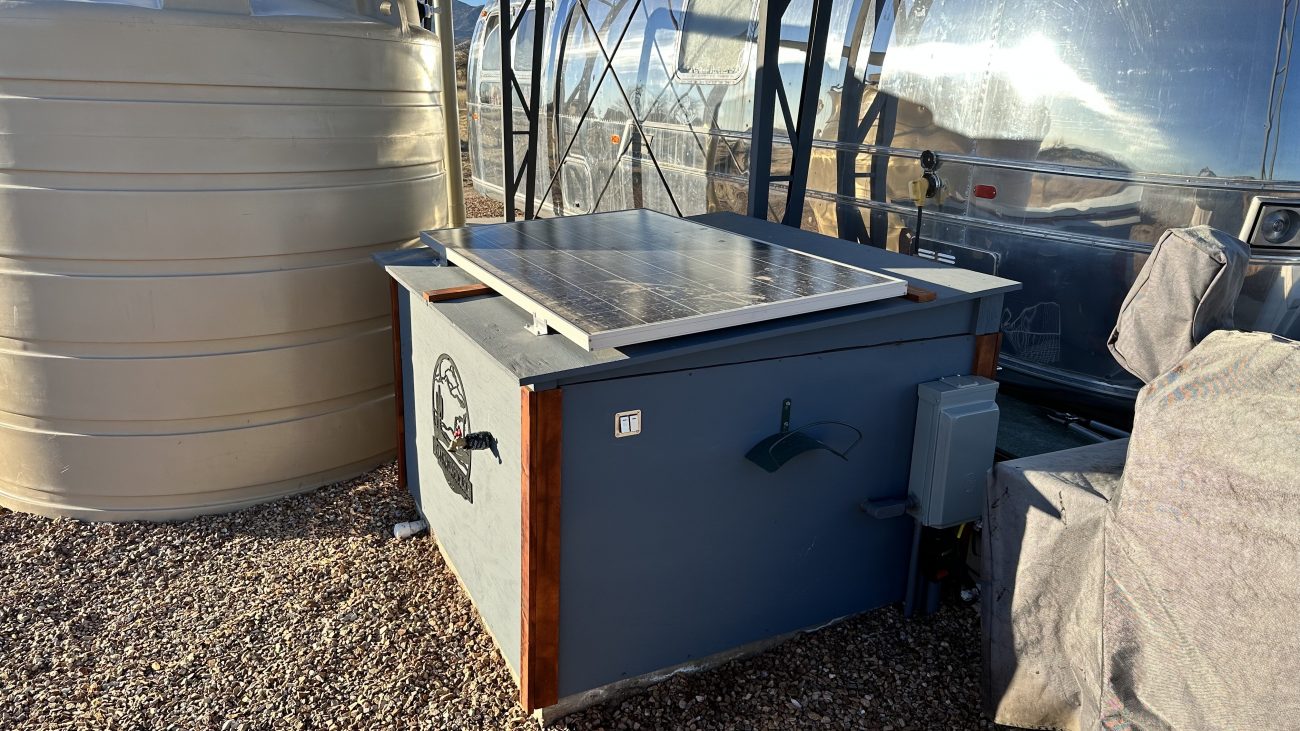
What if you have AC Power?
During our most recent project - moving our Airstream to a permanent covered location - we found ourselves in a situation where we actually had AC power available at our pump house.
We could have switched the whole system to run on 120V power, but decided instead to create a dual charging 12V system. Everything would stay the same except we would add a Victron Blue Smart IP65 Charger that would plug into a standard outlet and connect directly to the battery to keep it topped off.
That way if the AC power ever went out the solar panel would continue to do its job and charge the battery.
The Charger comes in several options and sizes - we went with the 120V 5A version since it would just need a trickle charge, and kept it on the default settings.
Wrapping Up
Who knew such a tiny 12V system could get so detailed? I’m not sure how I keep talking myself into writing these super nerdy posts, but here we are again.
I hope our installation breakdown and wire guide give you a better understanding of how to build your own remote mini 12V system that relays data back to you for monitoring.
If you found this interesting I have to let you know that we’re just getting started here on our off-grid homestead. Besides building all sorts of unique, sustainable structures we’re setting up rainwater catchment, lots of fun power installs, and so much more. Make sure you’re subscribed so you don’t miss our next project.
Until next time!

Apparel
Grab a fun, comfy t-shirt & help support our family.


About the Author
Jonathan Longnecker is the strongly opinionated tattooed and bearded half of Tiny Shiny Home. He loves making music, figuring out nerdy solutions, exploring the outdoors, and living off-grid.
comments powered by Disqus


