ShelterLogic Tent Permanent Rebuild for High Winds & UV in the Desert - Barn Doors, Earthbags, Metal Panels, & Solar
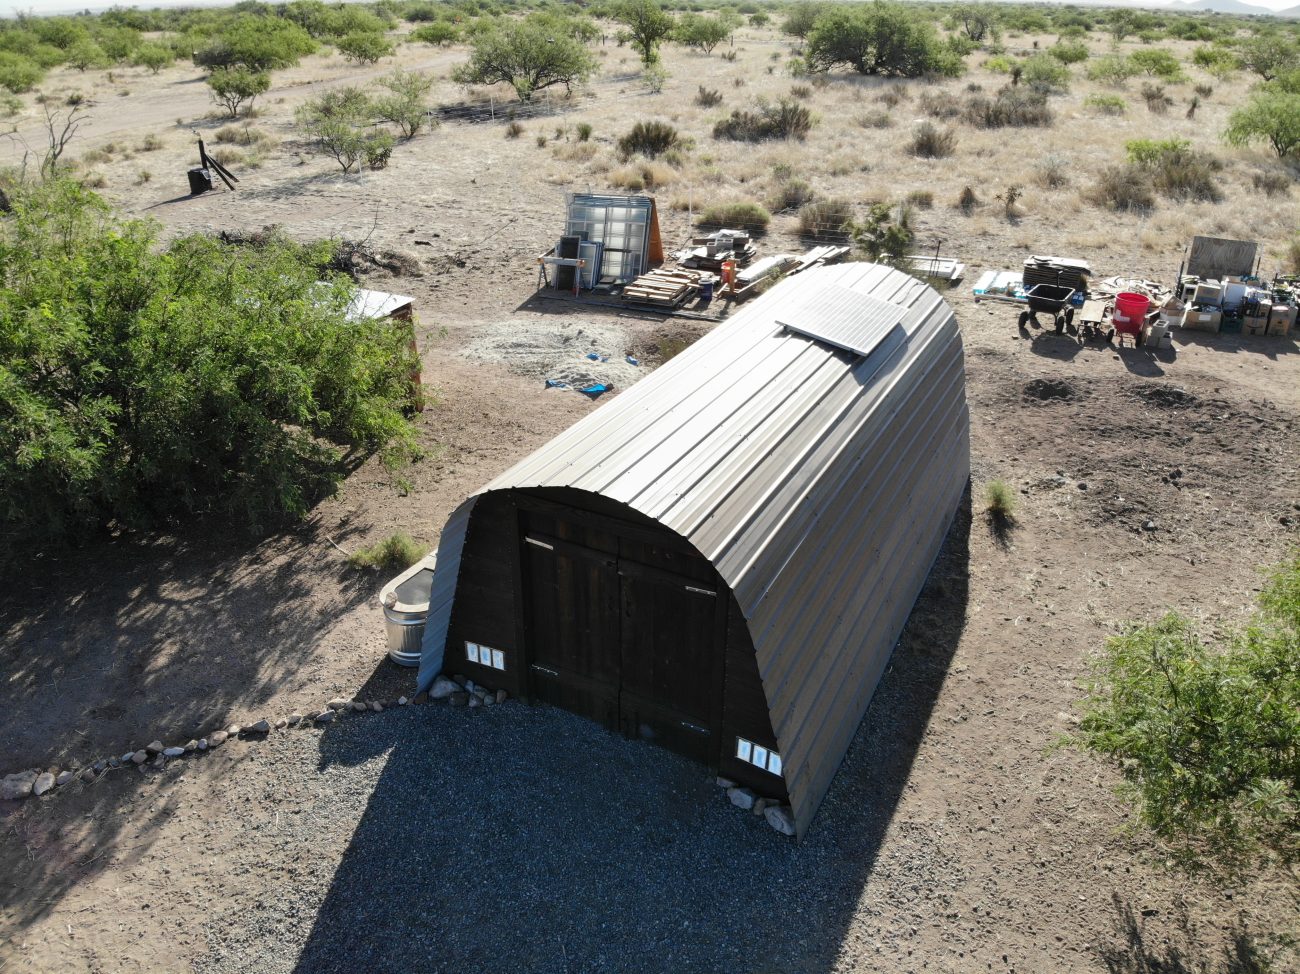
Welcome, friends! We've spent the last several weeks re-building our ShelterLogic Garage-in-a-Box tents to withstand the high UV and 100+mph wind events of the high desert here on our off-grid desert homestead. We did this by building barn door facings, hyperadobe earthbag walls, adding metal roofing panels, and giving them their own mini solar powered systems for good measure.
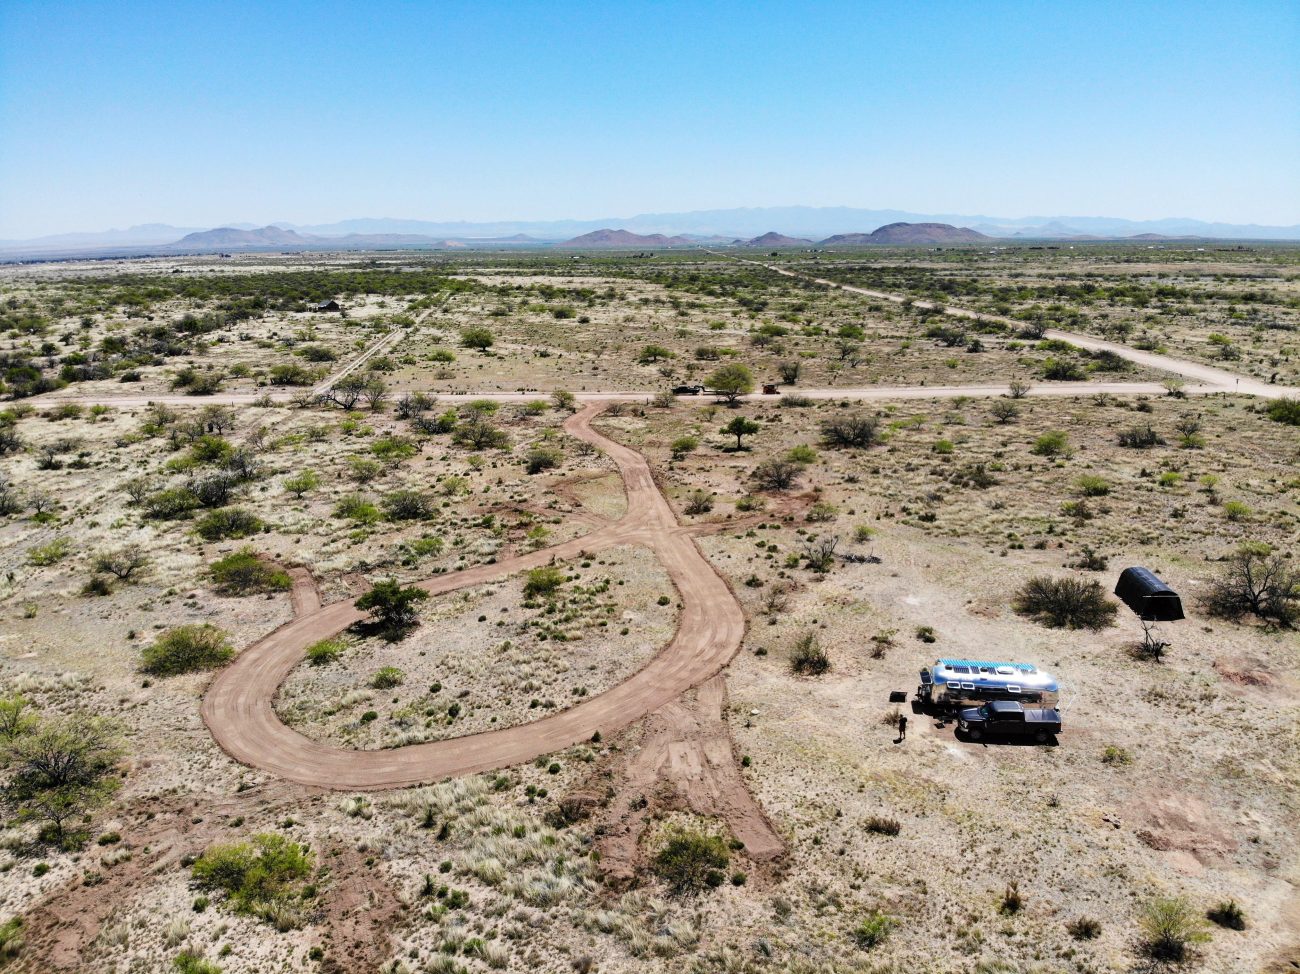
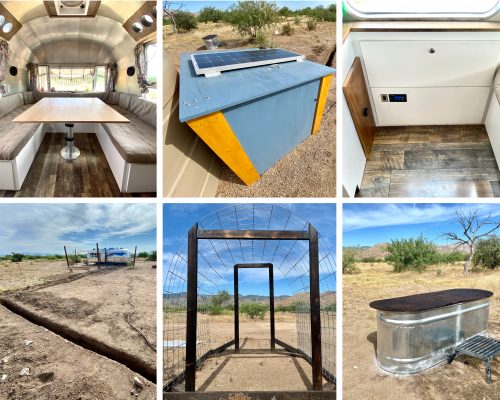
But first a little backstory. Our family is building an off-grid desert homestead from the ground up here in Cochise County, AZ. When we moved onto our raw land, we were coming off 5 years of full-time travel, and only had what we could fit in our truck and renovated Airstream.
But building property from scratch means your minimalism quickly goes out the window. Literally the day after we parked our trailer, we setup and installed a ShelterLogic Garage-in-a-Box to house our tools, water tank, and what we knew would be a whole lot more stuff in the near future.
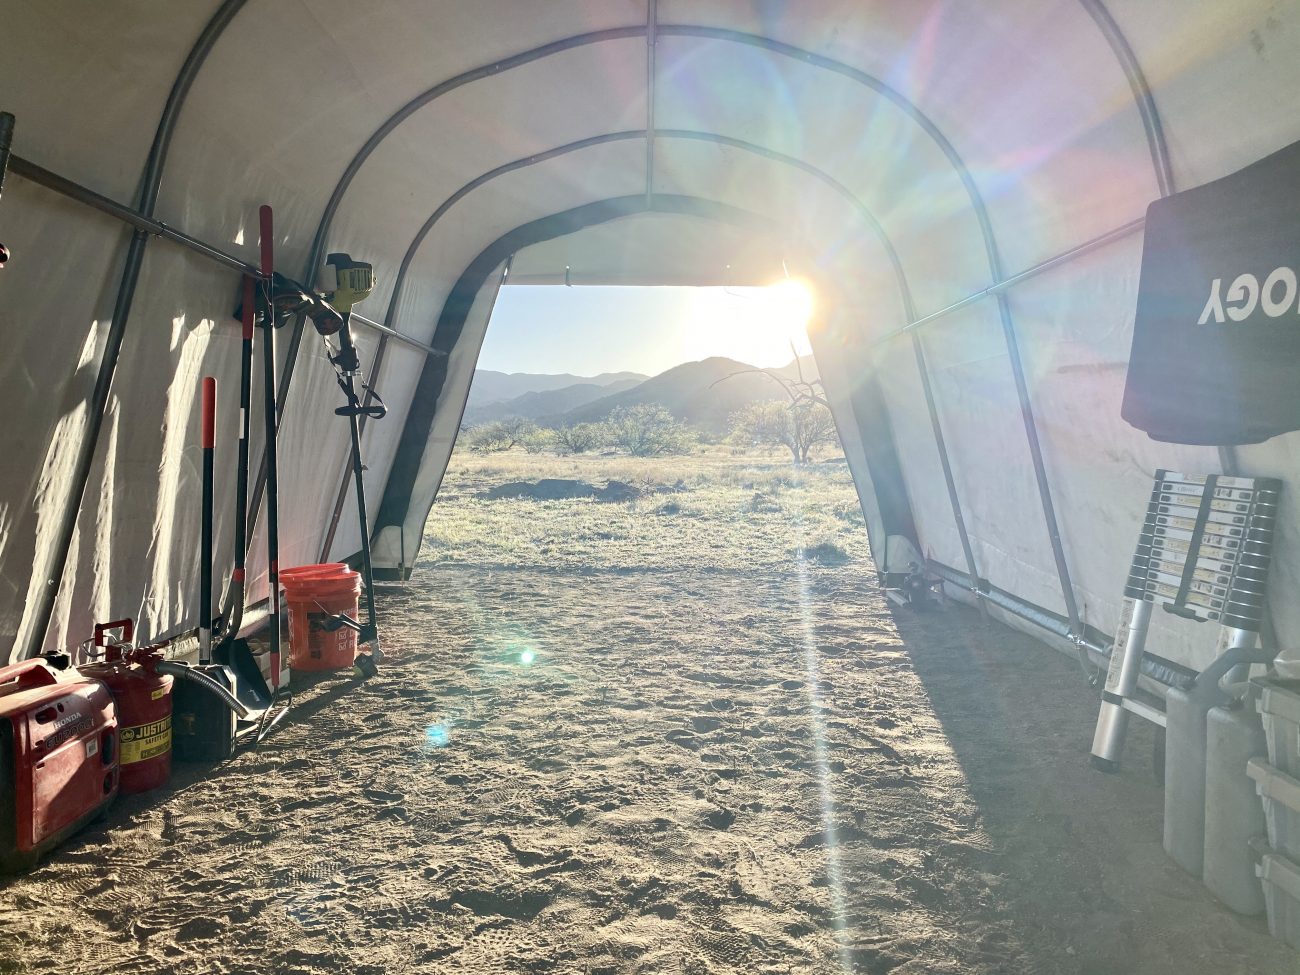
At the time, this was the fastest and cheapest way to get a 12x20 covered structure up, and it was exactly what we needed. But over time the cracks in this product began to show. Literally.
While the metal frame that makes up the skeleton of the Garage-in-a-Box is super heavy duty, the vinyl zippered fronts and overhead canopy do not hold up well in a high desert climate.
If the zippers themselves weren’t breaking and making it impossible to get into or seal up the front and back, the main overhead cover itself was in a constant state of rips, tears, and leakage.

You can only gorilla tape it so many times guys. Trust us, we tried.
We even got a second one to act as a feed shed for our animals, and within less than a year it’s cover began to deteriorate as well.
During this time we were storing animal feed, the gear for our massive off-grid solar system, our tools, and so much more in these structures. And we always felt like we were a monsoon or windy day away from disaster.
We finally reached our breaking point, and had to decide if we were going to trash them and start over, or find a way to re-build them to withstand the rain, UV, wind, and weather events that are common in our desert environment.
The base model 12x20x8 Garage-in-a-Box only cost us $500 at the time, and a quick look around the internet told us that a pre-built shed or shipping container was going to run anywhere from $6k-$12k for something similarly sized.
So we put our heads together, and came up with a plan to rebuild the shelters ourselves!
Like we mentioned, the frames of these structures are actually really solid. So our plan was to use the existing skeleton, and replace all the vinyl.
Two important things before we jump in:
- A huge thanks to Ecoflow for sponsoring this video! We’ll share more about their portable power station which we used in this project later.
- Just in case you missed it, we’re re-building two ShelterLogic Garage-in-a-Boxes - our feed shed and garage. Both are very similar, but have a few key differences.
Alright, let’s get started.
Article Overview
- Shou Sugi Ban Wood Preservation
- Barn Door Wooden Plank Front Wall Build
- Hyperadobe Earthbag Back Wall Build
- Metal Roof Installation
- Solar Panel Mounting
- Feed Shed 12V Power System
- Garage Ecoflow Solar Generator Power System
- Final Soil Cement Plaster Application
- Recap + Feature Highlights
- Cost Breakdown
- Wrap-up
Shou Sugi Ban Wood Preservation
The first step was to re-build the front panel with barn doors and wooden planks.
If you were wondering about the longevity of using wood here in the desert, you're on the right track. Using untreated lumber on any surface that the sun will hit causes that wood to warp, twist, crack, and quickly degrade.
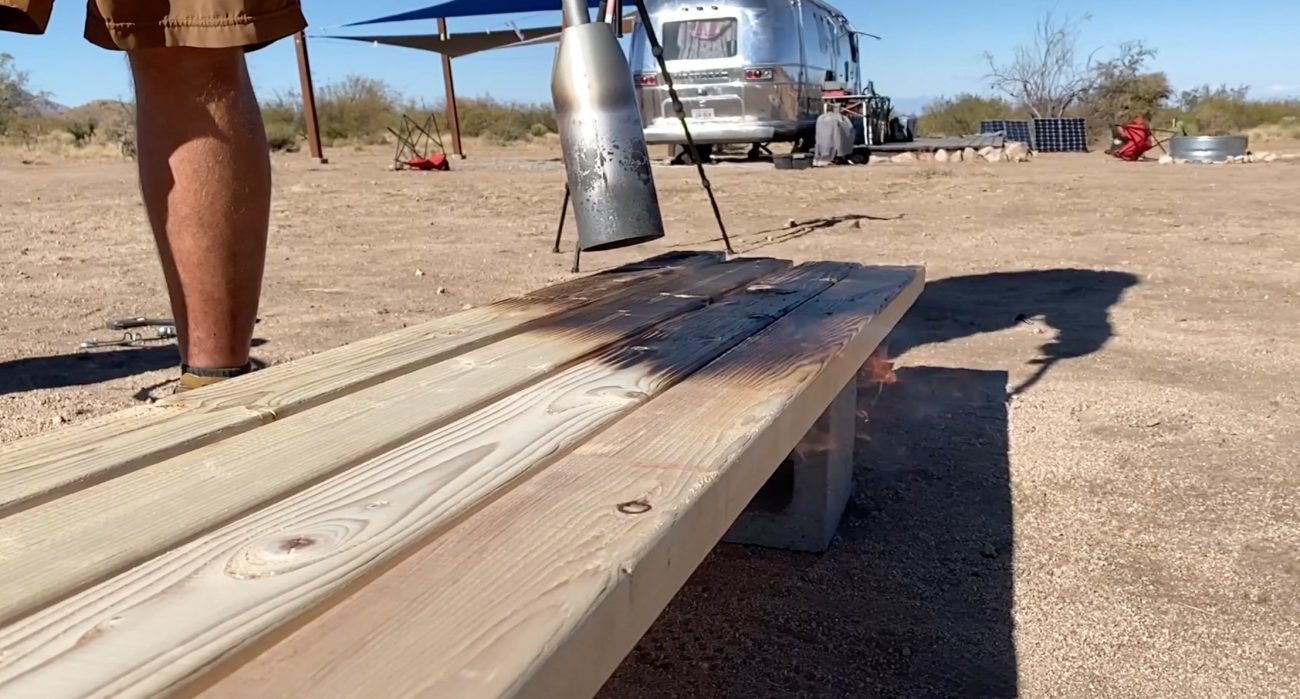
Thankfully we learned about an ancient Japanese technique called Shou Sugi Ban that we’ve used successfully on a number of other projects. It preserves and strengthens the wood for much longer periods of time. Here’s how it works:
- Using a propane torch, char all sides of the board
- Take a stiff bristle brush and scrape off the char, pushing it into the pores of the wood
- Brush on boiled linseed oil and let cure overnight
This process takes some time, and is super messy - but once finished you’ve got really well preserved wood that should hold up to the high UV and low humidity in the desert.
With the Shou Sugi Banning complete, it was time to start piecing together our new front.
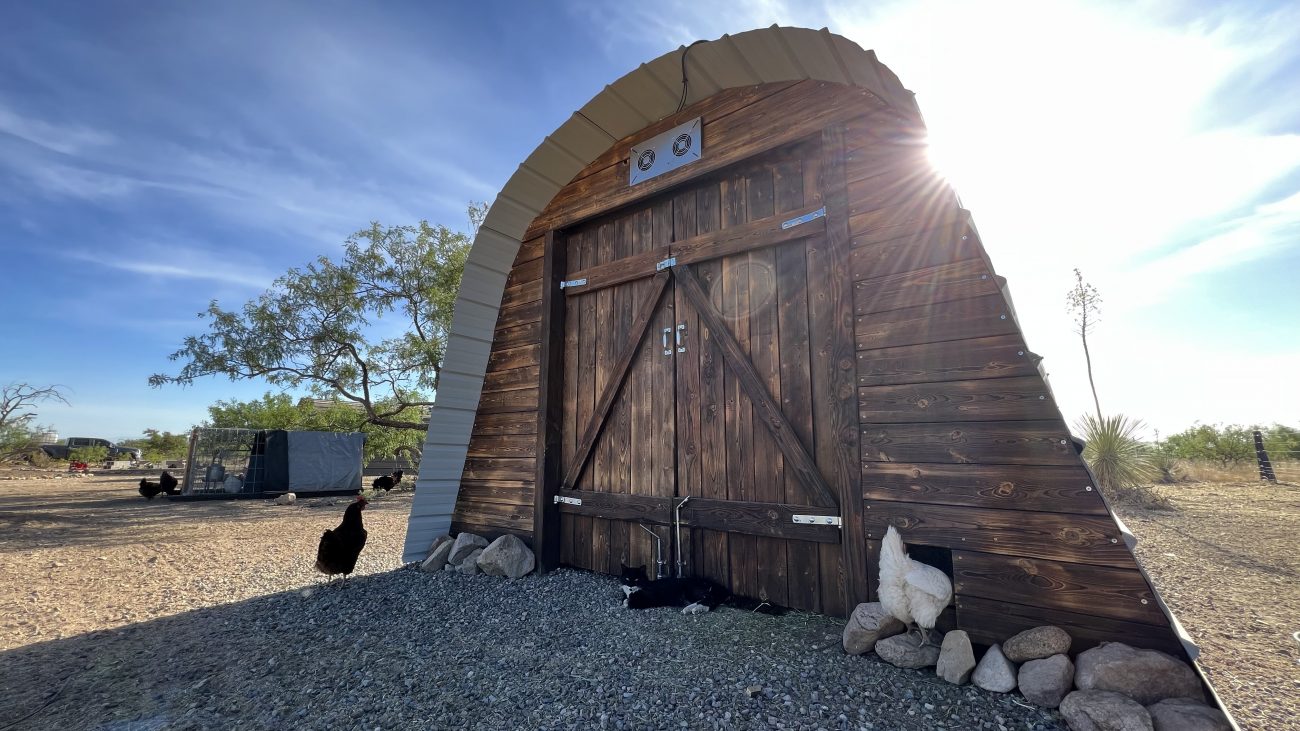
Barn Door Wooden Plank Front Wall Build
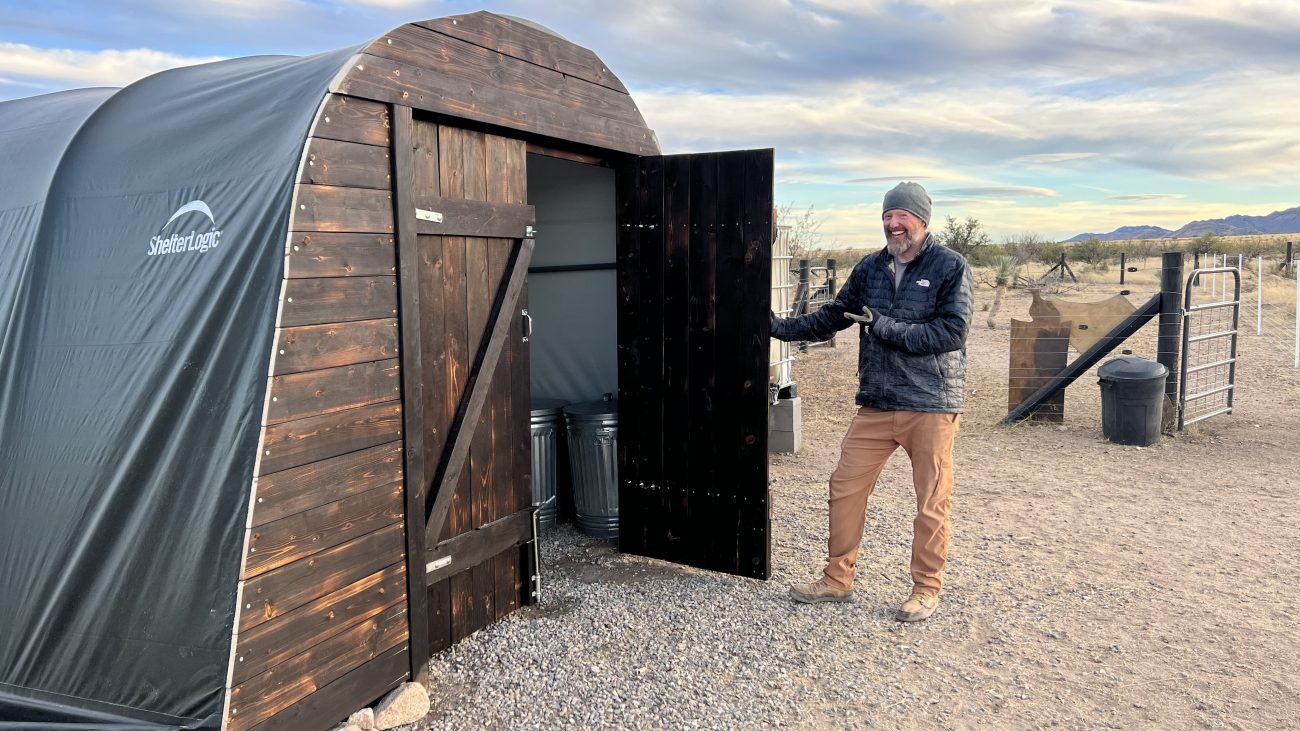
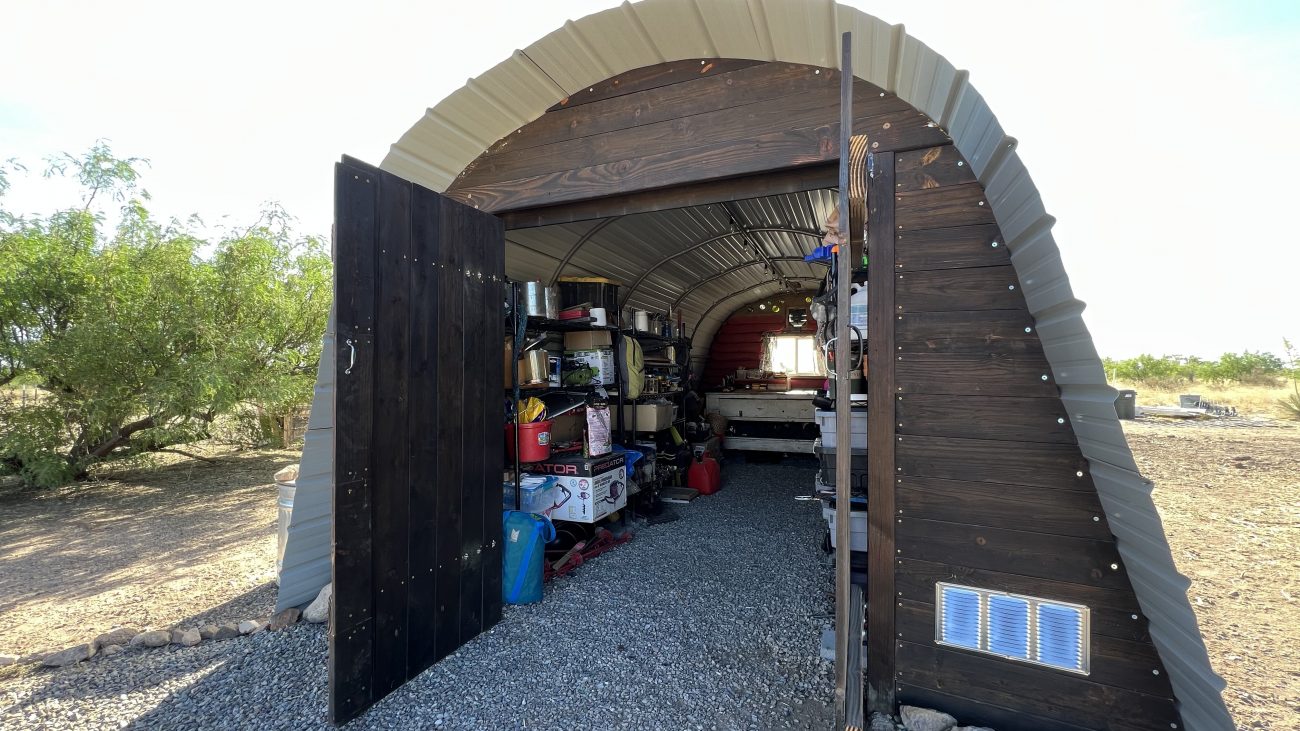
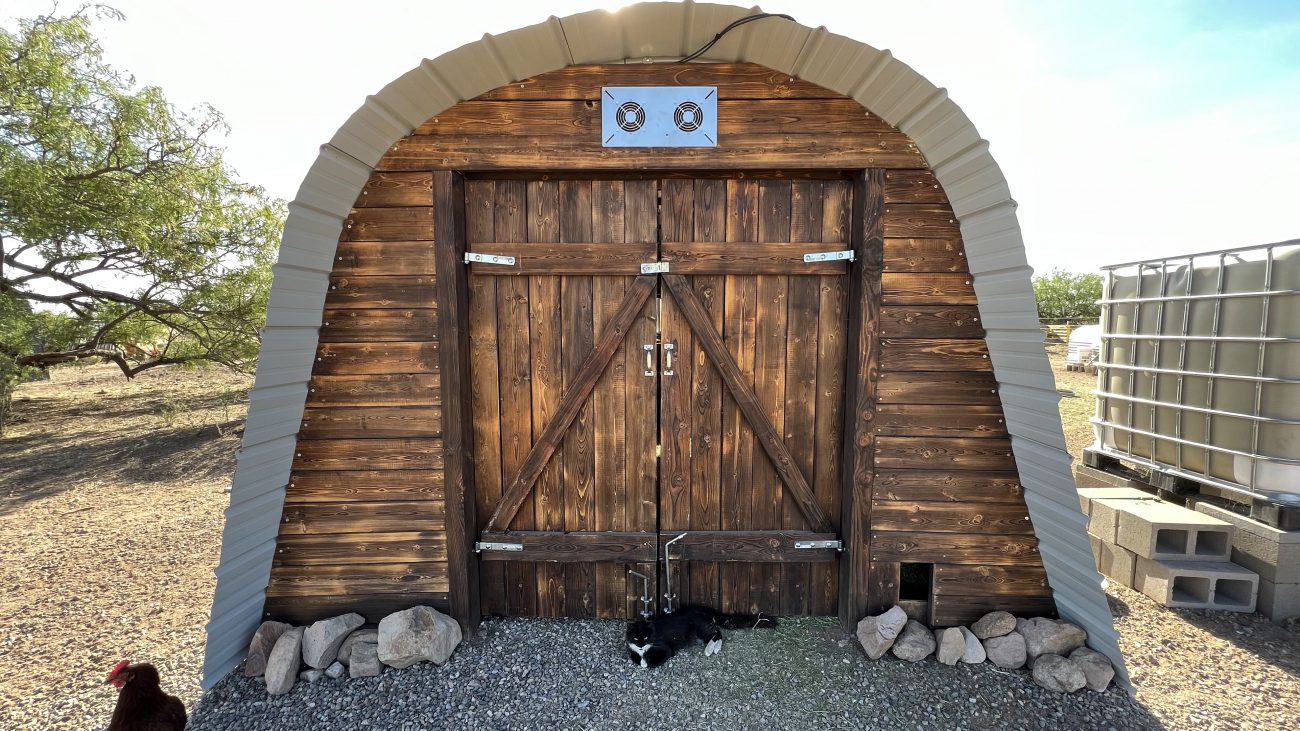
A major selling point of the ShelterLogic tents was a nice wide opening for easy access to everything inside. So at least one of our walls needed a large, secure door to get stuff in and out. While these barn doors aren't as big as the original opening, we think they're a good trade-off for the increased stability and durability they provide compared to rolled up vinyl.
Step 1 - Build a door frame
Use 2 4x6 posts and a 2x6 header to create a frame for your door to hang in. Notch the top of the 4x6 posts so the header fits perfectly. Decide on the width of your door and the height of the header, and temporarily screw the 3 pieces together. Measure side to side and corner to corner to get everything square, and add another brace in the middle.
Step 2 - Cement the Door Frame in place
Lift your frame up, and finalize exactly where you want it to go. Use a stringline and level to set its depth in relation to the front of the tent. Make sure it’s centered, and then mark where the 4x6 posts should go.
Use an auger to create 2’-3’ holes for the posts to sit in. Their depth will be determined by how high you want the header to sit. Put the frame in the holes, add some gravel in the bottom for drainage, make adjustments for level and plumb. Once you’re ready throw some Quickcrete and water in the holes to lock the frame in place.
Step 3 - Bolt Door Frame to Metal Frame
Now comes the important part. We need this central frame to lock into the Garage-in-a-box frame. We do this by finding the spot where the header meets the metal frame, and drilling all the way through the pipe into the wood.
Then we secure with bolts, washers, and nuts. Before tightening everything up, scribe a line on the header where it goes past the edge of the curved frame. Then take a jigsaw and trim it to match. Now you can tighten the bolts, and we recommend 4” lag screws that go through the header into the posts for good measure.
Now you have a cemented, bolted, and (hopefully) square door frame that you’ll use to attach everything else to.

Step 4 - Install Steel Screw Hooks
Measure a few feet from the top and bottom of the frame, drill and screw in 4 Steel Screw Hooks. It’s ok if they go all the way through the 4x6 posts. If you can put these in at a slight upward angle it will help the Steel High Straps look more level for the next step.
Step 5 - Attach 2x6 to High Straps
Set the Steel High Straps on the Screw Hooks, and cut a 2x6 board that stops right before the hook. Get the 2x6 level, and then drill and bolt the High Strap to the 2x6. Do this for both the top and bottom.
Step 6 - Install Vertical Planks
With the 2x6’s in place, begin to install your 1x6 vertical planks. Cut them to the vertical height you need, and screw from the back into the 2x6’s. Start from the middle, and work your way to each end, leaving a little extra space between the middle boards.
As you get to the end where the bolts are, you’ll need to cut or drill out holes for them to poke through.
Step 7 - Cut Down the Middle
With all planks installed, you can now cut your 2x6 boards down the middle, and you’ve got swinging doors! Note, you may need to cut at least 1/2” out of the 2x6 for no pinching.
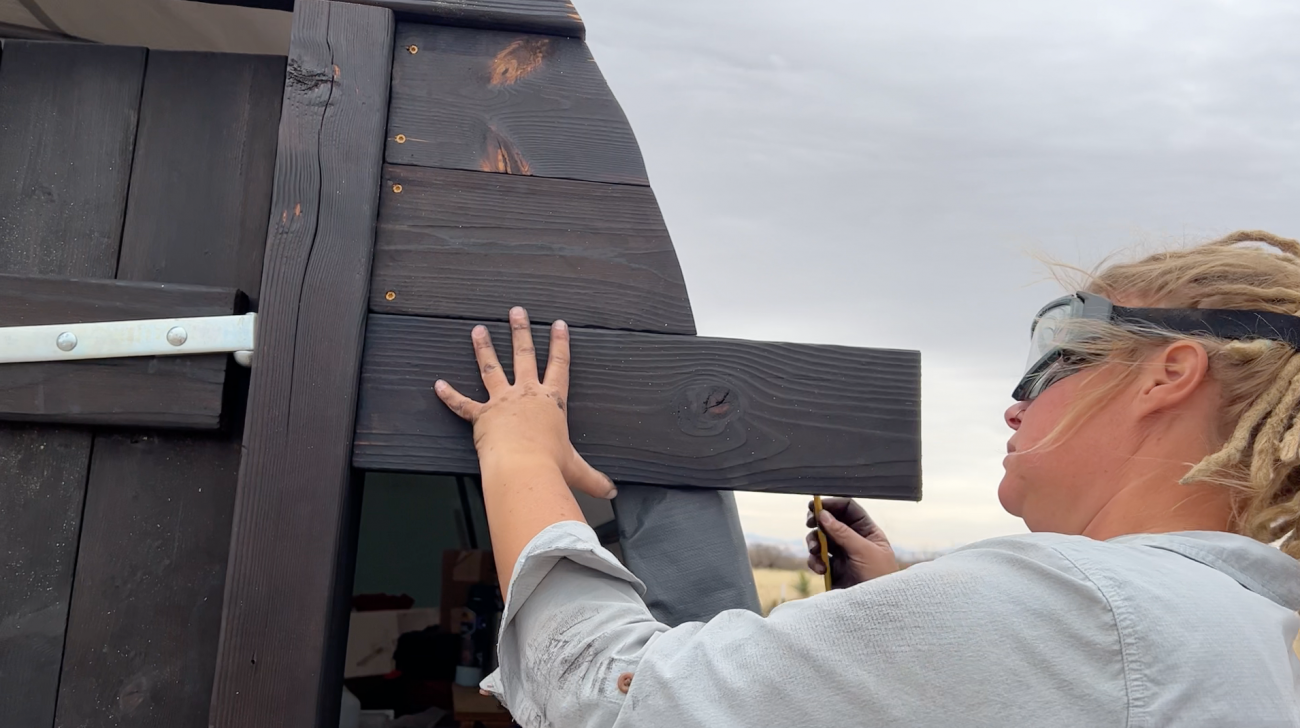
Step 8 - Install Facing Planks
Now that the door is finished, we need to close up the space above and to the side of the door frame. You’ll need two kinds of fasteners for this. Wood screws and self-drilling sheet metal screws.
What you’re trying to do is match the depth of the metal pole to a 2x4 you’re going to install on the side of the 4x6 post. Take a small piece of 1x6, set it against the metal frame, and mark where the 2x4 should go. If your Screw Hook went through the post, you’ll likely need to break this up into a few pieces. That’s ok, as the ShelterLogic frames tend to spread out a bit, and you’ll likely need to make adjustments the further you go down.
Put in your first 2x4, set a 1x6 in place, and scribe the curve on the back. Cut it off, bring it back, and you’re ready to install your first piece! Use the wood screws on the door frame side to screw into the 2x4, and a metal sheet screw to go straight into the metal pole. Since 1x6’s are so thin, we definitely recommend pre-drilling all the holes.
Once you get going on this, it’s really straightforward - mark the curve, cut, and install. The top boards will be a little different, but it’s basically the same idea.
Step 9 - Adding Door Supports
Remember those crazy winds we talked about. Well, they could totally push our brand new doors inward and start messing things up. So we like to add another 1x6 on the inside attached to the 4x6 posts far enough down to keep them from ever swinging inward.
We’ve also put a vertical door support on the left hand door for the right hand door to butt up against. Optional, but it will help stop water that might want to come through that large gap between doors.
Finally we created some angled 2x4 supports on each door that go from the top 2x6 to the bottom 2x6 for additional strength.
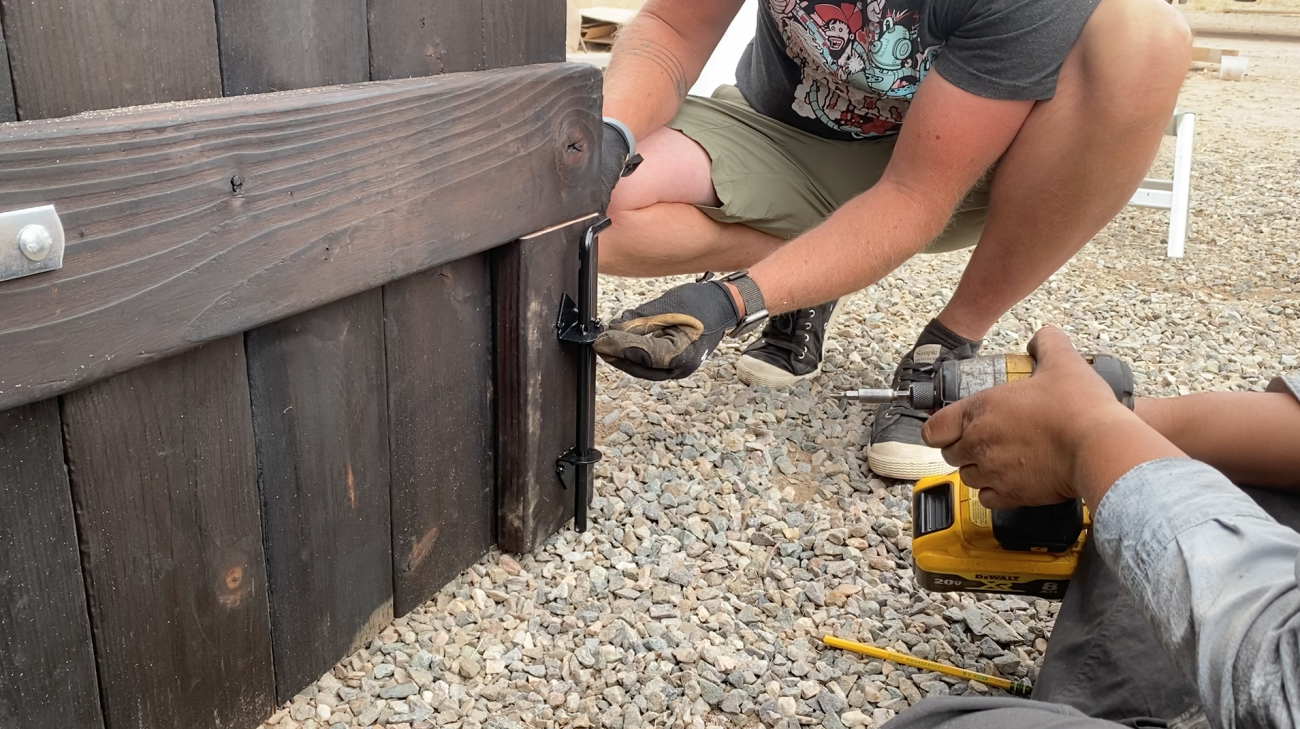
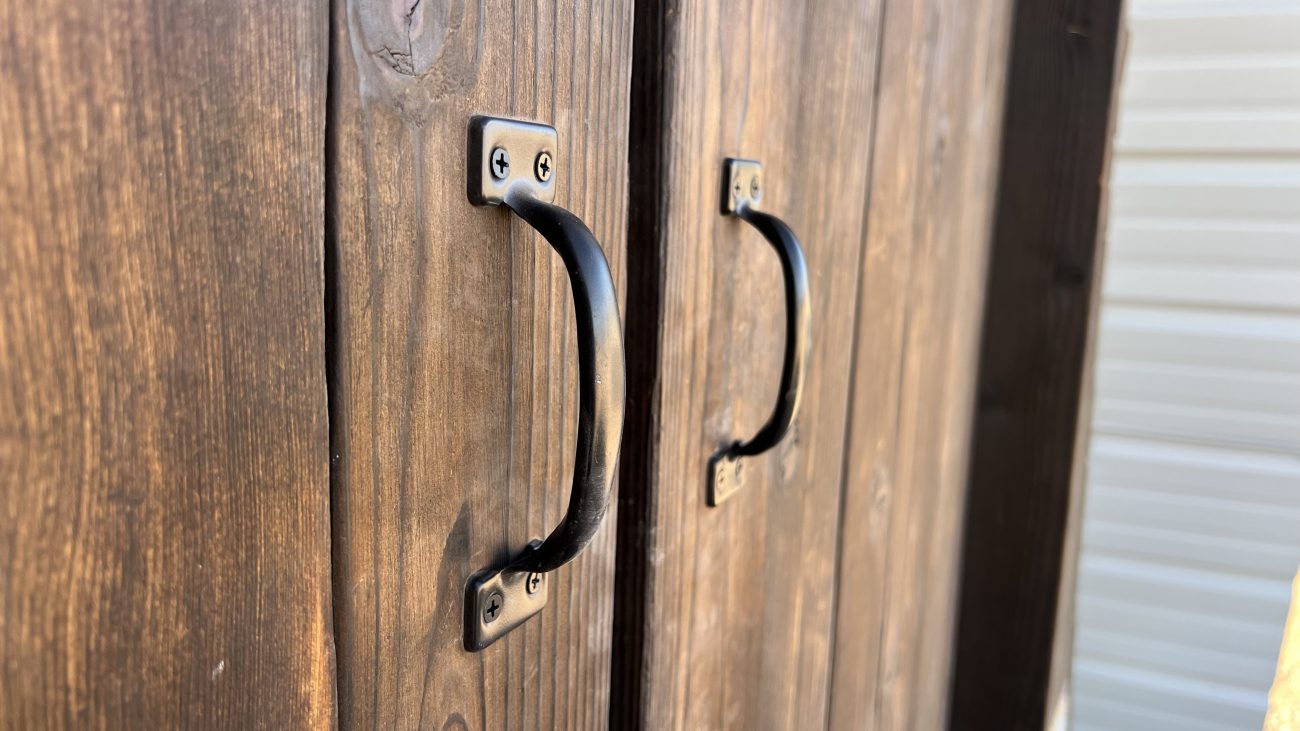
Step 10 - Add Door Hardware
Now we’re getting somewhere! Install whatever hardware you like. We used handles, swivel eye hasp latches, and cane bolt rods. For our feed shed, we made sure to instal the swivel latch and handles on the inside as well, since we often take goats in for milking and need to keep other animals out.
Finally we used some poles we had laying around and pounded them into the ground for the cane bolts to lock into for both closed and open door positions. With the wind we get here, both were important.
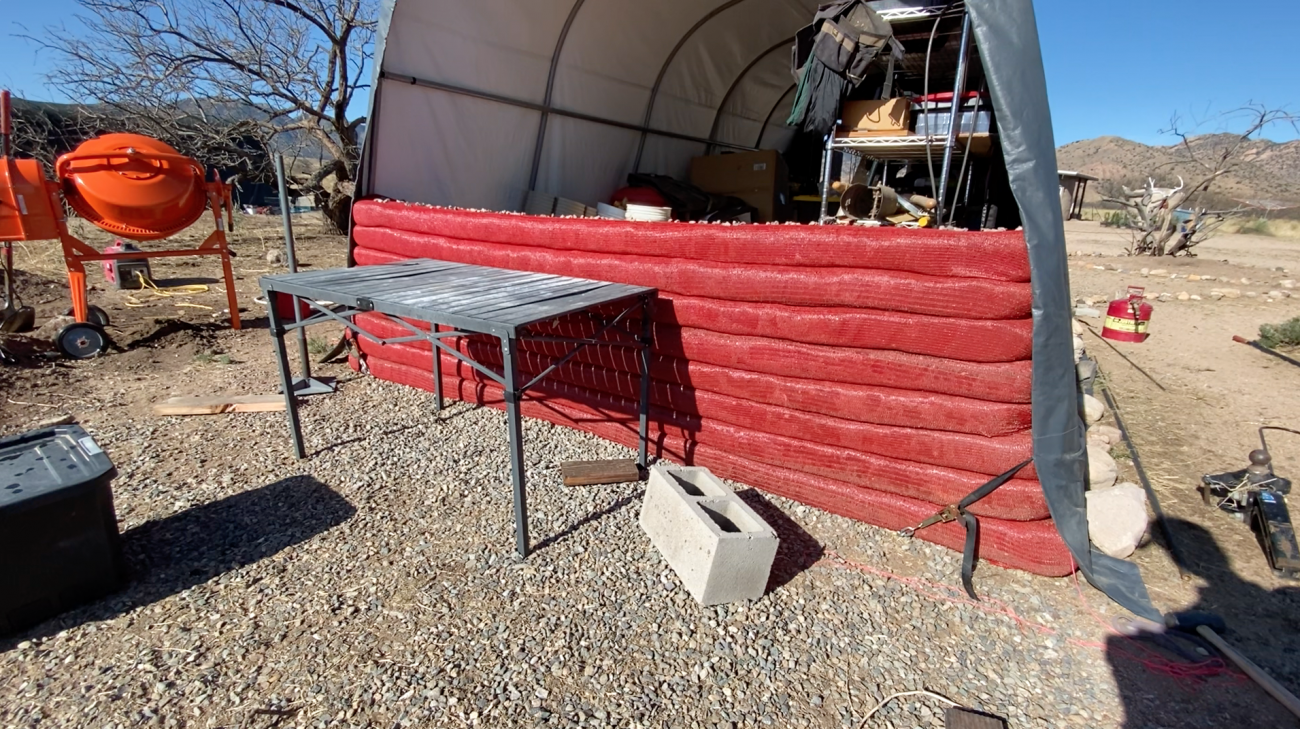
Earthbag Back Wall Build
The decision to fill in the back walls with Hyperadobe Earthbag came from a desire to keep costs down more than anything. Plywood or metal are not cheap right now, but hyperadobe rolls are only .15/linear ft. Using the soil on our property and leaving out the portland cement meant we spent a grand total of about $40 for the back walls of both structures. Not bad!
Even better, by laying the bag in the middle of the pole, the material would wrap around it as tamped into place, locking each layer in all the way up. This combined with the arched shape proved to confirm our theories - the completed back walls were super solid and structurally sound.
For these bags we just used our soil and some water, filled the bags, and tamped in place. Because of the tight spacing we could only use our bucket delivery system, and had to tamp with large pieces of wood as the metal tamps just kept running into the frame.
We also broke the wall build into multiple days to make sure we didn’t go too many layers high without letting them dry.
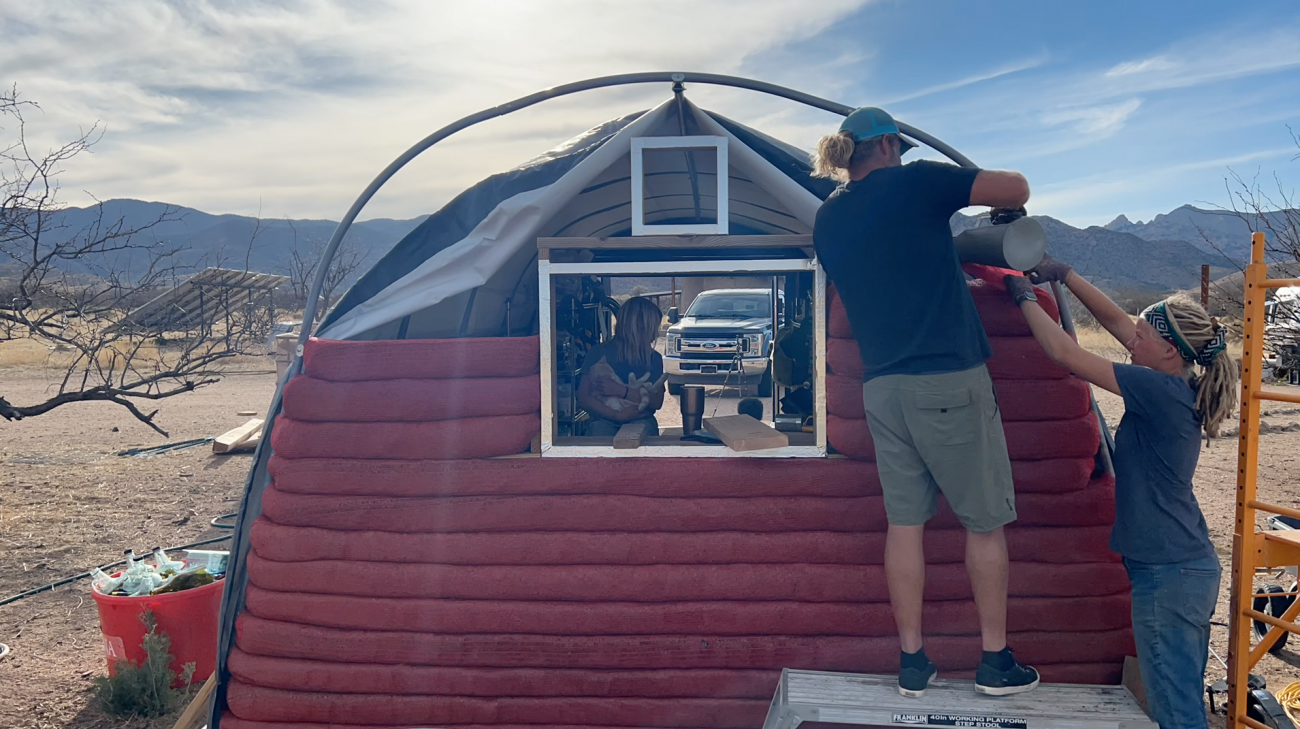
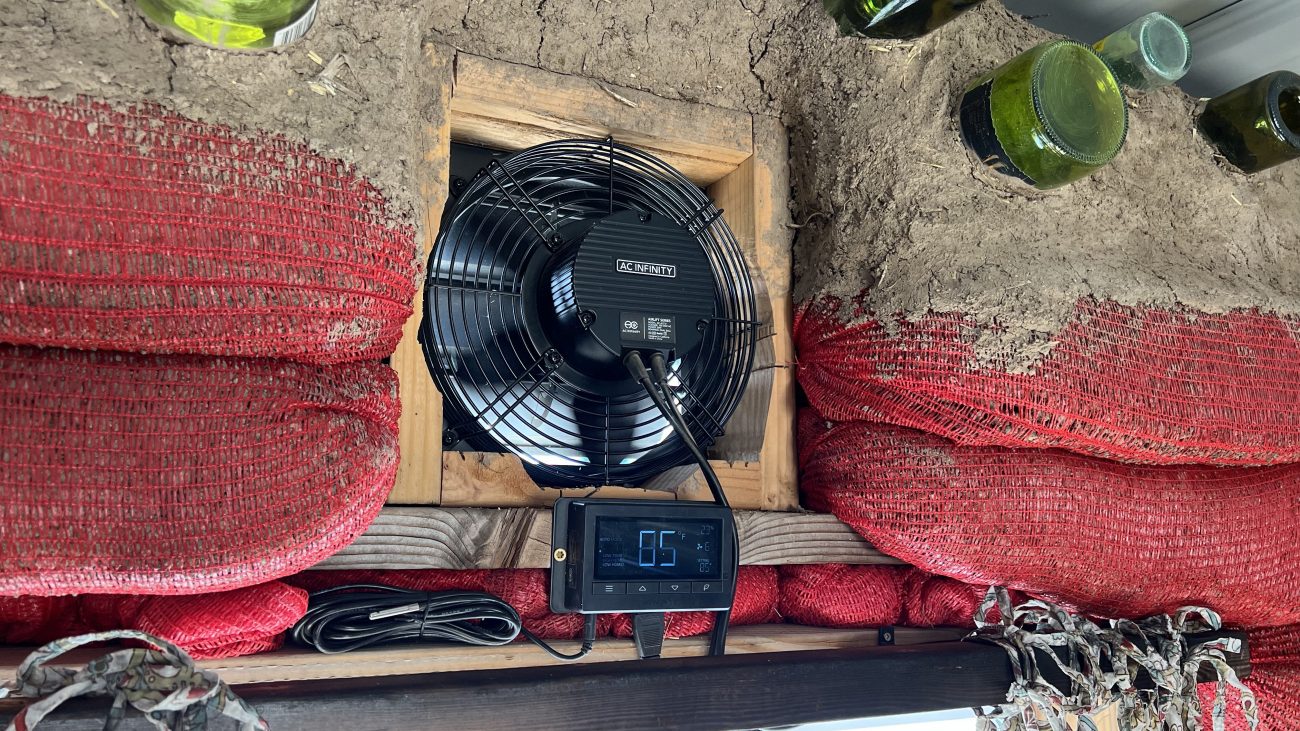
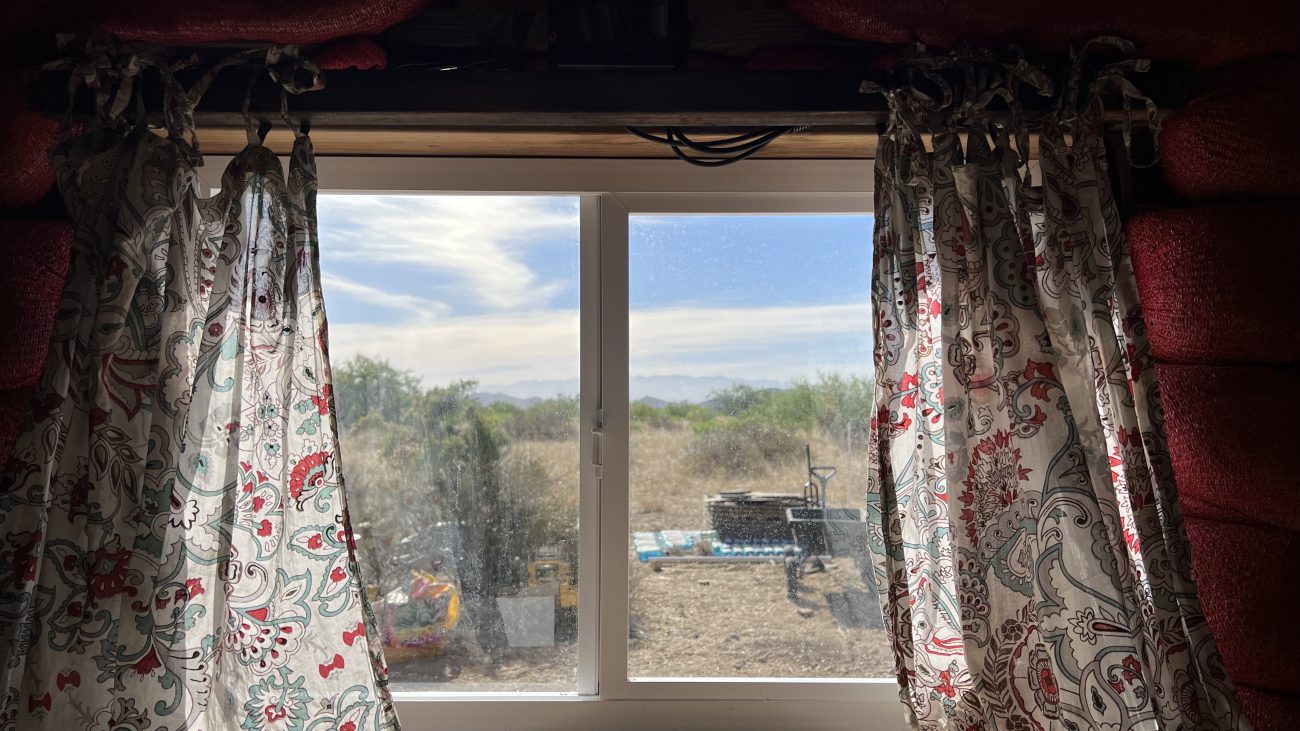
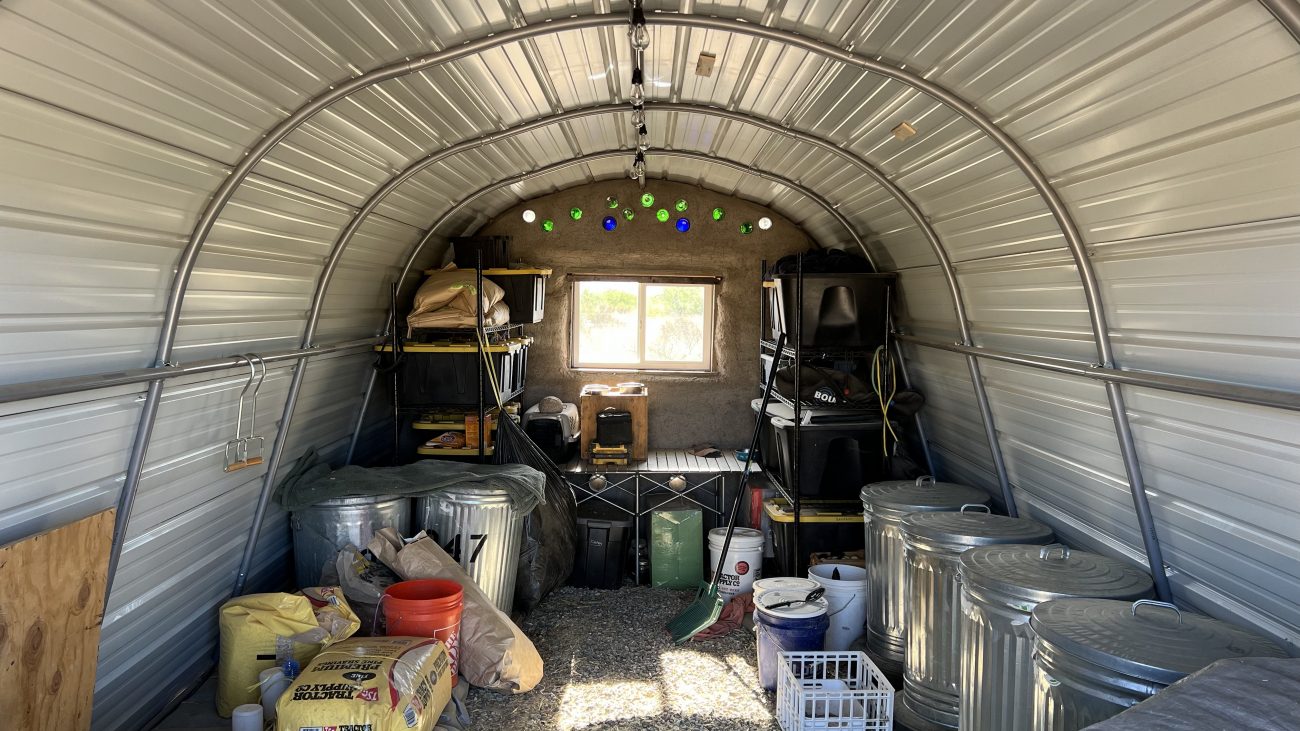
Halfway through the build, we decided to add a vent fan and window to the back wall. This was easy to do - it just required building the frames and cleating them in place, using the weight of the bags to lock them in.
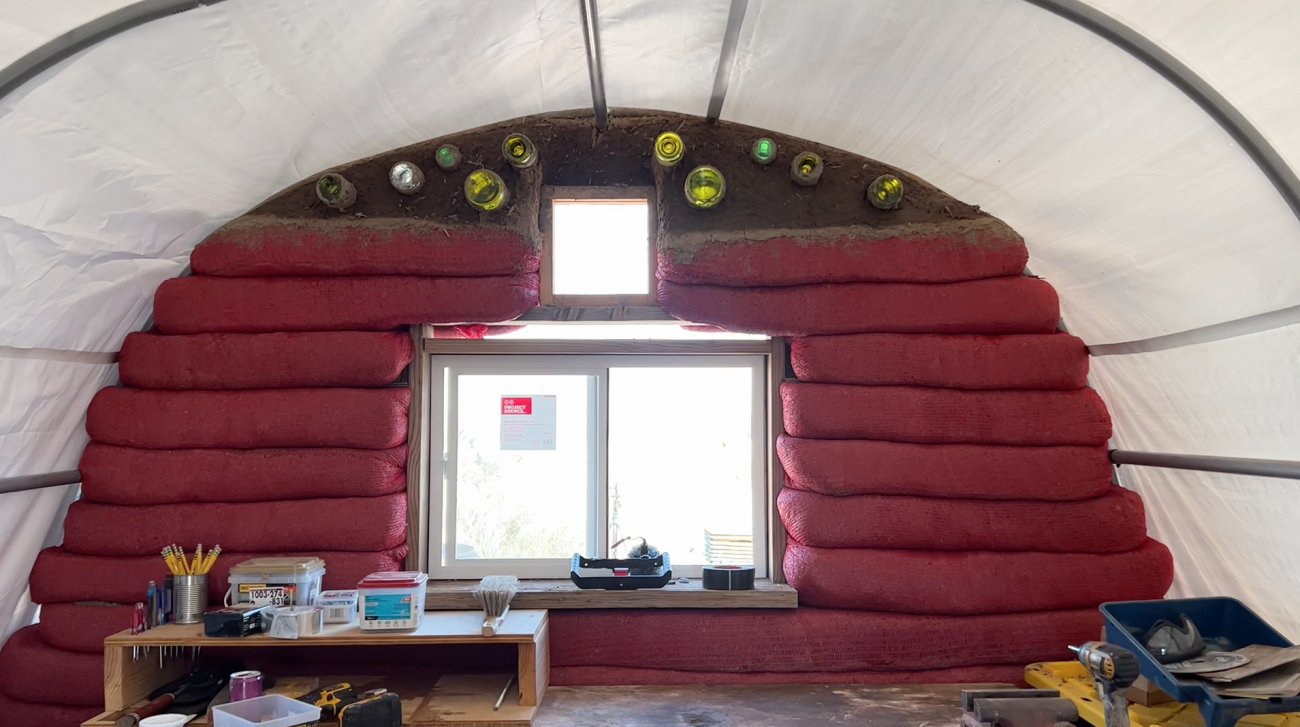
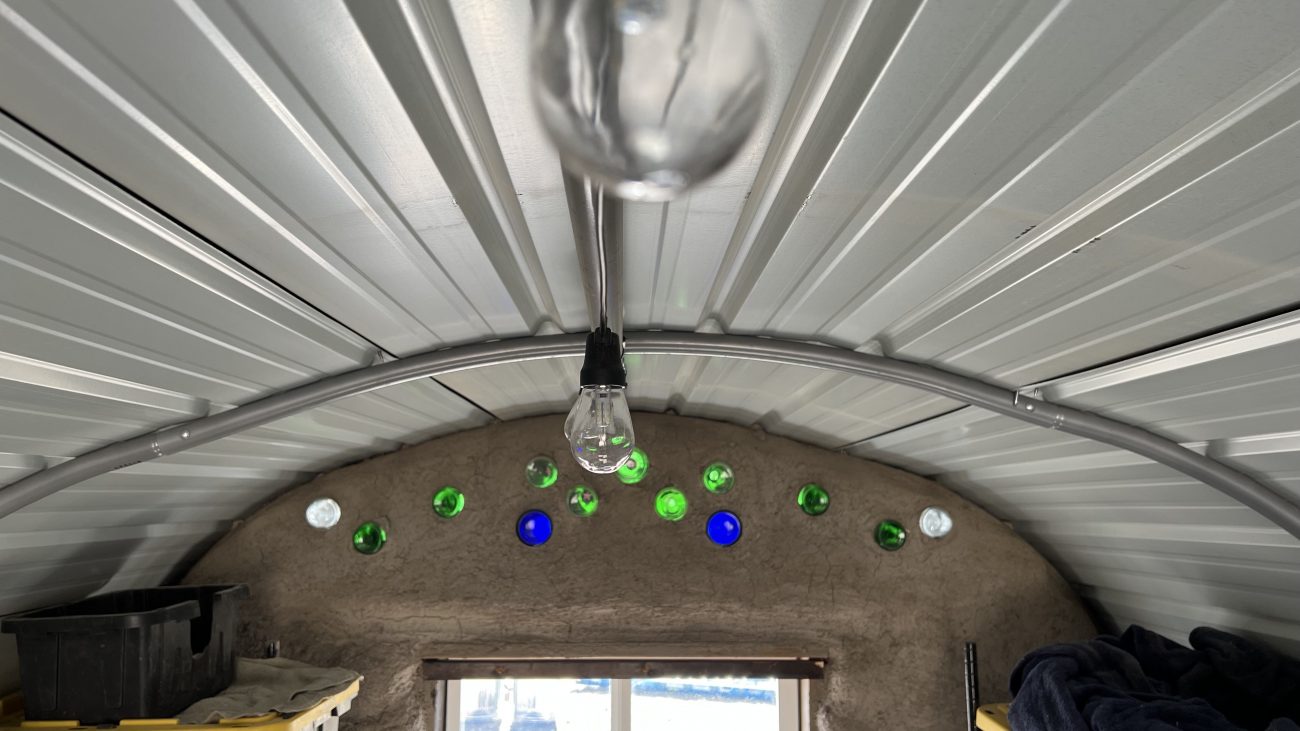
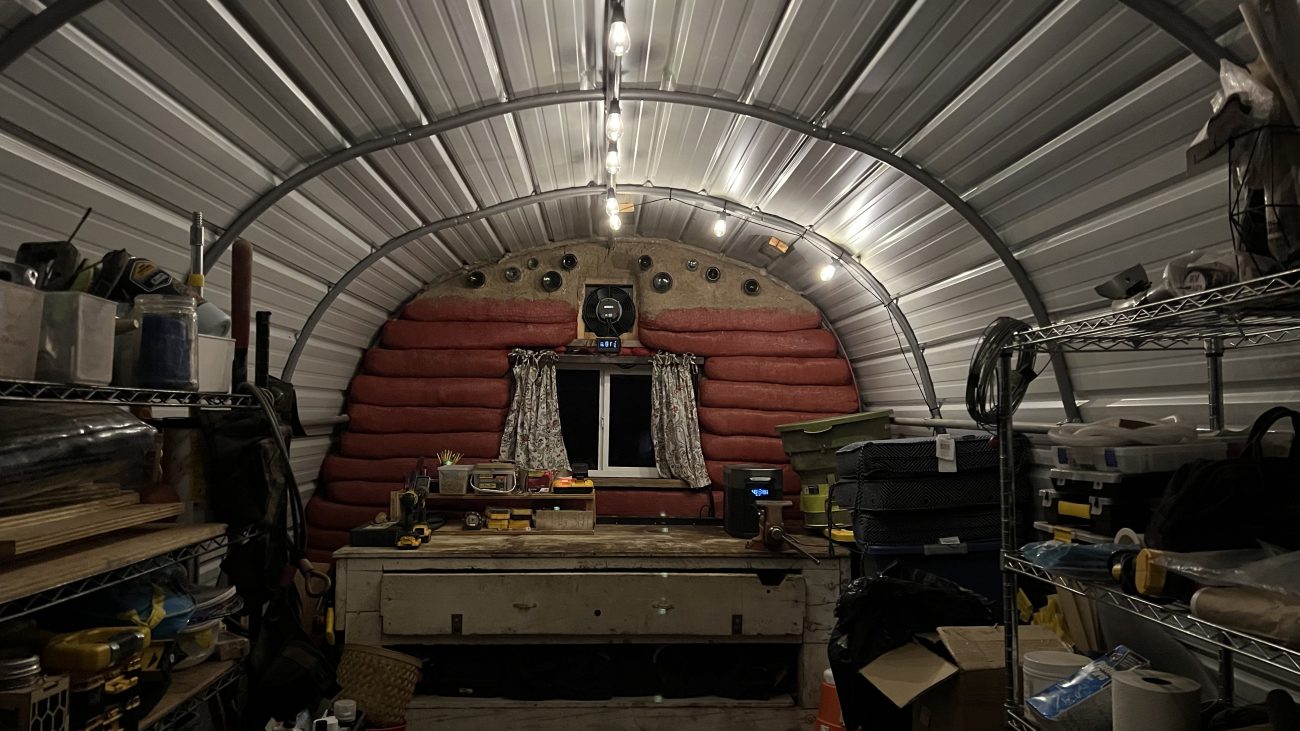
The top portion was too difficult to fill with bags so we used some left over bottle bricks from the Chicken Garden project, mixed up some cobb, and filled the space.
For the feed shed, we decided to mix things up - we installed two lower pipe vents on the back wall while building the walls, and planned on putting the vent fan at the front.
Once the walls were built, we needed to start covering the bags. This was a two step process. The first scratch coat of plaster was a 9 parts sifted soil 1 part portland cement ratio that we made up in our cement mixer with water, then chinked between the bags before applying a 2” layer all over, filling in the gaps and trying to get the wall relatively uniform. We’ll come back to the final plaster coat in a bit.
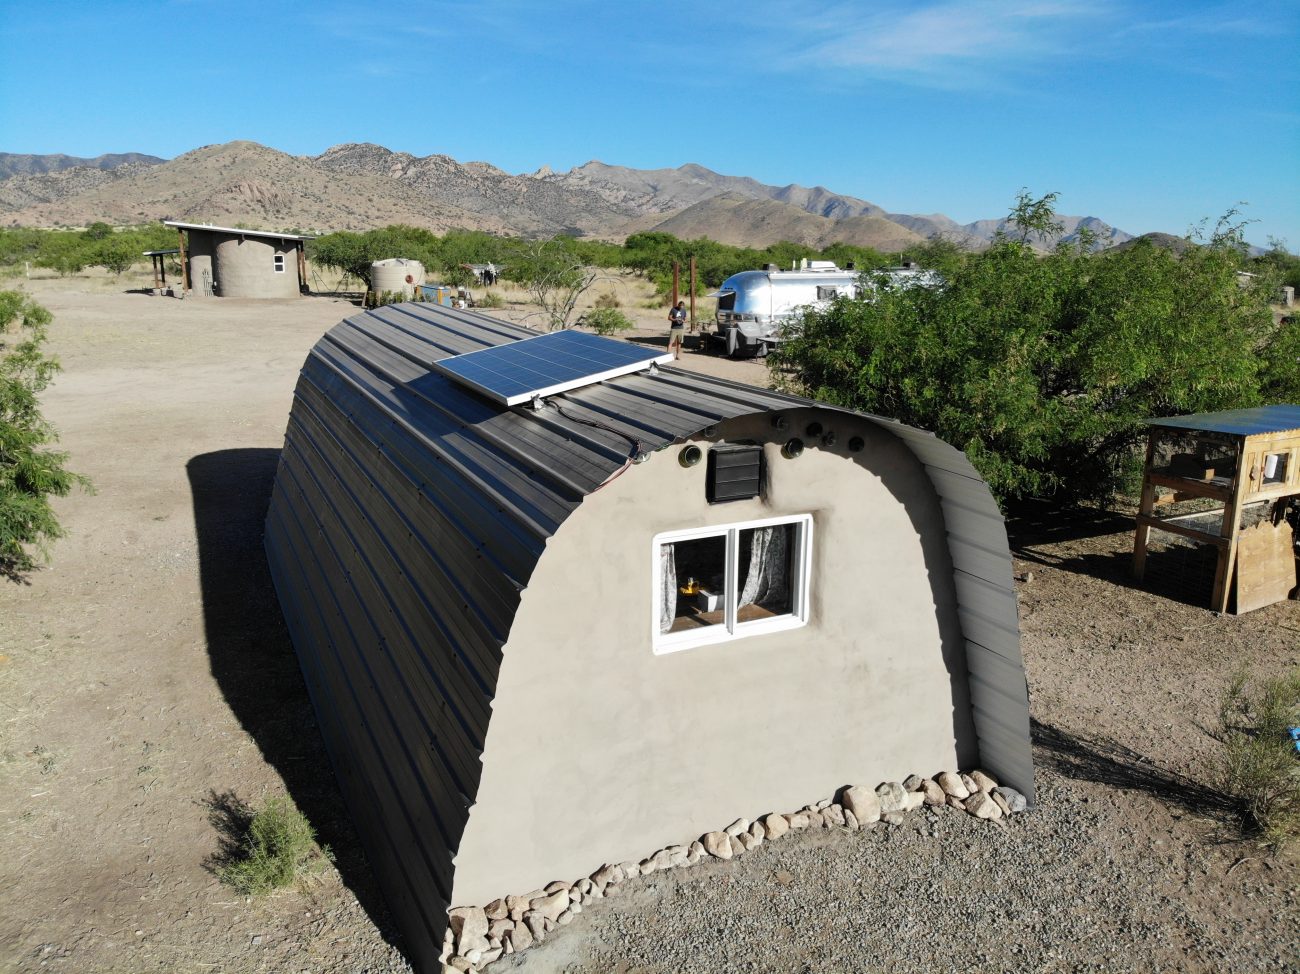
Metal Roof Installation
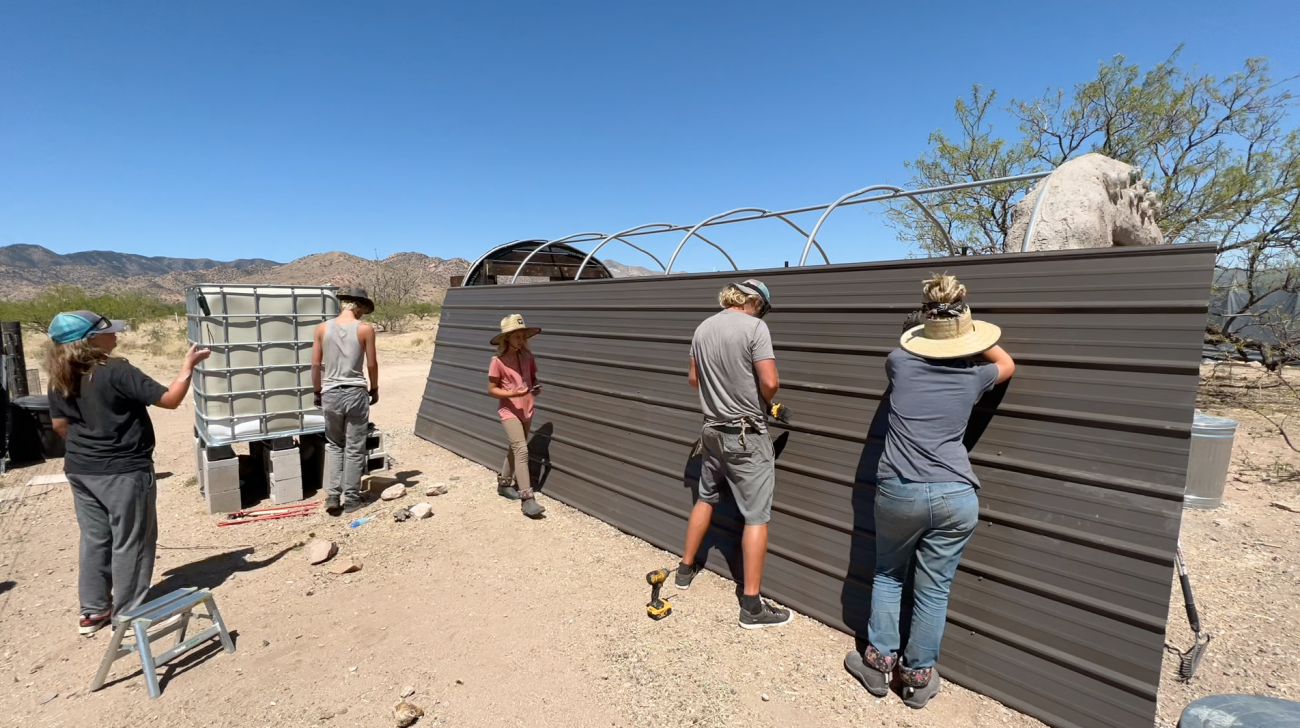
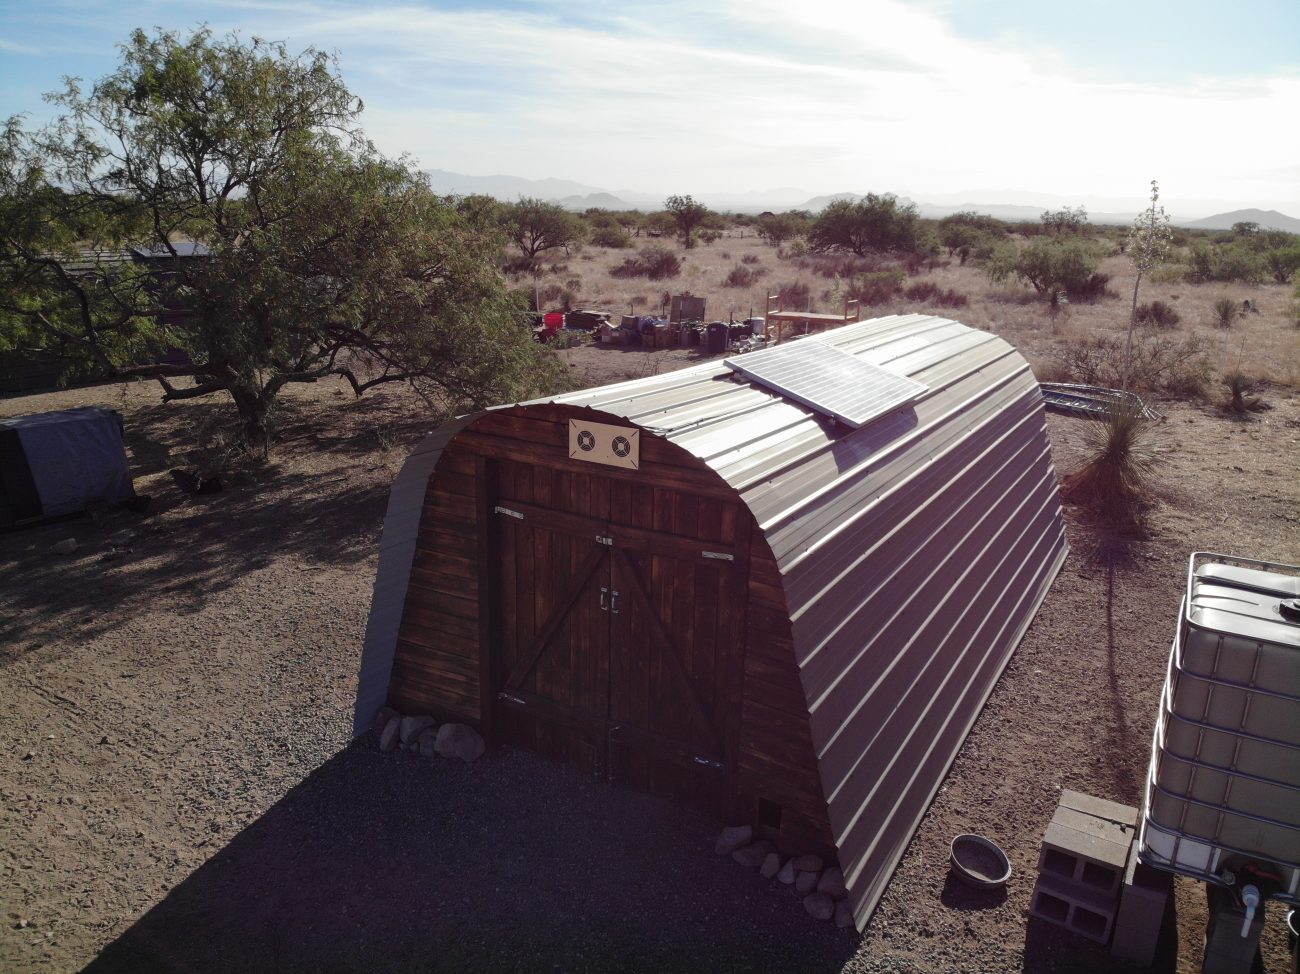
With the front barn doors installed and the earthbag back walls built, we were finally ready to get rid of that stupid vinyl cover, and replace with something more permanent. We considered a few materials, but settled on custom metal roofing panels from our friends over at Thunder Mountain Metal.
The first step was to measure, measure, and measure again. While the panels are about 3’ wide once overlapped, they can be custom made to just about any length. To protect the wood and earthen plaster, as well as provide some shade we decided to go with 23’ long panels. And by our calculations we needed at least 8 panels to span the 21+’ distance from side to side when wrapped over the curve.
While we wanted this roof to be fairly waterproof, we didn’t feel like using butyl tape between each overlap was necessary. A few drops coming in wasn’t going to hurt anything.
Instead of the usual metal to wood screws, Thunder Mountain sent metal to metal self tapping screws. They even have a protected gasket to seal up the holes.
Before we could start, we had to remove the old vinyl covers and remove and re-install the 4’ augers to make sure they wouldn’t interfere with the metal panels.
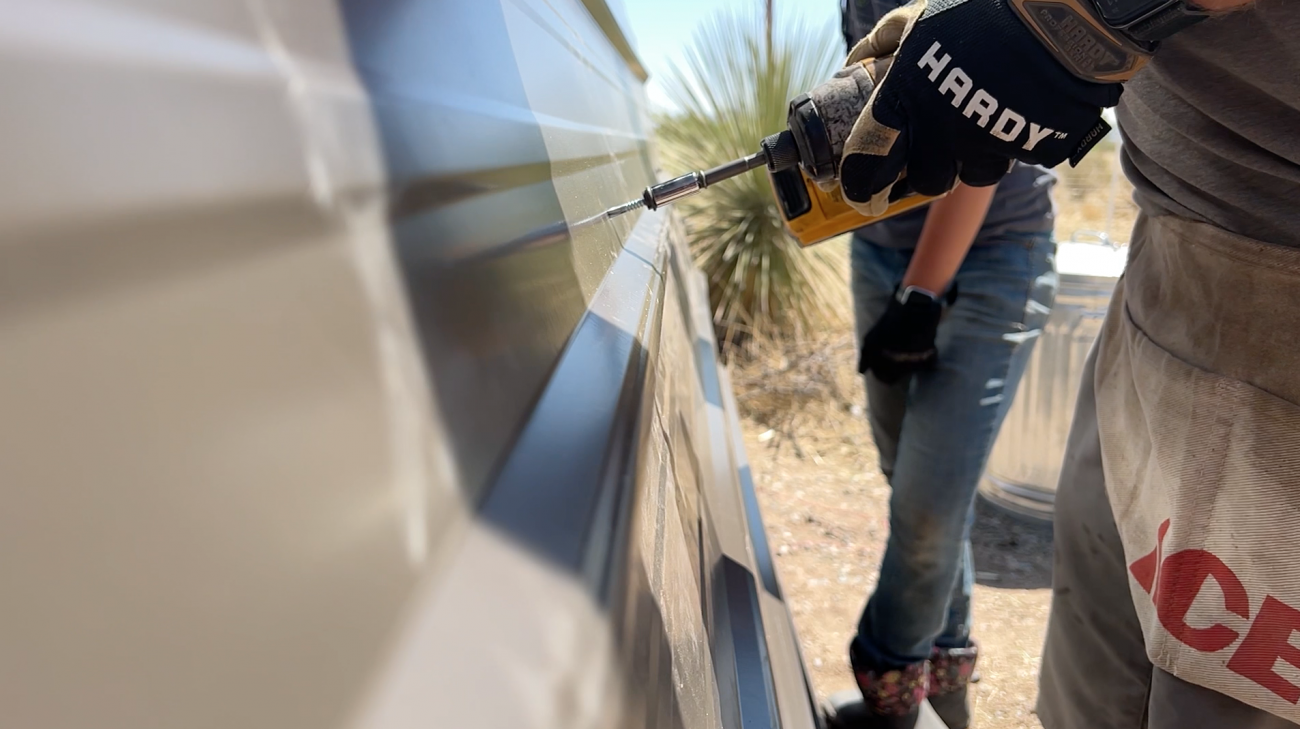
The hardest part of the panel install was really just lining up our holes, and hitting the frame dead on. Because just a fraction of an inch to the left or right, the bit would slip off the rounded pole and break. We definitely messed up a few times, but found that pre-drilling helped.
The ShelterLogic pole ribs were 4’ apart, and we felt ok just screwing into those at each ridge on the panel. Where panels overlapped, we also put in an additional metal screw through both into the rib, and a shorter stitch screw on each overlapping ridge.
Usually you pick a direction for your overlaps, and lay all the panels accordingly, but because of the curve we had to reverse the overlap once we got past the half-way point. So we started at the bottom on one side, put the panels up until one when over the curve, then slide the next one underneath, and continued to put panels under so that water would flow correctly.
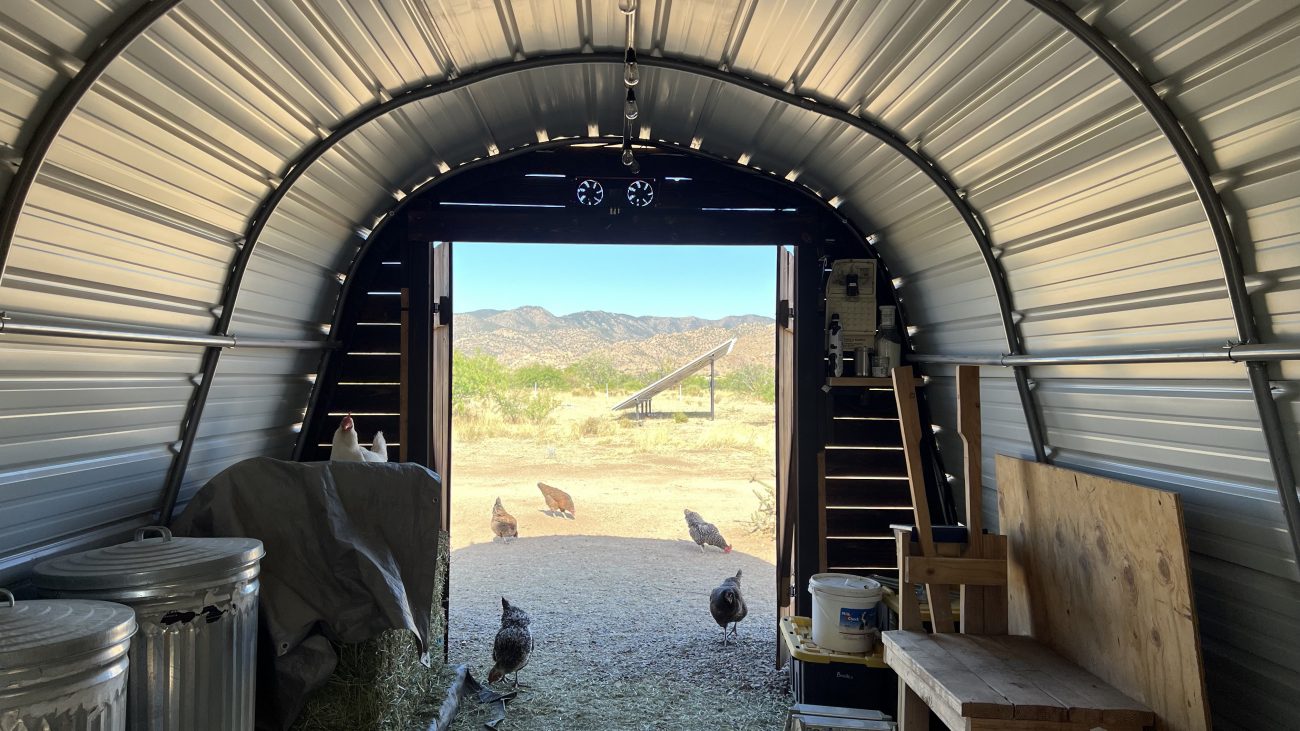
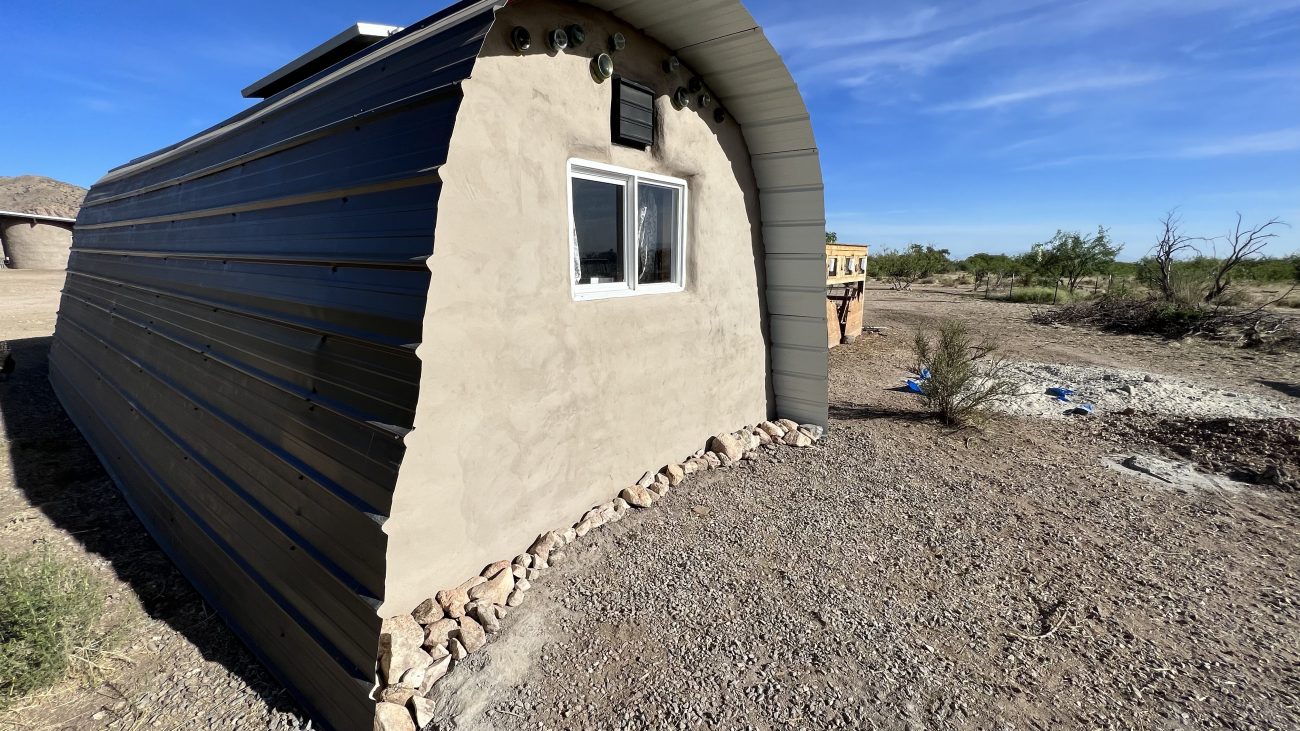
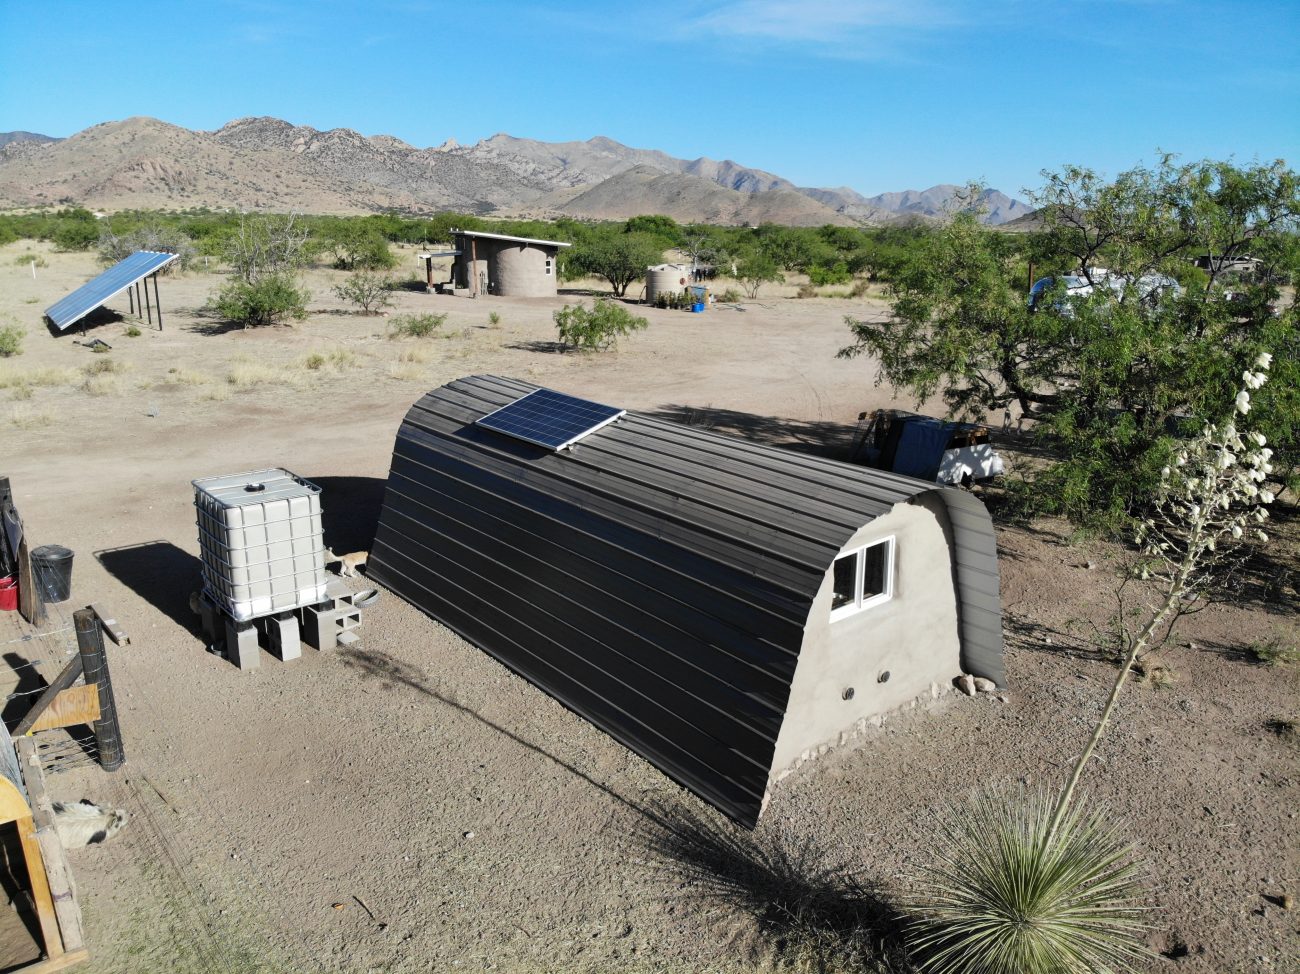
The final panel underlapped at least 2 or 3 ribs, but it worked out perfectly, with the metal sheet touching the ground on both sides. Screwing these panels in to the already secured front door frame and earthbag wall really locked in the whole structure, and gave it a super clean, professional feel inside and out.
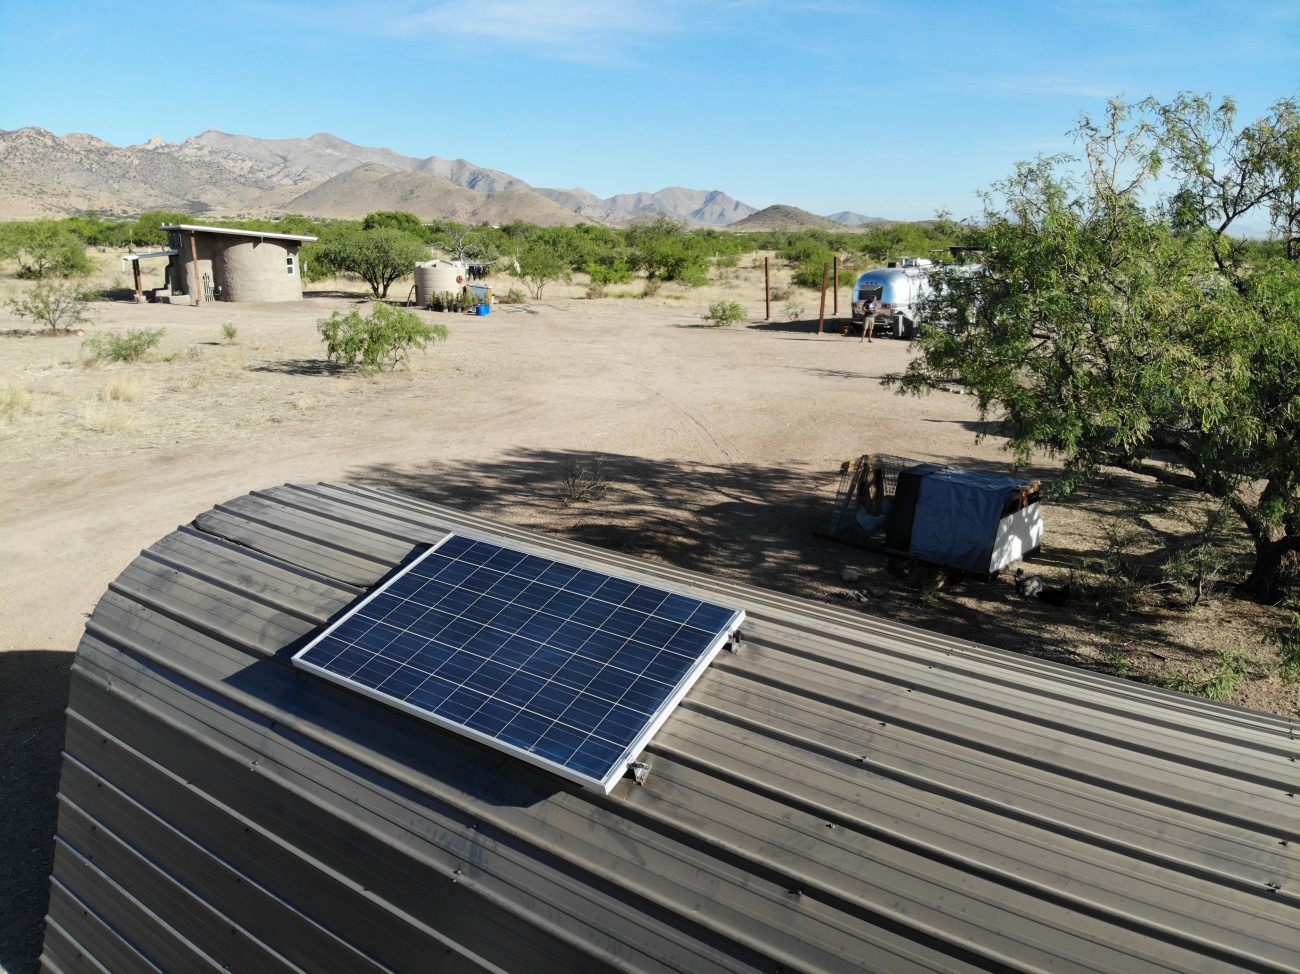
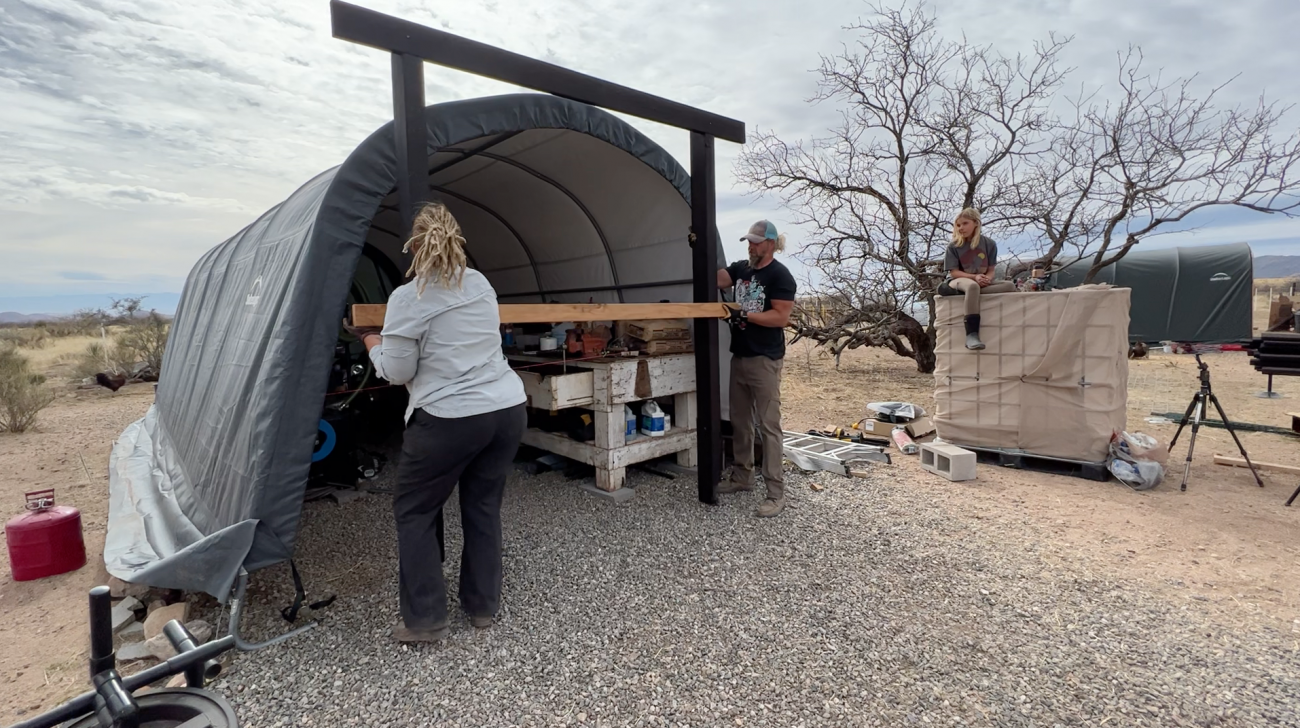
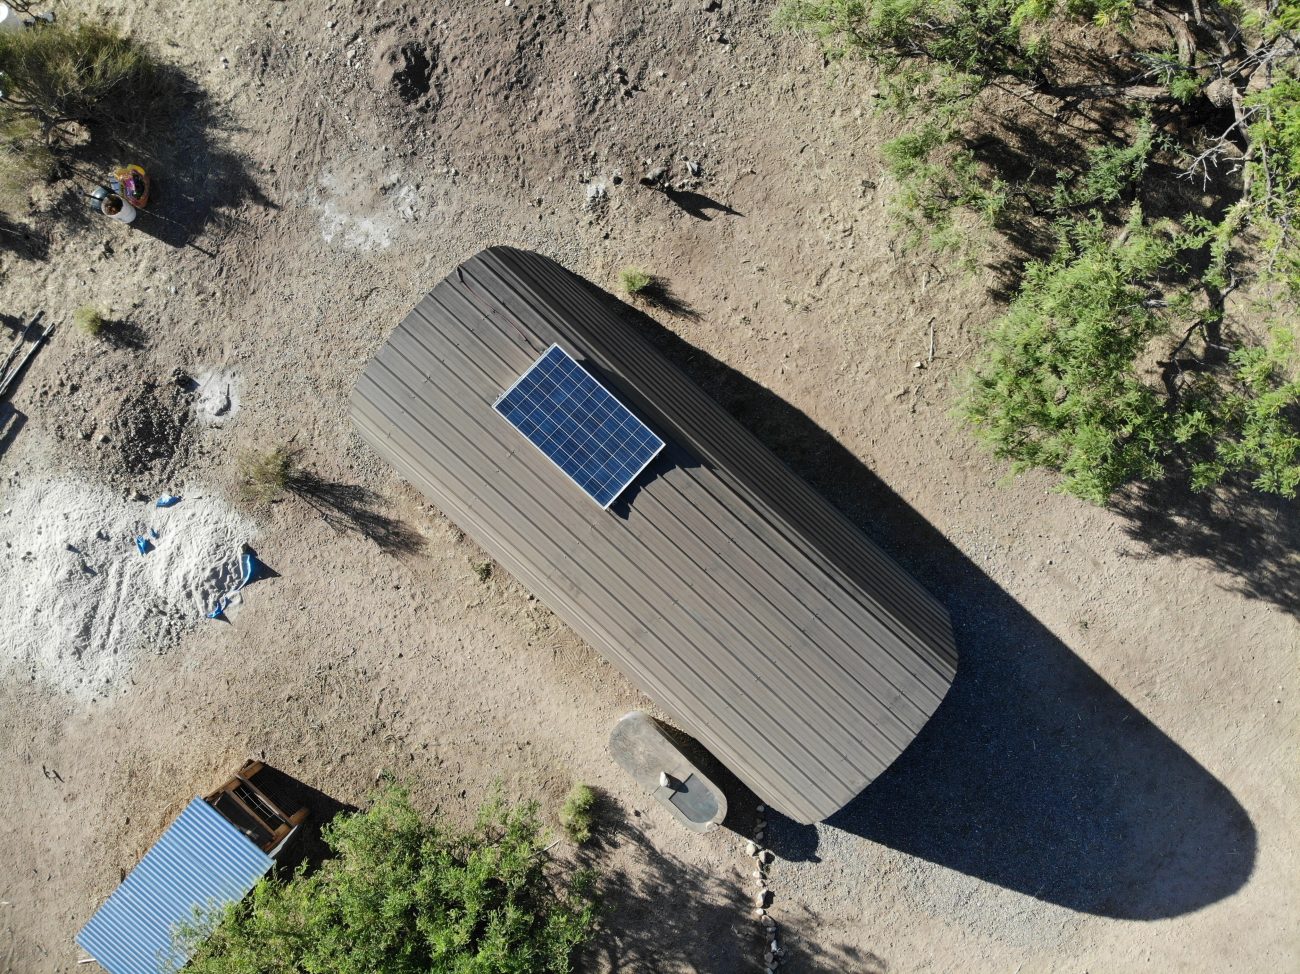
Solar Panel Install
Like we mentioned earlier, each Garage-in-a-Box would be getting it’s own mini solar power system. We’ll get to the nerdy details of that soon, but the first step was to mount the solar panels themselves.
If you’ve seen our massive off-grid DIY solar power system video, then you know we’re big fans of SanTan Solar. They buy used residential and commercial panels, test them, and sell them for massively reduced costs.
Our 7200W panel array used their budget 240w panels, and we liked them so much we decided to buy some more for these buildings. And maybe for a few other projects coming up :). This helps simplify things here on the homestead - by having the same panels everywhere it’s much easier to keep track of their technical details and switch out panels if one were to break.
Here’s the thing - these panels are BIG. They’re 65”x35” and weigh almost 40lbs. And in case you hadn’t noticed, these ShelterLogic tents do not have flat roofs!
So how did we mount a massive solar panel to a rounded metal roof?
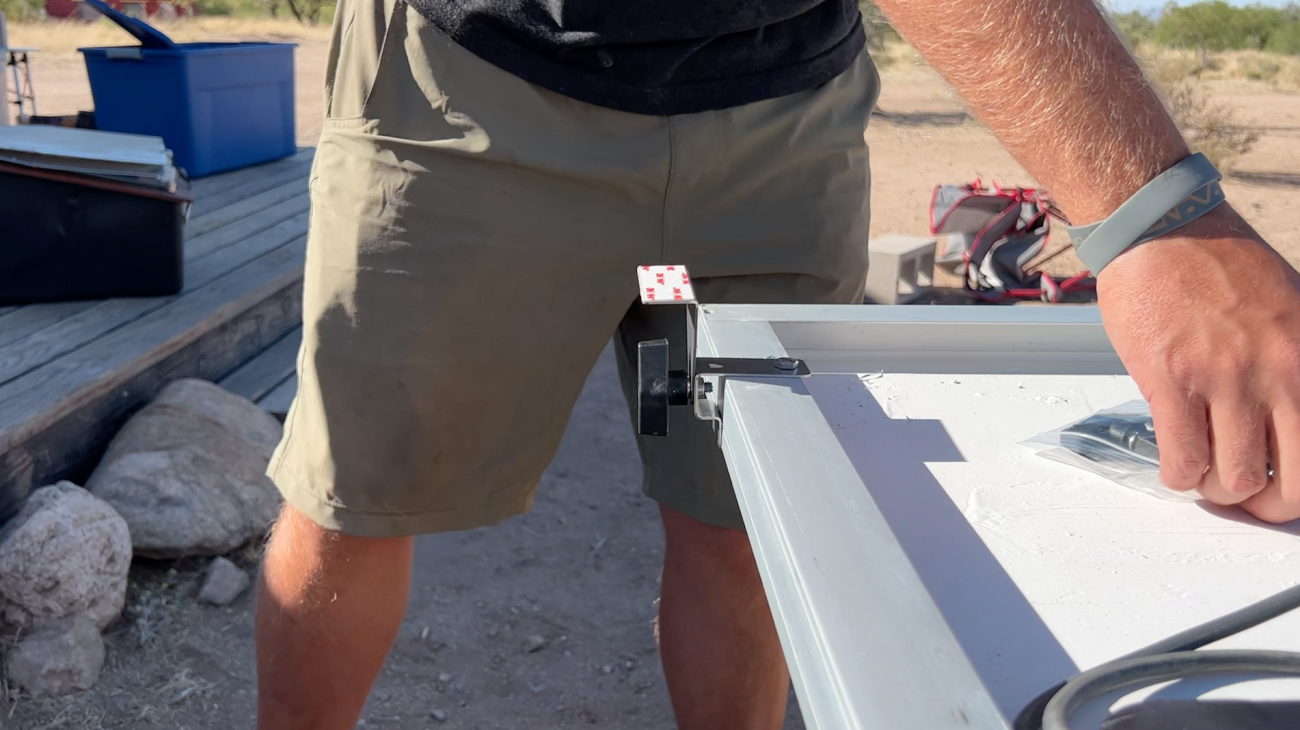
Thankfully we had dealt with a similar problem when installing solar panels on our renovated vintage Airstream. We found these Rocker Mount Feet from AM Solar, and they worked so well on that project that we used them again.
This was our process:
Step 1
Temporarily attach the mount adapter to the frame of the solar panel and then connect the L-Shaped Foot with the Knob. But don’t tighten it too much!
Step 2
Set your panel in place and adjust the feet to the curve of the roof. In our case we had to move the mounts inward a bit to make sure all the feet were touching the metal panels.
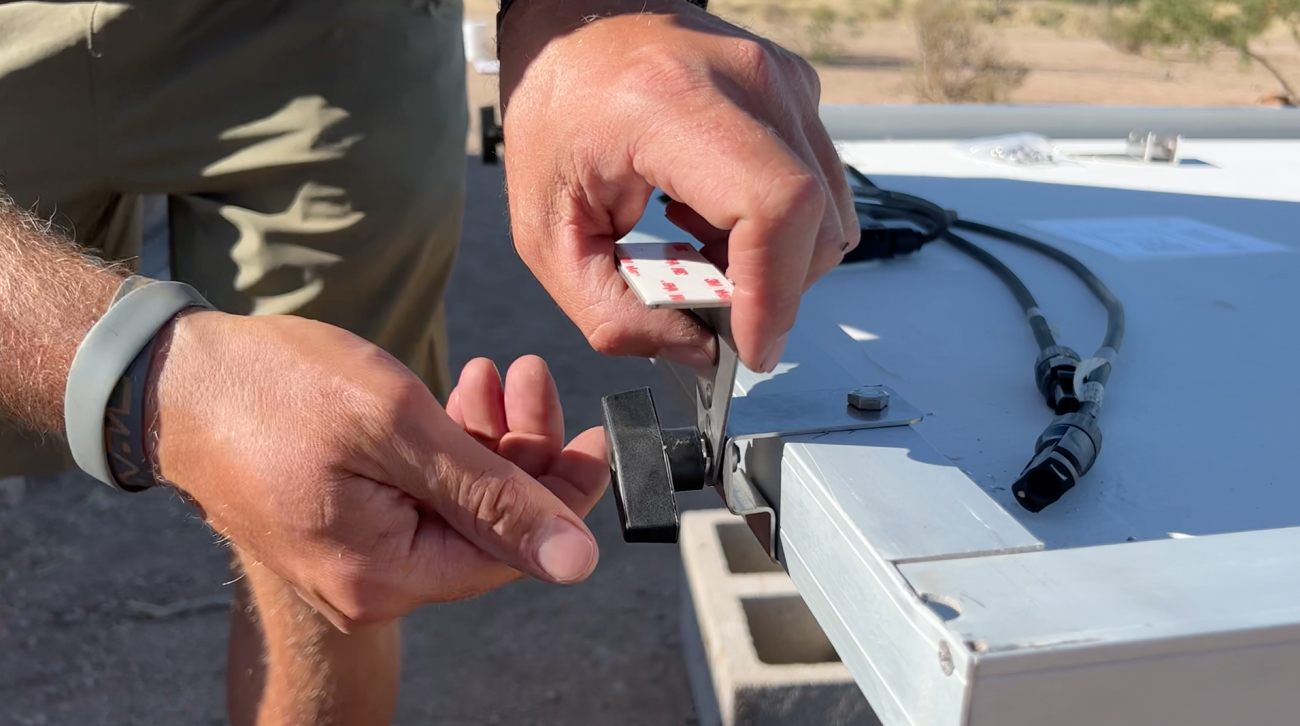
Step 3
Mark where the mount adapters should go, then drill and bolt them in place. Re-attach the L Foot Mounts (still loose), and set the panel back in place.
Step 4
For most installs you can just clean the metal surface and use the attached VHB tape to permanently stick it down. But in our case, the metal roofing panels had some small ridges that would have kept the feet from sitting flat on the entire surface. So we screwed the panels down as well.
The southwest side of the panel was the side that would get the most wind, so we made sure to screw those feet directly into the ShelterLogic Frame. Then for the back feet we screwed into some scrap pieces of wood for stability.
Step 5
An important part of the VHB tape actually working long term is to caulk around it and protect from UV rays. So we used some outdoor silicone to seal the feet and any additional holes we may have made during the roof installation.
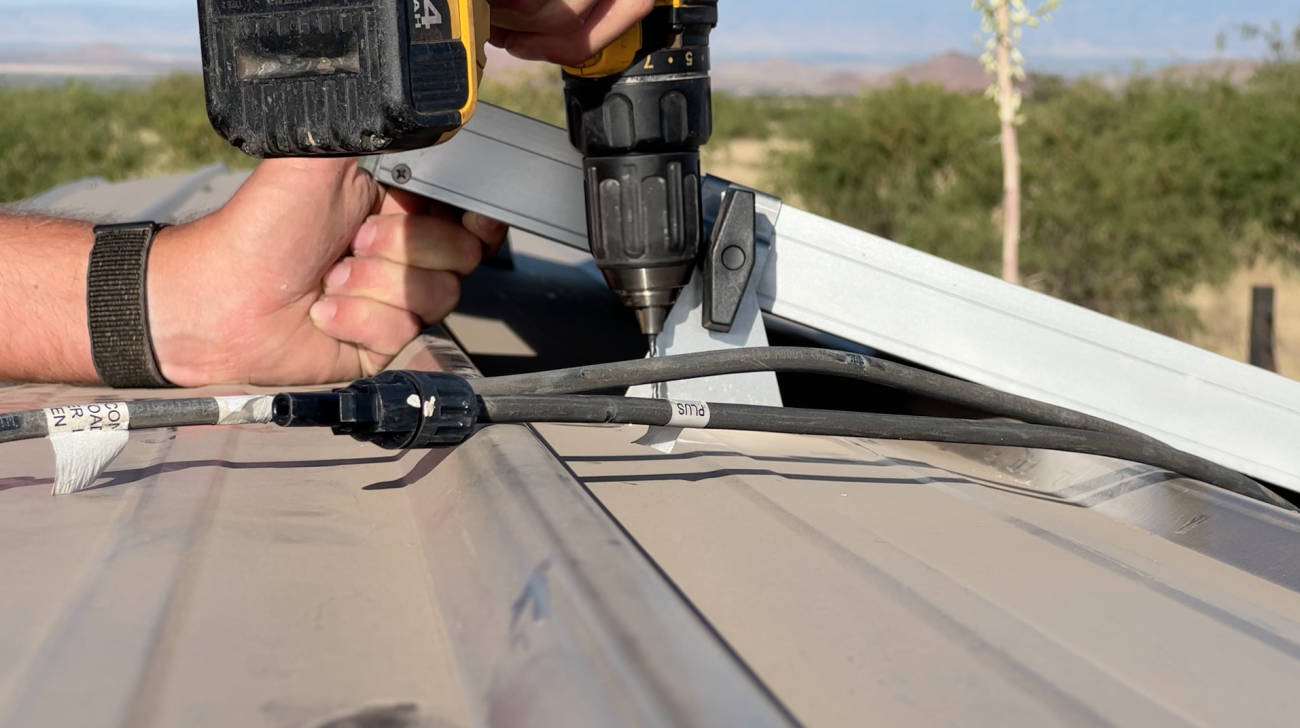
Step 6
Finally, we made up our solar wires, connected them to the panel, and ran them through the wall, making sure to use zip ties and mounts to keep the wires held down tight.
With both 240W solar panels securely installed, it was time to tackle the power systems for each building. And both couldn’t be more different.
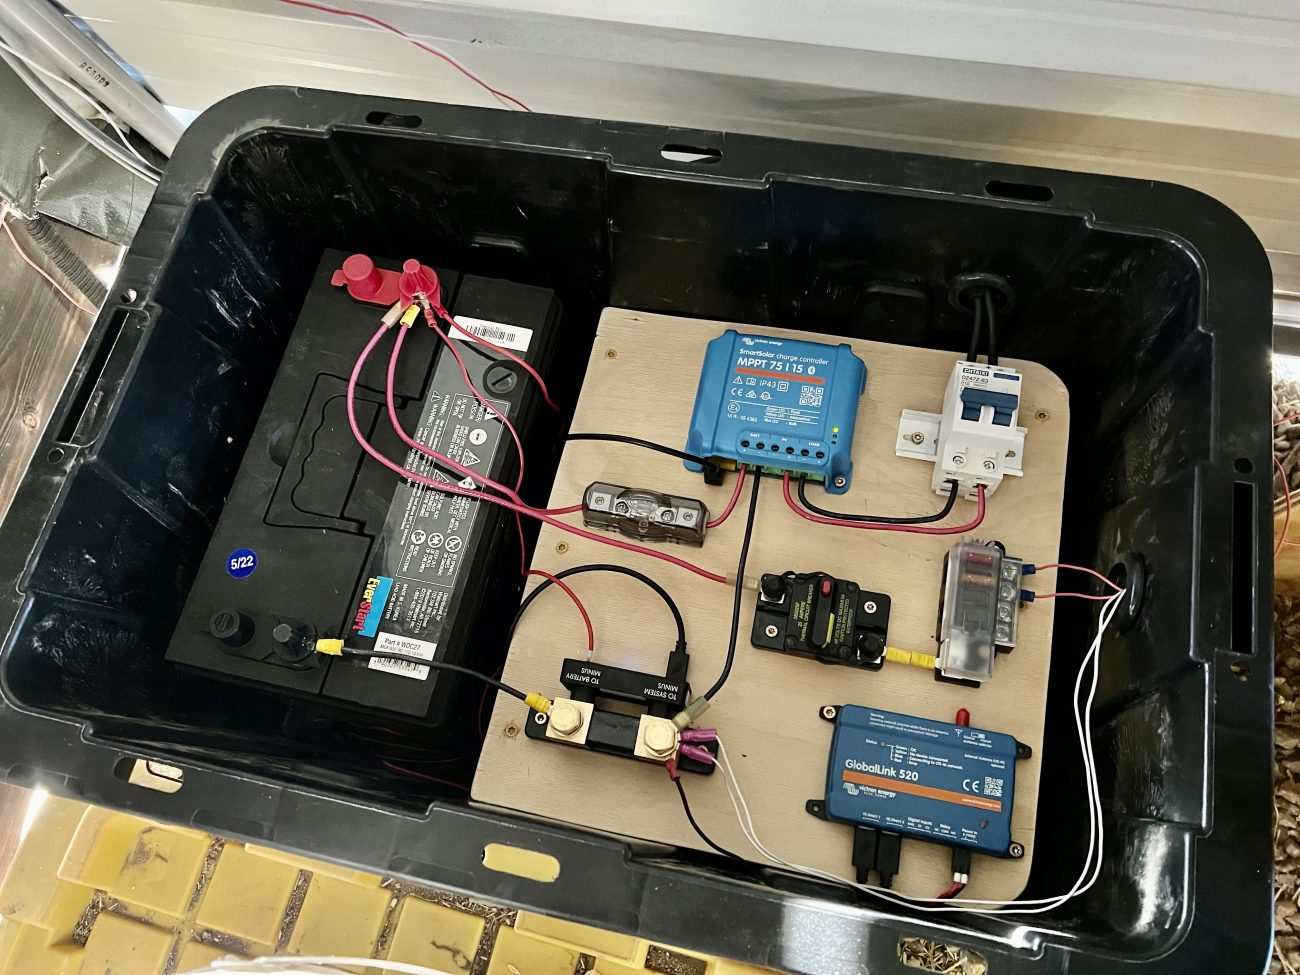
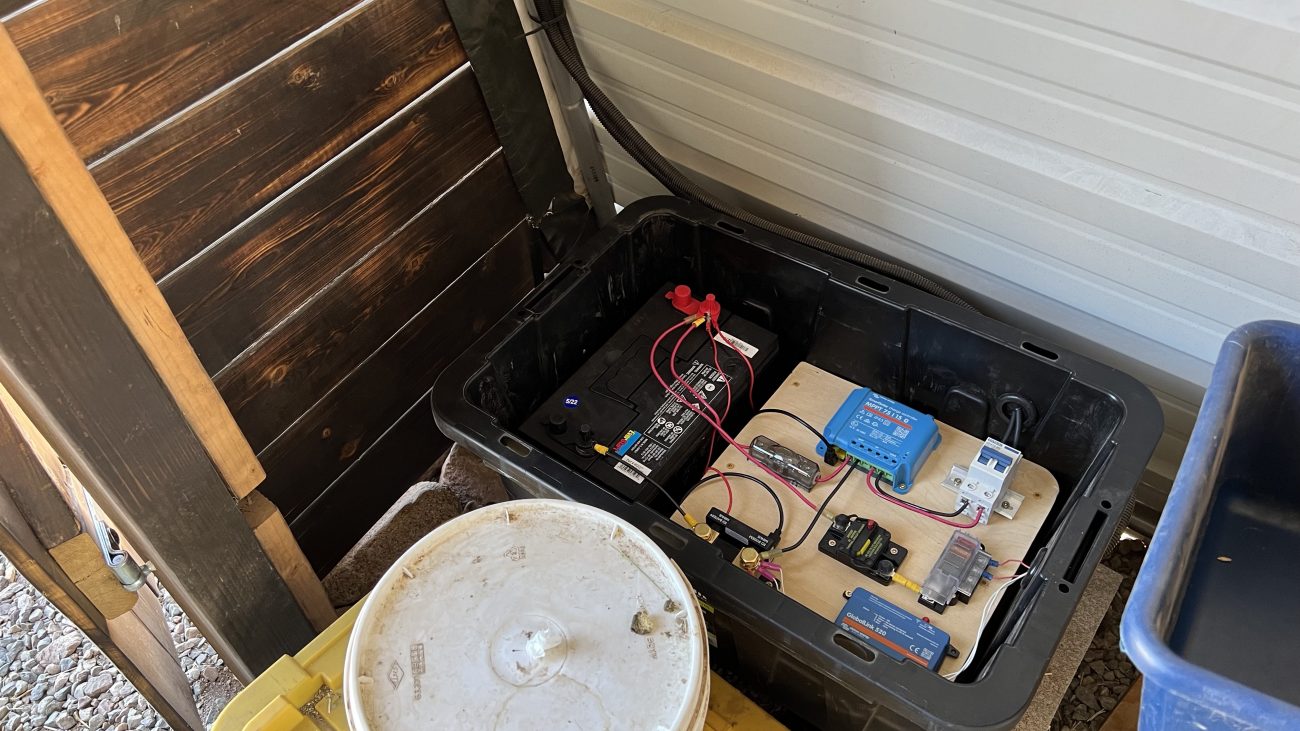
12V Feed Shed Power System
Our power goals for the feed shed were pretty simple. There needed to be a vent fan to keep air flow circulating, and lights so we could see when milking goats early or late in the day.
We decided to stay with a fully 12V system for the feed shed, buying USB lights and switches, and a DC based vent fan that we installed on the front of the building.
We also wanted to use this as an opportunity to test out connecting an additional power system to our Victron VRM Portal. Which was tricky, because this building wasn’t close enough to a steady wifi signal to get it to connect to the internet.
After a bunch of research, we settled on the GlobalLink 520 - a cell based VRM device that you connect to your charge controller and shunt, and it syncs the data with your account.
Now I’ll be honest, this power system is overkill for what we needed it to do - it was kind of more like a proof of concept for what we’ll be trying over in the Chicken Garden. There will also be a more detailed breakdown of this setup in a separate video and article, but here’s the basics:
240W Solar Panel (37V 8A)
This used 240W panel from SanTan Solar just had a positive and negative wire that we need to connect to the charge controller.
100AH Deep Cycle Lead Acid 12V Battery
Because the shed has temperature extremes of hot and cold, a Lead Acid battery would work just fine for our install. I grabbed a cheap Deep Cycle Marine battery from Walmart.
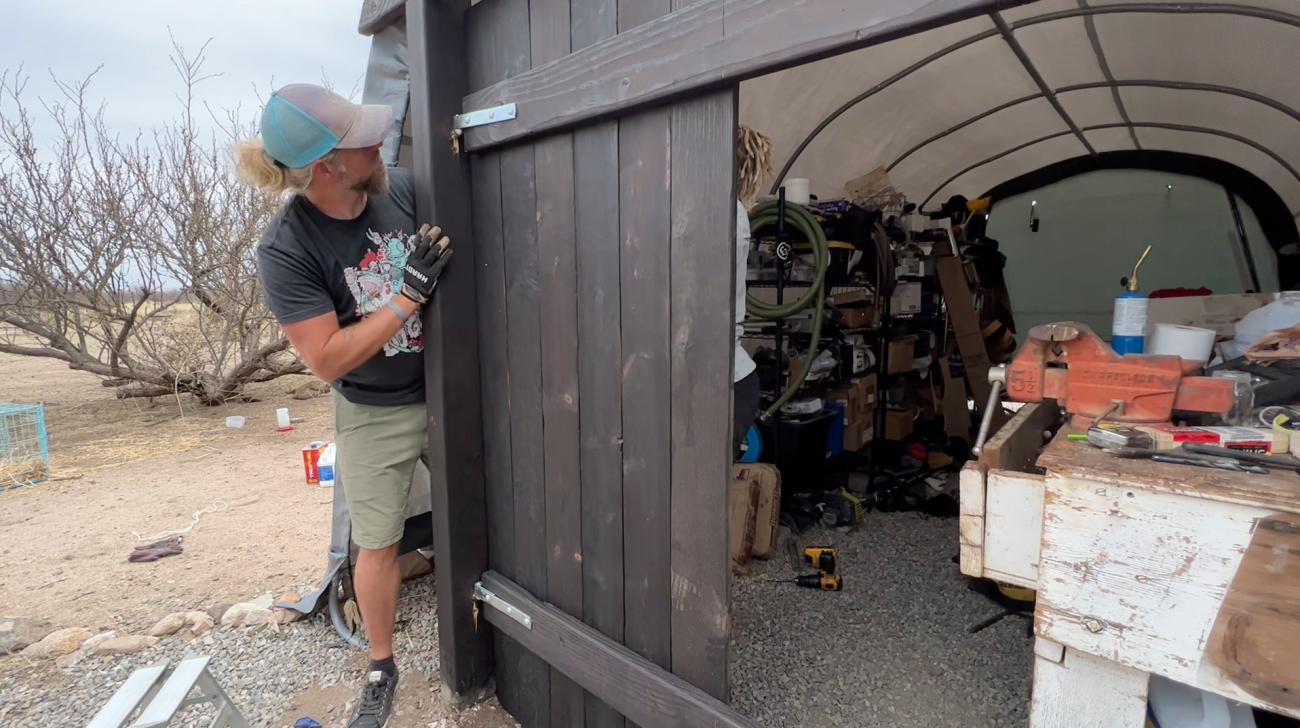
Storage Container Setup
We were going to build a power box for this, but found a plastic storage tote from the hardware store to put everything in. It was about 12"x26"x18", the battery fit perfectly, and we just cut a few pieces of scrap wood to mount everything to.
2 Pole 10A Circuit Breaker
We drilled a hole for the solar wires to come into the box, and added a 2 pole 10A circuit breaker in case of a power or lightning event.
Victron Smart Solar MPPT 75V/15A
From there we go through the solar charge controller. The SmartSolar MPPT 75V 15A is sized specifically for the solar panel. Positive and negative wires go to PV in, battery wires are detailed next. We also connected a VE.Direct cable to the GlobalLink 520.
25A Mini ANL Fuse
Coming out of the charge controller, the positive wire runs through a 25A Mini ANL fuse and cover for additional protection, and to the positive post of the battery.
Victron SmartShunt
The negative wire runs to the system minus side of the Victron Smart Shunt. The battery minus side of the shunt connects to the negative post of the battery. And the VBatt+ wire goes directly to the positive battery post. A VE.Direct cable connects to the GlobalLink520 as well.
DC Circuit Breaker and Fuse Block
From the positive battery post, we added a 25A DC Circuit breaker and fuse block to connect each item to so they could have separate fuses. The block has a few extra spaces should we decide to power more things in the future.
GlobalLink 520
The GlobalLink 520 needed power, so it is hardwired to the positive and negative post of the battery. And of course, the VE.Direct cables from the charge controller and shunt both connected here as well.
Loads
Finally, we ran the positive lines of each load to it’s own connection on the fuse block, and the negative lines to the system minus side of the shunt.
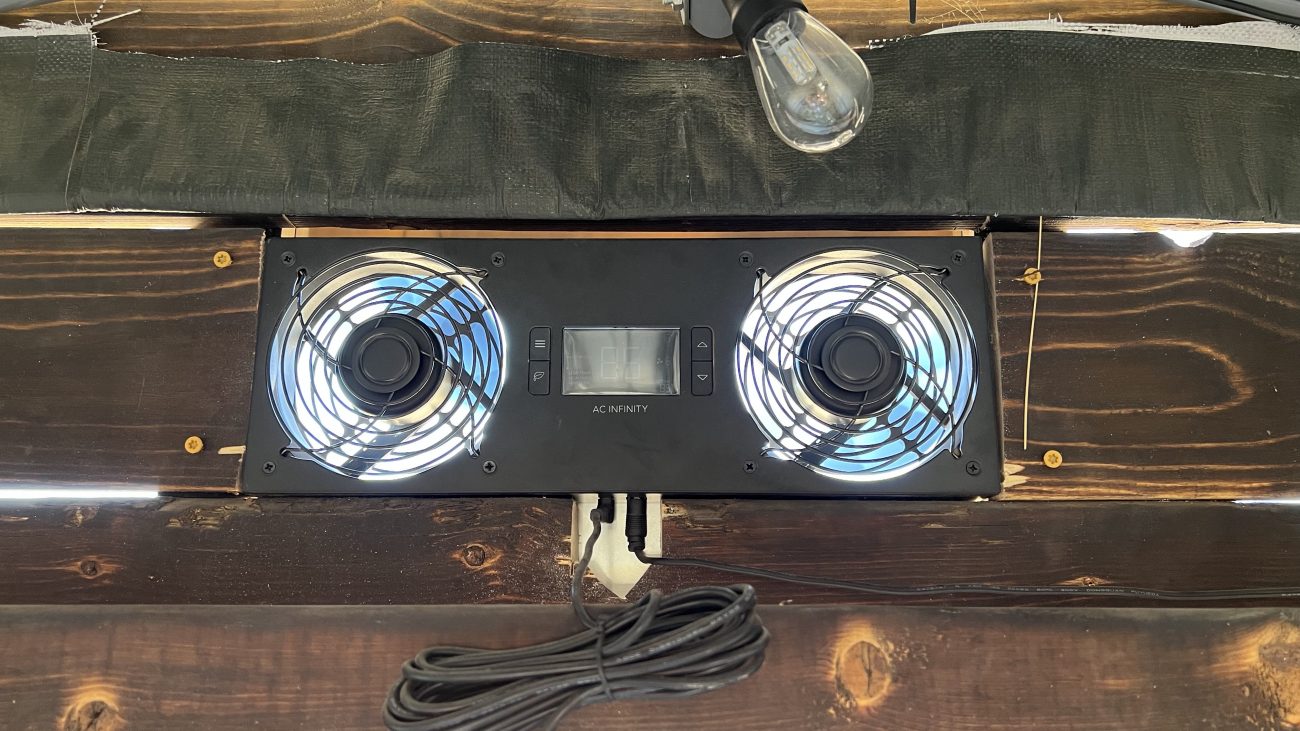
Vent Fan
This AC Infinity AIRTITAN T8 was the perfect size to fit over our barn doors, used DC motors so all I had to do was chop off the AC power brick and wire directly to the 12V system, and it has a temperature and humidity sensor with programmable alarms and settings to tell the fan to come one exactly when we want it to.
USB Lights and Switch
We found these super simple string lights that run very low power, have shatter proof bulbs, and connect using a USB connection. Technically USB is 5V so we needed a 12V USB outlet, and the model we found even had a switch for the whole thing. This worked out perfectly as an easy to access light switch for whoever was using the shed.
Again, this system is built to grow with us, and there’s plenty of headroom to add more things to power as we need them.
Garage Ecoflow Solar Generator Power System
We approached the power in the garage very differently. The fan we chose was higher power and AC based - plus it’s a garage! 120V power is kind of a no-brainer.
We wanted to charge our power tool batteries, have some lights, and run pretty much any other tool we might need. But this quickly got more complicated since it would involve an inverter.
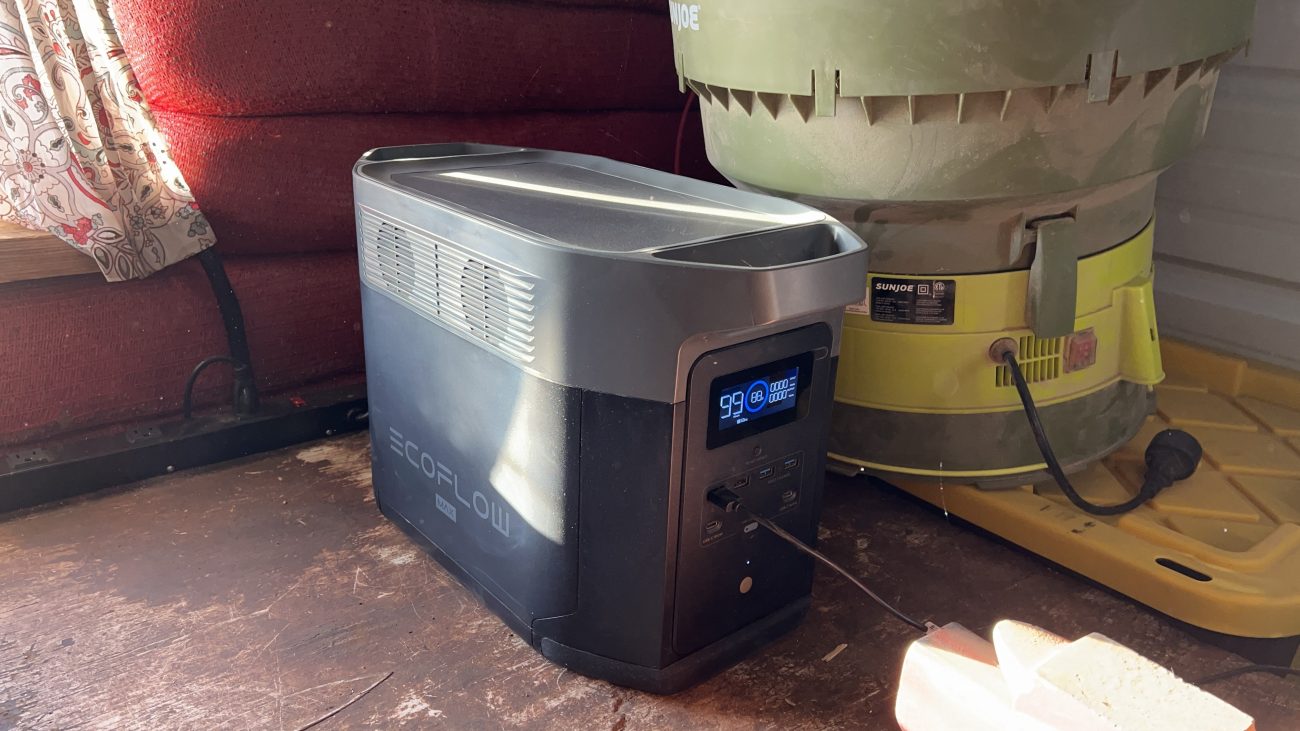
And this is where I get to talk about our sponsor, Ecoflow. They sent us a DELTA Max 1600 Portable Power Station to review. An all-in-one unit that does DC power, AC power, and can be charged via solar panels was a perfect fit for our use case. Here’s a few other cool features of the DELTA Max:
- EcoFlow power stations charge at 1,600W when plugged into AC Power - and you can combine up to 800W of additional solar input to charge it even faster.
- Even though the DELTA Max 1600 acts as a 2000W generator, it can actually run 2,800W appliances thanks to X-Boost. It can even surge up to 5,000W. Let’s see your gas generator do that! With 6x 20 amp outlets, you can power all the things.
- The Ecoflow app lets you monitor charge levels, usage data and adjust deep level settings via your smartphone.
- Our unit shipped with about 1.6kwh of lithium battery storage, and you can expand with optional battery banks up to 6kwh. The plug and play nature makes it easy to assemble a small lithium battery bank and inverter based system quickly.
- The unit is totally portable - it only weighs about 50lbs or the same as a small gas generator.
- You can even use the DELTA as emergency backup power. With its high surge capacity you can still run many appliances in your house worry free.
Now let’s look at specifically how we set it up in our garage.
Solar Panel
Just like the feed shed, we used the same 240W solar panel mounted to the roof with wires run though the wall to connect to the Ecoflow unit. Now obviously the solar charges a lot slower than a direct AC connection, but the goal was that the solar panel would provide enough wattage to run the vent and intermittent power tools and keep the batteries charged up most of the time. So far, so good on that front.
Next we used Ecoflow’s special solar adapter which has an XT60 on one end, and two MC4 connectors on the other. I appreciate that they stuck with a standard solar connector that I was easily able to wire and connect myself.
120V AC Power Connections
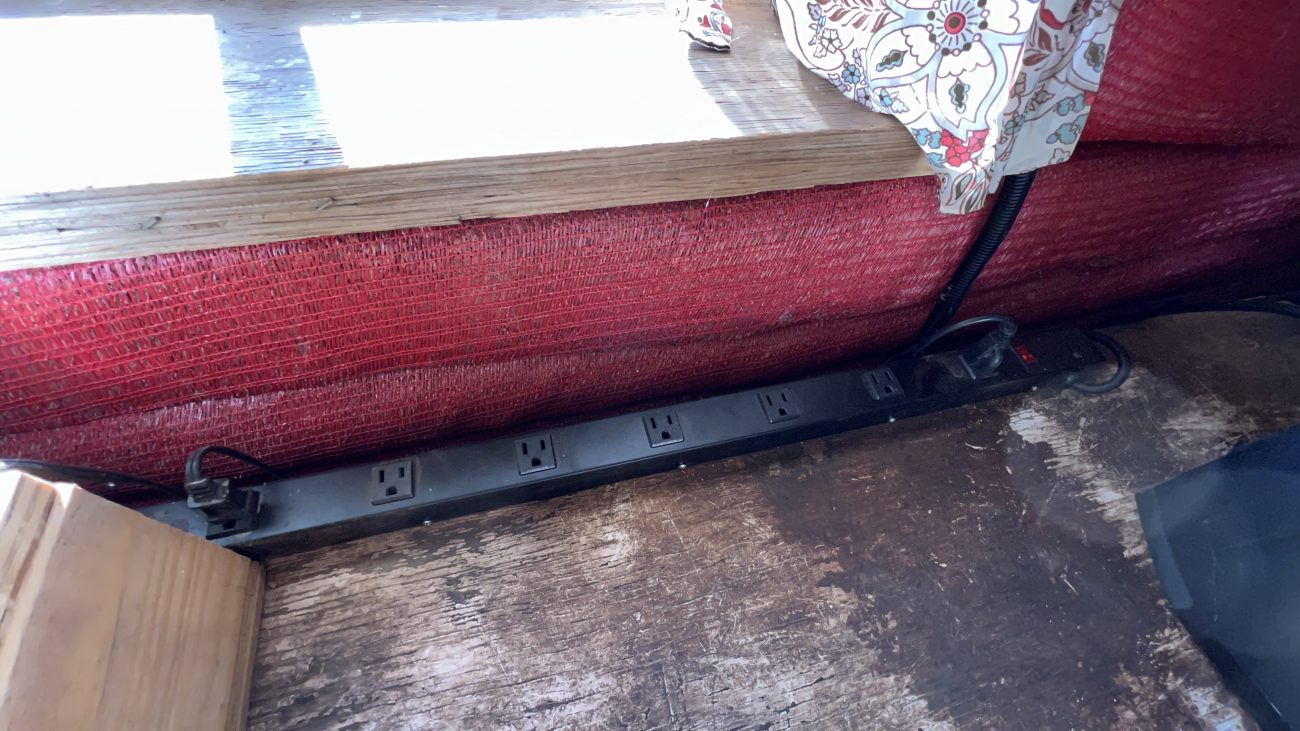
On the AC side, we got a laughably long power strip at Harbor Freight, mounted to our work desk, and plugged in. This gave us easy access to power everything else without having to reach around the back to find the outlets each time.
We connected our AC Infinity AIRLIFT T10, an higher powered AC version of the vent fan we installed in the feed shed, ran its cables and sensor, and mounted the separate display so we could program it to come on when we wanted.
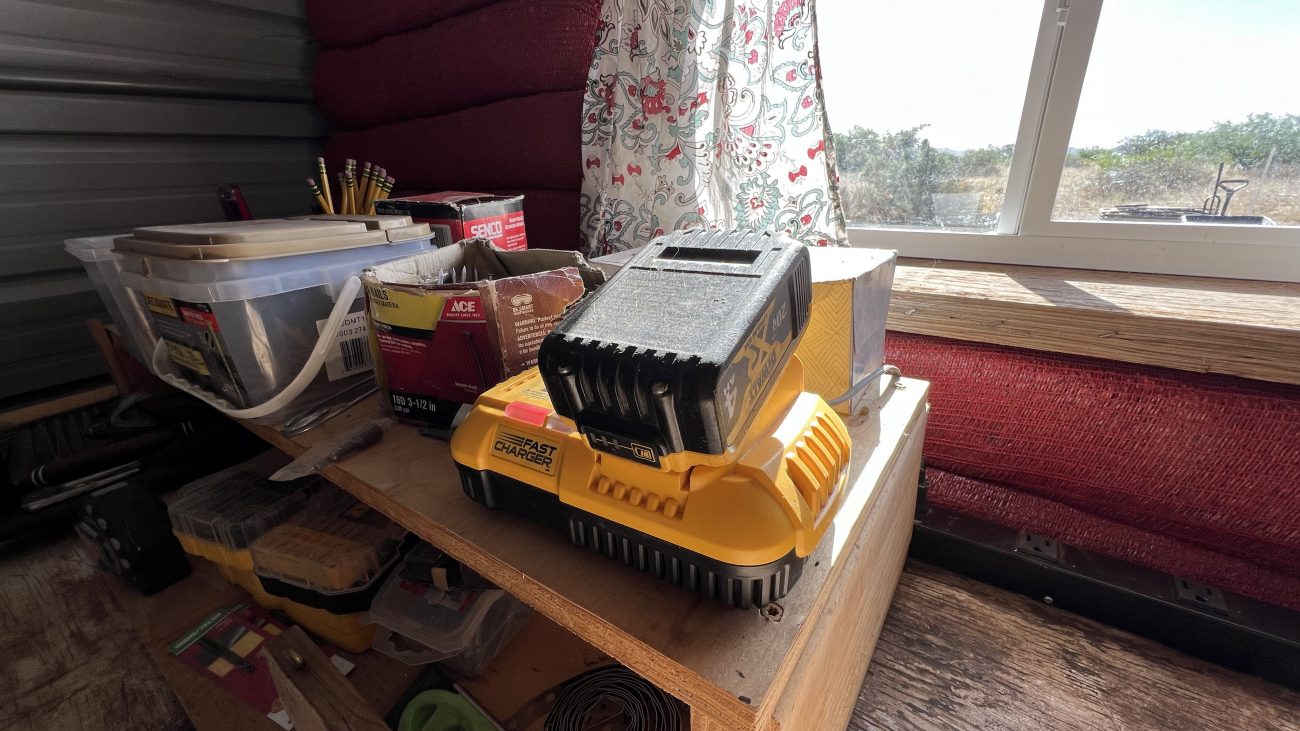
Then we plugged in our Dewalt battery charger so we would have a single place to charge batteries (hallelujah!).
Finally, we hung the same USB lights from the Feed Shed, but plugged them directly in to the DC panel on the front of the Ecoflow. If we want to turn them on or off, we just us the DC button.
The only thing I really needed to do out of the box to make this worked was to open the Ecoflow app and set the AC power not to shut itself off automatically overnight. Otherwise it’s been chugging along, running the vent fan, and powering tools like a champ!
Since the DELTA Max is still portable, we’ll be doing a more in-depth review later this year, using it for all sorts of projects. But for now we’re really loving having high wattage AC power in our garage that’s powered by the sun.
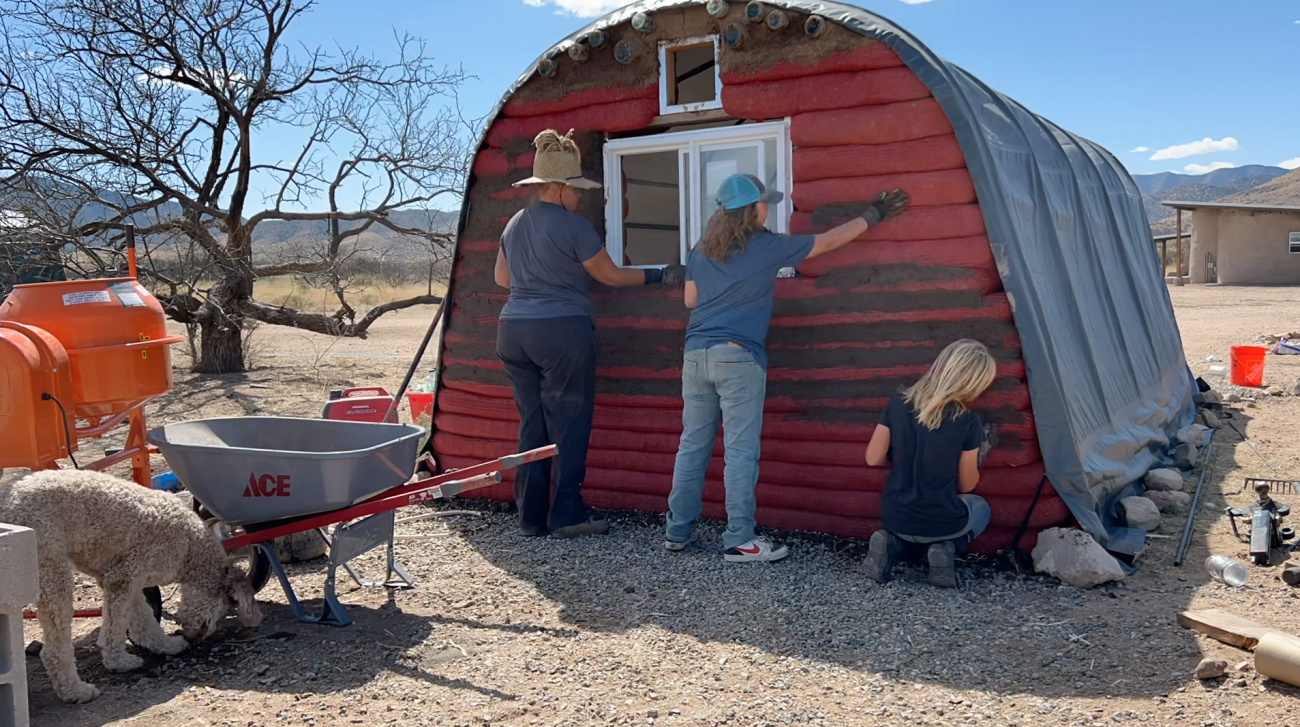
Final Soil Cement Plaster Application
Oh my goodness, it’s the final step! We headed back to those earthbag walls with their scratch plaster coat, and started applying the final coat. For this layer we went with an 8 parts native soil, 1 part portland cement ratio.
Instead of applying by hand, we used a trowel to really compress and smooth the final layer, then came back across with a wet sponge moving in circular motions to bring a bit of the sand back up to the surface and add a subtle texture.
We made sure to mist these walls down a few times the next day, and went back with the sponge again to patch any hairline cracks that showed up.
These turned out to be a great final plastering test for our upcoming larger chicken garden project, and we really like how it turned out.
Recap + Feature Highlights
Whew, what a rid this has been, friends! Our flimsy ShelterLogic Garage-in-a-Boxes got a complete high desert makeover. Let’s recap!
- Front facing barn doors and Shou Sugi Ban wooden planks provided a beautiful finished look
- The doors can be locked, held closed with fasteners from both sides, or held open with ground poles
- Vent fans helped circulate air so it doesn’t get trapped and heat up to dangerous temperatures
- Earthbag walls saved on material costs
- Windows and bottles provide beautiful light and views in the morning
- The metal roofing panels are securely mounted to the frame, keep the water out, and make it feel like a truly finished building
- Lights are super handy for working on projects at night or early morning animal feedings
- The feed shed 12V system is running well and connected to our VRM so we can see stats anytime
- The garage Ecoflow DELTA Max Power Station gives us true AC power for tools and projects while being charged back up by solar
- The whole thing is super solid now, we never have to worry about it leaking or blowing away
Cost Breakdown
We’re quickly learning that no matter how much work we do on a project, everyone just wants to know how much it cost! That’s fair. This whole re-build was definitely a cost benefit analysis, and we were constantly questioning whether we wanted to invest a chunk of money into these things or start over.
But like we mentioned, by the time you start researching other options like pre-built sheds or shipping containers, we felt like we could do it cheaper this way.
Let’s find out.
Feed Shed Materials
Item | Cost |
|---|---|
| $499.00 | |
4”x6”x8’ x2 | $50.00 |
2"x6"x8' x3 | $40.00 |
2"x4"x8' x4 | $32.00 |
1"x6"x8' x20 | $235.00 |
4" Steel Screw Hook x4 | $20.00 |
8" Steel Hinge Strap x4 | $32.00 |
Bots & Nuts x12 | $5.00 |
| $20.00 | |
$9.00 | |
| $15.00 | |
16" Hyperadobe Bag Roll (partial) | $20.00 |
| 4" PVC Pipe + Caps | $10.00 |
23' Burnished Slate 29 Gauge Metal Roofing Panels x8 | $929.00 |
1" Metal to Metal Screws | $60.00 |
3/4" Stitch Screws | $12.00 |
36"x24" Vinyl Window | $75.00 |
Total | $2,063.00 |
Feed Shed Power Gear
Item | Cost |
|---|---|
| $45.00 | |
| $80.00 | |
| $40.00 | |
| $30.00 | |
| $27.00 | |
| $34.00 | |
$120.00 | |
| $16.00 | |
| $119.00 | |
| $130.00 | |
| Victron GobalLink 520 | $230.00 |
| $13.00 | |
| $5.00 | |
| $46.00 | |
| $25.00 | |
| $119.00 | |
| $24.00 | |
| $18.00 | |
Total | $1,121.00 |
Feed Shed Total Cost
Item | Cost |
|---|---|
Materials | $2,063.00 |
Power Gear | $1,121.00 |
Total | $3,184.00 |
Garage Materials
Item | Cost |
|---|---|
| $499.00 | |
4”x6”x8’ x2 | $50.00 |
2"x6"x8' x3 | $40.00 |
2"x4"x8' x4 | $32.00 |
1"x6"x8' x20 | $235.00 |
4" Steel Screw Hook x4 | $20.00 |
8" Steel Hinge Strap x4 | $32.00 |
Bots & Nuts x12 | $5.00 |
| $20.00 | |
$9.00 | |
| $15.00 | |
16" Hyperadobe Bag Roll (partial) | $20.00 |
| Rectangular Soffit Vent x2 | $10.00 |
23' Burnished Slate 29 Gauge Metal Roofing Panels x8 | $929.00 |
1" Metal to Metal Screws | $60.00 |
3/4" Stitch Screws | $12.00 |
36"x24" Vinyl Window | $75.00 |
Total | $2,063.00 |
Garage Power Gear
Item | Cost |
|---|---|
| $45.00 | |
| $80.00 | |
| $40.00 | |
| $1,700.00 | |
| $25.00 | |
| $159.00 | |
$20.00 | |
| $24.00 | |
Total | $2,093.00 |
Garage Total Cost
Item | Cost |
|---|---|
Materials | $2,063.00 |
Power Gear | $2,093.00 |
Total | $4,156.00 |
So as you can see the base materials of these buildings came in way cheaper than anything else out on the market. Of course, a whole lot more elbow grease was involved. But that's not anything we're scared of. And with an extra investment we were able two add two different kinds of solar power systems as well. Sweet!

Wrap-Up
Whew! Can you believe you made it this far? Can you believe we made it this far? What a project this turned out to be! Maybe one day we’ll have wads of cash laying around that we can throw at pre-built sheds and shipping containers, but for now we’re happy to roll our sleeves up, use our brains, and come up with better solutions.
If you’ve enjoyed this project, you may want to check out a few of our other full builds here on the homestead:
- Hyperadobe Solar Shed Office
- DIY Off-Grid Solar System
- Earthbag Chicken Garden
- Solar Powered Water Pump
We’re just getting started out here, and there’s lots more to come. We hope to see you again soon!
Apparel
Grab a fun, comfy t-shirt & help support our family.


About the Author
Jonathan Longnecker is the strongly opinionated tattooed and bearded half of Tiny Shiny Home. He loves making music, figuring out nerdy solutions, exploring the outdoors, and living off-grid.
comments powered by Disqus