Solar Shed Office Part 2: Switching to Earthbag & Digging the Foundation

Sometimes the best laid plans need to be flexible! After settling on a strawbale solar shed, we had to change things up when the cost of lumber doubled over the last month!
Switching our Solar Shed Office to Hyperadobe
The California wildfires and COVID-19 pandemic created a huge constraint on lumber, and our deck foundation alone would have cost over $3,000. We decided we wanted to build this office more economically so it was back to the drawing board.
Our endgame was always earthbag housing, but with the solar shed office we were hoping to get something up faster and...um...more square 😂.
But after doing more research and visiting with other people in the area already in the middle of their own projects, we realized it was possible to build a rectangle "hyperadobe" building.
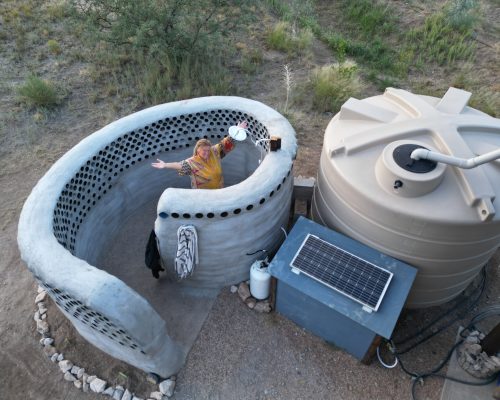
So we changed our plans completely. Instead of a passive solar rectangle strawbale building , we pivoted to a "rectangle intersected with a dome" earthbag building. This would allow us to experiment with both types (domes & vertical walls) at once.
We even sourced a different type of bag that was a fraction of the cost of the CalEarth ones. We're excited to try them out!
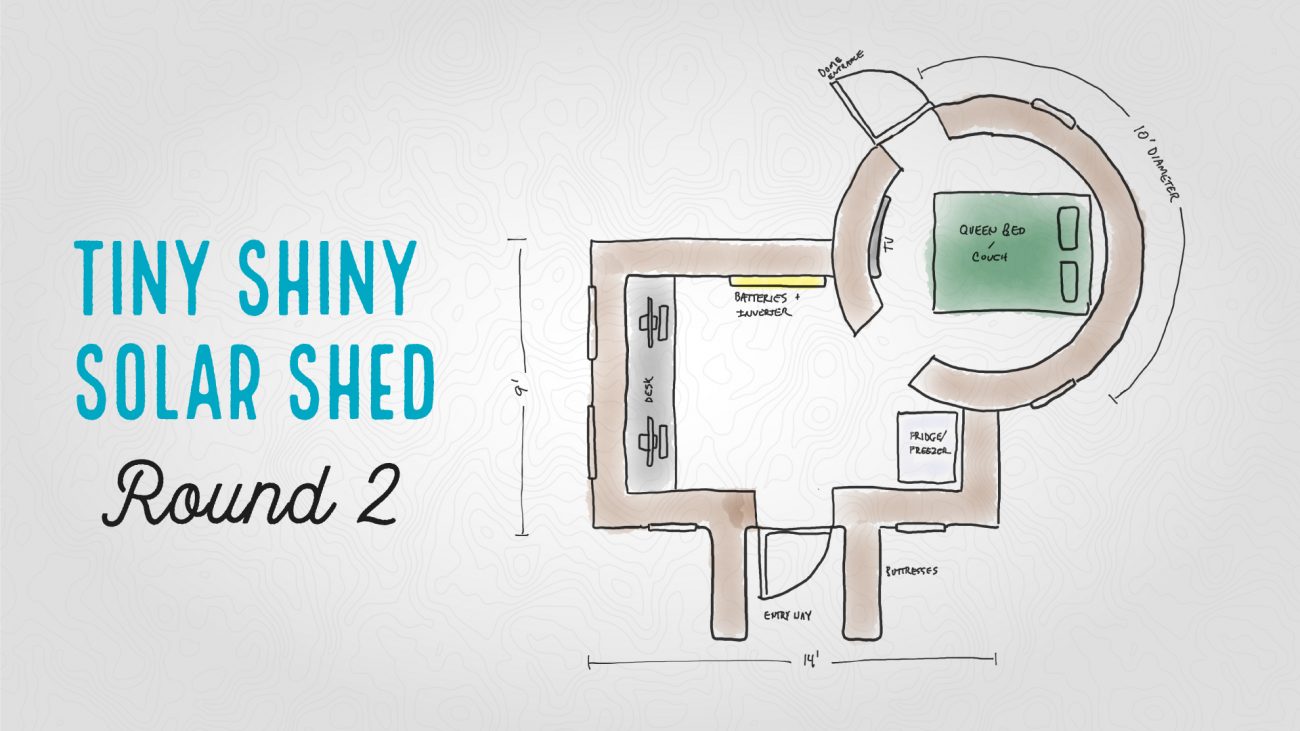
Solar Shed Office Hyperadobe Floorplan
The new floorplan still comes it at under 200 square feet (so we don't have to get a permit in Cochise County), but includes a 9'x14' rectangle and a 10' dome.
The West end will still include the desks for computers, the North wall will house the batteries + inverter, and the dome will be our hangout room with a convertible couch/bed & TV. Over in the SE corner we'll put a fridge or freezer for food storage.
What's cool about this design is that the dome can be closed off and become a guest room for anyone visiting.
Digging the Foundation
The first step was to dig the rubble trench foundation. After lots of research, and realizing some people dig down 5 feet and other just put the bags directly on the ground, we decided to split the difference. We would dig the trench wide enough for our 16' bags, and deep enough (about 18") to get a good layer of gravel in and at least one layer of bags at the lowest point.
This meant we had to dig much deeper on the West end because of the way the land sloped, but with all the kids and Nine Nine helping, we finished our first past in one weekend! Pro tip: get a pick axe, and thank me later 😂.
Next Steps
Turns out we still have a lot to do. We need a proper laser level to check if our trench digging is complete, a crap ton of gravel, our earthbags, a faster way to mix the dirt, and a better bucket delivery system. Lots of planning and trips to the hardware store.
But we're excited to finally get moving on our first building on the property!
If you’d like to keep up with our earthbag construction of our solar shed, make sure you’re subscribed to our YouTube channel and turn on that notification bell! We’ll see you next week!
Apparel
Grab a fun, comfy t-shirt & help support our family.


About the Author
Jonathan Longnecker is the strongly opinionated tattooed and bearded half of Tiny Shiny Home. He loves making music, figuring out nerdy solutions, exploring the outdoors, and living off-grid.
comments powered by Disqus