30 Days of Hyperadobe Solar Shed Office Daily Recap
Have you ever done something crazy? Like - "what were we thinking, how are we ever going to do this crazy?" This is the chronicle of our 30 60 Days of Hyperadobe Solar Shed Office build. And it is…crazy.
Update: We extended this 30 day project so keep on scrollin' below to see additional progress.
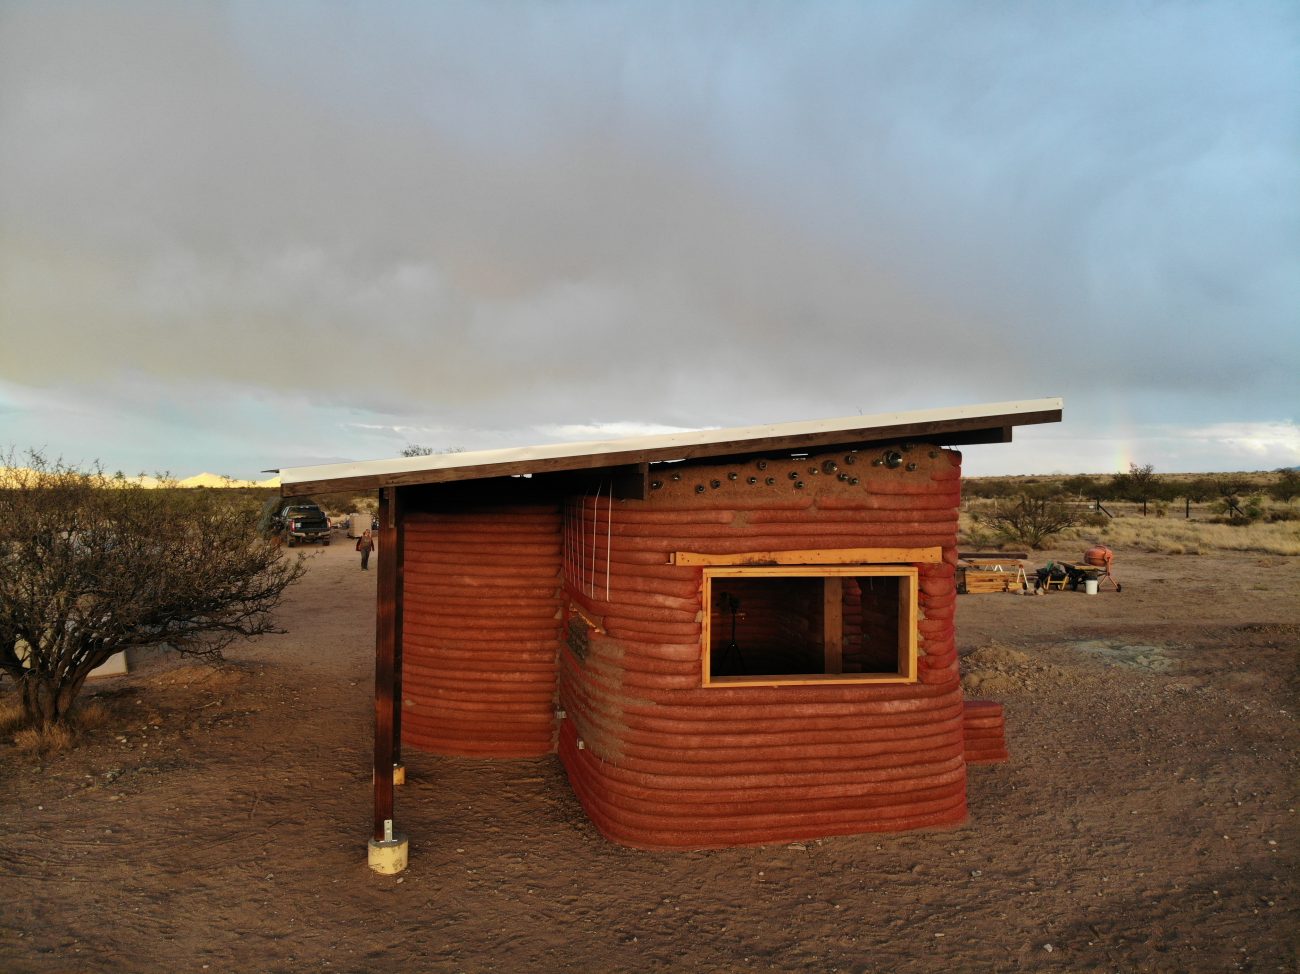
To give you a quick backstory, this project started started as a solar shed to house our batteries and inverter for our off-grid solar system. Then we thought, “hey since we’re building something let’s make it an office, too. Jonathan & Ashely could really use a space to work.” It was going to be a pretty simple rectangle straw bale build, but because of insane lumber price increases, we quickly pivoted and changed it to a combo rectangle & dome hyperadobe building. The dome would house a bed and couch hangout area that could double as a guest room for family.
Why did we choose hyperadobe instead of superadobe earthbag?
- We already had the right mix of clay and sand in our native soil (free materials!)
- Tube mesh bags were half the cost of solid superadobe cal-earth style bags
- Hyperadobe bags didn’t require barbed wire between the courses because the mesh interlocks when tamping. This kept the cost down and made the project much safer for the kids.
- Speaking of the kids, this type of building was something we quickly realized anyone could do. This would truly be a family effort.
- These hyperadobe bags were also UV treated so we didn’t have to worry about keeping them covered or getting the building up too quickly before they deteriorated.
- We were very interested in earthbag building, and this seemed like a newer evolution of that methodology that was even easier and cheaper than what was out there.
So after months of all this research and planning, it was time to get started. We dug the foundation and started laying the first courses. Then we got sidetracked with a bunch of other things on the homestead.
But we’d still work on a course here and there, slowly going up higher and higher until we it was time to install a rough opening for our door and form for our entryway between to two structures.
Finally we got to our electrical box level, and had to make some important decisions about where power would be both inside and outside the building.
Oh, we also made a video explaining our dolly bucket system, and the whole process for laying bags.
And that brings you up to speed where this 30 day project starts. You see, all that progress before I mentioned took months of work. But we asked ourselves, “What could we do if we worked on this thing every day for a month?” And then we asked ourselves, “What if we chronicled the whole process and made a video about it every day, too?”
And then we said, "Nah, that’s crazy!” and proceeded to do it anyway.
Our goal was to complete all the hyperadobe earthbag courses, build the roof, and install the windows and doors by the end of the 30 days. Did we do it? Read on to find out ;)
What follows is a day by day account of our project along with the video we posted each day. Enjoy!
Day 1
Where it all started! But before we could lay any bags, we had to finalize and install our electrical boxes. If you watched the previous video, we figured out how to build the interior electrical box cleats, but were struggling with the exterior ones because there needed to be a way for the electrical wire to go from the inside to the outside. It’s kind of confusing.
Anyway, we ended up using 2x2’s on each side of the conduit, and that worked perfectly.
Building and installing the electrical box cleats took all morning, so we really had to bust it to finish a full course by the end of the day. But we did it!
Status Report: Course 5 Completed, 23" From Floor, Electrical Boxes Installed
Day 2
After yesterday, we were all tired and sore, and it was cold and windy. We were not in the mood, which was not good. It was only day 2! Thankfully the weather cleared up, and we were able to go up one more level by the end of the day.
Status Report: Course 6 Completed, 28" From Floor
Day 3
We had to build door cleats for this level, and came up with a better system for adding the nails for easier installation.
We were also starting to feel like we were finding our groove with the bag technique, and began using our level more consistently on each bag. Looking good!
Oh, and we realized we were quickly reaching a height where we need more scaffolding inside. Hardware store run soon?
Status Report: Course 7 Completed, 33" From Floor
Day 4
This was the day we hit the wall. The kids weren’t feeling it. We were all tired, sore, and bored of putting dirt in bags.
So we resorted to bribery. “Candy, drinks, whatever you want at the dollar store!” we told them if they finished.
It worked, and we made it up one more course for the day.
Status Report: Course 8 Completed, 38" From Floor
Day 5
Bag work came to a screeching halt today as we needed to get some work done and run into town for supplies.
Out here we're 1.5 hours from the closest big box hardware store like Lowe's or Home Depot, so a trip into town ends up taking most of the day. Ashley took the kids and they picked up our door, main windows, wood for the frames, and some smaller scaffolding to use inside the building as we get higher up.
While we didn't get up another course, securing the windows, door, and scaffolding were very important to our next steps moving forward.
Status Report: Bought Windows, Door, Scaffolding, and wood for rough frame openings.
Day 6
Today we split up to haul some water, fix our measuring tape, and build more cleats. But we got a flat tire which threw everything off.
Anyhow, we put in several cleats to help us mount connections for our wires that need to come in through the outside wall. And then went up an entire course!
If that weren't enough, we had to switch out to the spare tire as the sun went down so we could go get it fixed the next day.
Status Report: Course 9 Completed, 45" From Floor
Day 7
What a weird day! We tried to start building our window frames, but had to get our flat tire fixed, wash our puppy, and more.
Status Report: No real progress today, but we got back at it tomorrow.
Day 8
Today we got back on track. First things first, we finished building and test fitting our window frames. Then we went up a whole other course in preparation for installing the frames tomorrow.
We also had so much help today! Our neighbor came and moved more dirt for us, and some friends helped sift. We love this little community!
Status Report: Window Frames Built, Course 10 Completed, 48" From Floor
Day 9
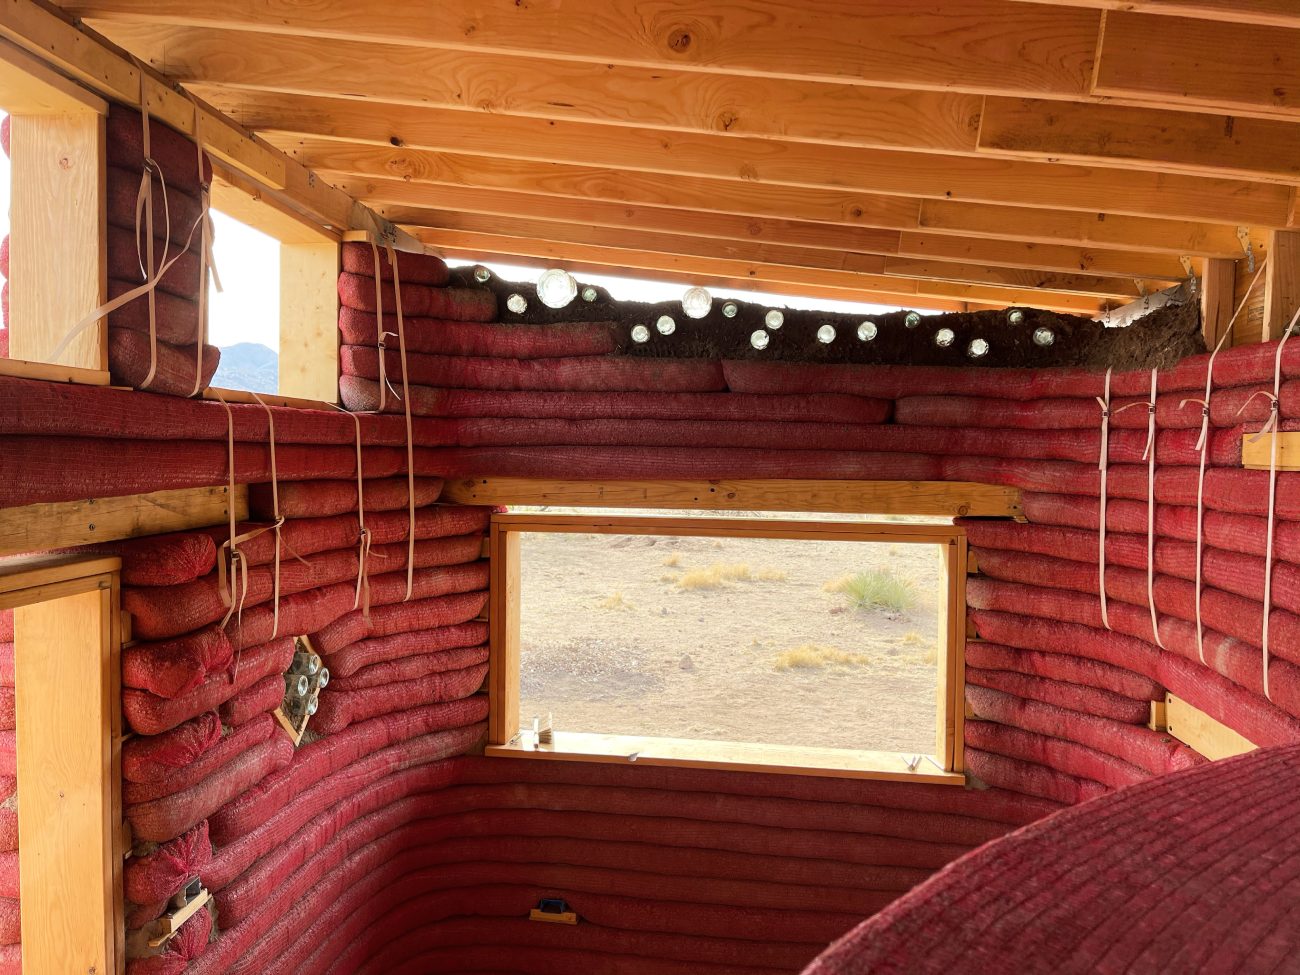
Finally! We were ready to install our window frames. We put in our huge vista window, our small egress window, and a small bottle brick window that we kind of made up on the fly. Each needed cleats and supporting 2x4's to hold them in place until we have more bags installed around them.
Status Report: All Window Rough Opening Frames Installed!
Day 10
Things started getting complicated today. In addition to having to lay bags around our windows and cleats, we also started installing our PVC sleeves for electrical coming into and going out of the building. Oh, and light switches!
All the starting and stopping + shorter runs meant we couldn't use our dolly system, and things slowed way down. We finished got half a course. We were pretty bummed, but this is all a learning opportunity, right? We thought fewer surface area for bags would equal less time, but apparently not.
Status Report: Half of Course 11 Completed
Day 11
After only getting half a course done yesterday, we rallied and did a whole course and a half! Whew!
Super proud of the kids stepping up and helping us get it done.
Status Report: Course 12 Completed, 56" From Floor
Day 12
Back when we built our door frame and entryway form, we only built part of the form. But we had gotten to the point where the bags were so high that we needed to build the rest of the arched entryway between the two buildings.
So we pieced it together and got it installed in preparation for more the next layer of bags.
Status Report: Built & Installed top of Arch Entryway
Day 13
It's glass bottle cutting day! In preparation for our bottle brick windows, we needed to do some tests on different bottle types and sizes. This will allow us to make sure we're building the frames the right depth and size.
We also took time today to answer a bunch of frequently asked questions to comments we kept getting asked over and over again.
Status Report: Cut Glass Bottles for Bottle Brick Windows
Day 14
We installed our final unique diamond shaped bottle brick windows on the front of the building, and laid down half of a course. Once again, all the stopping, starting, cleats, and now diamond windows slowed us down.
Status Report: Built & Installed Small Diamond Bottle Brick Window Frames, Half of Course 13 Completed
Day 15
Today marked two weeks since we started the challenge! This morning we did some planning for our roof, then went up another half a course.
Status Report: Course 13 Completed, 62" From Floor
Day 16
We finally built our first lintel that will go over the small bottle brick window. We also start trying a few methods to get the building more level all the way around.
Status Report: Built Our First Lintel, Half of Course 14 Completed
Day 17
Today we actually leveled and installed the bottle brick window lintel, and experimented even more with filling the bags with different amounts to achieve level.
Status Report: Installed Lintel, Course 14 Completed, 65" From Floor
Day 18
Today was all about using our bags filled at different amounts to finally get level all the way around. It took basically two half courses to get there, but we were really happy with the results.
Status Result: Courses and heights got a little fuzzy here with bags partially full. Let's just say we're up higher.
Day 19
Today we had to take a day off from laying bags to finalize our roof plans, put a parts list together, and get estimates from local suppliers.
Status Report: Roof Plans Finalized, Bids Sent Out for Materials
Day 20
After getting back the bids from roofing material suppliers, we made our decisions and got everything ordered. Oh my goodness!
Then it was up yet another half course of bags to finish out the day.
Status Report: Roofing Materials on Order, Half of Course 15 Completed
Day 22
Once again other duties around the homestead kept us from working on the solar shed all day, but we did manage to get up another half course. And then work on our animal paddock!
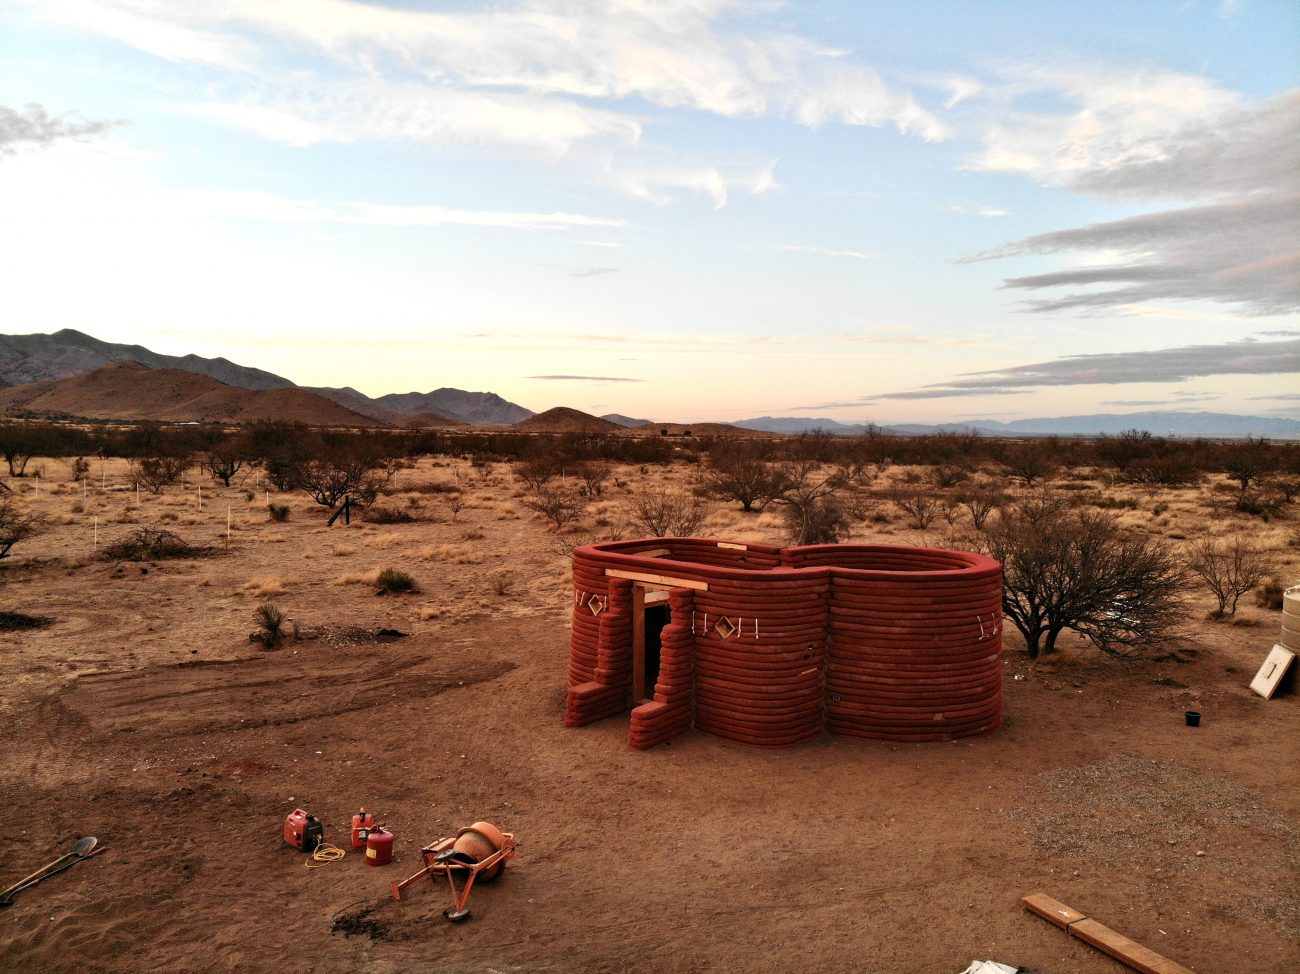
Status Report: Course 15 Completed, 70" From Floor
Day 22
Today was all about adding hurricane strapping to eventually hold our roof down. And going up another course, of course!
We also talked about a few things we would have done differently for next time.
Status Report: Course 16 Completed, 75" From Floor
Day 23
Today was an exciting day. Even though we only went up half a course, we ran our final bag over the arch entryway!
Status Report: Half of Course 16 Completed
Day 24
Today was our Anniversary! We celebrated by heading into town to pickup 7200 watts of solar panels for our solar shed that we got for an amazing deal at SanTan Solar. And of course we got delicious sushi!
Also, we announced our patreon-style membership area, Tiny Shiny Homies!
Status Report: Solar Panels Acquired
Day 25
Today we had to re-build our dirt sifter as it was starting to fall apart. We also braved the insane winds and sprinkling rain and went up another course.
Status Report: Course 17 Completed, 80" From Floor
Day 26
Moving right along, we go up another entire course and are now officially above our windows and doors. Lintels here we come!
Status Report: Course 18 Completed, 84" From Floor
Day 27
We built all our lintels today, but only installed 2 out of 3. Getting them leveled and cleated in took more time than we thought. That's ok, we're getting so close!
Status Report: Lintels Built and 2 Of Three Installed
Day 28
Today we installed our final lintel over the big vista window and go up half a course around the circle building.
We also made an off-the-cuff design decision to not lay anymore bags in the area over the arch entryway.
Status Report: Lintel Installed, Half of Course 19 Completed
Day 29
With the end in sight, we rallied for nearly 100' of earthbag in a day - a course and a half with no doors or windows to break it up. Whew! We were sore all over!
We also research and planed for our mini split air conditioner and installed the necessary PVC sleeves.
Status Report: Course 20 Completed, 96" From Floor, Installed Mini Split PVC Sleeves.
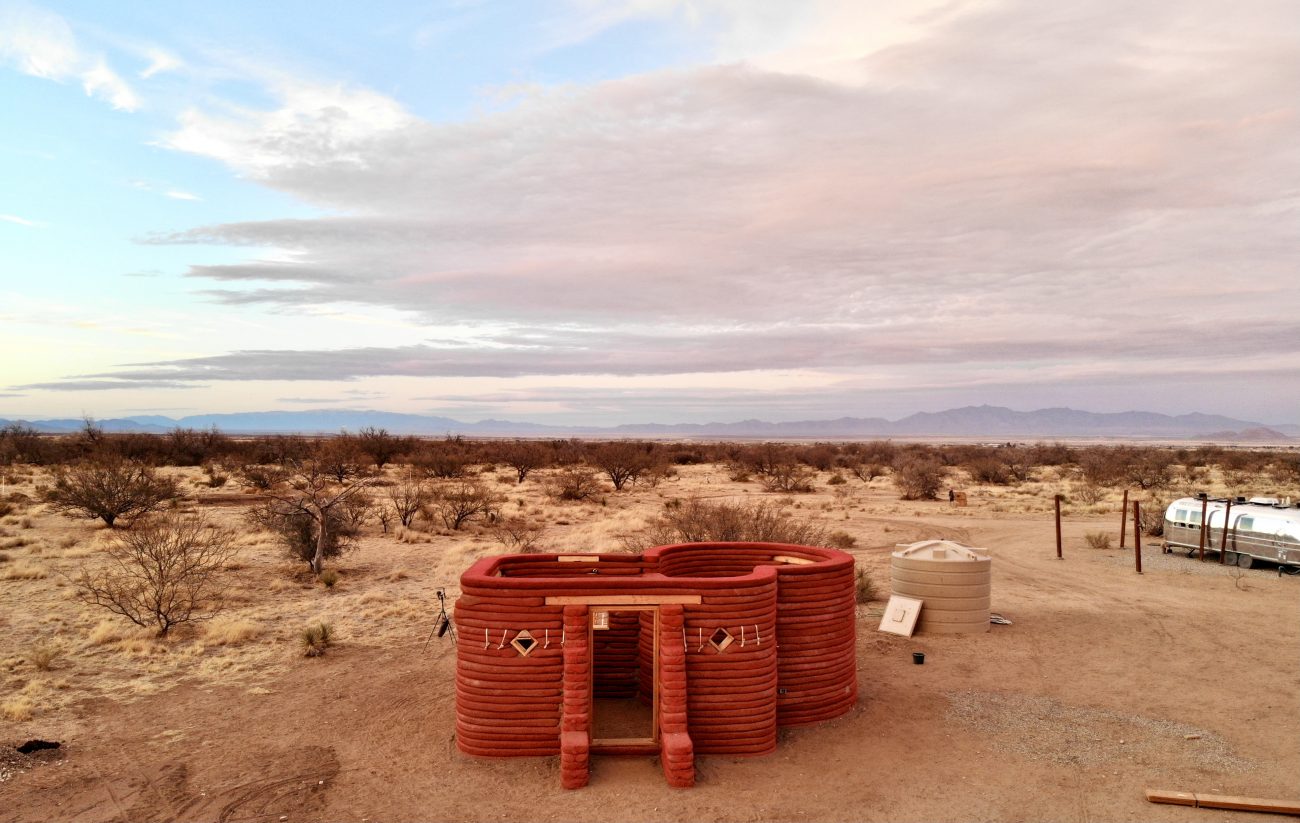
Day 30
We made it! The last day we went up the final full course, bringing the earthbag part of this project to a close.
Status Report: Course 21 Completed, 120" From Floor
Wrapping Up the Solar Shed Challenge
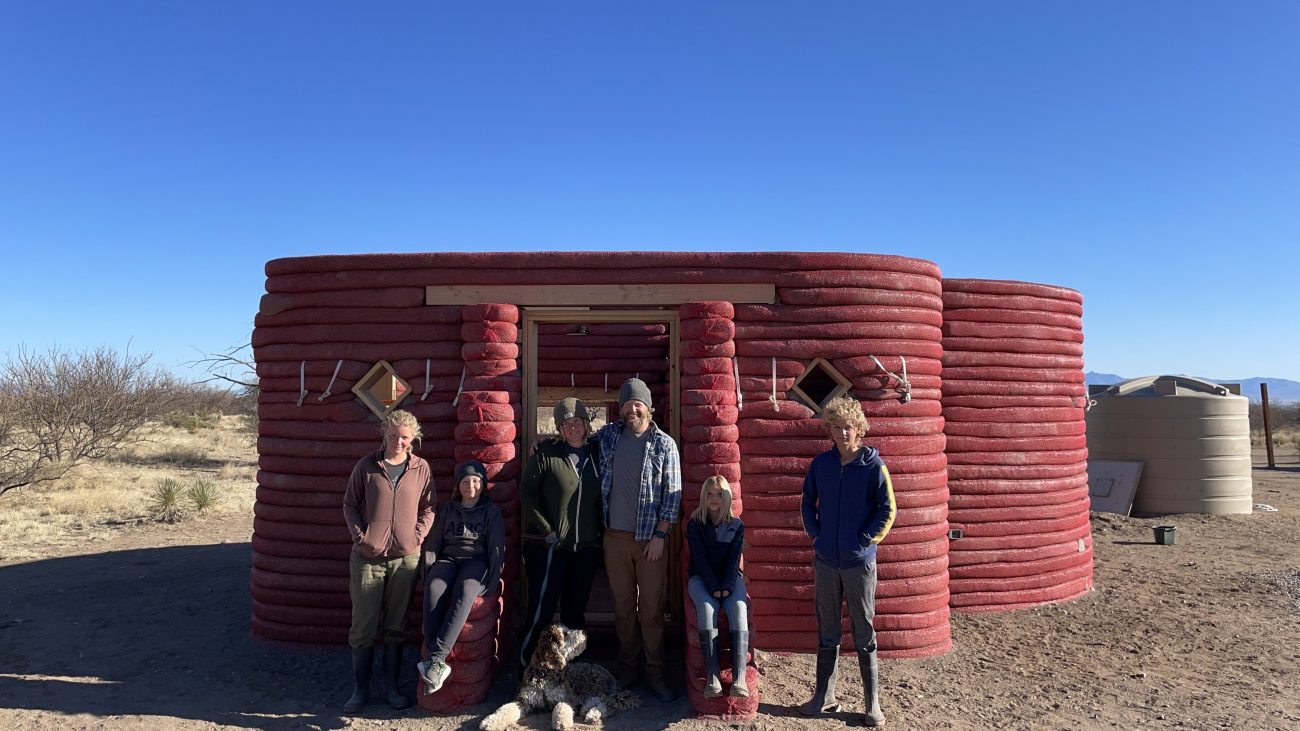
I cannot believe our little family pulled this off. While we didn't get the roof installed or the windows and doors put in, we did manage 30 days of constant work, plus shooting, producing, and editing a video each day. That's 17 courses and nearly 100" tall! I'm so proud of us.
We couldn't have done it without you, though. All your encouraging notes, comments, and support helped us make it through.
Many of you are asking, "what's next?" Glad you asked, because we decided to do another 30 Day Challenge. Let's get this roof on!
Day 31
That's right, we're back for another 30 days of hyperadobe solar shed. Yes we're insane. Today we focused on getting the rough opening window frames built and installed for our clerestory.
Status Report: Built clerestory window frames, installed in place with cleats.
Day 32
With the clerestory windows in place, it was time to start laying bags around them to build up the front of the building.
Status Report: Laid bags between window frames, started on the sides.
Day 33
Today we had to finish building up the bags on the front and side of the clerestory in preparation for a very special guest tomorrow!
Status Report: Finished laying staggered bags down the side to match pitch of roof.
Day 34
Excited to welcome our special guest, Ashley's Dad to the Tiny Shiny Homestead. His building expertise and math ninja skills are going to help us get this roof on quickly and correctly. Today we focused on running string lines, getting measurements, and setting concrete bases for our posts.
Status Report: Picked up Ashley's Dad, ran string lines, dug and concreted in footers for posts.
Day 35
We keep forging ahead with our roof build, readjusting the front beam and setting the back and middle beams in place. It's at this point we realize our change of plans to use one of our 12" tall LVL beams for the back means we need to lay more bags to get the middle beam at the right pitch. Cue a light night bagging session!
Status Report: Front and rear beams in place, added two more earthbag layers for the middle layer.
Day 36
We have rafters! Well, some of them. Finished setting the back LVL beams and started laying rafters.
Status Report: Installed all rear rafters.
Day 37
Our last day with Ashley's Dad so we busted our butts and finished up the front rafters and (gasp) added some decking! Guys, we're getting so freaking close to having a real roof!
Status Report: Installed front rafters and most of decking.
Day 38
After four insane days of roof building with Ashley's Dad it was time to send him home, relax a bit, and finish getting up the decking pieces.
Status Report: Finished installing decking pieces.
Day 39
We finish screwing down the decking on the plywood. We also take a look back at Day 34 working with Ashley's dad to better explain how we are securing the roof. Spoiler Alert - There's been a TON of research go into this roof!
Status Report: Added additional screws to decking. It's firmly locked in place.
Day 40
With the beams and decking in place, it was time to start securing everything. Hurricane straps, rafter ties, and more. Also, more Q&A w/ Jon & Ashley about setting the back beam and adding more bags on Day 35.
Status Report: Hand tightened hurricane straps, screwed in hurricane ties on each rafter.
Day 41
We install LVL supports, tension the hurricane straps, and start installing our facia boards. We also take a look back at day 36 when we started putting on the rafters.
Status Report: Tension hurricane straps, add LVL supports, install front facia boards.
Day 42
Today we install the rear facia boards and do another Q&A sessions about day 37.
Status Report: Install rear facia boards.
Day 43
Time to paint our facia boards, side rafters, and exposed beams!
Status Report: Paint all facia boards and exposed rafters and beams.
Day 44
Today we had grand plans to install our underlayment, but ended up just a bit short on material. Oh well!
Status Report: Hammer stapled most of underlayment onto decking
Day 45
Today we had also had grand plans to finish our underlayment and put on the metal roofing. But our goat decided to have babies instead.
Status Report: Finished underlayment, birthed twin goats.
Day 46
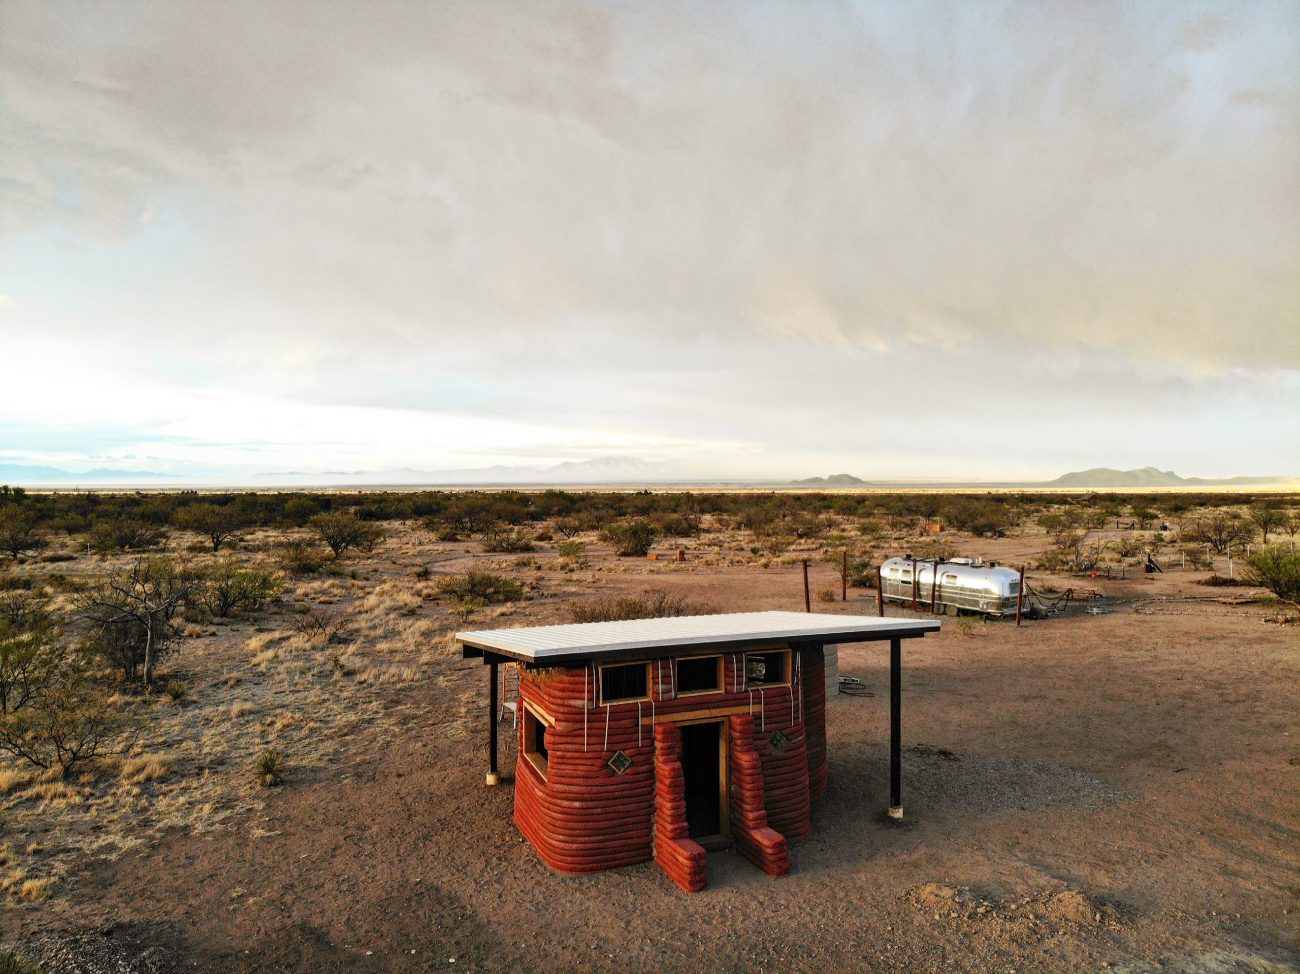
Today we started laying the metal panels on the roof! There were a lot of hurdles to overcome - getting the huge panels up on top, fighting the wind, and generally not knowing what we were doing. Thankfully our neighbor Mike came and helped us out :)
Status Report: Installed all top metal panels on roof.
Day 47
Today we ratcheted all our hurricane straps down, and installed our hurricane ties on the rafters. This was not very exciting, so we also took a minute and answered many of the questions we've been getting over and over again.
Status Report: Tightened hurricane straps, installed hurricane ties, answered all the questions.
Day 48
While the large metal panels went on the roof pretty easily, the trim nearly wrecked us. Words were said, metal was bent, but we pushed through and finished the dang roof. Whew!
Status Report: Finally finished installing all metal trim on roof and didn't get a divorce.
Day 49
With the roof a distance memory, we get to start testing our soil for our cob mixture.
Status Report: Ran some soil tests, mades some cob batch tests.
Day 50
Learned a lot from our first cob mix test, made some adjustments, and started filling in cracks. Also we may have a mud fight.
Status Report: Crack tests.
Day 51
Still working on that cob mix, but decided to try our first bottle brick windows!
Status Report: Completed diamond shaped bottle brick windows.
Day 52
With our small bottle brick windows complete, it was time to tackle the big one. Today we officially started our TopoWindow™ (Topo Chico Bottle Brick Window). That's right, we've named it. This is going to be so cool!
Status Report: Completed first row on the TopoWindow™.
Day 53
Before we could finish our TopoWindow™ we had to cut more bottles. Like, a whole bunch more bottles.
Status Report: Cut remainder of bottles for the TopoWindow™.
Day 54
With all bottles cut, today we finished cobbing the TopoWindow™ !
Status Report: Completed TopoWindow™.
Day 55
Now that all our bottle bricks were done, it was time to focus our attention on the space between the top of the hyperadobe bags and the roof. We started slow, still experimenting without mix and randomly placed bottles to fill the space.
Status Report: Started cobbing up to the roof.
Day 56
We continued to add cob and bottles up to the roof line.
Status Report: More cob, more bottles.
Day 57
We finally started to get in the cob groove, but ran out of bottle bricks! Had to spend time cutting a bunch more.
Status Report: More cob progress, cut more bottle bricks.
Day 58
Today we really clicked into gear on the cob, and got a bunch finished. We're loving how it's turning out!
Status Report: Even more cob progress, getting so close to the roof!
Day 59
Today we experiment with different ways to fill the wall, and get all the cob to roughly the same distance from the rafters.
Status Report: Built up all cob walls within 4 inches of rafters.
Day 60
We made it! The end of our second 30 day challenge. Celebrate with us as we install our first window and look back at how far we've come since Day 1.
Status Report: Installed our first window...nevermind we're taking a long nap!
Wrapping Up the Second Solar Shed Challenge
And somehow we managed to make it through another 30 days! We got the roof on, learned to cob, built our bottle brick windows, and more.
We couldn't have done it without you, though. All your encouraging notes, comments, and support helped us make it through.
"What's next?" you ask? You'll just have to subscribe and follow us to find out :)
Apparel
Grab a fun, comfy t-shirt & help support our family.


About the Author
Jonathan Longnecker is the strongly opinionated tattooed and bearded half of Tiny Shiny Home. He loves making music, figuring out nerdy solutions, exploring the outdoors, and living off-grid.
comments powered by Disqus


