Building a Fast, Reliable Wi-Fi Mesh Network for our Homestead
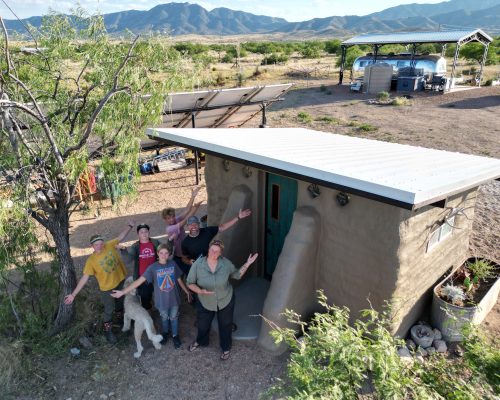
Hi there! Today we’re going to share the process of installing a Wi-Fi Mesh that not only covers our 7 acre homestead, but also puts that fast internet inside multiple buildings made out of metal and 16” thick earthbag walls.
Sections
- Existing Internet Setup
- Goals for New Setup
- Researching Options
- Why We Chose UniFi
- Making a Plan
- Wi-Fi Mesh Setup & Installation
- Problems We Encountered
- How Far Did our Mesh Reach?
- How's it Working?
- Shopping List
- Wiring Guide
Disclaimer: Before we get started, I just want to make sure you know I’m not an IT person, have no background in networking, and not sponsored by any of the companies we’ll talk about in this video. We chose our equipment based on our needs, and we’re just sharing our experience. We hope you find it helpful.
Now let’s talk about our existing setup.
How We Used to Get Internet
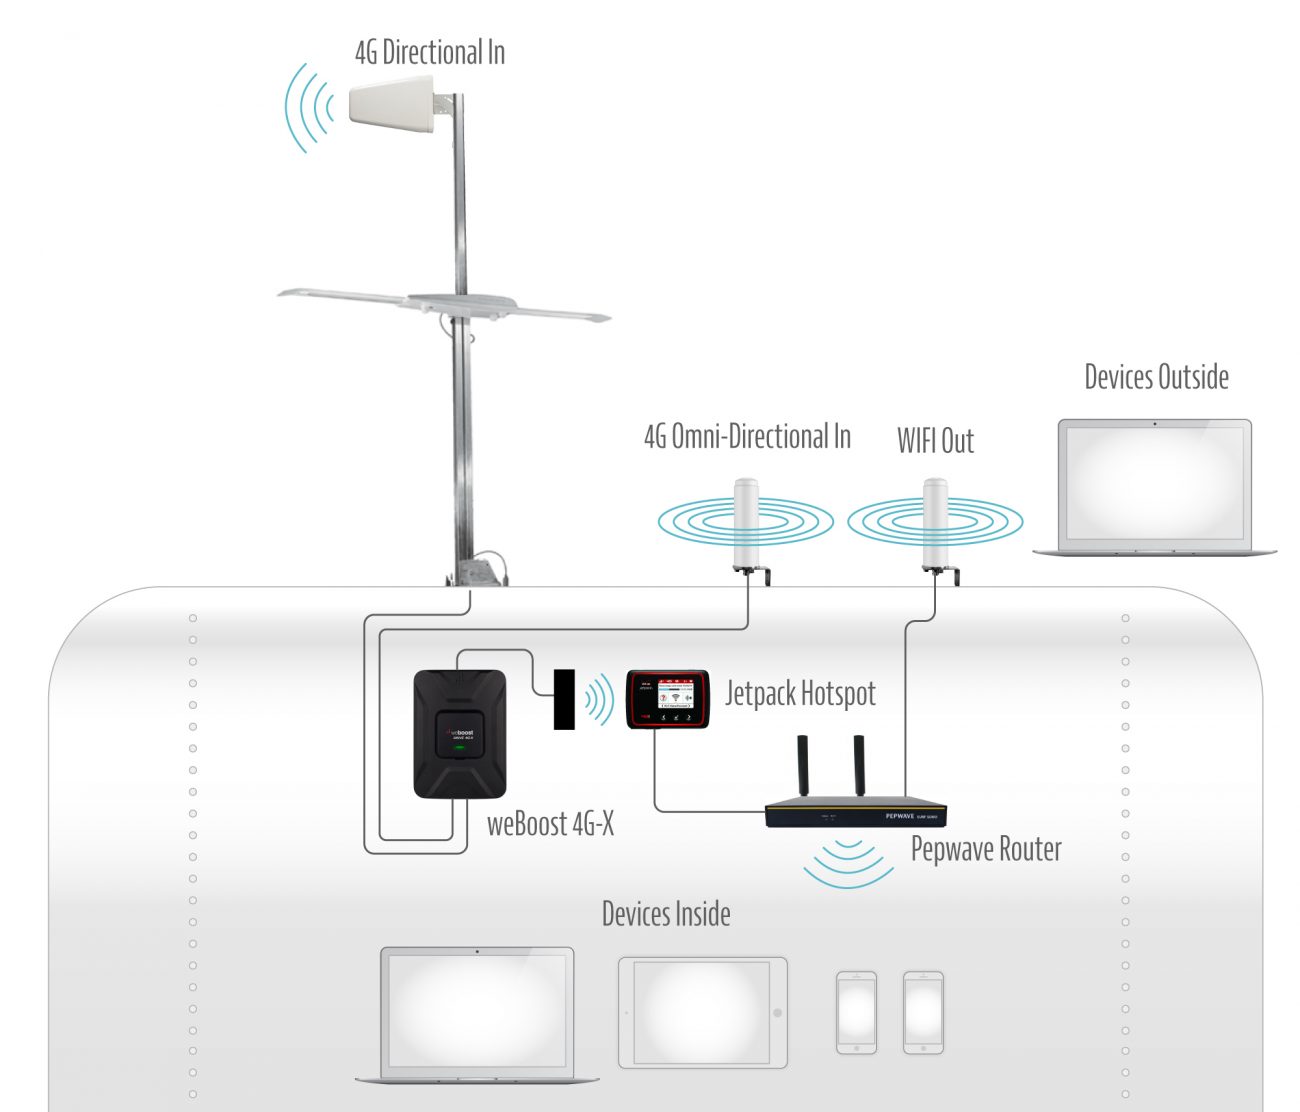
When we moved to our property, we were coming off 5 years of traveling full time in an RV. We spent most of our time camping off-grid and boondocking so we had a cell boosted internet setup that worked so well we just kept it:
But then we built our first building - this earthbag solar shed office - and that’s where our problems started. Now we had two buildings. The office where we did most of our work, and the Airstream where the kids did their school work. We hacked together a solution using the Wi-Fi out antenna of one router to share internet to another router in the Airstream. It kinda worked, but meant we had two separate wifi networks, and it was very unreliable.
It was one of those things were it worked just enough of the time that we kept using it, but the longer we lived here, the more we noticed slowdowns, network managing, and the switch to 5G was making our 4G connection unstable.
Not only that, but since the Wi-Fi was relegated to being inside the two buildings, we were constantly turning off the Wi-Fi on our phones while out working on the property. This meant our batteries didn’t last as long, or we’d get delayed texts, etc…
I knew it was time to level up our network here on the property, but it wasn’t until we ran into a guy marking things on our road that we really started taking it seriously. He told us a grant had been funded, and they were running fiber internet to our “neighborhood.” Crazy, right? We didn’t believe it, but over time they did start running the lines, and now that we were making videos full time this seemed like a no brainer.
Goals for the New Setup
So it was up to me to figure out how to make this work. These were our goals.
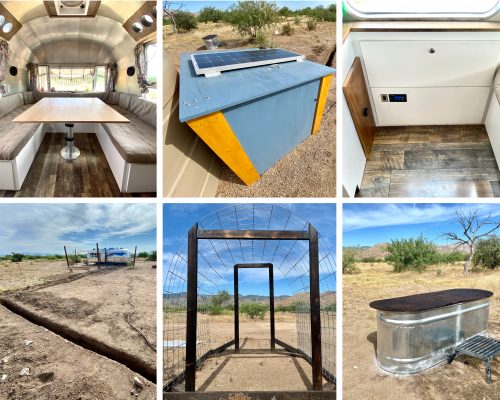
- Same Speeds Everywhere - We needed to have the same internet speeds in multiple buildings AND outside those buildings. Our solar shed office which has 16” earthbag walls, the Airstream which is Aluminum, and this steel goat barn container that we renovated for our daughter.
- Single Network - We also work outside A LOT. I wanted our Wi-Fi to be a single network that we stayed connected to as we walk around the property.
- Simple Setup - Like I mentioned, I’m not an IT person, and knew I would be the one setting up and managing this whole system. So simplicity both in physical setup and software would be important for my sanity.
- Expandability - We’re still building our big hyperadobe roundhouse, and let’s be honest, we live on homestead. We’re always going to be building or working on a new project. So it was important that this system was modular and expandable for different use cases.
- Solid Ecosystem - Besides being expandable, I wanted to be buying into a good ecosystem as well. Like I’d connect things and stuff would work. Adopting new pieces of hardware would be as painless as possible.
- Good Software - Part of that was software, too. With all of our off-grid systems, I’m finding it increasingly important to invest in companies that make good software. Bad software creates critical bugs that can be detrimental on a homestead.
- Fast - Finally I needed hardware that would take advantage of fiber internet speeds. Our current router maxed out at like 120Mbps, and we could get fiber plans up to a 1Gbps. So it was just time to level up.
Download the Wi-Fi Mesh Network Guide
This detailed walk-through, planning, and wiring guide will help you build a fast, reliable UniFi Wi-Fi Meshing Network for your homestead.
Researching Wi-Fi Mesh Options
Like any good homesteader, I started researching. First up was what I call active research. This is when you kind of know what you want, but don’t know how to make it happen. Typing search queries into search engines and websites, watching videos, reading articles, taking notes.
During this initial phase one company came up over and over again for people like me without a lot of networking experience. Ubiquiti - specifically their UniFi line.
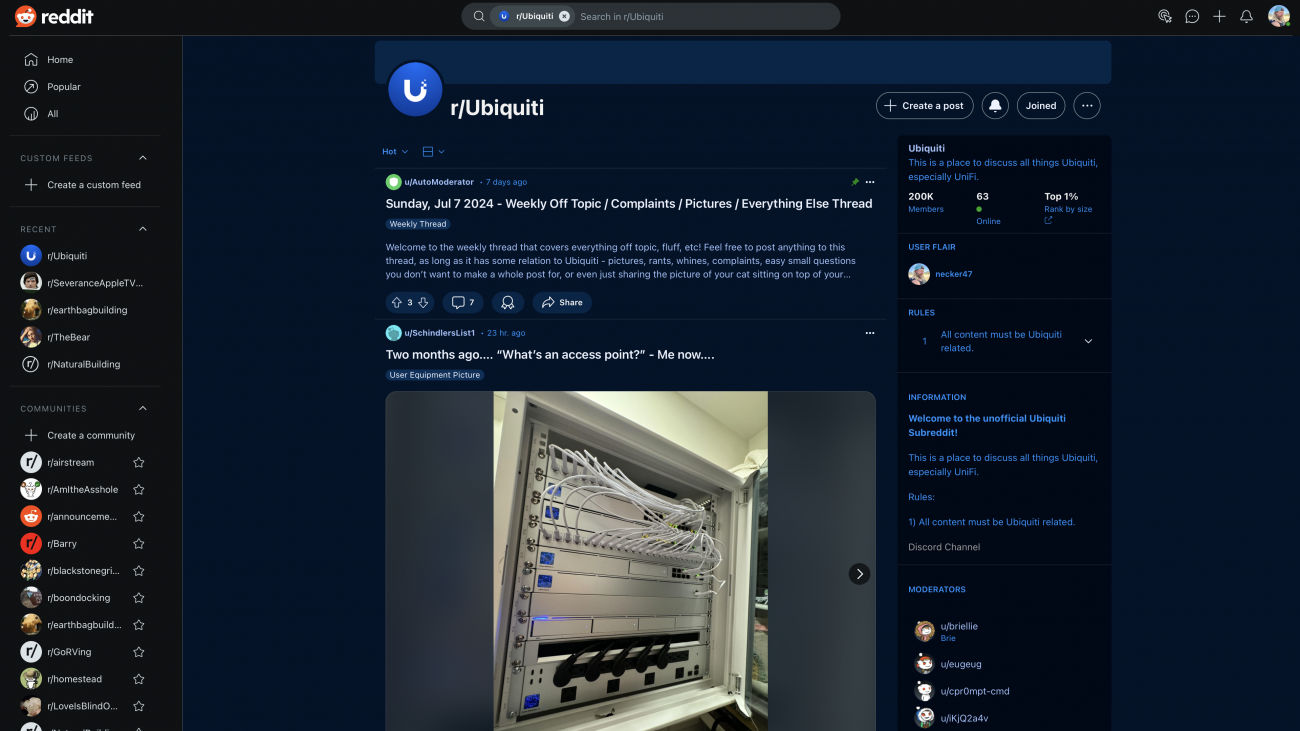
So I started what I call passive research. I joined Facebook groups and subreddits so that as I visited these social networks, I would start seeing conversations about UniFi and home networking in my feed.
Modular networking ecosystems are complicated, so just by reading other people’s problems and solutions and all the comments and advice on each thread I was able to understand so much more about what would work and what wouldn’t.
If you’re researching a topic like this that you’re not familiar with often you don’t even know what to search for. Passive research helped fill in a lot of those gaps for me.
Why We Chose UniFi for Our Homestead Mesh Network
So long story short, we picked UniFi for our homestead network. Like I said, not sponsored - but here’s why we felt like it was the best choice for us.
- The general consensus in the groups was that UniFi was a solid prosumer line of networking gear that worked well together, was fairly easy to setup for novices like me, but could be configured pretty deeply if needed.
- They actively developed their software, had open source repositories so you could use their software on your own hardware if you wanted, and that is a great sign that a company takes their software seriously.
- For me, having a great user interface is also important - if I’m getting frustrated with a bad UI then it’s’ just adding stress to my life. UniFi seemed like they were doing a good job of taking complicated actions, stats, and metrics, and making them easy to understand through design.
- They were all in on PoE, and this really intrigued me. Power over ethernet uses a single cable to not only pass data, but also power. So I knew I’d be installing multiple antennas to mesh around the property, and when you’re off-grid getting power to those antennas is difficult. So the idea of running a single ethernet cable to an antenna made a ton of sense to me.
- Once you buy the hardware, you get the software, and don’t have to pay monthly for it. This is not the case with a lot higher end networking gear nowadays. I appreciated that even if the hardware cost a bit more, the software was included, and constantly updated over time.
- As always we’re looking for companies that are DIY friendly. UniFi’s line of products is so deep and modular - they make a piece of hardware for just about every scenario you could think of - and has a pretty thriving base of users that are both professional and residential. So that was a good sign for me.
- They also had a solid ecosystem in place that we could expand and grow with - stuff like cameras, door entry, etc… I’ll just say we have big plans for our house.
- If I wanted to get deeper, they had options like VLANS for keeping certain Internet of Things (IoT) devices separate, and guest networks for when we have meetups and workshops.
Making a Plan & Understanding The Basic Components of a Unifi System
So now that we had decided on UniFi it was time to start planning our setup, and knowing what pieces of hardware to get. This was the hardest part for me to understand because with every other home networking system I had ever used, all of these things were usually included in a single box or router, and I never had to think about it.
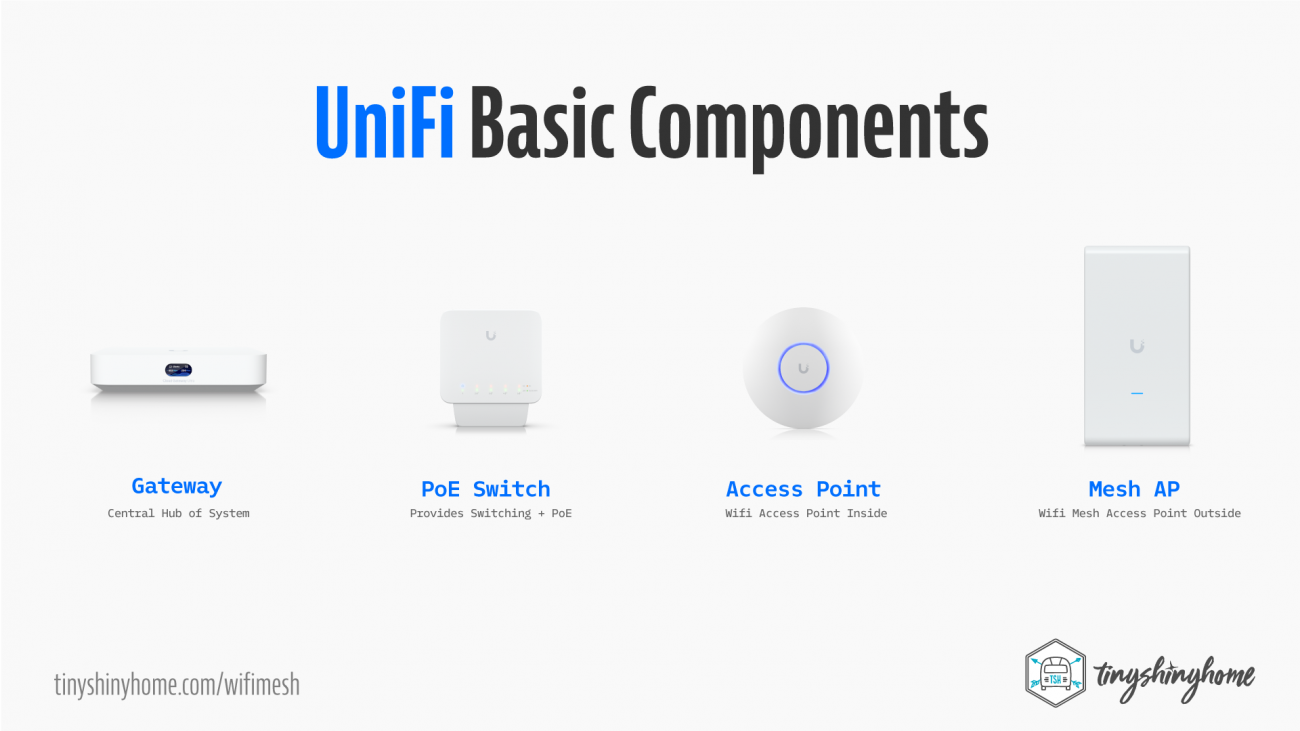
While UniFi does sell some "all-in-one" boxes, I quickly realized that to find the best combination of functionality, price, and expandability I needed to understand how each part worked. Here’s the basic pieces of a UniFi system:
- You need a gateway. This can be your own computer, but the simplest solution is to get one of theirs. The gateway is the sort of the heart and soul of the whole system. It comes with the software that lets everything talk to each other, lets you access online from anywhere in the world, and provides security - it’s how the whole ecosystem works.
- You need some kind of switching. What this means is that there are ethernet ports that you connect different antennas or devices to. While you can get gateways with switching built in, one main reason they’re often separate is the PoE aspect. If you need to power a bunch things on different ports, it makes more sense to have a dedicated device.
- You need an access point (AP). Or in my case multiple access points. These are Wi-Fi antennas that let your devices connect to your Wi-Fi network.
- Not to confuse things, but I also needed special access points that would allow meshing.
Understanding Meshing
Let’s talk about meshing real fast. For those situations where you want to extend your network, but don’t have a way to run physical wire, Wi-Fi meshing is the answer.
The way this works is that the access point has hardware and software that lets it “latch” on to a Wi-Fi signal from another antenna, send it to a switch, and distribute it back out through other access points. Also it can beam that Wi-Fi signal back out and make the radius of the first meshing antenna even larger.
So the goal is to be connected to the same Wi-Fi network as I walk around the property and enter buildings, having my device automatically jump between each access point depending on which has the strongest signal. Now let's see how we set it up.
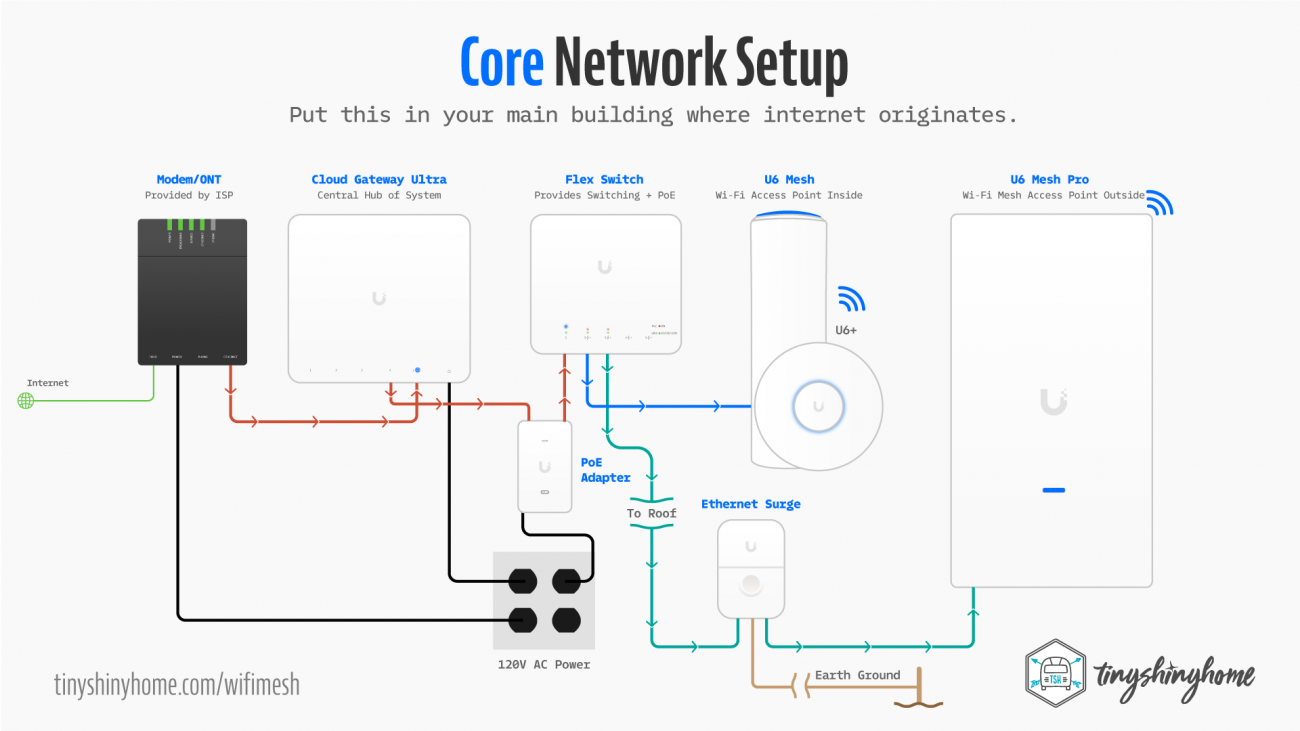
Wi-Fi Mesh Network Setup & Installation
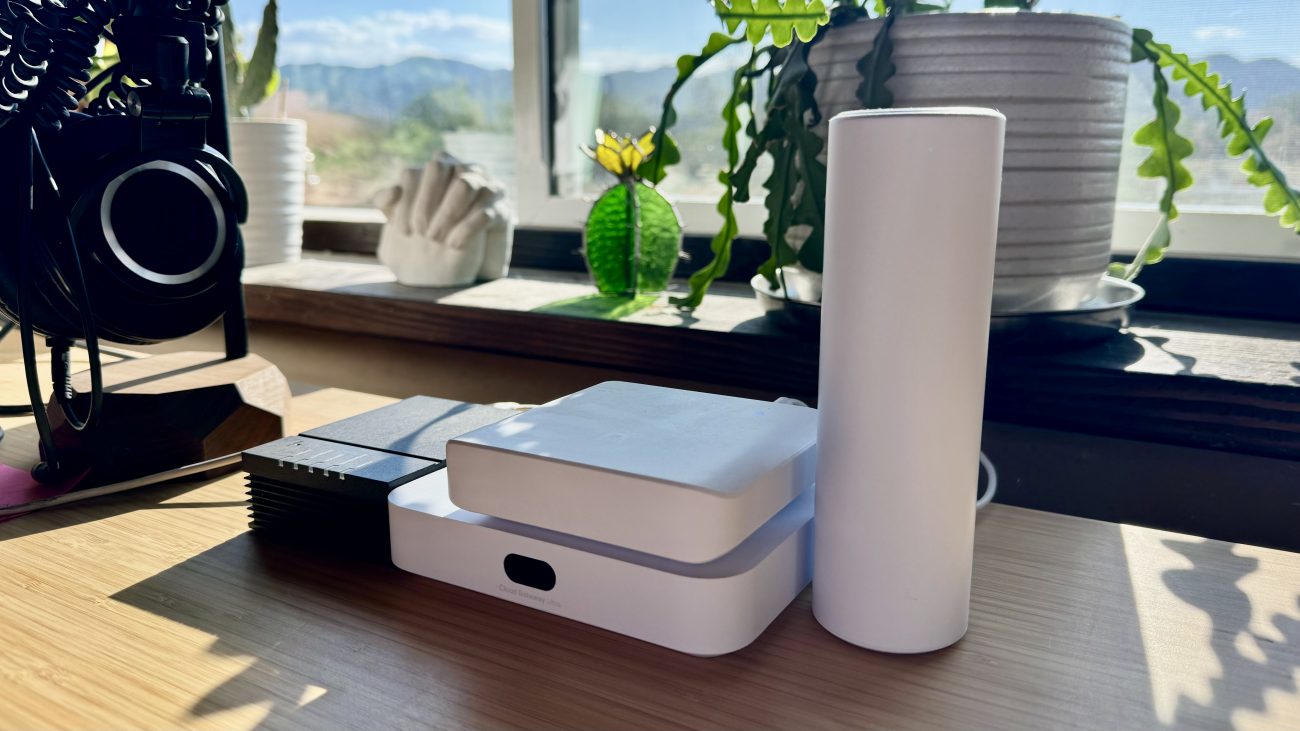
We started with our gateway, and we went with the Cloud Gateway Ultra. It’s considered a starter device for sure, but it was powerful enough to run 1gbps speeds, manage 30 UniFi Devices and 300 clients. Plus it sat nicely on the desk in the shed and didn’t require me to go down the route of a whole rack install. That’s for the house. Keeping it simple for now.
You plug an ethernet cable from your modem or ONT right into this device, and then download the UniFi App on your phone. Once I did that, the app was was able to discover the UCG-Ultra I got my unifi account setup, the gateway provisioned, and my wifi network created.
Now remember, this particular gateway didn’t have an access point built in. It also didn’t have PoE. I’ll pause to say you can buy gateways that have all those built in, but there are tradeoffs like price, slower speeds, not enough PoE ports, needing to go with a full rack install. Like I said, there are a lot of ways to do this. This is just what made the most sense for us.
In order to distribute the internet via Wi-Fi to the inside of the shed, and outside the shed to everything else, I needed access points, but also a way to power them via PoE.
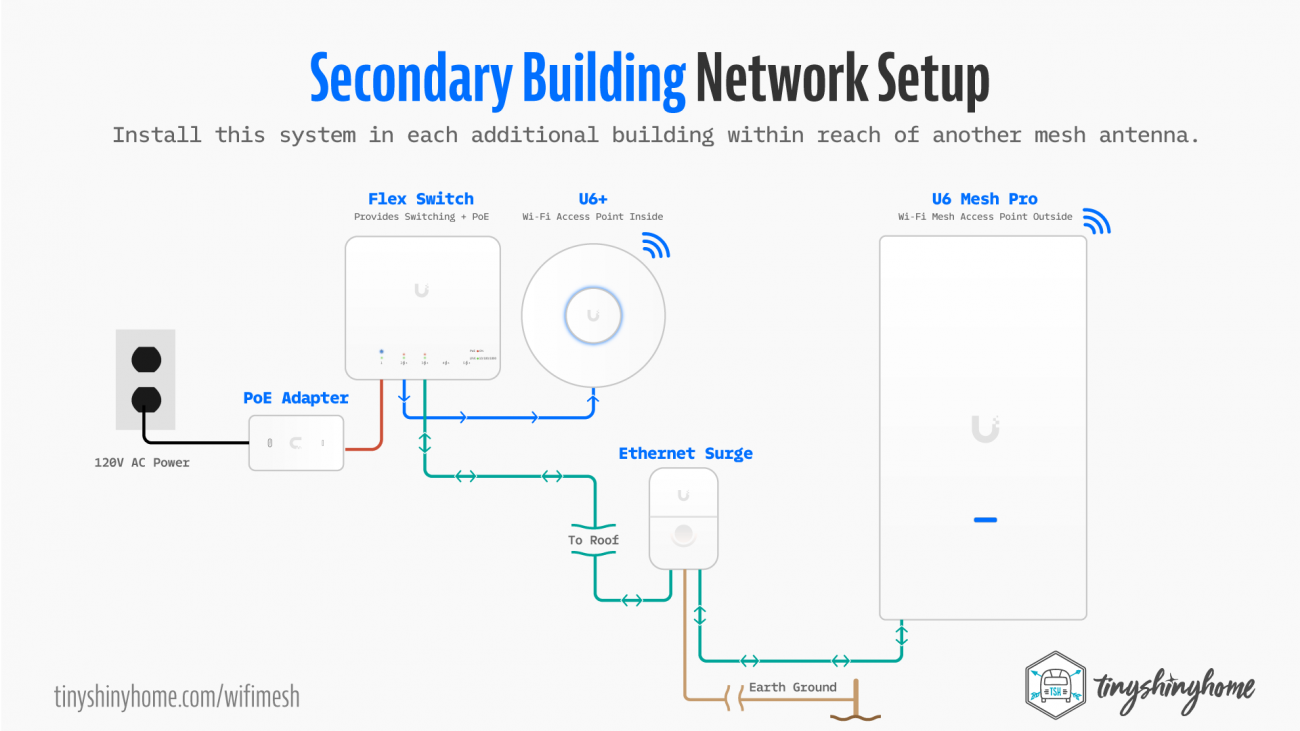
So I started with the Flex Switch. It was small and cheap, and had 5 ports and 46w of total power.
Now the tricky part with the flex is that it’s kind of made to be powered by PoE. So it doesn’t have a traditional power port. You have to get a PoE adapter which is just a little box with an ethernet in, ethernet out and an AC plug.
With the switch powered, I could connect my AP’s. Inside I could have used pretty much any of Unifi’s AP’s in such a small space, but went with the U6 Mesh so I could set it on the desk and not have to install one of the discs on the ceiling or wall. This connected to the switch with a single ethernet patch cable.
Then comes the fun part. Meshing to the rest of the property. I needed the most powerful outdoor mesh antenna they had so I went with the U6 Mesh Pro. It was weatherproof, had versatile mounting options, and gigabit speeds. It also said 2,000 square feet of coverage. We’ll see how that actually worked out.
So out of the Flex Switch we ran a very long shielded outdoor cable out our wire chase, under the eaves, and to the East side of the Solar Shed roof. We also put in an Ethernet Surge Protector with a drain wire down to our grounding rod. At the end of the day it’s not going to stop a direct strike, but should help a bit with static charges in the air.
With both AP’s connected to the switch, I went back into the app and began to “adopt” the new hardware. This should be a painless process, you just tap the button, give it a few minutes while it updates and sets stuff up, and then you’ve got a Wi-Fi network to connect.
When this works, it’s magic, and the reason I went with UniFi. It wasn’t always the case for me, though. I’ll get to that in a few minutes.
At this point we were setup inside the shed and outside the shed for about for decent distance in all directions. Pretty good! Now we just had to get that internet into our other buildings - which of course were both totally different.
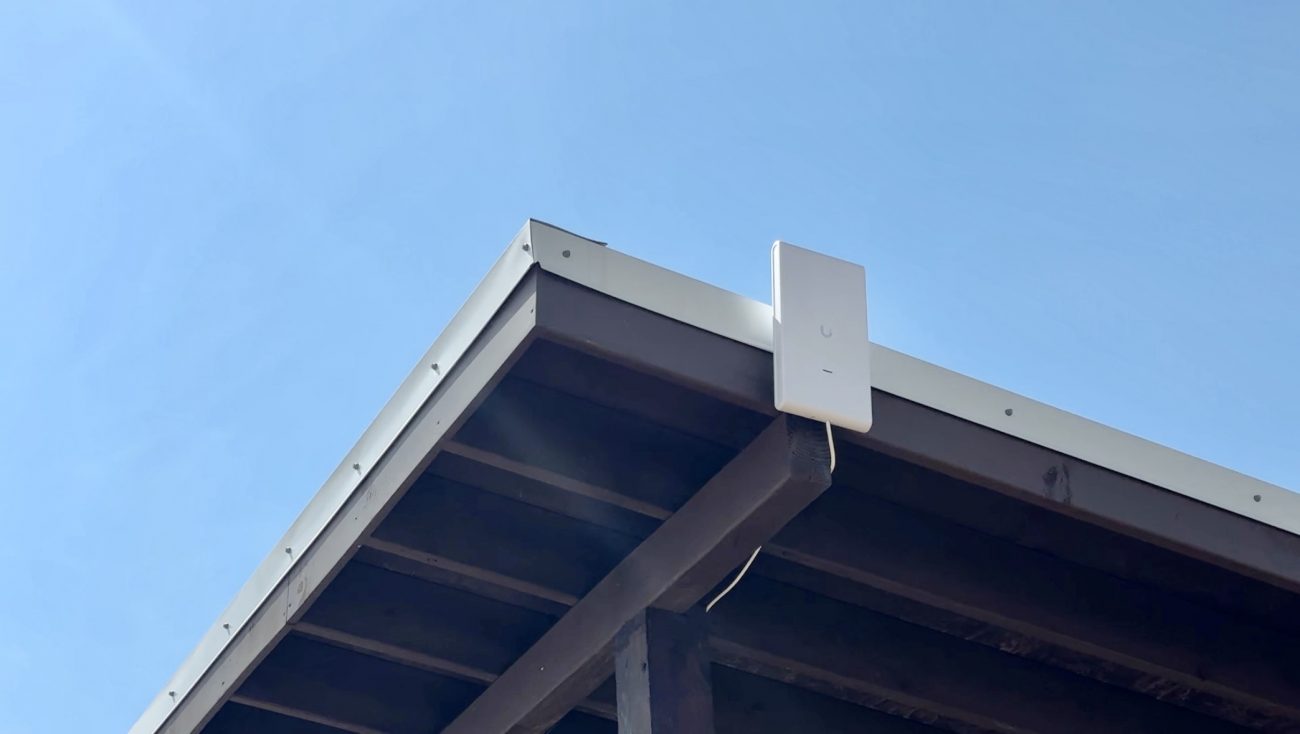
First up was the Airstream. It was under this awesome metal truss cover which I knew would allow me to get the second U6 Mesh Pro up as high as possible and pointed back towards the first U6 Mesh Pro at the Solar Shed.
The most difficult part of this install was figuring out how to get the wire from the antenna along the cover and down into the Airstream without adding new holes. I also added another Ethernet Surge Protector here and drain wire down to the grounding rod for this building.
Long story short, I figured it out, and pulled the single outdoor ethernet cable up to our networking area in the trailer.
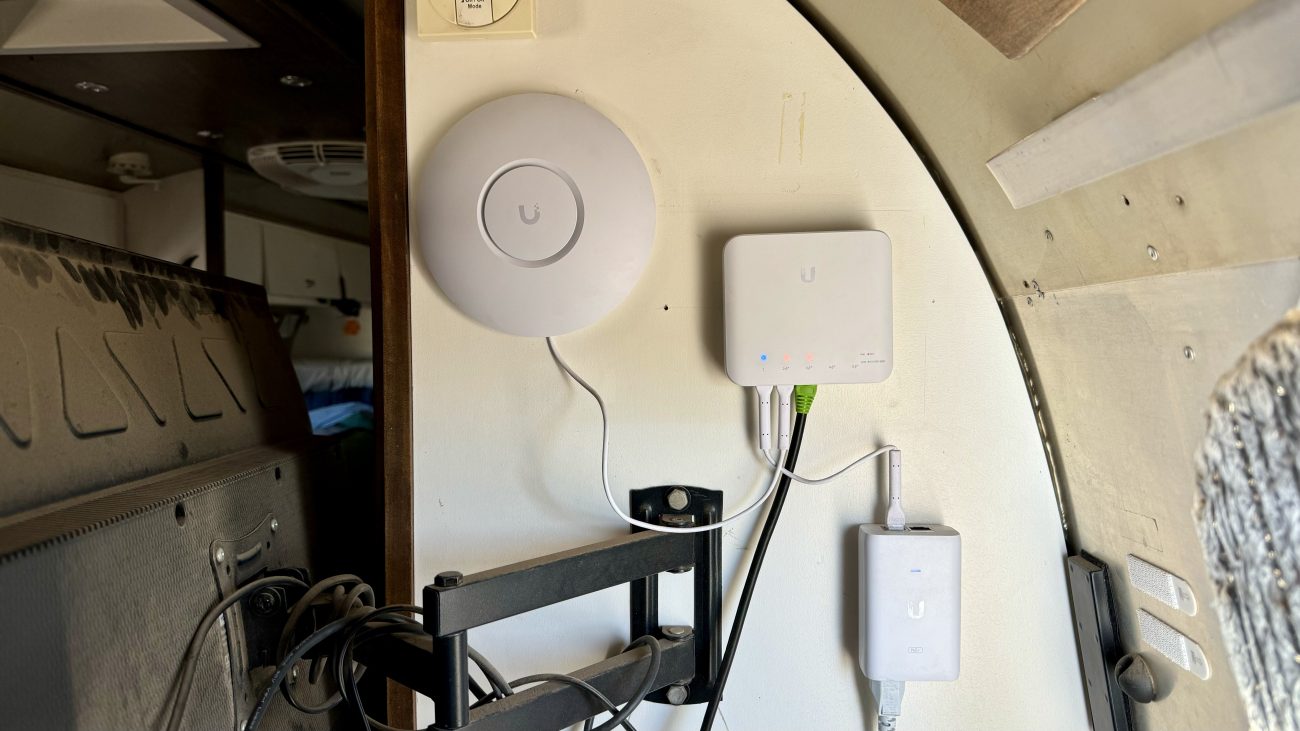
The U6 Mesh Pro then connected to another Flex Switch that we mounted to the wall also powered by the PoE adapter, and a U6+ was mounted to the wall to provide wireless signal inside the trailer.
Once this was all connected I powered on the Switch, and waited for the new devices to show up to be adopted. A few taps later, the U6 Mesh Pro on the Airstream cover roof was pulling internet from the U6 Mesh Pro on the Solar Shed roof and distributing back outside the Airstream and inside via the U6+ on the inside of the Airstream. Sweet.
Finally it was time to replicate the same setup inside our Goat Barn Container. Not only did we have a nice new 3,000 Watt Victron solar system we wanted to get connected to the internet to monitor, but we were hoping this would extend the Wi-Fi signal all the way down to the front gate so we could level up our new Ghost Controls Gate Opener with their Multi-Connect Module.
I mounted the 3rd U6 Mesh Pro to the Goat Barn where we had already drilled a hole in the container, and ran the last outdoor ethernet cable to the antenna. We also installed the Ethernet Surge Protector for this one, but instead of running a drain wire we grounded it directly to the container through the back plate we had already grounded the container itself.
Inside guess what? Another Flex Switch and U6+. Same process, once the switch was powered and the antennas booted up they were seen by the system, adopted, and magically everything was meshing. I was getting the same speeds inside the metal Goat Barn Container nearly 200' away as I was inside the Solar Shed near the source of the fiber installation.
Not only was it fast inside, but location of the Goat Barn got our Wi-Fi signal all the way down to the front gate. Perfect!
Ok well it wasn’t all perfect. Here are some problems I ran into.
Problems
The first big problem was that I actually couldn’t adopt any of my U6 Mesh Pro antennas. They just kept failing. Being new to the UniFi system I had no idea what to do. I went to bed the first night pretty disappointed because if I couldn’t get the main meshing antenna to work, then none of the other stuff would work.
Turns out, apparently this mesh antenna was brand new, and the networking software inside the gateway didn’t have the latest update to be able to adopt them yet. By default, the gateway is set to run updates on everything overnight, so the next morning it magically worked the way it was supposed to.
The second big problem was my cable from my U6 Mesh Pro on the Airstream Cover to the gear inside the trailer. I don’t know if I damaged it when puling through the holes in the Airstream or what, but it would only allow FE or fast ethernet speeds and was capping everything at about 100Mbps. Still pretty fast, but when you have so many kids with devices inside there I didn’t want it being restricted.
I ordered another one, did the whole mounting/reattaching thing again, and got full speeds there, too.
One final bit of setup issue was having to manually tell some of the access points not to mesh. We wanted the ones mounted to the outside of the buildings to mesh, but not the inside ones. This would start to create interference loops and slowdowns if everything was meshing all the time. Thankfully the control panel made this pretty easy as it’s just a software setting for each device.
Other than that, installing the Ethernet Surge Protectors was just a huge pain. Mounting to wood and metal was super fiddly, and of course running ground wires and digging up my ground rods was no fun.
How Far Did Our Mesh Reach?
This was the biggest question I had going into this. 2,000 square feet really isn’t that big from a circular perspective, and I was worried that my meshing antennas would be too far apart.
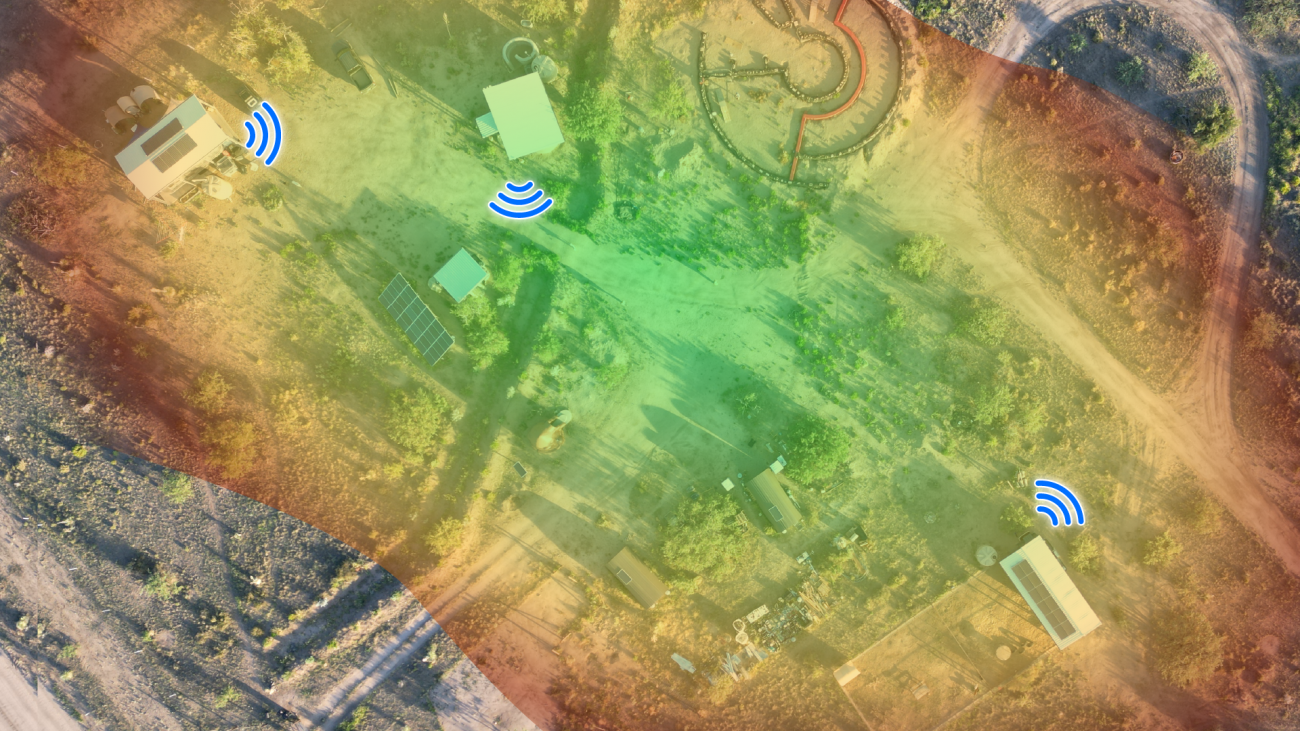
From the main antenna on the Solar Shed to the Airstream Cover is about 100ft. They are kind of pointed away from each other, and part of the roof is in the way, but I’d say we get 90% throughput.
The Goat Barn antenna, though farther away at 215’, fares much better because the Solar Shed antenna is pointed right towards it, and there aren’t any obstacles. Funny enough, the Goat Barn part of this was kind of last minute, but it really ended up being at the perfect central location.
With the Solar Shed antenna and Goat Barn antenna we have Wi-Fi over 500’ down to the front gate, and covering the majority of the property.
After seeing so many people online saying I’d only get a couple hundred feet out of these, I think it’s important to note that most folks are probably installing these in densely populated areas. For us, with wide open spaces and virtually zero obstacles we really were able to take full advantage of the distance these could mesh.
Also I have to say that I poured over the antenna patterns on UniFi’s site, and just couldn’t really make sense of them. So my drawing here is just showing where my signal reaches based on me walking around and doing speed tests. Not super scientific, but hopefully real world enough to be helpful.
How's It Working Out?
We’ve been running this setup for over a month now, and overall I’d say that the “it just works” promise of UniFi was pretty on point. Similar to our Victron power systems, once it was properly setup it has just been humming away in the background, doing its thing.
Sadly no one in the family has been like, “Wow, Dad the internet is so fast and stable now, you rock!” They’re just like…"Yeah it works like it’s supposed to. Cool."
Really though, those are the best kind of installs on a homestead. When what you did improves your quality of life, and you don’t have to think about it anymore. It just does it’s thing in the background, stable solid, and reliable. That’s the goal.
Just a couple of fun extra things I’ve noticed.
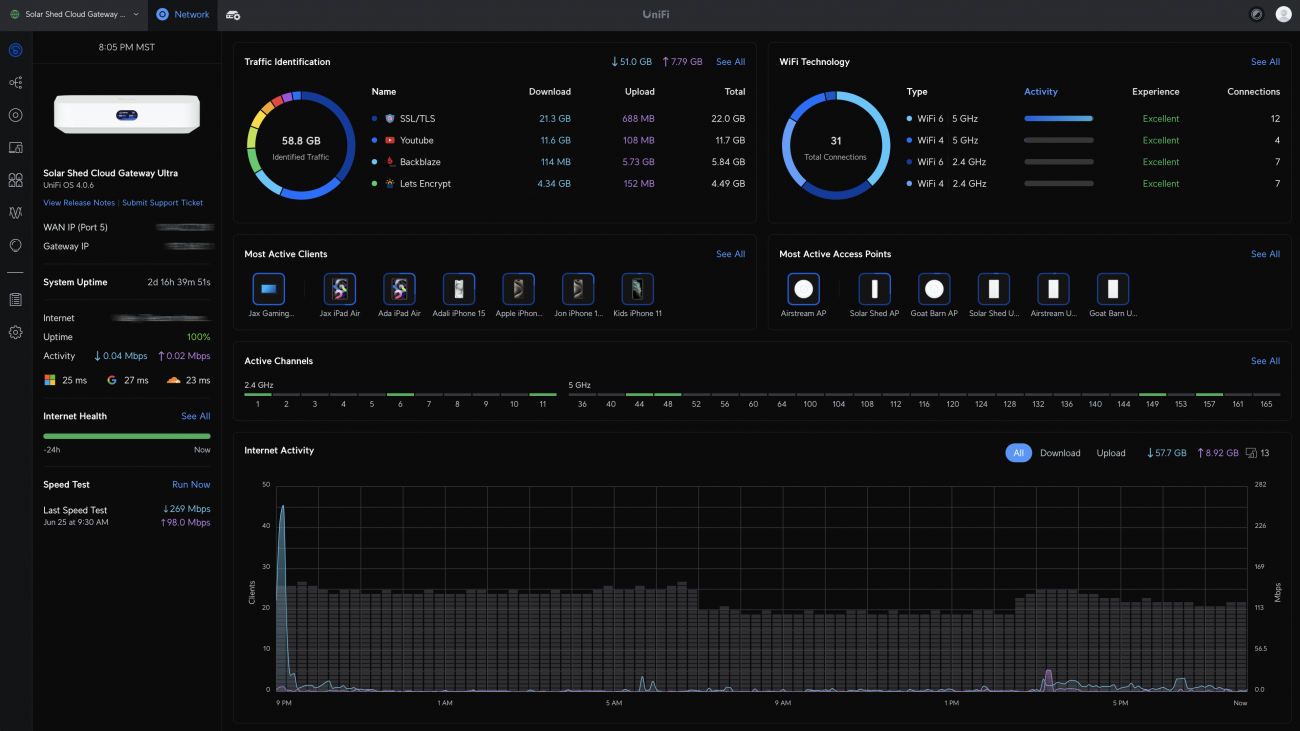
- The control panel and dashboard really are great. They give you so much information, and present it in a really clear and easy to understand way. I’m learning so much about networking just from their graphs, tables, and data.
- The Topology map is a unique visual way to see how things are connecting to your network, especially if you’re doing a lot of meshing like I am.
- Yes everything is configurable, even the icons and names of devices connected. So you can easily see at a glance who’s connected and where in a way that makes sense to you.
- And that’s just scratching the surface. There’s the ability to create multiple networks and firewalls, turn on various security and filtering, add backup failover internet sources, view details of traffic to various sites and which devices accessed them, and so much more. Sometimes I get a little overwhelmed looking at it. In a good way.
Shopping List
Cloud Gateway Ultra ($129)
UniFi sells quite a few different gateways, but I’ve found the Cloud Gateway Ultra to be great for small tabletop installations and medium sized homestead networks when paired with the right PoE Switches and AP’s.
Flex Switch ($99) x3
For my install I needed a PoE switch in each building to power my antennas. The Flex Switch was the right size for us, but if you need to make more connections UniFi makes a ton of different switches in every size and power capacity you could think of.
PoE+ Adapter ($15) x 3
The Flex Switch needs a PoE+ Adapter to get power if you’re not powering it via a PoE cable from another bigger switch. Many of UniFi’s other large, more expensive switches do have a more traditional power supply included.
U6 Mesh ($179)
I bought a U6 Mesh to take up as little space as possible on our desk in the shed. Feel free to use the U6+ or similar if you’re ok with mounting to the ceiling or wall.
U6+ ($129) x2
We went with this the U6+ for inside the other buildings. Similar to the other products in the UniFi line, they sell like 8 versions of this antenna with varying power, coverage area, bandwidth and speeds. Our buildings were tiny so we went with the cheapest one.
U6 Mesh Pro ($199) x3
We were looking for max square footage so we went with the U6 Mesh Pro for our outside antennas. UniFi makes several outdoor rated mesh antennas with different specs. They also make point to point antenna sets to “beam” the signal and nearly full speeds for very long distances. We almost used this to feed the Airstream until we realized it would be better to mesh and provide signal outside the buildings as well.
Ethernet Surge Protector ($12.50) x3
Jury’s still out on how important these are, but the Ethernet Surge Protector is relatively cheap, and as we’ve learned -lightning can be erratic. A little extra protection never hurts. Use one for each external antenna.
Outdoor Rated Networking Cables
Using quality waterproof, UV rated and shielded cables for outside antenna runs is important. UniFi actually makes some really nice ones, though they only make them up to 26ft. We had to use these 3rd party ones for our longer runs.
- 1m ($4) x 4
- 2m ($5) x 2
- 5m ($8) x 2
- 50ft ($20) x 1
- 30ft ($20) x 1
Short Patch Cables
And of course you’ll need lots of shorter patch cables to connect all your gear together. To keep my life simple I ordered all these from Unifi, but you can obviously get Cat6 cables anywhere.
- .1m ($2) x 4
- .3m ($2.20) x 4
- 1m ($2.60) x 2
Wire Clips
Finally, if you want a nice clean install, you should have some wire clips on hand. We bought several types as we had multiple materials to connect things to (i.e. wood, metal, etc..).
Total
So for my install I spent about $1,700 including all the cables and accessories. Each building added about $550 to the total.
Wiring Guide & Wrap Up
Oh my goodness friends, we feel like we’ve covered so much, but if you still have questions feel free to leave a comment, and we’ll do our best to answer.
And if you’re looking to do something similar on your own property, and want to say thanks for this video, we’ve created a PDF guide of our setup with wiring diagrams and a shopping list to get you started.
Download the Wi-Fi Mesh Network Guide
This detailed walk-through, planning, and wiring guide will help you build a fast, reliable UniFi Wi-Fi Meshing Network for your homestead.
As always we’re just getting started here on our off-grid homestead, - make sure you’re subscribed so you don’t miss the next project. Until next time!
Apparel
Grab a fun, comfy t-shirt & help support our family.


About the Author
Jonathan Longnecker is the strongly opinionated tattooed and bearded half of Tiny Shiny Home. He loves making music, figuring out nerdy solutions, exploring the outdoors, and living off-grid.
comments powered by Disqus